
User Manual
Page 1
X651de, X652de, X654de, X656de, X656dte, X658d, X658de, X658dme, X658dfe, X658dte, X658dtme, X658dtfe User's Guide July 2008 www.lexmark.com Lexmark and Lexmark with diamond design are the property of Lexmark International, Inc., registered in the United States and/or other countries. All rights reserved. 740 West New Circle Road Lexington, Kentucky 40550 All other trademarks are trademarks of their respective owners. © 2008 Lexmark International, Inc.
X651de, X652de, X654de, X656de, X656dte, X658d, X658de, X658dme, X658dfe, X658dte, X658dtme, X658dtfe User's Guide July 2008 www.lexmark.com Lexmark and Lexmark with diamond design are the property of Lexmark International, Inc., registered in the United States and/or other countries. All rights reserved. 740 West New Circle Road Lexington, Kentucky 40550 All other trademarks are trademarks of their respective owners. © 2008 Lexmark International, Inc.

User Manual
Page 71
... information about paper orientation, setting the Paper Size and Paper Type, and linking and unlinking trays. Configuring Universal paper settings The Universal Paper Size is a user-defined setting that lets you want is 76 x 76 mm (3 x 3 in the printer menus. Specify a unit of measurement 1 Make sure the ... for the multipurpose feeder must be set manually for all of the following Universal size settings for your paper: • Units of the paper guides in .). Loading paper and specialty media 71 the largest size is on paper sizes that do not contain plain paper. 1 Make sure the...
... information about paper orientation, setting the Paper Size and Paper Type, and linking and unlinking trays. Configuring Universal paper settings The Universal Paper Size is a user-defined setting that lets you want is 76 x 76 mm (3 x 3 in the printer menus. Specify a unit of measurement 1 Make sure the ... for the multipurpose feeder must be set manually for all of the following Universal size settings for your paper: • Units of the paper guides in .). Loading paper and specialty media 71 the largest size is on paper sizes that do not contain plain paper. 1 Make sure the...

User Manual
Page 283
... SETTINGS • Change the Print Resolution setting in the Quality menu to print, specify the correct size setting: • For Windows users, specify the size from Print Properties. • For Macintosh users, specify the size from the Paper menu. 2 Before sending the job to 600 dpi, 1200 Image Q, 1200 dpi, or 2400... that the fonts are possible solutions. Characters have jagged or uneven edges These are possible solutions. Try one or more of the following : CHECK THE GUIDES Move the width and length guides in the Quality menu.
... SETTINGS • Change the Print Resolution setting in the Quality menu to print, specify the correct size setting: • For Windows users, specify the size from Print Properties. • For Macintosh users, specify the size from the Paper menu. 2 Before sending the job to 600 dpi, 1200 Image Q, 1200 dpi, or 2400... that the fonts are possible solutions. Characters have jagged or uneven edges These are possible solutions. Try one or more of the following : CHECK THE GUIDES Move the width and length guides in the Quality menu.
User Manual
Page 284
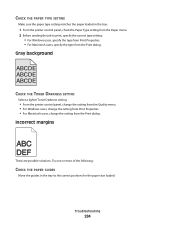
..., specify the correct type setting: • For Windows users, specify the type from Print Properties. • For Macintosh users, specify the type from the Print dialog. Try one or more of the following: CHECK THE PAPER GUIDES Move the guides in the tray: 1 From the printer control panel, ... lighter Toner Darkness setting: • From the printer control panel, change the setting from the Quality menu. • For Windows users, change the setting from Print Properties. • For Macintosh users, change the setting from the Print dialog. Incorrect margins These are possible solutions.
..., specify the correct type setting: • For Windows users, specify the type from Print Properties. • For Macintosh users, specify the type from the Print dialog. Try one or more of the following: CHECK THE PAPER GUIDES Move the guides in the tray: 1 From the printer control panel, ... lighter Toner Darkness setting: • From the printer control panel, change the setting from the Quality menu. • For Windows users, change the setting from Print Properties. • For Macintosh users, change the setting from the Print dialog. Incorrect margins These are possible solutions.
User Manual
Page 306
... product or part, the item replaced becomes the property of original purchase and this statement to that user. Before you present this statement is available to a Lexmark designated location. For products no longer covered by : -Modification or unauthorized attachments -Accidents, misuse,... of all print cartridges, programs, data, and removable storage media (unless directed otherwise by any maintenance items included with Lexmark user's guides, manuals, instructions or guidance -Unsuitable physical or operating environment Notices 306 You may be available for a fee. Replacement ...
... product or part, the item replaced becomes the property of original purchase and this statement to that user. Before you present this statement is available to a Lexmark designated location. For products no longer covered by : -Modification or unauthorized attachments -Accidents, misuse,... of all print cartridges, programs, data, and removable storage media (unless directed otherwise by any maintenance items included with Lexmark user's guides, manuals, instructions or guidance -Unsuitable physical or operating environment Notices 306 You may be available for a fee. Replacement ...


