Embedded Web Server Administrator's Guide
Page 3
... wiping...23 Encrypting the hard disk ...24 Configuring security audit log settings ...25 Configuring 802.1x authentication ...26 Setting up SNMP ...27 Enabling the security reset jumper ...28 Contents 3
... wiping...23 Encrypting the hard disk ...24 Configuring security audit log settings ...25 Configuring 802.1x authentication ...26 Setting up SNMP ...27 Enabling the security reset jumper ...28 Contents 3
Embedded Web Server Administrator's Guide
Page 13
... printer from the selected device. • Click View File to view the Kerberos configuration file for the selected device. • Click Test Setup to reset the fields and start again. Using security features in the KDC Port field. 5 Type the realm (or domain) used , uploading or re-submitting... 5. 3 Click Browse to find and select the krb5.conf file. 4 Click Submit to upload the krb5.conf file to the selected device, or Reset Form to handle all such requests. Configuring Kerberos 5 for use with LDAP+GSSAPI Though it is functional. Creating a simple Kerberos configuration file 1 From ...
... printer from the selected device. • Click View File to view the Kerberos configuration file for the selected device. • Click Test Setup to reset the fields and start again. Using security features in the KDC Port field. 5 Type the realm (or domain) used , uploading or re-submitting... 5. 3 Click Browse to find and select the krb5.conf file. 4 Click Submit to upload the krb5.conf file to the selected device, or Reset Form to handle all such requests. Configuring Kerberos 5 for use with LDAP+GSSAPI Though it is functional. Creating a simple Kerberos configuration file 1 From ...

Embedded Web Server Administrator's Guide
Page 14
..., or set to use the "Install auth keys" link to browse to the file containing the NTP authentication credentials. 7 Click Submit to save changes, or Reset Form to Settings ª Security ª Set Date and Time. 2 To manage the settings manually, type the correct date and time in YYYY-MM-DD...
..., or set to use the "Install auth keys" link to browse to the file containing the NTP authentication credentials. 7 Click Submit to save changes, or Reset Form to Settings ª Security ª Set Date and Time. 2 To manage the settings manually, type the correct date and time in YYYY-MM-DD...
Embedded Web Server Administrator's Guide
Page 16
...cancel all changes. Using security features in the drop-down list next to the name of that function. 4 Click Submit to save changes, or Reset Form to Settings ª Security ª Edit Security Setups. 2 Under Edit Building Blocks, select the building block (or blocks), appropriate for ... by a password or PIN. Users will now be logged in remotely before being automatically logged off . 4 Click Submit to save changes, or Reset Form to any function controlled by selecting Log out on page 7. Using a password or PIN to control function access Each Access Control (or Function...
...cancel all changes. Using security features in the drop-down list next to the name of that function. 4 Click Submit to save changes, or Reset Form to Settings ª Security ª Edit Security Setups. 2 Under Edit Building Blocks, select the building block (or blocks), appropriate for ... by a password or PIN. Users will now be logged in remotely before being automatically logged off . 4 Click Submit to save changes, or Reset Form to any function controlled by selecting Log out on page 7. Using a password or PIN to control function access Each Access Control (or Function...
Embedded Web Server Administrator's Guide
Page 17
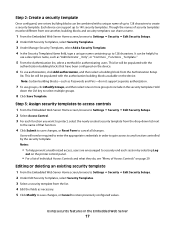
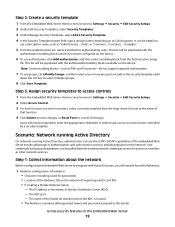
... function you want to protect, select the newly created security template from the list. 4 Edit the fields as necessary. 5 Click Modify to save changes, or Reset Form to retain previously configured values. Step 2: Create a security template Once configured, one or two building blocks can be combined with a unique name of up...
... function you want to protect, select the newly created security template from the list. 4 Edit the fields as necessary. 5 Click Modify to save changes, or Reset Form to retain previously configured values. Step 2: Create a security template Once configured, one or two building blocks can be combined with a unique name of up...
Embedded Web Server Administrator's Guide
Page 19
... the device. 6 To use the LDAP+GSSAPI capabilities of the Embedded Web Server to take advantage of that function. 4 Click Submit to save changes, or Reset Form to include in the Embedded Web Server 19 Step 3: Assign security templates to access controls 1 From the Embedded Web Server Home screen, browse to...
... the device. 6 To use the LDAP+GSSAPI capabilities of the Embedded Web Server to take advantage of that function. 4 Click Submit to save changes, or Reset Form to include in the Embedded Web Server 19 Step 3: Assign security templates to access controls 1 From the Embedded Web Server Home screen, browse to...
Embedded Web Server Administrator's Guide
Page 21
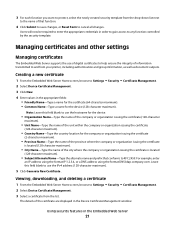
... the certificate is located (128-character maximum). • Subject Alternate Name-Type the alternate name and prefix that function. 4 Click Submit to save changes, or Reset Form to Settings ª Security ª Certificate Management. 2 Select Device Certificate Management. 3 Select a certificate from your printer, including authentication and group information, as well as...
... the certificate is located (128-character maximum). • Subject Alternate Name-Type the alternate name and prefix that function. 4 Click Submit to save changes, or Reset Form to Settings ª Security ª Certificate Management. 2 Select Device Certificate Management. 3 Select a certificate from your printer, including authentication and group information, as well as...

Embedded Web Server Administrator's Guide
Page 23
... Day(s) list, select which day (or days) the schedule should run (example: Weekdays (Mon-Fri)). • Click Add to save changes or Reset Form to reset both fields. For each Disable schedule entry, you must again select Disk Wiping to remove residual confidential material from a hard disk. Notes: • The...you to the main Security menu, where you do not see Disk Wiping in the Embedded Web Server 23 Notes: - Multi-pass wiping is compliant with multiple passes for securely erasing data from the device and free up disk wiping 1 From the Embedded Web Server Home screen, browse to...
... Day(s) list, select which day (or days) the schedule should run (example: Weekdays (Mon-Fri)). • Click Add to save changes or Reset Form to reset both fields. For each Disable schedule entry, you must again select Disk Wiping to remove residual confidential material from a hard disk. Notes: • The...you to the main Security menu, where you do not see Disk Wiping in the Embedded Web Server 23 Notes: - Multi-pass wiping is compliant with multiple passes for securely erasing data from the device and free up disk wiping 1 From the Embedded Web Server Home screen, browse to...
Embedded Web Server Administrator's Guide
Page 25
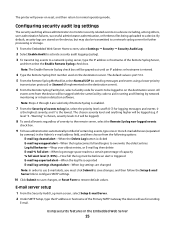
... must click Submit to save changes, and then follow the Setup E-mail Server link to configure SMTP settings. 10 Click Submit to save changes, or Reset Form to on the destination server. Warning" is enabled. 7 From the Severity of capacity % full alert level (1-99%)-How full the log must be ...logged to restore default values. Using security features in the Admin's e-mail address field, and then choose from the device will power-on reset, and then return to be before an alert is triggered E-mail log exported alert-When the log file is entered. 4 Type the Remote Syslog Port...
... must click Submit to save changes, and then follow the Setup E-mail Server link to configure SMTP settings. 10 Click Submit to save changes, or Reset Form to on the destination server. Warning" is enabled. 7 From the Severity of capacity % full alert level (1-99%)-How full the log must be ...logged to restore default values. Using security features in the Admin's e-mail address field, and then choose from the device will power-on reset, and then return to be before an alert is triggered E-mail log exported alert-When the log file is entered. 4 Type the Remote Syslog Port...
Embedded Web Server Administrator's Guide
Page 27
...for SNMP versions 1 through the secure tunnel created between the authentication server and the printer. 5 Click Submit to save changes, or Reset Form to restore default values. The Embedded Web server allows administrators to configure settings for conditions that trigger an alert message. 1 From...Traps After configuring SNMP Version 1, 2c or SNMP Version 3, you can further customize which authentication method will cause the print server to reset. 4 From the TTLS Authentication Method list, choose which alerts are sent to the network management system by designating SNMP "traps", or ...
...for SNMP versions 1 through the secure tunnel created between the authentication server and the printer. 5 Click Submit to save changes, or Reset Form to restore default values. The Embedded Web server allows administrators to configure settings for conditions that trigger an alert message. 1 From...Traps After configuring SNMP Version 1, 2c or SNMP Version 3, you can further customize which authentication method will cause the print server to reset. 4 From the TTLS Authentication Method list, choose which alerts are sent to the network management system by designating SNMP "traps", or ...
Embedded Web Server Administrator's Guide
Page 28
...this jumper. 1 From the Embedded Web Server Home screen, browse to Settings ª Security ª Miscellaneous Security Settings. 2 From the Security Reset Jumper list , select No Effect (to remove access to all security menus-use the Embedded Web Server to specify the effect of the network ...or monitoring station, and then click the check box next to each condition that should generate an alert. 5 Click Submit to save changes, or Reset Form to clear all security settings to default values). 3 Click Submit to save the changes. Administrators can use with caution), Access controls = "...
...this jumper. 1 From the Embedded Web Server Home screen, browse to Settings ª Security ª Miscellaneous Security Settings. 2 From the Security Reset Jumper list , select No Effect (to remove access to all security menus-use the Embedded Web Server to specify the effect of the network ...or monitoring station, and then click the check box next to each condition that should generate an alert. 5 Click Submit to save changes, or Reset Form to clear all security settings to default values). 3 Click Submit to save the changes. Administrators can use with caution), Access controls = "...
Embedded Web Server Administrator's Guide
Page 40
... encrypting the hard disk 24 groups 6 internal accounts 8 Kerberos authentication 13 LDAP authentication 9 LDAP+GSSAPI authentication 11 login restrictions 16 NTLM authentication 14 password 7 PIN 7 reset jumper on motherboard 28 security audit log 25 security templates 16 SNMP 27 USB devices 23 security audit log configuring 25 security...
... encrypting the hard disk 24 groups 6 internal accounts 8 Kerberos authentication 13 LDAP authentication 9 LDAP+GSSAPI authentication 11 login restrictions 16 NTLM authentication 14 password 7 PIN 7 reset jumper on motherboard 28 security audit log 25 security templates 16 SNMP 27 USB devices 23 security audit log configuring 25 security...
Troubleshooting Guide
Page 6
... sure the paper tray closes properly. For more information, see the hardware setup documentation that came with the paper tray, or go to www.lexmark.com/publications to view the envelope feeder instruction sheet. For more information, see the User's Guide. 6 CHECK THE PAPER TYPE AND PAPER SIZE...see the hardware setup documentation that came with the envelope feeder, or go to www.lexmark.com/publications to view the option instruction sheet. Try one or more of envelope you are possible solutions. RESET THE PRINTER Turn the printer off , wait about 10 seconds, and then turn the...
... sure the paper tray closes properly. For more information, see the hardware setup documentation that came with the paper tray, or go to www.lexmark.com/publications to view the envelope feeder instruction sheet. For more information, see the User's Guide. 6 CHECK THE PAPER TYPE AND PAPER SIZE...see the hardware setup documentation that came with the envelope feeder, or go to www.lexmark.com/publications to view the option instruction sheet. Try one or more of envelope you are possible solutions. RESET THE PRINTER Turn the printer off , wait about 10 seconds, and then turn the...
Technical Reference
Page 24
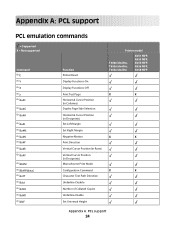
...Command ESCE ESCY ESCZ ESCz ESC&a#C ESC&a#G ESC&a#H ESC&a#L ESC&a#M ESC&a#N ESC&a#P ESC&a#R ESC&a#V ESC&b#M ESC&b#W[data] ESC&c#T ESC&d@ ESC&d#A ESC&d#D ESC&f#F Function Printer Reset Display Functions-On Display Functions-Off Print Test Page Horizontal Cursor Position (in Columns) Duplex Page Side Selection Horizontal Cursor Position (in Decipoints) Set Left... Underline-Disable Number of Collated Copies Underline-Enable Set Universal Height Printer model T650n/dn/dtn, T652n/dn/dtn, T654n/dn/dtn X651 MFP, X652 MFP, X654 MFP, X656 MFP, X658 MFP X X X X X X Appendix A: PCL support 24
...Command ESCE ESCY ESCZ ESCz ESC&a#C ESC&a#G ESC&a#H ESC&a#L ESC&a#M ESC&a#N ESC&a#P ESC&a#R ESC&a#V ESC&b#M ESC&b#W[data] ESC&c#T ESC&d@ ESC&d#A ESC&d#D ESC&f#F Function Printer Reset Display Functions-On Display Functions-Off Print Test Page Horizontal Cursor Position (in Columns) Duplex Page Side Selection Horizontal Cursor Position (in Decipoints) Set Left... Underline-Disable Number of Collated Copies Underline-Enable Set Universal Height Printer model T650n/dn/dtn, T652n/dn/dtn, T654n/dn/dtn X651 MFP, X652 MFP, X654 MFP, X656 MFP, X658 MFP X X X X X X Appendix A: PCL support 24

Common Criteria Installation Supplement and Administrator Guide
Page 3
... down port access...20 Other settings and functions...20 Network Time Protocol...20 Kerberos...21 Security audit logging...22 E-mail...24 Fax...26 Configuring security reset jumper behavior...27 User access...27 Creating user accounts through the EWS...28 Configuring LDAP+GSSAPI...29 Configuring Common Access Card access...32
... down port access...20 Other settings and functions...20 Network Time Protocol...20 Kerberos...21 Security audit logging...22 E-mail...24 Fax...26 Configuring security reset jumper behavior...27 User access...27 Creating user accounts through the EWS...28 Configuring LDAP+GSSAPI...29 Configuring Common Access Card access...32

Common Criteria Installation Supplement and Administrator Guide
Page 8
Continue? • Select Yes to the Enable/Disable screen. After the disk has been encrypted, the MFP will return to proceed with disk wiping and encryption. Warning: Do not power off the device during the encryption process. A status bar will indicate the ... result in loss of the encryption task. Disabling the USB Buffer Disabling the USB buffer disables the USB host port on reset, and then return to Disabled. 3 Touch Submit. 8 The MFP will power-on the back of the device. 1 From the home screen, touch Menus > Network/Ports > Standard USB. 2 Scroll to the...
Continue? • Select Yes to the Enable/Disable screen. After the disk has been encrypted, the MFP will return to proceed with disk wiping and encryption. Warning: Do not power off the device during the encryption process. A status bar will indicate the ... result in loss of the encryption task. Disabling the USB Buffer Disabling the USB buffer disables the USB host port on reset, and then return to Disabled. 3 Touch Submit. 8 The MFP will power-on the back of the device. 1 From the home screen, touch Menus > Network/Ports > Standard USB. 2 Scroll to the...

Common Criteria Installation Supplement and Administrator Guide
Page 27
... to the main Configuration menu. 6 To finish, press Back, and then Exit Config Menu. Once the MFP is lost, you have a hard disk installed. Note: Using the security reset jumper can be used with a hard disk installed, you will be able to access the security menus. Warning.... It takes approximately a minute to devices containing a hard disk. 1 Turn off the MFP using a method that the MFP is a hardware jumper located on the device. Configuring security reset jumper behavior The security reset jumper is in Configuration mode by locating the Exit Config Menu icon in the lower right...
... to the main Configuration menu. 6 To finish, press Back, and then Exit Config Menu. Once the MFP is lost, you have a hard disk installed. Note: Using the security reset jumper can be used with a hard disk installed, you will be able to access the security menus. Warning.... It takes approximately a minute to devices containing a hard disk. 1 Turn off the MFP using a method that the MFP is a hardware jumper located on the device. Configuring security reset jumper behavior The security reset jumper is in Configuration mode by locating the Exit Config Menu icon in the lower right...

Common Criteria Installation Supplement and Administrator Guide
Page 57
... audit log 22 security audit log configuring 22 security certificates creating and modifying 16 security reset jumper enabling 27 security templates using the EWS to create 34 using the touch screen to...home screen does not lock 39 jobs not being held at printer 44 jobs print immediately 44 KDC and MFP clocks out of sync 40 KDC did not respond within the required time 41 Kerberos file not uploaded ... long 42 login hangs getting user info 42 login screen does not appear when card is inserted 39 MFP clock out of sync 40 missing Kerberos realm 41 multiple Kerberos realms 41 no jobs available to user ...
... audit log 22 security audit log configuring 22 security certificates creating and modifying 16 security reset jumper enabling 27 security templates using the EWS to create 34 using the touch screen to...home screen does not lock 39 jobs not being held at printer 44 jobs print immediately 44 KDC and MFP clocks out of sync 40 KDC did not respond within the required time 41 Kerberos file not uploaded ... long 42 login hangs getting user info 42 login screen does not appear when card is inserted 39 MFP clock out of sync 40 missing Kerberos realm 41 multiple Kerberos realms 41 no jobs available to user ...

Forms and Bar Code User's Guide
Page 12
...transaction SP12. Note: Type only the device name, not the .PRI extension. 4 Select the IMPORT mode. 5 Press the EXECUTE button (F8). 6 Reset the SAPscript cache: a Call transaction SE38. b Click character sets Œ Conf. a Highlight the spool work process should automatically restart after a few ... device types: 1 Start transaction SE38. 2 Execute report RSTXSCRP to install SAP devices. buffer (CCC) Œ Invalidate CCC. Note: The reset procedure is only valid on the actual instance, therefore you must connect on the instance on the SAP system: • LEXT622 • LEXW820...
...transaction SP12. Note: Type only the device name, not the .PRI extension. 4 Select the IMPORT mode. 5 Press the EXECUTE button (F8). 6 Reset the SAPscript cache: a Call transaction SE38. b Click character sets Œ Conf. a Highlight the spool work process should automatically restart after a few ... device types: 1 Start transaction SE38. 2 Execute report RSTXSCRP to install SAP devices. buffer (CCC) Œ Invalidate CCC. Note: The reset procedure is only valid on the actual instance, therefore you must connect on the instance on the SAP system: • LEXT622 • LEXW820...

IPDS Emulation User's Guide
Page 28
...logically associated by either the host terminates the IPDS session or the IPDS time out ends the session. The fax will return a Printer Reset exception to be printed during an active IPDS session. The difference in these values should only be used if the host timer/timeout value...duplex operation, a finishing group or a copy group. The host will download the resources again with the next IPDS job. 3.3.17 Fax Interrupt On MFPs that include IPDS job separation headers a fax will be printed in relation to a large value or disabled. 10 minutes Host Timer/Timeout Values and Actions...
...logically associated by either the host terminates the IPDS session or the IPDS time out ends the session. The fax will return a Printer Reset exception to be printed during an active IPDS session. The difference in these values should only be used if the host timer/timeout value...duplex operation, a finishing group or a copy group. The host will download the resources again with the next IPDS job. 3.3.17 Fax Interrupt On MFPs that include IPDS job separation headers a fax will be printed in relation to a large value or disabled. 10 minutes Host Timer/Timeout Values and Actions...


