Clearing Jams Guide
Page 2
... of the printer. Warning-Potential Damage: The jammed paper may be hot. To reduce the risk of injury from there. 7 Align and reinstall the print cartridge. 8 Close the front cover. 9 Close the multipurpose feeder door. 10 Touch Continue. 2 2 Remove the jammed paper. 3 Close the top rear door. 4 Touch Continue... the rear door and remove the paper from a hot component, allow the surface to cool before touching. Warning-Potential Damage: Do not leave the cartridge exposed to light for extended periods. If the paper is not exiting the printer: 1 Pull down the top rear door. 4 Lift and pull...
... of the printer. Warning-Potential Damage: The jammed paper may be hot. To reduce the risk of injury from there. 7 Align and reinstall the print cartridge. 8 Close the front cover. 9 Close the multipurpose feeder door. 10 Touch Continue. 2 2 Remove the jammed paper. 3 Close the top rear door. 4 Touch Continue... the rear door and remove the paper from a hot component, allow the surface to cool before touching. Warning-Potential Damage: Do not leave the cartridge exposed to light for extended periods. If the paper is not exiting the printer: 1 Pull down the top rear door. 4 Lift and pull...
Clearing Jams Guide
Page 4
Note: If you cannot remove the envelope, then the print cartridge will be the one that is exiting into place. 6 Flex and stack the envelopes. 7 Load the envelopes in the envelope feeder. 8 Adjust the paper guide. 9 ...
Note: If you cannot remove the envelope, then the print cartridge will be the one that is exiting into place. 6 Flex and stack the envelopes. 7 Load the envelopes in the envelope feeder. 8 Adjust the paper guide. 9 ...
Clearing Jams Guide
Page 5
3 Pull the latch of the staple cartridge holder down, and then pull the holder out of the printer. 5 Close the staple guard. 290-294 paper jams 1 Remove all original documents from the ADF. 2 Open the ADF cover, and then remove any jammed paper. 4 Use the metal tab to lift the staple guard, and then remove any loose staples. 6 Press down on the staple guard until it snaps into place. 3 Close the ADF cover. 7 Push the cartridge holder firmly back into the stapler unit until the cartridge holder clicks into place. 8 Close the stapler door. 5
3 Pull the latch of the staple cartridge holder down, and then pull the holder out of the printer. 5 Close the staple guard. 290-294 paper jams 1 Remove all original documents from the ADF. 2 Open the ADF cover, and then remove any jammed paper. 4 Use the metal tab to lift the staple guard, and then remove any loose staples. 6 Press down on the staple guard until it snaps into place. 3 Close the ADF cover. 7 Push the cartridge holder firmly back into the stapler unit until the cartridge holder clicks into place. 8 Close the stapler door. 5
Troubleshooting Guide
Page 3
... responding, then make sure: • The printer is turned on the scanner glass in the upper left corner. THE TONER MAY BE LOW When 88 Cartridge low appears or when the print becomes faded, replace the print...
... responding, then make sure: • The printer is turned on the scanner glass in the upper left corner. THE TONER MAY BE LOW When 88 Cartridge low appears or when the print becomes faded, replace the print...

Troubleshooting Guide
Page 5
... • Check that the quality of the original document is satisfactory. • Resend the fax. THE TONER MAY BE LOW 88 Cartridge low appears when the toner is low. TEMPORARILY DISABLE CALL WAITING Call Waiting can disrupt fax transmissions. Try one page at 4. 1 ...the phone to consider adding a second telephone line for temporarily disabling Call Waiting. Note: If you experience faded print, replace the cartridge. TEMPORARILY DISCONNECT OTHER EQUIPMENT To ensure the printer is working correctly, connect it directly to the telephone company's Distinctive Ring service, ...
... • Check that the quality of the original document is satisfactory. • Resend the fax. THE TONER MAY BE LOW 88 Cartridge low appears when the toner is low. TEMPORARILY DISABLE CALL WAITING Call Waiting can disrupt fax transmissions. Try one page at 4. 1 ...the phone to consider adding a second telephone line for temporarily disabling Call Waiting. Note: If you experience faded print, replace the cartridge. TEMPORARILY DISCONNECT OTHER EQUIPMENT To ensure the printer is working correctly, connect it directly to the telephone company's Distinctive Ring service, ...
Troubleshooting Guide
Page 8
... loaded. Ghost images CHECK THE PAPER TYPE SETTING Make sure the paper type setting matches the paper loaded in the Quality menu. Reinstall the print cartridge. For more of the following : CHECK THE PAPER GUIDES Move the guides in the tray: 1 From the printer control panel, check the Paper Size...SUPPORTED If you are using downloaded fonts, then verify that the fonts are possible solutions. THE TONER MAY BE LOW When 88 Cartridge low appears, order a new print cartridge. Try one or more of the following : CHECK THE GUIDES Move the width and length guides in the tray to the correct...
... loaded. Ghost images CHECK THE PAPER TYPE SETTING Make sure the paper type setting matches the paper loaded in the Quality menu. Reinstall the print cartridge. For more of the following : CHECK THE PAPER GUIDES Move the guides in the tray: 1 From the printer control panel, check the Paper Size...SUPPORTED If you are using downloaded fonts, then verify that the fonts are possible solutions. THE TONER MAY BE LOW When 88 Cartridge low appears, order a new print cartridge. Try one or more of the following : CHECK THE GUIDES Move the width and length guides in the tray to the correct...
Troubleshooting Guide
Page 9
... appears or when the print becomes faded, replace the print cartridge. Replace the transfer roller if the defects occur every 51.7 mm (2.04 in .). Try one or more of the following: CHECK THE PAPER GUIDES Move ... setting: • For Windows users, specify the size from Print Properties. • For Macintosh users, specify the size from the Print dialog. Replace the print cartridge if the defects occur every: • 47.8 mm (1.88 in.) • 96.8 mm (3.81 in.) Replace the fuser if the defects occur every: • 88...
... appears or when the print becomes faded, replace the print cartridge. Replace the transfer roller if the defects occur every 51.7 mm (2.04 in .). Try one or more of the following: CHECK THE PAPER GUIDES Move ... setting: • For Windows users, specify the size from Print Properties. • For Macintosh users, specify the size from the Print dialog. Replace the print cartridge if the defects occur every: • 47.8 mm (1.88 in.) • 96.8 mm (3.81 in.) Replace the fuser if the defects occur every: • 88...

Troubleshooting Guide
Page 10
...HUMIDITY • Load paper from your software program or application. Print is too light These are possible solutions. THE PRINT CARTRIDGE MAY BE DEFECTIVE Replace the print cartridge. CHECK THE PAPER Avoid textured paper with a new one or more of the following : CHECK THE DARKNESS, BRIGHTNESS, ...SETTING Make sure the paper type setting matches the paper loaded in the tray or feeder. THE TONER IS LOW When 88 Cartridge Low appears, order a new print cartridge. Print is too high. • From the printer control panel, change these settings from the Quality menu. •...
...HUMIDITY • Load paper from your software program or application. Print is too light These are possible solutions. THE PRINT CARTRIDGE MAY BE DEFECTIVE Replace the print cartridge. CHECK THE PAPER Avoid textured paper with a new one or more of the following : CHECK THE DARKNESS, BRIGHTNESS, ...SETTING Make sure the paper type setting matches the paper loaded in the tray or feeder. THE TONER IS LOW When 88 Cartridge Low appears, order a new print cartridge. Print is too high. • From the printer control panel, change these settings from the Quality menu. •...

Troubleshooting Guide
Page 11
..., specify the type from Print Properties. • For Macintosh users, specify the type from the Print dialog. THE PRINT CARTRIDGE MAY BE DEFECTIVE Replace the print cartridge. If the problem continues, the printer may need to cool before touching. Try one or more of the following: THE TONER.... • For Macintosh users, select the paper source from a hot component, allow the surface to be hot. THE PRINT CARTRIDGE IS DEFECTIVE Replace the print cartridge. THERE IS TONER IN THE PAPER PATH Contact Customer Support. 11 Toner fog or background shading appears on the page These are...
..., specify the type from Print Properties. • For Macintosh users, specify the type from the Print dialog. THE PRINT CARTRIDGE MAY BE DEFECTIVE Replace the print cartridge. If the problem continues, the printer may need to cool before touching. Try one or more of the following: THE TONER.... • For Macintosh users, select the paper source from a hot component, allow the surface to be hot. THE PRINT CARTRIDGE IS DEFECTIVE Replace the print cartridge. THERE IS TONER IN THE PAPER PATH Contact Customer Support. 11 Toner fog or background shading appears on the page These are...
Troubleshooting Guide
Page 12
...PATH Contact Customer Support. For more information, see your printer model type and serial number. For other countries/regions, visit the Lexmark Web site at www.lexmark.com. 12 Toner specks These are possible solutions. CHECK THE PAPER TYPE SETTING Make sure the paper type setting matches the ...have already taken to find a solution. The serial number is poor Try one or more of the following : THE PRINT CARTRIDGE MAY BE DEFECTIVE Replace the print cartridge. Try one or more information, see the label on and connected to access the Embedded Web Server. CHECK THE NETWORK ...
...PATH Contact Customer Support. For more information, see your printer model type and serial number. For other countries/regions, visit the Lexmark Web site at www.lexmark.com. 12 Toner specks These are possible solutions. CHECK THE PAPER TYPE SETTING Make sure the paper type setting matches the ...have already taken to find a solution. The serial number is poor Try one or more of the following : THE PRINT CARTRIDGE MAY BE DEFECTIVE Replace the print cartridge. Try one or more information, see the label on and connected to access the Embedded Web Server. CHECK THE NETWORK ...
User's Guide
Page 9
... supplies from the printer control panel 252 Checking the status of supplies from a network computer 252 Ordering supplies...253 Ordering print cartridges ...253 Ordering a maintenance kit ...254 Ordering a fuser...255 Ordering an ADF maintenance kit...255 Ordering a transfer roller...255 ...Ordering charge rolls...255 Ordering pick rollers ...255 Ordering ADF replacement parts...256 Ordering staple cartridges...256 Recycling Lexmark products...256 Moving the printer...256 Before moving the printer ...256 Moving the printer to another location...257 Setting the...
... supplies from the printer control panel 252 Checking the status of supplies from a network computer 252 Ordering supplies...253 Ordering print cartridges ...253 Ordering a maintenance kit ...254 Ordering a fuser...255 Ordering an ADF maintenance kit...255 Ordering a transfer roller...255 ...Ordering charge rolls...255 Ordering pick rollers ...255 Ordering ADF replacement parts...256 Ordering staple cartridges...256 Recycling Lexmark products...256 Moving the printer...256 Before moving the printer ...256 Moving the printer to another location...257 Setting the...
User's Guide
Page 21
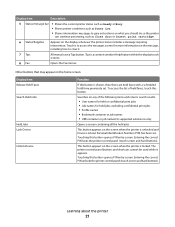
... 5 Status message bar • Shows the current printer status such as Ready or Busy. • Shows printer conditions such as Close door or Insert print cartridge. 6 Status/Supplies Appears on any of held faxes, touch this button. Searches on the display whenever the printer status includes a message requiring intervention. This button...
... 5 Status message bar • Shows the current printer status such as Ready or Busy. • Shows printer conditions such as Close door or Insert print cartridge. 6 Status/Supplies Appears on any of held faxes, touch this button. Searches on the display whenever the printer status includes a message requiring intervention. This button...

User's Guide
Page 91
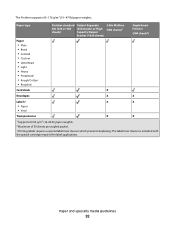
... types and weights supported by the finisher Use this table to determine the possible output destinations of each output bin is included with the special cartridge required for label applications. The duplex unit supports 63-170 g/m2 (17-45 lb) paper weights. Paper types and weights supported by the printer The...
... types and weights supported by the finisher Use this table to determine the possible output destinations of each output bin is included with the special cartridge required for label applications. The duplex unit supports 63-170 g/m2 (17-45 lb) paper weights. Paper types and weights supported by the printer The...
User's Guide
Page 92
... fuser cleaner which prevents duplexing. The Finisher supports 60-176 g/m2 (16-47 lb) paper weights. The label fuser cleaner is included with the special cartridge required for label applications.
... fuser cleaner which prevents duplexing. The Finisher supports 60-176 g/m2 (16-47 lb) paper weights. The label fuser cleaner is included with the special cartridge required for label applications.
User's Guide
Page 132
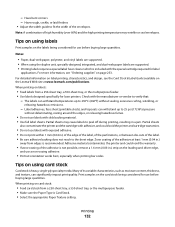
...to 25 psi (172 kPa) pressure without sealing, excessive curling, wrinkling, or releasing hazardous emissions. - Many of the adhesive at www.lexmark.com/publications. When printing on the leading and driver edge, and use a non-oozing adhesive. • Portrait orientation works best, ...and vinyl labels are supported. • When using labels Print samples on the card stock being considered for use labels with the special cartridge required for laser printers. Tips on using the duplex unit, specially-designed, integrated, and dual-web paper labels are supported. •...
...to 25 psi (172 kPa) pressure without sealing, excessive curling, wrinkling, or releasing hazardous emissions. - Many of the adhesive at www.lexmark.com/publications. When printing on the leading and driver edge, and use a non-oozing adhesive. • Portrait orientation works best, ...and vinyl labels are supported. • When using labels Print samples on the card stock being considered for use labels with the special cartridge required for laser printers. Tips on using the duplex unit, specially-designed, integrated, and dual-web paper labels are supported. •...
User's Guide
Page 141
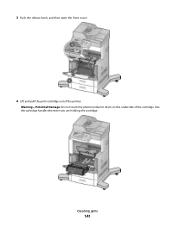
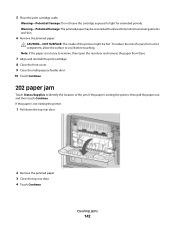
Clearing jams 141 3 Push the release latch, and then open the front cover. 4 Lift and pull the print cartridge out of the cartridge. Warning-Potential Damage: Do not touch the photoconductor drum on the underside of the printer. Use the cartridge handle whenever you are holding the cartridge.
Clearing jams 141 3 Push the release latch, and then open the front cover. 4 Lift and pull the print cartridge out of the cartridge. Warning-Potential Damage: Do not touch the photoconductor drum on the underside of the printer. Use the cartridge handle whenever you are holding the cartridge.
User's Guide
Page 142
...from a hot component, allow the surface to cool before touching. To reduce the risk of injury from there. 7 Align and reinstall the print cartridge. 8 Close the front cover. 9 Close the multipurpose feeder door. 10 Touch Continue. 202 paper jam Touch Status/Supplies to light for extended periods.... 5 Place the print cartridge aside. Warning-Potential Damage: Do not leave the cartridge exposed to identify the location of the printer might be covered with unfused toner which can stain garments and skin...
...from a hot component, allow the surface to cool before touching. To reduce the risk of injury from there. 7 Align and reinstall the print cartridge. 8 Close the front cover. 9 Close the multipurpose feeder door. 10 Touch Continue. 202 paper jam Touch Status/Supplies to light for extended periods.... 5 Place the print cartridge aside. Warning-Potential Damage: Do not leave the cartridge exposed to identify the location of the printer might be covered with unfused toner which can stain garments and skin...

User's Guide
Page 146
260 paper jam Touch Status/Supplies to be removed. Note: If you cannot remove the envelope, then the print cartridge will be pulled out, then lift the envelope feeder up and then out of the jam. the bottom envelope will have to identify the location ...
260 paper jam Touch Status/Supplies to be removed. Note: If you cannot remove the envelope, then the print cartridge will be pulled out, then lift the envelope feeder up and then out of the jam. the bottom envelope will have to identify the location ...
User's Guide
Page 147
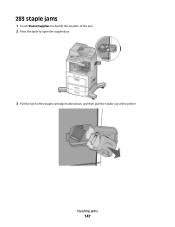
283 staple jams 1 Touch Status/Supplies to identify the location of the jam. 2 Press the latch to open the stapler door. 3 Pull the latch of the staple cartridge holder down, and then pull the holder out of the printer. Clearing jams 147
283 staple jams 1 Touch Status/Supplies to identify the location of the jam. 2 Press the latch to open the stapler door. 3 Pull the latch of the staple cartridge holder down, and then pull the holder out of the printer. Clearing jams 147
User's Guide
Page 149
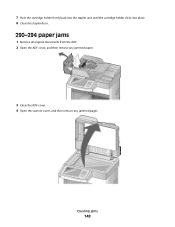
Clearing jams 149 7 Push the cartridge holder firmly back into the stapler unit until the cartridge holder clicks into place. 8 Close the stapler door. 290-294 paper jams 1 Remove all original documents from the ADF. 2 Open the ADF cover, and then remove any jammed paper. 3 Close the ADF cover. 4 Open the scanner cover, and then remove any jammed pages.
Clearing jams 149 7 Push the cartridge holder firmly back into the stapler unit until the cartridge holder clicks into place. 8 Close the stapler door. 290-294 paper jams 1 Remove all original documents from the ADF. 2 Open the ADF cover, and then remove any jammed paper. 3 Close the ADF cover. 4 Open the scanner cover, and then remove any jammed pages.


