Card Stock & Label Guide
Page 145
Total strip matrix Vellum finish Wash boarding Zone coating Labels that gives a rippled appearance to eggshell and antique finishes. Waviness in selected areas only. generally moisture related. Glossary 145 Allows no adhesive ...
Total strip matrix Vellum finish Wash boarding Zone coating Labels that gives a rippled appearance to eggshell and antique finishes. Waviness in selected areas only. generally moisture related. Glossary 145 Allows no adhesive ...
IPDS Emulation User’s Guide
Page 8
...your printer becomes an IBM host workstation printer capable of the following: • Standard Network (Ethernet connection integrated into printer system board on selected printer models) 8 If you need basic information about your printer setup and printer operation, please refer to the ... the following Multifunction Products (MFPs): • Lexmark X644e MFP, X646e MFP • Lexmark X646ef MFP • Lexmark X782e MFP (IPDS color and monochrome printing, SCS monochrome printing only) • Lexmark X850e MFP, X852e MFP, X854e MFP • Lexmark X940e MFP, X945e MFP (IPDS color and ...
...your printer becomes an IBM host workstation printer capable of the following: • Standard Network (Ethernet connection integrated into printer system board on selected printer models) 8 If you need basic information about your printer setup and printer operation, please refer to the ... the following Multifunction Products (MFPs): • Lexmark X644e MFP, X646e MFP • Lexmark X646ef MFP • Lexmark X782e MFP (IPDS color and monochrome printing, SCS monochrome printing only) • Lexmark X850e MFP, X852e MFP, X854e MFP • Lexmark X940e MFP, X945e MFP (IPDS color and ...
IPDS Printer and Host Setup Guide
Page 4
...• Standard Network (Ethernet connection integrated into printer system board on selected printer models). • a MarkNet internal LAN print server (optional card providing Ethernet or Fiber network connection). • Lexmark 802.11g Wireless Print Adapter • a Coax/Twinax ... monochrome printing, SCS monochrome printing only) • Lexmark T640, T642,T644 • Lexmark W840 • Lexmark X644e MFP, X646e MFP • Lexmark X646ef MFP • Lexmark X782e MFP • Lexmark X850e MFP, X852e MFP, X854e MFP • Lexmark X940e MFP, X945e MFP (IPDS color and monochrome ...
...• Standard Network (Ethernet connection integrated into printer system board on selected printer models). • a MarkNet internal LAN print server (optional card providing Ethernet or Fiber network connection). • Lexmark 802.11g Wireless Print Adapter • a Coax/Twinax ... monochrome printing, SCS monochrome printing only) • Lexmark T640, T642,T644 • Lexmark W840 • Lexmark X644e MFP, X646e MFP • Lexmark X646ef MFP • Lexmark X782e MFP • Lexmark X850e MFP, X852e MFP, X854e MFP • Lexmark X940e MFP, X945e MFP (IPDS color and monochrome ...
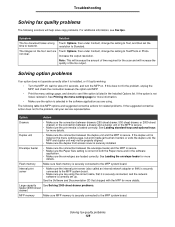
Troubleshooting Guide
Page 2
...Paper menu and in the Finishing Menu. The job is selected in the job. If the option is securely memory connected to the MFP system board. Option Action Drawers • Make sure the connection between drawers (250-sheet drawer, 500-sheet drawer, or 2000-sheet drawer) or the ...characters print You are using an incompatible parallel cable If you are using a parallel interface, make sure you can print your service representative. We recommend Lexmark part number 1329605 (10 ft) or 1427498 (20 ft) for more information, see if the option is listed in the Paper Menu. •...
...Paper menu and in the Finishing Menu. The job is selected in the job. If the option is securely memory connected to the MFP system board. Option Action Drawers • Make sure the connection between drawers (250-sheet drawer, 500-sheet drawer, or 2000-sheet drawer) or the ...characters print You are using an incompatible parallel cable If you are using a parallel interface, make sure you can print your service representative. We recommend Lexmark part number 1329605 (10 ft) or 1427498 (20 ft) for more information, see if the option is listed in the Paper Menu. •...
User's Guide
Page 6
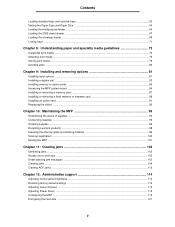
... and removing options 81 Installing input options ...81 Installing a duplex unit ...83 Installing memory or option cards ...84 Accessing the MFP system board ...84 Installing or removing a memory card ...87 Installing or removing a flash memory or firmware card 89 Installing an option card ...91...shield ...92 Chapter 10: Maintaining the MFP 93 Determining the status of supplies ...94 Conserving supplies ...95 Ordering supplies ...95 Recycling Lexmark products ...98 Cleaning the scanner glass and backing material 99 Scanner registration ...100 Moving the MFP ...101 Chapter 11: Clearing jams ...
... and removing options 81 Installing input options ...81 Installing a duplex unit ...83 Installing memory or option cards ...84 Accessing the MFP system board ...84 Installing or removing a memory card ...87 Installing or removing a flash memory or firmware card 89 Installing an option card ...91...shield ...92 Chapter 10: Maintaining the MFP 93 Determining the status of supplies ...94 Conserving supplies ...95 Ordering supplies ...95 Recycling Lexmark products ...98 Cleaning the scanner glass and backing material 99 Scanner registration ...100 Moving the MFP ...101 Chapter 11: Clearing jams ...

User's Guide
Page 84
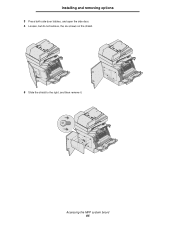
Flash memory • Firmware cards - PrintCryption™ • Other options - Ethernet 100BaseFX-MTRJ - 802g Wireless Adapter Accessing the MFP system board You must access the MFP system board to remove the system board access cover. 1 Push the release latch, and lower the multipurpose feeder. 2 Push both release latches, and open the top front cover...
Flash memory • Firmware cards - PrintCryption™ • Other options - Ethernet 100BaseFX-MTRJ - 802g Wireless Adapter Accessing the MFP system board You must access the MFP system board to remove the system board access cover. 1 Push the release latch, and lower the multipurpose feeder. 2 Push both release latches, and open the top front cover...
User's Guide
Page 85
Installing and removing options 3 Press both side door latches, and open the side door. 4 Loosen, but do not remove, the six screws on the shield. 5 Slide the shield to the right, and then remove it. Accessing the MFP system board 85
Installing and removing options 3 Press both side door latches, and open the side door. 4 Loosen, but do not remove, the six screws on the shield. 5 Slide the shield to the right, and then remove it. Accessing the MFP system board 85

User's Guide
Page 86
Option card connector Flash and firmware card connectors Memory card connector Accessing the MFP system board 86 Installing and removing options 6 Set the shield aside. Use the illustration to locate the connector for the card you want to install.
Option card connector Flash and firmware card connectors Memory card connector Accessing the MFP system board 86 Installing and removing options 6 Set the shield aside. Use the illustration to locate the connector for the card you want to install.
User's Guide
Page 87
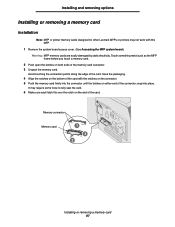
...of the card. Save the packaging. 4 Align the notches on the bottom of the card with this MFP. 1 Remove the system board access cover. (See Accessing the MFP system board.) Warning: MFP memory cards are easily damaged by static electricity. It may not work with the notches on the connector. 5 Push ...on both ends of the card. Installing and removing options Installing or removing a memory card Installation Note: MFP or printer memory cards designed for other Lexmark MFPs or printers may require some force to fully seat the card. 6 Make sure each latch fits over the notch on the end of the...
...of the card. Save the packaging. 4 Align the notches on the bottom of the card with this MFP. 1 Remove the system board access cover. (See Accessing the MFP system board.) Warning: MFP memory cards are easily damaged by static electricity. It may not work with the notches on the connector. 5 Push ...on both ends of the card. Installing and removing options Installing or removing a memory card Installation Note: MFP or printer memory cards designed for other Lexmark MFPs or printers may require some force to fully seat the card. 6 Make sure each latch fits over the notch on the end of the...
User's Guide
Page 88
... away from the card on both latches. Installing or removing a memory card 88 Installing and removing options Removal 1 Remove the system board access cover. (See Accessing the MFP system board.) Warning: MFP memory cards are easily damaged by static electricity. The memory card moves out of the connector as the MFP frame...
... away from the card on both latches. Installing or removing a memory card 88 Installing and removing options Removal 1 Remove the system board access cover. (See Accessing the MFP system board.) Warning: MFP memory cards are easily damaged by static electricity. The memory card moves out of the connector as the MFP frame...
User's Guide
Page 89
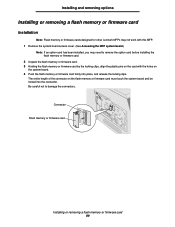
...: If an option card has been installed, you may need to damage the connectors. The entire length of the connector on the system board. 4 Push the flash memory or firmware card firmly into the connector. Installing and removing options Installing or removing a flash memory or firmware card ...Installation Note: Flash memory or firmware cards designed for other Lexmark MFPs may not work with the holes on the flash memory or firmware card must touch the system board and be locked into place, and release the locking clips. Connector Flash memory or firmware ...
...: If an option card has been installed, you may need to damage the connectors. The entire length of the connector on the system board. 4 Push the flash memory or firmware card firmly into the connector. Installing and removing options Installing or removing a flash memory or firmware card ...Installation Note: Flash memory or firmware cards designed for other Lexmark MFPs may not work with the holes on the flash memory or firmware card must touch the system board and be locked into place, and release the locking clips. Connector Flash memory or firmware ...
User's Guide
Page 90
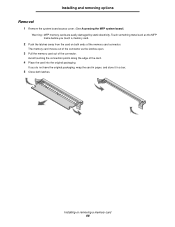
..., reinstall the option card. 1 2 Installing or removing a flash memory or firmware card 90 Installing and removing options Removal 1 Remove the system board access cover. (See Accessing the MFP system board.) Note: If an option card has been installed, you removed an option card to remove the option card before removing the flash...
..., reinstall the option card. 1 2 Installing or removing a flash memory or firmware card 90 Installing and removing options Removal 1 Remove the system board access cover. (See Accessing the MFP system board.) Note: If an option card has been installed, you removed an option card to remove the option card before removing the flash...

User's Guide
Page 91
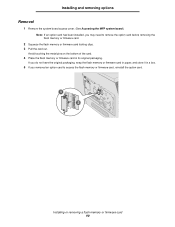
... 91 Touch something metal such as the MFP frame before you touch an option card. 1 Locate the card connectors on the system board, and push the card firmly into the system board connector. 5 Insert the screw saved from the cover plate (or the extra screw shipped with the connector on the system...
... 91 Touch something metal such as the MFP frame before you touch an option card. 1 Locate the card connectors on the system board, and push the card firmly into the system board connector. 5 Insert the screw saved from the cover plate (or the extra screw shipped with the connector on the system...
User's Guide
Page 92
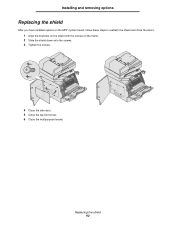
Replacing the shield 92 Installing and removing options Replacing the shield After you have installed options on the MFP system board, follow these steps to reattach the shield and close the doors. 1 Align the keyholes on the shield with the screws on the frame. 2 Slide the shield down onto the screws. 3 Tighten the screws. 4 Close the side door. 5 Close the top front cover. 6 Close the multipurpose feeder.
Replacing the shield 92 Installing and removing options Replacing the shield After you have installed options on the MFP system board, follow these steps to reattach the shield and close the doors. 1 Align the keyholes on the shield with the screws on the frame. 2 Slide the shield down onto the screws. 3 Tighten the screws. 4 Close the side door. 5 Close the top front cover. 6 Close the multipurpose feeder.
User's Guide
Page 128
...Touch Options, then under Content, change the setting to Text/Photo or Photo. If the option is securely connected to the MFP system board. See Loading the envelope feeder for more details. Flash memory Make sure flash memory is not listed, reinstall it quits working: •...Solving 2000-sheet drawer problems. feeder (2000-sheet drawer) MFP memory Make sure MFP memory is securely installed. resolution to the MFP system board. • Make sure you are using . Increase the output resolution. If the duplex unit is listed in the software application you are...
...Touch Options, then under Content, change the setting to Text/Photo or Photo. If the option is securely connected to the MFP system board. See Loading the envelope feeder for more details. Flash memory Make sure flash memory is not listed, reinstall it quits working: •...Solving 2000-sheet drawer problems. feeder (2000-sheet drawer) MFP memory Make sure MFP memory is securely installed. resolution to the MFP system board. • Make sure you are using . Increase the output resolution. If the duplex unit is listed in the software application you are...
Service Manual
Page 5
...Interface card service check 2-148 LCD touchscreen contrast control service check-model X642e 2-149 LCD touchscreen display service check-models X644e/X646e 2-149 Main drive service check 2-153 Operator panel Help and Home buttons service check-model X642e 2-154 Operator panel... port service check 2-159 Print quality service check 2-160 Scan quality service check 2-165 Signature button assembly service check 2-170 System board service check 2-170 Toner sensor service check 2-171 Transfer roll service check 2-172 Diagnostic aids 3-1 Accessing service menus 3-1 Diagnostics Menu...
...Interface card service check 2-148 LCD touchscreen contrast control service check-model X642e 2-149 LCD touchscreen display service check-models X644e/X646e 2-149 Main drive service check 2-153 Operator panel Help and Home buttons service check-model X642e 2-154 Operator panel... port service check 2-159 Print quality service check 2-160 Scan quality service check 2-165 Signature button assembly service check 2-170 System board service check 2-170 Toner sensor service check 2-171 Transfer roll service check 2-172 Diagnostic aids 3-1 Accessing service menus 3-1 Diagnostics Menu...
Service Manual
Page 9
... Low voltage power supply 5-11 Operator panel card (UICC #1)-model X642e 5-12 Operator panel card (UICC #1)-models X644e/X646e 5-14 LCD inverter board (IUCC #2 5-16 Scanner control card 5-17 Motor driver board 5-23 Flatbed interconnect card 5-26 Modem card 5-31 Preventive maintenance 6-1 Safety inspection guide 6-1 Lubrication specifications 6-1 Scheduled maintenance 6-1 Maintenance kit 6-1 Cleaning the scanner...
... Low voltage power supply 5-11 Operator panel card (UICC #1)-model X642e 5-12 Operator panel card (UICC #1)-models X644e/X646e 5-14 LCD inverter board (IUCC #2 5-16 Scanner control card 5-17 Motor driver board 5-23 Flatbed interconnect card 5-26 Modem card 5-31 Preventive maintenance 6-1 Safety inspection guide 6-1 Lubrication specifications 6-1 Scheduled maintenance 6-1 Maintenance kit 6-1 Cleaning the scanner...

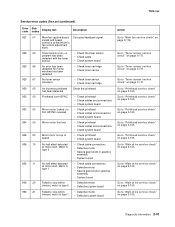
Service Manual
Page 52
...4-131. Replace the system board. Replace the system board. See "System board and inner shield removal -models X644e/X646e" on page 2-118. 947 Modem Init Failed Defective modem hardware. See "System board and inner shield removal -models X644e/X646e" on page 2-156. Replace the system board. printer" on page 4-... check- printer" on page 4-131. Replace the modem card. Engine flash error Indicates that the flash which the system board code is programmed into is bad. See "System board and inner shield removal -models X644e/X646e" on page 2-156. Engine software error These...
...4-131. Replace the system board. Replace the system board. See "System board and inner shield removal -models X644e/X646e" on page 2-118. 947 Modem Init Failed Defective modem hardware. See "System board and inner shield removal -models X644e/X646e" on page 2-156. Replace the system board. printer" on page 4-... check- printer" on page 4-131. Replace the modem card. Engine flash error Indicates that the flash which the system board code is programmed into is bad. See "System board and inner shield removal -models X644e/X646e" on page 2-156. Engine software error These...
Service Manual
Page 69
... An incorrect printhead has been detected Check the printhead Printhead lost lock • Check printhead • Check cables and connections • Check system board Mirror moor not up to "Main drive service check" on page 2-119. Motor is at maximum in fan control adjustment state. Go to "... 2-165. Toner sensor error-a problem has been detected with the toner sensor. • Check the toner sensor • Check cable • Check system board An error has been detected. Go to "Main drive service check" on page 2-165. Go to "Main drive service check" on page 2-165. Go...
... An incorrect printhead has been detected Check the printhead Printhead lost lock • Check printhead • Check cables and connections • Check system board Mirror moor not up to "Main drive service check" on page 2-119. Motor is at maximum in fan control adjustment state. Go to "... 2-165. Toner sensor error-a problem has been detected with the toner sensor. • Check the toner sensor • Check cable • Check system board An error has been detected. Go to "Main drive service check" on page 2-165. Go to "Main drive service check" on page 2-165. Go...
Service Manual
Page 70
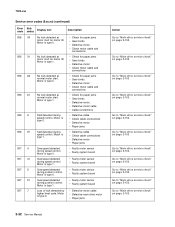
... connections • Defective motor • Paper jams • Faulty motor sensor • Faulty system board • Faulty motor sensor • Faulty system board • Faulty motor sensor • Faulty system board • Faulty motor sensor • Faulty system board • Defective motor cable • Defective main drive motor • Paper jams Action Go to...
... connections • Defective motor • Paper jams • Faulty motor sensor • Faulty system board • Faulty motor sensor • Faulty system board • Faulty motor sensor • Faulty system board • Faulty motor sensor • Faulty system board • Defective motor cable • Defective main drive motor • Paper jams Action Go to...


