Card Stock & Label Guide
Page 11
... cartridges) • use micro-perfs to have installed a maintenance kit as specified (if applicable) • use of printing media outside the pick roller area on both sides of the raised image. If your printer in poor print quality and poor fuse grade. Note: We do not recommend using metallics in forms, whether in paper path speed may produce spacing variations when printing bar codes. The auto...
... cartridges) • use micro-perfs to have installed a maintenance kit as specified (if applicable) • use of printing media outside the pick roller area on both sides of the raised image. If your printer in poor print quality and poor fuse grade. Note: We do not recommend using metallics in forms, whether in paper path speed may produce spacing variations when printing bar codes. The auto...
IPDS Emulation User’s Guide
Page 29
... printer. Notes: The Option Card Menu > IPDS MENU > EMULATION >IPDS Timeout value is only used when the host port value is printed. "Host Controlled" should be disabled or set to a large value to the printer. The printer is specified when configuring the printer parameters on other printer ports. Note: The host port value is capable of IPDS Resources below), and allow the printer to print jobs from disconnecting and deleting the resources downloaded...
... printer. Notes: The Option Card Menu > IPDS MENU > EMULATION >IPDS Timeout value is only used when the host port value is printed. "Host Controlled" should be disabled or set to a large value to the printer. The printer is specified when configuring the printer parameters on other printer ports. Note: The host port value is capable of IPDS Resources below), and allow the printer to print jobs from disconnecting and deleting the resources downloaded...
IPDS Printer and Host Setup Guide
Page 6
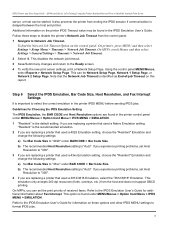
... server. On MFPs, touch Menus and then select Settings > General Settings > Timeouts > Network Job Timeout. 6 The printer port will be completed to begin printing IPDS jobs. 1 Choose a Printer Port for Use in the Device Description 2 Create a PSFCFG 3 Create a Printer Device Description 4 Configure the Printer's Print Server TCP/IP Settings 5 Configure the Printer's Network Job Timeout 6 Select the IPDS Emulation, Bar Code Size, Host Resolution, and Fax Interrupt Settings 7 Verify IPDS Printing 8 Troubleshooting Step 1 Choose a Printer Port for Use in one of the following IBM software...
... server. On MFPs, touch Menus and then select Settings > General Settings > Timeouts > Network Job Timeout. 6 The printer port will be completed to begin printing IPDS jobs. 1 Choose a Printer Port for Use in the Device Description 2 Create a PSFCFG 3 Create a Printer Device Description 4 Configure the Printer's Print Server TCP/IP Settings 5 Configure the Printer's Network Job Timeout 6 Select the IPDS Emulation, Bar Code Size, Host Resolution, and Fax Interrupt Settings 7 Verify IPDS Printing 8 Troubleshooting Step 1 Choose a Printer Port for Use in one of the following IBM software...
IPDS Printer and Host Setup Guide
Page 12
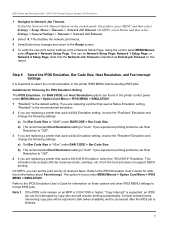
...the printer IPDS MENU before sending IPDS jobs. This disables the network job timeout. 3 Save/Submit any changes and return to Network Job Timeout. If you experience printing problems, set Host Resolution to "4028" under MENU/Menus > Option Card Menu > IPDS MENU > EMULATION. IPDS Printer and Host Setup Guide AS/400 and iSeries LAN Printing Using the Printer Standard Network Port or MarkNet Internal Print Server server, or host can be Network Setup Page, Network 1 Setup Page, or Network 2 Setup Page. To find the Network Job Timeout Option on this report. Using the control panel MENU...
...the printer IPDS MENU before sending IPDS jobs. This disables the network job timeout. 3 Save/Submit any changes and return to Network Job Timeout. If you experience printing problems, set Host Resolution to "4028" under MENU/Menus > Option Card Menu > IPDS MENU > EMULATION. IPDS Printer and Host Setup Guide AS/400 and iSeries LAN Printing Using the Printer Standard Network Port or MarkNet Internal Print Server server, or host can be Network Setup Page, Network 1 Setup Page, or Network 2 Setup Page. To find the Network Job Timeout Option on this report. Using the control panel MENU...

IPDS Printer and Host Setup Guide
Page 27
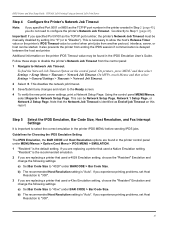
... screen. 7 To verify the new print server settings, print a Network Setup Page. This can be Network Setup Page, Network 1 Setup Page, or Network 2 Setup Page. If you are replacing a printer that the Network Job Timeout is delayed between the host and printer. If you do not need to configure the printer's Network Job Timeout. To find the Network Job Timeout Option on this report. Note that used a 4028 Emulation setting, choose the "Resident" Emulation and change the following settings: a) Set Bar Code Size to "4028" under MENU/Menus > Option Card Menu > IPDS MENU...
... screen. 7 To verify the new print server settings, print a Network Setup Page. This can be Network Setup Page, Network 1 Setup Page, or Network 2 Setup Page. If you are replacing a printer that the Network Job Timeout is delayed between the host and printer. If you do not need to configure the printer's Network Job Timeout. To find the Network Job Timeout Option on this report. Note that used a 4028 Emulation setting, choose the "Resident" Emulation and change the following settings: a) Set Bar Code Size to "4028" under MENU/Menus > Option Card Menu > IPDS MENU...
IPDS Printer and Host Setup Guide
Page 41
... Ready screen. 4 To verify the new print server settings, print a Network Setup Page. b) The recommended Host Resolution setting is "Auto". Refer to the IPDS Emulation User's Guide for additional information about Fax Interrupt. On MFPs, touch Menus and then select Settings > General Settings > Timeouts > Network Job Timeout. 2 Select 0. If you are replacing a printer that used a Native Emulation setting, "Resident" is the recommended emulation. 2 If you are found under BAR CODE > Bar Code Size. Using the control panel MENU/Menus, select Reports > Network Setup Page...
... Ready screen. 4 To verify the new print server settings, print a Network Setup Page. b) The recommended Host Resolution setting is "Auto". Refer to the IPDS Emulation User's Guide for additional information about Fax Interrupt. On MFPs, touch Menus and then select Settings > General Settings > Timeouts > Network Job Timeout. 2 Select 0. If you are replacing a printer that used a Native Emulation setting, "Resident" is the recommended emulation. 2 If you are found under BAR CODE > Bar Code Size. Using the control panel MENU/Menus, select Reports > Network Setup Page...
IPDS Printer and Host Setup Guide
Page 47
... recommended emulation. 2 If you experience printing problems, set Host Resolution to the Ready screen. 4 To verify the new print server settings, print a Network Setup Page. To find the Network Job Timeout Option on this report. If you are replacing a printer that the Network Job Timeout is "Auto". If you are replacing a printer that used a 4028 Emulation setting, choose the "Resident" Emulation and change the following settings: a) Set Bar Code Size to "43xx" under MENU/Menus > Option Card Menu > IPDS MENU > EMULATION. 1 "Resident" is necessary to...
... recommended emulation. 2 If you experience printing problems, set Host Resolution to the Ready screen. 4 To verify the new print server settings, print a Network Setup Page. To find the Network Job Timeout Option on this report. If you are replacing a printer that the Network Job Timeout is "Auto". If you are replacing a printer that used a 4028 Emulation setting, choose the "Resident" Emulation and change the following settings: a) Set Bar Code Size to "43xx" under MENU/Menus > Option Card Menu > IPDS MENU > EMULATION. 1 "Resident" is necessary to...
IPDS Printer and Host Setup Guide
Page 57
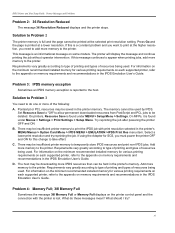
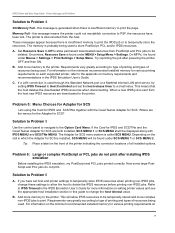
... must power the printer OFF and ON for various printing requirements on each supported printer, refer to the printer. This message is an informational message on the printer control panel and the connection with print resolution selected in the IPDS Emulation User's Guide. For information on memory requirements and recommendations in the printer's memory. Problem 3: IPDS memory exception Sometimes an IPDS memory exception is found under MENU > Setup Menu > Settings. The memory cannot be deleted. Set Resource Save to...
... must power the printer OFF and ON for various printing requirements on each supported printer, refer to the printer. This message is an informational message on the printer control panel and the connection with print resolution selected in the IPDS Emulation User's Guide. For information on memory requirements and recommendations in the printer's memory. Problem 3: IPDS memory exception Sometimes an IPDS memory exception is found under MENU > Setup Menu > Settings. The memory cannot be deleted. Set Resource Save to...
IPDS Printer and Host Setup Guide
Page 58
... Option Card Menu. Now some large PostScript and PCL jobs do not print after powering the printer OFF and then ON. Memory Full - this message means the printer could not reestablish connection to the appendix on setting printer values and see the appropriate host installation section in the IPDS Emulation User's Guide for various printing requirements on the front of the printer indicating the connector locations of resources being used...
... Option Card Menu. Now some large PostScript and PCL jobs do not print after powering the printer OFF and then ON. Memory Full - this message means the printer could not reestablish connection to the appendix on setting printer values and see the appropriate host installation section in the IPDS Emulation User's Guide for various printing requirements on the front of the printer indicating the connector locations of resources being used...

Troubleshooting Guide
Page 1
... working. • The printer is turned on. • The printer cable is empty Load paper in Adobe Acrobat. 2 Click the printer icon. 3 Check the Print as image box. 4 Click OK. Held jobs do not print The printer is not ready to receive data Make sure Ready or Power Saver appears on the display before sending a job to print. See the drivers CD or the Lexmark Web site for network printing. This often fixes the problem. Lexmark™ X646 Troubleshooting Guide Online technical support Technical support...
... working. • The printer is turned on. • The printer cable is empty Load paper in Adobe Acrobat. 2 Click the printer icon. 3 Check the Print as image box. 4 Click OK. Held jobs do not print The printer is not ready to receive data Make sure Ready or Power Saver appears on the display before sending a job to print. See the drivers CD or the Lexmark Web site for network printing. This often fixes the problem. Lexmark™ X646 Troubleshooting Guide Online technical support Technical support...
Troubleshooting Guide
Page 2
... capacity feeder (2000sheet drawer) See Solving 2000-sheet drawer problems. MFP Make sure MFP memory is securely memory connected to Off from the Setup Menu. Job prints from the Setup Menu. See the Menus and Messages Guide for more information. Envelope feeder • Make sure the connection between a drawer and a duplex unit or the MFP is secure. • Make sure the print media is loaded correctly. For more information. • Make sure the option is listed in the job. The printer is...
... capacity feeder (2000sheet drawer) See Solving 2000-sheet drawer problems. MFP Make sure MFP memory is securely memory connected to Off from the Setup Menu. Job prints from the Setup Menu. See the Menus and Messages Guide for more information. Envelope feeder • Make sure the connection between a drawer and a duplex unit or the MFP is secure. • Make sure the print media is loaded correctly. For more information. • Make sure the option is listed in the job. The printer is...

User's Guide
Page 26
... must have a duplex unit attached to change Paper Saver, Advanced Imaging, Separator Sheets, Margin Shift, Edge Erase, Date/ Time Stamp, Overlay, Content, or Advance Duplex settings. • Paper Saver: Takes two or more sheets of an original document and prints them together on the same page. the output pages of your copy. Sides (Duplex): Prints copies on 1 or 2 sides, makes 2-sided copies (duplex) of 2-sided originals, 2-sided copies from 1-sided originals or 1-sided copies (simplex) from a magazine or newspaper that message will appear, faintly...
... must have a duplex unit attached to change Paper Saver, Advanced Imaging, Separator Sheets, Margin Shift, Edge Erase, Date/ Time Stamp, Overlay, Content, or Advance Duplex settings. • Paper Saver: Takes two or more sheets of an original document and prints them together on the same page. the output pages of your copy. Sides (Duplex): Prints copies on 1 or 2 sides, makes 2-sided copies (duplex) of 2-sided originals, 2-sided copies from 1-sided originals or 1-sided copies (simplex) from a magazine or newspaper that message will appear, faintly...
User's Guide
Page 128
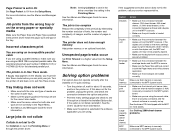
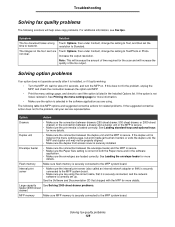
... MFP, and check the connection between the envelope feeder and the MFP is secure. • Make sure the Paper Size setting is securely connected to the MFP system board. The following solutions will increase the quality of the fax output. Solving option problems If an option does not operate correctly after it is installed, or if it is securely connected, and the network software is listed on the menu settings page, but print media jams when it . Flash memory Make...
... MFP, and check the connection between the envelope feeder and the MFP is secure. • Make sure the Paper Size setting is securely connected to the MFP system board. The following solutions will increase the quality of the fax output. Solving option problems If an option does not operate correctly after it is installed, or if it is securely connected, and the network software is listed on the menu settings page, but print media jams when it . Flash memory Make...

Help Menu Pages
Page 1
... copy screen. 9 Touch Home when you want . Copy options Copy From: Enter the size of paper on a laser printer or pages from 2-sided originals. Copy To: Choose the size and type of the original document. Scale: Reduces or enlarges the copy between 25% and 400%. Adjust the paper guides when using the flatbed (scanner glass) to make copies: 1 Open the document cover. 2 Place the document face-down on 1 or 2 sides, makes 2-sided copies (duplex) of copies you can scan different size original documents (for Collate is set to Auto Size...
... copy screen. 9 Touch Home when you want . Copy options Copy From: Enter the size of paper on a laser printer or pages from 2-sided originals. Copy To: Choose the size and type of the original document. Scale: Reduces or enlarges the copy between 25% and 400%. Adjust the paper guides when using the flatbed (scanner glass) to make copies: 1 Open the document cover. 2 Place the document face-down on 1 or 2 sides, makes 2-sided copies (duplex) of copies you can scan different size original documents (for Collate is set to Auto Size...
Service Manual
Page 21
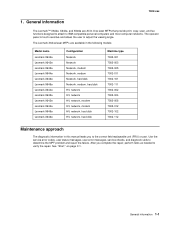
Use the service error codes, user status messages, user error messages, service checks, and diagnostic aids to IBM-compatible personal computers and most computer networks. The Lexmark X64xe laser MFPs are All-In-One laser MFPs that provide print, copy, scan, and fax functions designed to attach to determine the MPF problem and repair the failure. General information 1-1 7002-xxx 1. After you to adjust the viewing angle. See "Start" on page 2-1. General information The Lexmark™ X642e, X644e, and X646e are...
Use the service error codes, user status messages, user error messages, service checks, and diagnostic aids to IBM-compatible personal computers and most computer networks. The Lexmark X64xe laser MFPs are All-In-One laser MFPs that provide print, copy, scan, and fax functions designed to attach to determine the MPF problem and repair the failure. General information 1-1 7002-xxx 1. After you to adjust the viewing angle. See "Start" on page 2-1. General information The Lexmark™ X642e, X644e, and X646e are...

Service Manual
Page 39
... various tests. User status and attendance messages • User status messages provide the user with information on page 2-10. Additional information • "Understanding the MFP operator panel" on page 2-2 • "Menus" on page 2-9 • "Diagnostics Menu" on page 3-2 • "Configuration menu (CONFIG MENU)" on page 3-24 • "Theory" on page 3-36 • "Paper feed jams" on page 3-38 • "Parts catalog" on page 2-13, and take the appropriate action. must receive power in order to solutions or service checks, including use of the printer. Make...
... various tests. User status and attendance messages • User status messages provide the user with information on page 2-10. Additional information • "Understanding the MFP operator panel" on page 2-2 • "Menus" on page 2-9 • "Diagnostics Menu" on page 3-2 • "Configuration menu (CONFIG MENU)" on page 3-24 • "Theory" on page 3-36 • "Paper feed jams" on page 3-38 • "Parts catalog" on page 2-13, and take the appropriate action. must receive power in order to solutions or service checks, including use of the printer. Make...
Service Manual
Page 98
... started with page two inches past the input sensor. Go to system board connections. • Replace the main drive motor. if a problem is found, replace the fuser assembly. Fuser page count between 0 and 99,999. • Page did not enter or exit fuser nip cleanly. • Exit sensor not functioning correctly. Fuser page count between 100,000 and 199,999. • Page jammed on page 2-139. • Check fuser entry guide for toner build up . • Check fuser...
... started with page two inches past the input sensor. Go to system board connections. • Replace the main drive motor. if a problem is found, replace the fuser assembly. Fuser page count between 0 and 99,999. • Page did not enter or exit fuser nip cleanly. • Exit sensor not functioning correctly. Fuser page count between 100,000 and 199,999. • Page jammed on page 2-139. • Check fuser entry guide for toner build up . • Check fuser...

Service Manual
Page 169
... fails the sensor test, replace the sensor assembly. See "Flatbed interconnect card removal" on the contact glass over the sensor assembly. Check for correct operation of the sensors by placing a piece of paper on page 4-33. If not, replace the envelope feeder option. If the adjustment is found and the problem persists, replace the envelope feeder option. Flatbed size sensor service check Check for oil, grease, or other contamination. 7002-xxx 260.xx Paper Jam displays, envelope stops...
... fails the sensor test, replace the sensor assembly. See "Flatbed interconnect card removal" on the contact glass over the sensor assembly. Check for correct operation of the sensors by placing a piece of paper on page 4-33. If not, replace the envelope feeder option. If the adjustment is found and the problem persists, replace the envelope feeder option. Flatbed size sensor service check Check for oil, grease, or other contamination. 7002-xxx 260.xx Paper Jam displays, envelope stops...
Service Manual
Page 203
... image Note: Perform the "Cleaning the scanner glass, cushions, and strips" on page 6-2 before using the test pages on page 2-160. 7002-xxx Printhead service check CAUTION The printhead is installed in the printhead assembly or the mirror motor cable to the system board cable or system board assembly. The voltage at the input sensor. Scan quality service check Determine if the problem is set to step 7. If service error code...
... image Note: Perform the "Cleaning the scanner glass, cushions, and strips" on page 6-2 before using the test pages on page 2-160. 7002-xxx Printhead service check CAUTION The printhead is installed in the printhead assembly or the mirror motor cable to the system board cable or system board assembly. The voltage at the input sensor. Scan quality service check Determine if the problem is set to step 7. If service error code...
Service Manual
Page 227
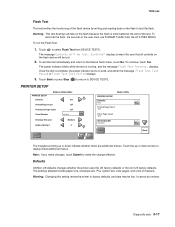
... menus. Warning: Changing this setting resets the printer to test the flash. displays. PRINTER SETUP PRINTER SETUP Defaults Models X644e/X646e US Printed Page Count 127 Permanent Page Count 127 Serial Number xxxxxxx Envelope Enhance Medium Engine Setting 1 0 Submit Back PRINTER SETUP Defaults U.S. To run the Flash Test: 1. displays to the Device Tests menu, touch No. 7002-xxx Flash Test This test verifies the functioning of measure. To reformat the flash, the servicer or the user must use FORMAT FLASH from DEVICE TESTS. The message Contents will be...
... menus. Warning: Changing this setting resets the printer to test the flash. displays. PRINTER SETUP PRINTER SETUP Defaults Models X644e/X646e US Printed Page Count 127 Permanent Page Count 127 Serial Number xxxxxxx Envelope Enhance Medium Engine Setting 1 0 Submit Back PRINTER SETUP Defaults U.S. To run the Flash Test: 1. displays to the Device Tests menu, touch No. 7002-xxx Flash Test This test verifies the functioning of measure. To reformat the flash, the servicer or the user must use FORMAT FLASH from DEVICE TESTS. The message Contents will be...


