Clearing Jams Guide
Page 1
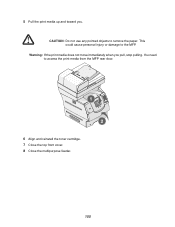
...front covers, remove the print cartridge, and then remove the jam. 202 Paper Jam Open the rear door on the labels in the trays are properly positioned for extended periods. Clearing jams Understanding jam messages Message What to do occur with unfused toner, which may be covered with... clearing the jam, press to light for the size of print media. Lexmark™ X642 Clearing Jams Guide Avoiding jams The following hints can help you Make sure the guides are holding the cartridge. 4 Place the print cartridge aside. Open the ADF cover, and remove any jammed pages. Note: Do...
...front covers, remove the print cartridge, and then remove the jam. 202 Paper Jam Open the rear door on the labels in the trays are properly positioned for extended periods. Clearing jams Understanding jam messages Message What to do occur with unfused toner, which may be covered with... clearing the jam, press to light for the size of print media. Lexmark™ X642 Clearing Jams Guide Avoiding jams The following hints can help you Make sure the guides are holding the cartridge. 4 Place the print cartridge aside. Open the ADF cover, and remove any jammed pages. Note: Do...
Clearing Jams Guide
Page 2
You need to access the print media from the MFP rear door. 8 Close the multipurpose feeder. 3 Remove the jammed media. 1 2 6 Align and reinstall the toner cartridge. 1 2 9 Touch Continue. 202 Paper Jam Open Rear Door 1 If the paper is exiting the MFP, pull the media straight out, and then touch Continue. pull, stop pulling. Otherwise, continue with step 2. 4 Close the rear door. 5 Touch Continue. 23x Paper Jam Open Duplex Rear Door 1 Open the duplex rear door. 7 Close the top front cover. 2 Open the MFP rear door.
You need to access the print media from the MFP rear door. 8 Close the multipurpose feeder. 3 Remove the jammed media. 1 2 6 Align and reinstall the toner cartridge. 1 2 9 Touch Continue. 202 Paper Jam Open Rear Door 1 If the paper is exiting the MFP, pull the media straight out, and then touch Continue. pull, stop pulling. Otherwise, continue with step 2. 4 Close the rear door. 5 Touch Continue. 23x Paper Jam Open Duplex Rear Door 1 Open the duplex rear door. 7 Close the top front cover. 2 Open the MFP rear door.

Troubleshooting Guide
Page 4
... 2 and number 6 keys on the numeric pad. 5 Continue to hold the buttons, and turn the MFP on the page • Check the print cartridge to be low. Toner appears on the back of the job to make sure it is Class B. • Replace the charge rolls. • Replace the print...remains faded. See the User's Guide for about 10 seconds while the MFP is Class B. When the print remains faded, replace the print cartridge. • Change the Toner Darkness setting in the Quality menu. • Change the Brightness setting in the Quality menu. • Change the Contrast setting in the Quality...
... 2 and number 6 keys on the numeric pad. 5 Continue to hold the buttons, and turn the MFP on the page • Check the print cartridge to be low. Toner appears on the back of the job to make sure it is Class B. • Replace the charge rolls. • Replace the print...remains faded. See the User's Guide for about 10 seconds while the MFP is Class B. When the print remains faded, replace the print cartridge. • Change the Toner Darkness setting in the Quality menu. • Change the Brightness setting in the Quality menu. • Change the Contrast setting in the Quality...

Troubleshooting Guide
Page 5
... in the Paper menu is correct. • Verify the environment is Class B. • Replace the charge rolls. • Replace the print cartridge. • Replace the photoconductor kit. Transparency print quality is poor. • Use only transparencies recommended by the printer manufacturer. • Make ...job prints, but the top and side edges margins are supported by gripping the handles with both hands. To utilize the remaining toner, remove the cartridge by the printer, the host computer, and the software application. • Verify the print media type and print tray type ...
... in the Paper menu is correct. • Verify the environment is Class B. • Replace the charge rolls. • Replace the print cartridge. • Replace the photoconductor kit. Transparency print quality is poor. • Use only transparencies recommended by the printer manufacturer. • Make ...job prints, but the top and side edges margins are supported by gripping the handles with both hands. To utilize the remaining toner, remove the cartridge by the printer, the host computer, and the software application. • Verify the print media type and print tray type ...
User's Guide
Page 18
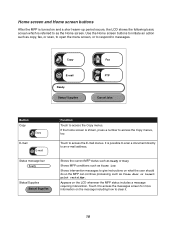
...to open the menu screen, or to respond to give instructions on what the user should do so the MFP can continue processing, such as Toner Low. Status/ Supplies Fax FTP Cancel Jobs Button Copy Copy E-mail E-mail Status message bar Ready Status/Supplies Status/ Supplies Function Touch to... clear it. 18 Shows intervention messages to messages. Shows MFP conditions such as Close door or insert print cartridge. Home screen and Home screen buttons After the MFP is turned on and a short warm-up period occurs, the LCD shows the following ...
...to open the menu screen, or to respond to give instructions on what the user should do so the MFP can continue processing, such as Toner Low. Status/ Supplies Fax FTP Cancel Jobs Button Copy Copy E-mail E-mail Status message bar Ready Status/Supplies Status/ Supplies Function Touch to... clear it. 18 Shows intervention messages to messages. Shows MFP conditions such as Close door or insert print cartridge. Home screen and Home screen buttons After the MFP is turned on and a short warm-up period occurs, the LCD shows the following ...
User's Guide
Page 126
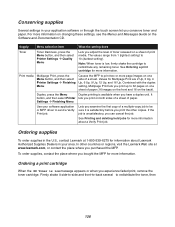
... the job. Ordering supplies To order supplies in the U.S., contact Lexmark at www.lexmark.com, or contact the place where you print on one sheet of print media. Ordering a print cartridge When the 88 Toner is unsatisfactory, you experience faded print, remove the toner cartridge. For more information. Supply Menu selection item What the setting does...
... the job. Ordering supplies To order supplies in the U.S., contact Lexmark at www.lexmark.com, or contact the place where you print on one sheet of print media. Ordering a print cartridge When the 88 Toner is unsatisfactory, you experience faded print, remove the toner cartridge. For more information. Supply Menu selection item What the setting does...
User's Guide
Page 154
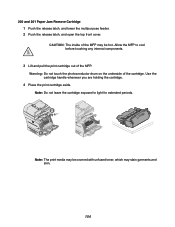
... the photoconductor drum on the underside of the MFP may stain garments and skin. 154 Use the cartridge handle whenever you are holding the cartridge. 4 Place the print cartridge aside. Note: Do not leave the cartridge exposed to cool before touching any internal components. 3 Lift and pull the print... cartridge out of the MFP. CAUTION: The inside of the cartridge. 200 and 201 Paper Jam Remove Cartridge 1 Push the release latch, and lower the multipurpose feeder. 2 Push the release latch, and open the top ...
... the photoconductor drum on the underside of the MFP may stain garments and skin. 154 Use the cartridge handle whenever you are holding the cartridge. 4 Place the print cartridge aside. Note: Do not leave the cartridge exposed to cool before touching any internal components. 3 Lift and pull the print... cartridge out of the MFP. CAUTION: The inside of the cartridge. 200 and 201 Paper Jam Remove Cartridge 1 Push the release latch, and lower the multipurpose feeder. 2 Push the release latch, and open the top ...
User's Guide
Page 155
You need to the MFP. This could cause personal injury or damage to access the print media from the MFP rear door. 1 2 6 Align and reinstall the toner cartridge. 7 Close the top front cover. 8 Close the multipurpose feeder. 155 5 Pull the print media up and toward you pull, stop pulling. CAUTION: Do not use any pointed objects to remove the paper. Warning: If the print media does not move immediately when you .
You need to the MFP. This could cause personal injury or damage to access the print media from the MFP rear door. 1 2 6 Align and reinstall the toner cartridge. 7 Close the top front cover. 8 Close the multipurpose feeder. 155 5 Pull the print media up and toward you pull, stop pulling. CAUTION: Do not use any pointed objects to remove the paper. Warning: If the print media does not move immediately when you .
User's Guide
Page 191
... Start button 16 static sensitivity notice 3 status message bar 18 Stop button 16 supplies label fuser cleaner 130 maintenance kit 129 print cartridge 127 recycling 131 T time stamp 31 toner cartridge recycling 131 transfer roller 130 transparencies loading input tray 79 transparencies, copying 32 tray linking 93 tray selection 33 troubleshooting settings software...
... Start button 16 static sensitivity notice 3 status message bar 18 Stop button 16 supplies label fuser cleaner 130 maintenance kit 129 print cartridge 127 recycling 131 T time stamp 31 toner cartridge recycling 131 transfer roller 130 transparencies loading input tray 79 transparencies, copying 32 tray linking 93 tray selection 33 troubleshooting settings software...

Menus and Messages
Page 43
... text field NULL* Alarms Controls whether the MFP sounds an alarm when the device requires operator intervention. Toner Alarm is activated when the print cartridge or a toner cartridge is low on MM-DD-YYYY* the geographical location. Using MFP menus Menu item Purpose Values and ...descriptions Date Format Specifies the format based on toner. Alarm Control Off Single* Continuous Toner Alarm Off* Single Continuous Alarm ...
... text field NULL* Alarms Controls whether the MFP sounds an alarm when the device requires operator intervention. Toner Alarm is activated when the print cartridge or a toner cartridge is low on MM-DD-YYYY* the geographical location. Using MFP menus Menu item Purpose Values and ...descriptions Date Format Specifies the format based on toner. Alarm Control Off Single* Continuous Toner Alarm Off* Single Continuous Alarm ...
Service Manual
Page 69
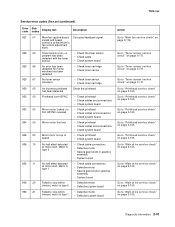
...Go to "Main drive service check" on page 2-119. Go to "Main drive service check" on page 2-171. Go to "Toner sensor service check" on page 2-153. 7002-xxx Service error codes (9xx.xx) (continued) Error code Sub codes Display text ...Printhead service check" on page 2-165. No home windows has been detected. • Check toner cartridge. • Check toner sensor No toner sensor transition. • Check toner sensor • Check toner cartridge An incorrect printhead has been detected Check the printhead Printhead lost lock • Check printhead •...
...Go to "Main drive service check" on page 2-119. Go to "Main drive service check" on page 2-171. Go to "Toner sensor service check" on page 2-153. 7002-xxx Service error codes (9xx.xx) (continued) Error code Sub codes Display text ...Printhead service check" on page 2-165. No home windows has been detected. • Check toner cartridge. • Check toner sensor No toner sensor transition. • Check toner sensor • Check toner cartridge An incorrect printhead has been detected Check the printhead Printhead lost lock • Check printhead •...
Service Manual
Page 78
...resources needed for the job are deleted to receive and process jobs. Toner Low The toner cartridge is turned off and then on. • Replace the toner cartridge. Until the level is read the level of data to clear. The MFP receives a page of toner. Print, fax, scan, e-mail, copy, or use FTP....inserted, go to read , the MFP does not show the message. • The message clears automatically when the cover or door over the toner cartridge is opened or if the MFP power is low on page 2-147. System busy, preparing resources for job. Some held job(s). The Menu Settings...
...resources needed for the job are deleted to receive and process jobs. Toner Low The toner cartridge is turned off and then on. • Replace the toner cartridge. Until the level is read the level of data to clear. The MFP receives a page of toner. Print, fax, scan, e-mail, copy, or use FTP....inserted, go to read , the MFP does not show the message. • The message clears automatically when the cover or door over the toner cartridge is opened or if the MFP power is low on page 2-147. System busy, preparing resources for job. Some held job(s). The Menu Settings...

Service Manual
Page 80
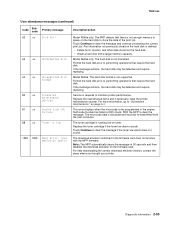
...source for the remainder of print media. 7002-xxx User attendance messages User attendance messages Code Sub code Primary message Description/action Change Cartridge Invalid Refill Select one of the print job. Change [src] to cancel the current job if needed . 2-42 Service Manual Change... [size] [type] Lets the user override the current print media source for the remainder of the following actions: Remove the toner cartridge and install a new cartridge. This may cause clipping of text or images. Touch Continue: • which is ignored if there is no print media in...
...source for the remainder of print media. 7002-xxx User attendance messages User attendance messages Code Sub code Primary message Description/action Change Cartridge Invalid Refill Select one of the print job. Change [src] to cancel the current job if needed . 2-42 Service Manual Change... [size] [type] Lets the user override the current print media source for the remainder of the following actions: Remove the toner cartridge and install a new cartridge. This may cause clipping of text or images. Touch Continue: • which is ignored if there is no print media in...
Service Manual
Page 93
... be defective and require replacing. The microcode data is not formatted. Replace the toner cartridge if the toner low alarm sounds. The download emulator contained in 30 seconds and then disables the download emulator on toner. If the message remains, the hard disk may be re-transmitted from the... a hard disk with the MFP firmware. Any information not previously stored on the hard disk is running low on the firmware card. The toner cartridge is deleted. • Delete fonts, macros, and other data stored on the hard disk to performing operations that require the hard disk. ...
... be defective and require replacing. The microcode data is not formatted. Replace the toner cartridge if the toner low alarm sounds. The download emulator contained in 30 seconds and then disables the download emulator on toner. If the message remains, the hard disk may be re-transmitted from the... a hard disk with the MFP firmware. Any information not previously stored on the hard disk is running low on the firmware card. The toner cartridge is deleted. • Delete fonts, macros, and other data stored on the hard disk to performing operations that require the hard disk. ...

Service Manual
Page 163
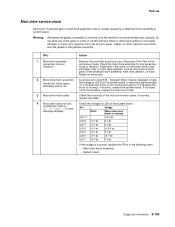
... voltage at J8-1. If the voltage is correct, check the continuity between J8-1 and J8-3 on the toner cartridge is not broken and that the right and left cartridge tracks are working. CAUTION When you begin, or use caution if the product must receive power in continuity ...product where you are not loose or broken. 7002-xxx Cover closed switch/cable service check-printer FRU 1 Toner cartridge 2 Cover closed switch/cable assembly Action Make sure the toner cartridge is correctly installed and that the tab correctly activates the cover closed switch spring. Make sure the cover ...
... voltage at J8-1. If the voltage is correct, check the continuity between J8-1 and J8-3 on the toner cartridge is not broken and that the right and left cartridge tracks are working. CAUTION When you begin, or use caution if the product must receive power in continuity ...product where you are not loose or broken. 7002-xxx Cover closed switch/cable service check-printer FRU 1 Toner cartridge 2 Cover closed switch/cable assembly Action Make sure the toner cartridge is correctly installed and that the tab correctly activates the cover closed switch spring. Make sure the cover ...
Service Manual
Page 191
... the main drive motor. Check the voltages at J20-6 on the system board. Do not allow any loose or worn parts in the main drive, toner cartridge, fuser, or main drive gearbox. Check the voltage at J20 on ) 3 Main drive motor cable 4 Motor gear does not turn, no 936 error code or...
... the main drive motor. Check the voltages at J20-6 on the system board. Do not allow any loose or worn parts in the main drive, toner cartridge, fuser, or main drive gearbox. Check the voltage at J20 on ) 3 Main drive motor cable 4 Motor gear does not turn, no 936 error code or...
Service Manual
Page 200
... J15-2 +4 V dc J15-4 0 V dc Printer printing J15-1 0 V dc to +5 V dc J15-2 0 V dc to +4 V dc J15-4 0 V dc to improve the print quality by rough papers, non-Lexmark toner cartridges or if the media texture is set to printer ground. If there is not continuity, replace the harness cable. If J15-2 voltage is incorrect, check...
... J15-2 +4 V dc J15-4 0 V dc Printer printing J15-1 0 V dc to +5 V dc J15-2 0 V dc to +4 V dc J15-4 0 V dc to improve the print quality by rough papers, non-Lexmark toner cartridges or if the media texture is set to printer ground. If there is not continuity, replace the harness cable. If J15-2 voltage is incorrect, check...
Service Manual
Page 217
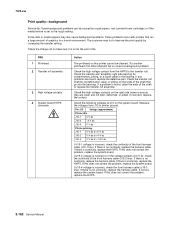
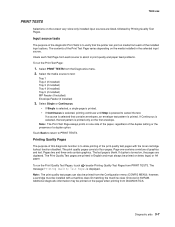
... each of the installed input options. The contents of four pages. Check each Test Page from the Configuration menu (CONFIG MENU), however, a cartridge must always be installed with the toner cartridge lockout function disabled. Pages two and three only contain graphics. The print quality pages consist of the Print Test Page varies depending...
... each of the installed input options. The contents of four pages. Check each Test Page from the Configuration menu (CONFIG MENU), however, a cartridge must always be installed with the toner cartridge lockout function disabled. Pages two and three only contain graphics. The print quality pages consist of the Print Test Page varies depending...
Service Manual
Page 257
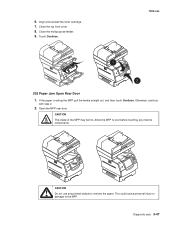
Otherwise, continue with step 2. 2. Open the MFP rear door. Allow the MFP to the MFP. Close the top front cover. 8. This could cause personal injury or damage to cool before touching any pointed objects to remove the paper. Touch Continue. 7002-xxx 1 2 202 Paper Jam Open Rear Door 1. Diagnostic aids 3-47 If the paper is exiting the MFP, pull the media straight out, and then touch Continue. CAUTION Do not use any internal components. 6. CAUTION The inside of the MFP may be hot. Close the multipurpose feeder. 9. Align and reinstall the toner cartridge. 7.
Otherwise, continue with step 2. 2. Open the MFP rear door. Allow the MFP to the MFP. Close the top front cover. 8. This could cause personal injury or damage to cool before touching any pointed objects to remove the paper. Touch Continue. 7002-xxx 1 2 202 Paper Jam Open Rear Door 1. Diagnostic aids 3-47 If the paper is exiting the MFP, pull the media straight out, and then touch Continue. CAUTION Do not use any internal components. 6. CAUTION The inside of the MFP may be hot. Close the multipurpose feeder. 9. Align and reinstall the toner cartridge. 7.
Service Manual
Page 333
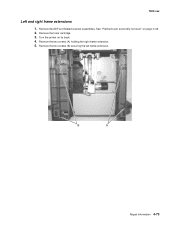
Remove the toner cartridge. 3. Repair information 4-73 Remove the two screws (A) holding the right frame extension. 5. Turn the printer on page 4-38. 2. Remove the two screws (B) securing the left frame extension. 7002-xxx Left and right frame extensions 1. See "Flatbed scan assembly removal" on its back. 4. Remove the ADF and flatbed scanner assemblies.
Remove the toner cartridge. 3. Repair information 4-73 Remove the two screws (A) holding the right frame extension. 5. Turn the printer on page 4-38. 2. Remove the two screws (B) securing the left frame extension. 7002-xxx Left and right frame extensions 1. See "Flatbed scan assembly removal" on its back. 4. Remove the ADF and flatbed scanner assemblies.


