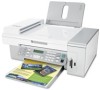

User's Guide
Page 3
... original documents 43 Loading paper...43 Loading various paper types...43 Loading original documents into the Automatic Document Feeder 46 Loading original documents on the scanner glass 48 Printing 50 Printing a document...50 Printing a Web page...50 Printing photos or images from a Web page...51 Printing collated copies...51 Contents...
... original documents 43 Loading paper...43 Loading various paper types...43 Loading original documents into the Automatic Document Feeder 46 Loading original documents on the scanner glass 48 Printing 50 Printing a document...50 Printing a Web page...50 Printing photos or images from a Web page...51 Printing collated copies...51 Contents...
User's Guide
Page 5
... printer 89 Changing print cartridges...89 Achieving better print quality...91 Preserving the print cartridges...93 Cleaning the scanner glass...94 Ordering supplies...94 Using genuine Lexmark print cartridges...95 Refilling a print cartridge...95 Recycling Lexmark products...95 Troubleshooting 96 Setup troubleshooting...96 Print troubleshooting...99 Copy troubleshooting...102 Scan troubleshooting...103 Fax...
... printer 89 Changing print cartridges...89 Achieving better print quality...91 Preserving the print cartridges...93 Cleaning the scanner glass...94 Ordering supplies...94 Using genuine Lexmark print cartridges...95 Refilling a print cartridge...95 Recycling Lexmark products...95 Troubleshooting 96 Setup troubleshooting...96 Print troubleshooting...99 Copy troubleshooting...102 Scan troubleshooting...103 Fax...

User's Guide
Page 21
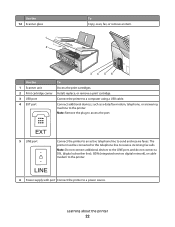
... into the ADF. Learning about the printer 21 For more information, see "Using the control panel" on the scanner glass. 10 Paper guide Keep paper straight when feeding. 11 Top cover Access the scanner glass. Place these items on page 23. 6 Paper exit tray Hold paper as magazine clippings) into the ADF...
... into the ADF. Learning about the printer 21 For more information, see "Using the control panel" on the scanner glass. 10 Paper guide Keep paper straight when feeding. 11 Top cover Access the scanner glass. Place these items on page 23. 6 Paper exit tray Hold paper as magazine clippings) into the ADF...
User's Guide
Page 22
... printer to an active telephone line to a power source. Note: Remove the plug to the printer. Use the 12 Scanner glass 1 2 To Copy, scan, fax, or remove an item. 34 5 6 Use the To 1 Scanner unit Access the print cartridges. 2 Print cartridge carrier Install, replace, or remove a print cartridge. 3 USB port Connect the...
... printer to an active telephone line to a power source. Note: Remove the plug to the printer. Use the 12 Scanner glass 1 2 To Copy, scan, fax, or remove an item. 34 5 6 Use the To 1 Scanner unit Access the print cartridges. 2 Print cartridge carrier Install, replace, or remove a print cartridge. 3 USB port Connect the...

User's Guide
Page 46
... can load A4, letter, or legal-size paper into the Automatic Document Feeder (ADF) for the banner in Print Properties. Place these items on the scanner glass. 1 If you are using A4 or letter-size paper, pull up the ADF paper stop. 2 Adjust the paper guide on page 38. For more...
... can load A4, letter, or legal-size paper into the Automatic Document Feeder (ADF) for the banner in Print Properties. Place these items on the scanner glass. 1 If you are using A4 or letter-size paper, pull up the ADF paper stop. 2 Adjust the paper guide on page 38. For more...

User's Guide
Page 47
... Document Feeder paper capacity Load up to Make sure 10 sheets of the original document. • The original document is not supported when using the scanner. 4 Load the original document facedown and top edge first into the ADF. Note: Preview is loaded facedown, top edge first, until you hear a beep...
... Document Feeder paper capacity Load up to Make sure 10 sheets of the original document. • The original document is not supported when using the scanner. 4 Load the original document facedown and top edge first into the ADF. Note: Preview is loaded facedown, top edge first, until you hear a beep...

User's Guide
Page 48
... on . 2 Open the top cover. Note: Place postcards, photos, small items, transparencies, photo paper, or thin items (such as magazine clippings) on the scanner glass instead of the original document. • The original document is loaded facedown, top edge first, until you hear a beep. • The paper size fits...in.-14.0 in. • You allow preprinted media to the width of in the ADF. 1 Make sure the computer and the printer are on the scanner glass You can scan a document for faxing. Load up to 10 sheets of: • Custom paper • Pre-punched paper • Reinforced edge ...
... on . 2 Open the top cover. Note: Place postcards, photos, small items, transparencies, photo paper, or thin items (such as magazine clippings) on the scanner glass instead of the original document. • The original document is loaded facedown, top edge first, until you hear a beep. • The paper size fits...in.-14.0 in. • You allow preprinted media to the width of in the ADF. 1 Make sure the computer and the printer are on the scanner glass You can scan a document for faxing. Load up to 10 sheets of: • Custom paper • Pre-punched paper • Reinforced edge ...

User's Guide
Page 49
3 Place the original document or item facedown on the scanned image. Note: Photos should be loaded as shown. 4 Close the top cover to avoid dark edges on the scanner glass in the upper left corner. Loading paper and original documents 49
3 Place the original document or item facedown on the scanned image. Note: Photos should be loaded as shown. 4 Close the top cover to avoid dark edges on the scanner glass in the upper left corner. Loading paper and original documents 49
User's Guide
Page 59
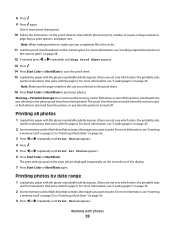
... time the printer is the printable side, see the instructions that came with the paper.) For more information, see "Loading original documents on the scanner glass" on the scanner glass. 8 Press . 9 Press again. One or more information, see "Loading paper" on the second line of copies, red eye reduction, page layout, print...
... time the printer is the printable side, see the instructions that came with the paper.) For more information, see "Loading original documents on the scanner glass" on the scanner glass. 8 Press . 9 Press again. One or more information, see "Loading paper" on the second line of copies, red eye reduction, page layout, print...

User's Guide
Page 64
...these items on page 48. 3 If necessary, press Copy Mode. 4 Press . 5 Press or repeatedly until Quality appears. 6 Press . Copying ADF Scanner glass Use the ADF for single pages, small items (such as postcards or photos), transparencies, photo paper, or thin media (such as magazine clippings) into... the ADF or on the scanner glass. Use the scanner glass for multiple-page A4, letter or legal size documents. Copying 64 Making a copy 1 Load paper. 2 Load an original document...
...these items on page 48. 3 If necessary, press Copy Mode. 4 Press . 5 Press or repeatedly until Quality appears. 6 Press . Copying ADF Scanner glass Use the ADF for single pages, small items (such as postcards or photos), transparencies, photo paper, or thin media (such as magazine clippings) into... the ADF or on the scanner glass. Use the scanner glass for multiple-page A4, letter or legal size documents. Copying 64 Making a copy 1 Load paper. 2 Load an original document...

User's Guide
Page 65
... print the copies as groups of pages (not collated). Collated Not collated 1 Load paper. 2 Load an original document facedown into the ADF or on the scanner glass. 3 From the control panel, press Copy Mode. 4 Press . 5 Press or repeatedly until Collate appears. 6 Press . 7 Press or repeatedly until the size you can choose...
... print the copies as groups of pages (not collated). Collated Not collated 1 Load paper. 2 Load an original document facedown into the ADF or on the scanner glass. 3 From the control panel, press Copy Mode. 4 Press . 5 Press or repeatedly until Collate appears. 6 Press . 7 Press or repeatedly until the size you can choose...

User's Guide
Page 66
...Load paper. Note: To select Custom Resize, press and use photo or heavyweight matte paper, with the paper.) 2 Load an original document facedown on the scanner glass. 3 From the control panel, press Copy Mode. 4 Press . 5 Press or repeatedly until Repeat Image appears. 6 Press . 7 Press or repeatedly... document facedown into the ADF. Note: If you want to enter a custom size. 8 Press Start Color or Start Black. Place these items on the scanner glass. 3 From the control panel, press Copy Mode. 4 Press . 5 Press or repeatedly until Resize appears. 6 Press . 7 Press or repeatedly ...
...Load paper. Note: To select Custom Resize, press and use photo or heavyweight matte paper, with the paper.) 2 Load an original document facedown on the scanner glass. 3 From the control panel, press Copy Mode. 4 Press . 5 Press or repeatedly until Repeat Image appears. 6 Press . 7 Press or repeatedly... document facedown into the ADF. Note: If you want to enter a custom size. 8 Press Start Color or Start Black. Place these items on the scanner glass. 3 From the control panel, press Copy Mode. 4 Press . 5 Press or repeatedly until Resize appears. 6 Press . 7 Press or repeatedly ...

User's Guide
Page 67
...click File ΠSave As. 7 Enter the file name, format, and location where you want the scanned image saved. 8 Click Save. Use the scanner glass for multiple-page A4, letter, or legal size documents. Scanning 67 Scanning a document 1 Make sure the printer is connected to a computer, and both... the printer and the computer are on. 2 Load an original document facedown into the ADF or on page 27. Scanning ADF Scanner glass Use the ADF for single pages, small items (such as postcards or photos), transparencies, photo paper, or thin media (such as magazine ...
...click File ΠSave As. 7 Enter the file name, format, and location where you want the scanned image saved. 8 Click Save. Use the scanner glass for multiple-page A4, letter, or legal size documents. Scanning 67 Scanning a document 1 Make sure the printer is connected to a computer, and both... the printer and the computer are on. 2 Load an original document facedown into the ADF or on page 27. Scanning ADF Scanner glass Use the ADF for single pages, small items (such as postcards or photos), transparencies, photo paper, or thin media (such as magazine ...

User's Guide
Page 68
.... b Customize the scan settings using the tabs listed in the following table. c Click OK. 11 Click Scan Now. Place these items on the scanner glass. Advanced Scan Settings tabs Options Scan • Select the color depth. • Select the scan resolution. • Select Optical Scan settings. ...Note: Do not load postcards, photos, small items, transparencies, photo paper, or thin media (such as magazine clippings) into the ADF or on the scanner glass. 3 From the control panel, press Scan Mode. 4 Press or repeatedly until E-mail appears. 6 If you want to scan only a portion of...
.... b Customize the scan settings using the tabs listed in the following table. c Click OK. 11 Click Scan Now. Place these items on the scanner glass. Advanced Scan Settings tabs Options Scan • Select the color depth. • Select the scan resolution. • Select Optical Scan settings. ...Note: Do not load postcards, photos, small items, transparencies, photo paper, or thin media (such as magazine clippings) into the ADF or on the scanner glass. 3 From the control panel, press Scan Mode. 4 Press or repeatedly until E-mail appears. 6 If you want to scan only a portion of...

User's Guide
Page 69
...; The printer is connected to a computer, and both the printer and the computer are on. • ABBYY Fine Reader is not supported when using the scanner. 6 Select a word-processing program to edit the text. 7 Click Send Now. 8 Edit and save the document. 5 Press Start Color or Start Black. 6 ...Follow the instructions on the scanner glass. 3 From the desktop, double-click the Imaging Studio icon. 4 Click Scan. 5 From the "Send scanned image to" menu, select a graphics program to...
...; The printer is connected to a computer, and both the printer and the computer are on. • ABBYY Fine Reader is not supported when using the scanner. 6 Select a word-processing program to edit the text. 7 Click Send Now. 8 Edit and save the document. 5 Press Start Color or Start Black. 6 ...Follow the instructions on the scanner glass. 3 From the desktop, double-click the Imaging Studio icon. 4 Click Scan. 5 From the "Send scanned image to" menu, select a graphics program to...

User's Guide
Page 70
...the computer to which you want to a computer over a network (Direct IP Printing). 2 Load an original document facedown into the ADF or on the scanner glass. 3 From the control panel, press Scan Mode. 4 Press or repeatedly until the scan destination you want appears. 7 Press Start Color or Start..., photos, small items, transparencies, photo paper, or thin media (such as magazine clippings) into the ADF. Place these items on the scanner glass. Note: Do not load postcards, photos, small items, transparencies, photo paper, or thin media (such as magazine clippings) into the ADF.
...the computer to which you want to a computer over a network (Direct IP Printing). 2 Load an original document facedown into the ADF or on the scanner glass. 3 From the control panel, press Scan Mode. 4 Press or repeatedly until the scan destination you want appears. 7 Press Start Color or Start..., photos, small items, transparencies, photo paper, or thin media (such as magazine clippings) into the ADF. Place these items on the scanner glass. Note: Do not load postcards, photos, small items, transparencies, photo paper, or thin media (such as magazine clippings) into the ADF.

User's Guide
Page 71
Faxing ADF Scanner glass Use the ADF for single pages, small items (such as postcards or photos), transparencies, photo paper, or thin media (such as magazine clippings). Note: If you want to customize fax settings: • Using the control panel, see "Using the Fax menu" on page 27. • Using the computer, see "Customizing settings using the Fax Setup Utility" on page 80. Faxing 71 Use the scanner glass for : • Multiple-page A4 or letter-size documents. • Legal-size documents.
Faxing ADF Scanner glass Use the ADF for single pages, small items (such as postcards or photos), transparencies, photo paper, or thin media (such as magazine clippings). Note: If you want to customize fax settings: • Using the control panel, see "Using the Fax menu" on page 27. • Using the computer, see "Customizing settings using the Fax Setup Utility" on page 80. Faxing 71 Use the scanner glass for : • Multiple-page A4 or letter-size documents. • Legal-size documents.
User's Guide
Page 72
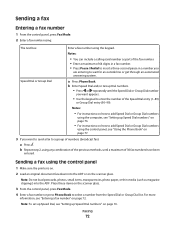
...-99). Notes: • For instructions on how to add Speed Dial or Group Dial numbers using the computer, see "Using the Phone Book" on the scanner glass. 3 From the control panel, press Fax Mode. 4 Enter a fax number or press Phone Book to add Speed Dial or Group Dial numbers using... for an outside line or get through an automated answering system. b Repeat step 2, using the control panel, see "Setting up Speed Dial numbers" on the scanner glass. Sending a fax using the keypad. Notes: • You can include a calling card number as magazine clippings) into the ADF or on page 76....
...-99). Notes: • For instructions on how to add Speed Dial or Group Dial numbers using the computer, see "Using the Phone Book" on the scanner glass. 3 From the control panel, press Fax Mode. 4 Enter a fax number or press Phone Book to add Speed Dial or Group Dial numbers using... for an outside line or get through an automated answering system. b Repeat step 2, using the control panel, see "Setting up Speed Dial numbers" on the scanner glass. Sending a fax using the keypad. Notes: • You can include a calling card number as magazine clippings) into the ADF or on page 76....
User's Guide
Page 73
... Enter a fax number, or press Phone Book to select a number from the Speed Dial or Group Dial list. Faxing 73 Place these items on the scanner glass. 3 From the desktop, double-click the Imaging Studio icon. 4 Click Fax. 5 Click Fax a document in the All-in-One Center. 6... Follow the instructions on the scanner glass. 2 From the control panel, press Fax Mode. 3 Press . 4 Press or repeatedly until Delay Fax appears. 5 Press . 6 Press or repeatedly until a maximum ...
... Enter a fax number, or press Phone Book to select a number from the Speed Dial or Group Dial list. Faxing 73 Place these items on the scanner glass. 3 From the desktop, double-click the Imaging Studio icon. 4 Click Fax. 5 Click Fax a document in the All-in-One Center. 6... Follow the instructions on the scanner glass. 2 From the control panel, press Fax Mode. 3 Press . 4 Press or repeatedly until Delay Fax appears. 5 Press . 6 Press or repeatedly until a maximum ...
User's Guide
Page 89
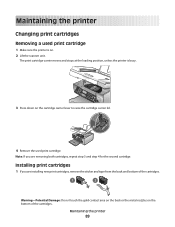
... 4 for the second cartridge. Maintaining the printer Changing print cartridges Removing a used print cartridge 1 Make sure the printer is busy. 3 Press down on . 2 Lift the scanner unit. Installing print cartridges 1 If you are installing new print cartridges, remove the sticker and tape from the back and bottom of the cartridges. 1 2 Warning...
... 4 for the second cartridge. Maintaining the printer Changing print cartridges Removing a used print cartridge 1 Make sure the printer is busy. 3 Press down on . 2 Lift the scanner unit. Installing print cartridges 1 If you are installing new print cartridges, remove the sticker and tape from the back and bottom of the cartridges. 1 2 Warning...


