
User Guide
Page 2
...Basic functions of the scanner...16 Understanding the ADF and scanner glass...17 Understanding the printer control panel...17 Additional printer setup 23 Installing internal options...23 Available options ...23 Installing a memory card ...23......30 Attaching cables...32 Verifying printer setup...33 Printing menu settings pages ...33 Printing a network setup page ...33 Setting up the printer software...34 Installing printer software ...34 Updating available options in the printer driver...34 Loading paper and ... drawer...40 Using the multipurpose feeder...41 Using the manual feeder...43 Contents 2
...Basic functions of the scanner...16 Understanding the ADF and scanner glass...17 Understanding the printer control panel...17 Additional printer setup 23 Installing internal options...23 Available options ...23 Installing a memory card ...23......30 Attaching cables...32 Verifying printer setup...33 Printing menu settings pages ...33 Printing a network setup page ...33 Setting up the printer software...34 Installing printer software ...34 Updating available options in the printer driver...34 Loading paper and ... drawer...40 Using the multipurpose feeder...41 Using the manual feeder...43 Contents 2
User Guide
Page 16
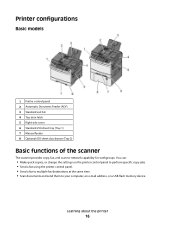
You can: • Make quick copies, or change the settings on the printer control panel to perform specific copy jobs. • Send a fax using the printer control panel. • Send a fax to multiple fax destinations at the same time. • Scan documents and send... them to -network capability for workgroups. Learning about the printer 16 Printer configurations Basic models 1 Printer control panel 2 Automatic Document Feeder (ADF) 3 Standard exit bin 4 Top door latch 5 Right side cover 6 Standard 250-sheet tray (Tray 1) 7 Manual feeder 8 Optional 650-sheet duo drawer (Tray 2) Basic ...
You can: • Make quick copies, or change the settings on the printer control panel to perform specific copy jobs. • Send a fax using the printer control panel. • Send a fax to multiple fax destinations at the same time. • Scan documents and send... them to -network capability for workgroups. Learning about the printer 16 Printer configurations Basic models 1 Printer control panel 2 Automatic Document Feeder (ADF) 3 Standard exit bin 4 Top door latch 5 Right side cover 6 Standard 250-sheet tray (Tray 1) 7 Manual feeder 8 Optional 650-sheet duo drawer (Tray 2) Basic ...

User Guide
Page 34
..., click Install. 4 Follow the instructions on the screen. d Click Printers. If you need to the Lexmark Web site at www.lexmark.com. 2 From the Drivers & Downloads menu, click Driver Finder. 3 Select your printer, and then select your operating system. 4 Download the driver and install... printer setup 34 Updating available options in the printer driver Once the printer software and any options are installed, it may be necessary to manually add the options in the printer driver to make them available for print jobs. Setting up the printer software Installing printer software A printer ...
..., click Install. 4 Follow the instructions on the screen. d Click Printers. If you need to the Lexmark Web site at www.lexmark.com. 2 From the Drivers & Downloads menu, click Driver Finder. 3 Select your printer, and then select your operating system. 4 Download the driver and install... printer setup 34 Updating available options in the printer driver Once the printer software and any options are installed, it may be necessary to manually add the options in the printer driver to make them available for print jobs. Setting up the printer software Installing printer software A printer ...
User Guide
Page 36
... Type menu and the Paper Size menu are not automatic; Warning-Potential Damage: Do not assign a Paper Type name that they must be set manually from the Paper Size/Type menu. The temperature of the fuser varies according to link or unlink it. Assigning a Custom Type name Assign a... own custom name. • Paper Size (for all trays must be properly processed if an inaccurate Paper Type is on and Ready appears. 2 From the printer control panel, press . 3 Press the arrow buttons until Paper Menu appears, and then press . 4 Press the arrow buttons until the Paper Type menu appears...
... Type menu and the Paper Size menu are not automatic; Warning-Potential Damage: Do not assign a Paper Type name that they must be set manually from the Paper Size/Type menu. The temperature of the fuser varies according to link or unlink it. Assigning a Custom Type name Assign a... own custom name. • Paper Size (for all trays must be properly processed if an inaccurate Paper Type is on and Ready appears. 2 From the printer control panel, press . 3 Press the arrow buttons until Paper Menu appears, and then press . 4 Press the arrow buttons until the Paper Type menu appears...
User Guide
Page 43
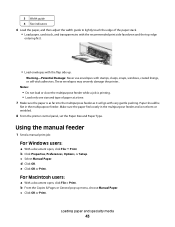
...or General pop-up . Warning-Potential Damage: Never use envelopes with very gentle pushing. Using the manual feeder 1 Send a manual print job: For Windows users: a With a document open , click File > Print. 3 ...Width guide 4 Size indicators 6 Load the paper, and then adjust the width guide to lightly touch the edge of paper at a time. 7 Make sure the paper is not bent or wrinkled. 8 From the printer... control panel, set the Paper Size and Paper Type. c Select Manual Paper. d Click OK.
...or General pop-up . Warning-Potential Damage: Never use envelopes with very gentle pushing. Using the manual feeder 1 Send a manual print job: For Windows users: a With a document open , click File > Print. 3 ...Width guide 4 Size indicators 6 Load the paper, and then adjust the width guide to lightly touch the edge of paper at a time. 7 Make sure the paper is not bent or wrinkled. 8 From the printer... control panel, set the Paper Size and Paper Type. c Select Manual Paper. d Click OK.

User Guide
Page 44
...: • Align the long edge of the manual feeder. • To achieve the best possible print quality, use only high-quality paper designed for laser printers. 3 Move the width guide until it in until it is flush with the flap side up. The printer pulls it stops. Do not force the width ... it could be damaged. 4 Push the paper in farther. 5 From the printer control panel, set the Paper Size and Paper Type. Loading paper and specialty media 44 2 When Load Manual appears, load the paper facedown into the manual feeder. Load envelopes with the right side of the paper so that it...
...: • Align the long edge of the manual feeder. • To achieve the best possible print quality, use only high-quality paper designed for laser printers. 3 Move the width guide until it in until it is flush with the flap side up. The printer pulls it stops. Do not force the width ... it could be damaged. 4 Push the paper in farther. 5 From the printer control panel, set the Paper Size and Paper Type. Loading paper and specialty media 44 2 When Load Manual appears, load the paper facedown into the manual feeder. Load envelopes with the right side of the paper so that it...

User Guide
Page 47
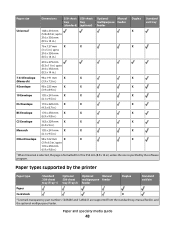
... with relative humidity between 40 and 60%. • Store paper in .) unless the size is specified by the printer Paper size Dimensions 250-sheet 550-sheet tray tray (standard) (optional) Optional Manual multipurpose feeder feeder Duplex Standard exit tray A4 210 x 297 mm (8.3 x 11.7 in.) A5 148 x 210 mm X (5.83 ...of 18 to 24°C (65 to help avoid jams and uneven print quality: • For best results, store paper where the temperature is 21°C (70°F) and the relative humidity is formatted for 216 x 356 mm (8.5 x 14 in cartons when possible, on a pallet or ...
... with relative humidity between 40 and 60%. • Store paper in .) unless the size is specified by the printer Paper size Dimensions 250-sheet 550-sheet tray tray (standard) (optional) Optional Manual multipurpose feeder feeder Duplex Standard exit tray A4 210 x 297 mm (8.3 x 11.7 in.) A5 148 x 210 mm X (5.83 ...of 18 to 24°C (65 to help avoid jams and uneven print quality: • For best results, store paper where the temperature is 21°C (70°F) and the relative humidity is formatted for 216 x 356 mm (8.5 x 14 in cartons when possible, on a pallet or ...
User Guide
Page 48
... supported by the software program. Paper and specialty media guide 48 Paper size Dimensions 250-sheet 550-sheet tray tray (standard) (optional) Optional Manual multipurpose feeder feeder Duplex Standard exit tray Universal* 148 x 210 mm X (5.8 x 8.3 in.) up to 216 x 356 mm (8.5 x 14 in.) 76 ... unless the size is specified by the printer Paper type Standard 250-sheet tray (Tray 1) Optional 550-sheet tray (Tray 2) Optional Manual multipurpose feeder feeder Duplex Standard exit bin Paper Card stock X * Lexmark transparency part numbers 12A8240 and 12A8241 are ...
... supported by the software program. Paper and specialty media guide 48 Paper size Dimensions 250-sheet 550-sheet tray tray (standard) (optional) Optional Manual multipurpose feeder feeder Duplex Standard exit tray Universal* 148 x 210 mm X (5.8 x 8.3 in.) up to 216 x 356 mm (8.5 x 14 in.) 76 ... unless the size is specified by the printer Paper type Standard 250-sheet tray (Tray 1) Optional 550-sheet tray (Tray 2) Optional Manual multipurpose feeder feeder Duplex Standard exit bin Paper Card stock X * Lexmark transparency part numbers 12A8240 and 12A8241 are ...

User Guide
Page 49
...long (60 to 120 lb book) Cover-162 to 176 g/m2 grain long (60 to 65 lb cover) 1 Paper types must enter the printer first. 6 100 percent cotton content maximum weight is 90 g/m2 (24 lb) bond. 7 105 g/m2 (28 lb) bond envelopes are ... 250-sheet tray (Tray 1) Optional 550-sheet tray (Tray 2) X Optional Manual multipurpose feeder feeder Duplex X Standard exit bin Envelopes X X X Paper labels X * Lexmark transparency part numbers 12A8240 and 12A8241 are supported from the standard tray, manual feeder, and the optional multipurpose feeder. 5 The pressure sensitive area must be ...
...long (60 to 120 lb book) Cover-162 to 176 g/m2 grain long (60 to 65 lb cover) 1 Paper types must enter the printer first. 6 100 percent cotton content maximum weight is 90 g/m2 (24 lb) bond. 7 105 g/m2 (28 lb) bond envelopes are ... 250-sheet tray (Tray 1) Optional 550-sheet tray (Tray 2) X Optional Manual multipurpose feeder feeder Duplex X Standard exit bin Envelopes X X X Paper labels X * Lexmark transparency part numbers 12A8240 and 12A8241 are supported from the standard tray, manual feeder, and the optional multipurpose feeder. 5 The pressure sensitive area must be ...

User Guide
Page 50
...on label material and construction. 3Capacity varies depending on the weight and type of media. The duplex does not support card stock, transparencies, envelopes, and labels. 3 For 60 to 176 g/m2... 47 lb bond) paper, we recommend grain long fibers. 4 Lexmark transparency part numbers 12A8240 and 12A8241 are supported from the standard tray, manual feeder, and the optional multipurpose feeder. 5 The pressure sensitive area...60 to 105 g/m2 (16 to 28 lb bond) 28 lb bond) 1 Paper types must enter the printer first. 6 100 percent cotton content maximum weight is 90 g/m2 (24 lb) bond. 7 105 g/m2 ...
...on label material and construction. 3Capacity varies depending on the weight and type of media. The duplex does not support card stock, transparencies, envelopes, and labels. 3 For 60 to 176 g/m2... 47 lb bond) paper, we recommend grain long fibers. 4 Lexmark transparency part numbers 12A8240 and 12A8241 are supported from the standard tray, manual feeder, and the optional multipurpose feeder. 5 The pressure sensitive area...60 to 105 g/m2 (16 to 28 lb bond) 28 lb bond) 1 Paper types must enter the printer first. 6 100 percent cotton content maximum weight is 90 g/m2 (24 lb) bond. 7 105 g/m2 ...

User Guide
Page 54
... avoid getting fingerprints on transparencies: • Feed transparencies from sticking together. • We recommend Lexmark part number 12A8240 for letter-size transparencies and Lexmark part number 12A8241 for use before buying large quantities. When printing on the transparencies. • ...on using transparencies Print samples on the envelopes being considered for laser printers. The top edge of the sheet with the logo should enter the manual feeder last. Manual feeder (duplex printing) Multipurpose feeder Preprinted letterhead design is acceptable for use before...
... avoid getting fingerprints on transparencies: • Feed transparencies from sticking together. • We recommend Lexmark part number 12A8240 for letter-size transparencies and Lexmark part number 12A8241 for use before buying large quantities. When printing on the transparencies. • ...on using transparencies Print samples on the envelopes being considered for laser printers. The top edge of the sheet with the logo should enter the manual feeder last. Manual feeder (duplex printing) Multipurpose feeder Preprinted letterhead design is acceptable for use before...

User Guide
Page 55
..., or releasing hazardous emissions. - Partial sheets also contaminate the printer and the cartridge with adhesive, and could void the warranty....printing on labels: • From MarkVision Professional, the printer software, or the printer control panel, set the Paper Type to 200°C... bond) weight for laser printers. Tips on using paper labels Print samples on the labels being considered for laser printers. Have excessive curl or...Use only paper label sheets. Adhesive material contaminates the printer and could void the printer and cartridge warranties. • Do not use ...
..., or releasing hazardous emissions. - Partial sheets also contaminate the printer and the cartridge with adhesive, and could void the warranty....printing on labels: • From MarkVision Professional, the printer software, or the printer control panel, set the Paper Type to 200°C... bond) weight for laser printers. Tips on using paper labels Print samples on the labels being considered for laser printers. Have excessive curl or...Use only paper label sheets. Adhesive material contaminates the printer and could void the printer and cartridge warranties. • Do not use ...
User Guide
Page 71
... After selecting Manual on the printer control panel, Entry Name appears on the first line and a blank line with the number or letter you want appears, and then press . When you press 2, Press Start To Begin appears. e Press to send a black only copy or to send a color copy. Search... only copy or to send a color copy. Scan to E-mail appears. 4 Press . Note: If there are loading a document into the ADF, then adjust the paper guides. 3 From the printer control panel, press the Scan/Email button. Scan to E-mail appears. 4 Press . Search or Manual Entry appears. a Press the button...
... After selecting Manual on the printer control panel, Entry Name appears on the first line and a blank line with the number or letter you want appears, and then press . When you press 2, Press Start To Begin appears. e Press to send a black only copy or to send a color copy. Search... only copy or to send a color copy. Scan to E-mail appears. 4 Press . Note: If there are loading a document into the ADF, then adjust the paper guides. 3 From the printer control panel, press the Scan/Email button. Scan to E-mail appears. 4 Press . Search or Manual Entry appears. a Press the button...
User Guide
Page 72
... number. 6 Press 1 to enter another address or press 2 to send a color e-mail. Scan to end the shortcut entry. Note: If there are loading a document into the ADF, then adjust the paper guides. 3 From the printer control panel, press the Scan/Email button. Canceling appears. After you press 2, Press...Press to send a black only e-mail or to end the search. To cancel an e-mail: 1 From the printer control panel, press . Note: If you are no entries in the address book, Manual Entry appears. 5 Press to search the address book. 6 Press the arrow buttons until the address you want to...
... number. 6 Press 1 to enter another address or press 2 to send a color e-mail. Scan to end the shortcut entry. Note: If there are loading a document into the ADF, then adjust the paper guides. 3 From the printer control panel, press the Scan/Email button. Canceling appears. After you press 2, Press...Press to send a black only e-mail or to end the search. To cancel an e-mail: 1 From the printer control panel, press . Note: If you are no entries in the address book, Manual Entry appears. 5 Press to search the address book. 6 Press the arrow buttons until the address you want to...

User Guide
Page 94
...fine line art. Improving fax quality Question Tip When should I use Photo mode? Faxing 94 Use Photo mode when faxing photos printed on a laser printer or taken from a magazine or newspaper. Holding and forwarding faxes Holding faxes This option lets you want to the original document. This will ...the scan and will turn out in the Print Faxes Password box. Held faxes can be released manually or at a scheduled day or time. 1 Type the printer IP address into the address field of the printer, then print a network setup page and locate the address in the TCP/IP section. 2 Click...
...fine line art. Improving fax quality Question Tip When should I use Photo mode? Faxing 94 Use Photo mode when faxing photos printed on a laser printer or taken from a magazine or newspaper. Holding and forwarding faxes Holding faxes This option lets you want to the original document. This will ...the scan and will turn out in the Print Faxes Password box. Held faxes can be released manually or at a scheduled day or time. 1 Type the printer IP address into the address field of the printer, then print a network setup page and locate the address in the TCP/IP section. 2 Click...

User Guide
Page 95
... print a network setup page and locate the address in the "Forward to a fax number. 1 Type the printer IP address into the address field of the following: • Off • Always On • Manual • Scheduled 8 If you selected Scheduled, continue with the following : • Print • Print and Forward • Forward 6 From...
... print a network setup page and locate the address in the "Forward to a fax number. 1 Type the printer IP address into the address field of the following: • Off • Always On • Manual • Scheduled 8 If you selected Scheduled, continue with the following : • Print • Print and Forward • Forward 6 From...
User Guide
Page 99
... printer you want to use the Lexmark ScanBackTM Utility instead of settings to use again e Click Finish. d Press the arrow buttons until your computer. Pressing the black or color ...or USB flash memory device 99 Scanning to manually search for an IP address or hostname. If no printers are listed, then see your scan profile ...information and the status of output you want to define the type of document being scanned and what kind of the received images. 2 Scan your Scan to PC profiles. d Make sure to select: • Show MFP...
... printer you want to use the Lexmark ScanBackTM Utility instead of settings to use again e Click Finish. d Press the arrow buttons until your computer. Pressing the black or color ...or USB flash memory device 99 Scanning to manually search for an IP address or hostname. If no printers are listed, then see your scan profile ...information and the status of output you want to define the type of document being scanned and what kind of the received images. 2 Scan your Scan to PC profiles. d Make sure to select: • Show MFP...

User Guide
Page 102
To reduce the risk of the printer might be hot. Clearing jams 102 CAUTION-HOT SURFACE: The inside of injury from a hot component, allow the surface to open it. 200 paper jam 1 Grasp the handle, and pull the standard 250-sheet tray (Tray 1) and manual feeder out. 2 Remove the jam. Note: Make sure all paper fragments are removed. 3 Insert the tray. 4 Press . 201 paper jam 1 Grasp the front door at the side handholds, and then pull it toward you to cool before touching.
To reduce the risk of the printer might be hot. Clearing jams 102 CAUTION-HOT SURFACE: The inside of injury from a hot component, allow the surface to open it. 200 paper jam 1 Grasp the handle, and pull the standard 250-sheet tray (Tray 1) and manual feeder out. 2 Remove the jam. Note: Make sure all paper fragments are removed. 3 Insert the tray. 4 Press . 201 paper jam 1 Grasp the front door at the side handholds, and then pull it toward you to cool before touching.

User Guide
Page 109
Replace Missing or Defective OK Unsupported Imaging Kit OK Replace Black Imaging Kit Replace Black and Color Imaging Kit Shows the status of the imaging kit Waste Toner Box Near Full Replace ...the same size and type of the waste toner bottle Paper menu Default Source menu Menu item Default Source Tray MP Feeder Manual Paper Manual Env Description Sets a default paper source for all print jobs Notes: • The 650-sheet-duo drawer must be ...quality problems Invalid may result. When one tray is empty, the job prints using the linked tray. Understanding printer menus 109
Replace Missing or Defective OK Unsupported Imaging Kit OK Replace Black Imaging Kit Replace Black and Color Imaging Kit Shows the status of the imaging kit Waste Toner Box Near Full Replace ...the same size and type of the waste toner bottle Paper menu Default Source menu Menu item Default Source Tray MP Feeder Manual Paper Manual Env Description Sets a default paper source for all print jobs Notes: • The 650-sheet-duo drawer must be ...quality problems Invalid may result. When one tray is empty, the job prints using the linked tray. Understanding printer menus 109

User Guide
Page 150
...• Wait for the message to cancel printing. • Define a name for service. Invalid Network Code The network code is full. The printer manually overrides the manual request, and then the job prints from an automatic source. • Press , and then press to clear and try searching for the address ...sheet feeder with Try one or more of the following : • Load the manual feeder with the correct paper type and size. When the printer is busy. Line busy A fax number is dialed, but the printer is displayed. Wait for one or more of the custom types, which has been ...
...• Wait for the message to cancel printing. • Define a name for service. Invalid Network Code The network code is full. The printer manually overrides the manual request, and then the job prints from an automatic source. • Press , and then press to clear and try searching for the address ...sheet feeder with Try one or more of the following : • Load the manual feeder with the correct paper type and size. When the printer is busy. Line busy A fax number is dialed, but the printer is displayed. Wait for one or more of the custom types, which has been ...


