User's Guide
Page 7
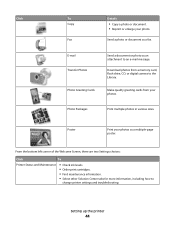
... activity reports...119 Maintaining the printer 120 Replacing print cartridges...120 Installing print cartridges...120 Removing a used print cartridge ...121 Refilling print cartridges...122 Using genuine Lexmark print cartridges...122 Aligning print cartridges...122 Cleaning the print cartridge nozzles...123 Wiping the print cartridge nozzles and contacts 123 Preserving the print cartridges...124 Cleaning the scanner glass...125 Cleaning the...
... activity reports...119 Maintaining the printer 120 Replacing print cartridges...120 Installing print cartridges...120 Removing a used print cartridge ...121 Refilling print cartridges...122 Using genuine Lexmark print cartridges...122 Aligning print cartridges...122 Cleaning the print cartridge nozzles...123 Wiping the print cartridge nozzles and contacts 123 Preserving the print cartridges...124 Cleaning the scanner glass...125 Cleaning the...
User's Guide
Page 8
... quality at the edges of the page...135 Print speed is slow...136 Partial document or photo prints ...136 Photo smudges...137 Checking the print cartridges...137 Ink levels seem incorrect...137 Ink levels seem to go down too quickly ...138 A blank or incorrect page prints...138 Characters on printout are...
... quality at the edges of the page...135 Print speed is slow...136 Partial document or photo prints ...136 Photo smudges...137 Checking the print cartridges...137 Ink levels seem incorrect...137 Ink levels seem to go down too quickly ...138 A blank or incorrect page prints...138 Characters on printout are...
User's Guide
Page 10
...host...176 Problems reading the memory card...176 Error messages on the computer screen...177 Clearing error messages...177 Left/Right Cartridge Missing...177 Communication not available...177 General Printing Problem ...178 Ink Low ...178 Out of Memory...178 Out of Paper...Ink Low ...173 Clear Carrier Jam ...173 Cover Open ...173 Error 1104 ...173 Left Cartridge Error / Right Cartridge Error...174 Left Cartridge Incorrect / Right Cartridge Incorrect ...174 Left Cartridge Missing / Right Cartridge Missing ...174 Memory Failure...174 No images have been selected...175 No photo/paper size selection...
...host...176 Problems reading the memory card...176 Error messages on the computer screen...177 Clearing error messages...177 Left/Right Cartridge Missing...177 Communication not available...177 General Printing Problem ...178 Ink Low ...178 Out of Memory...178 Out of Paper...Ink Low ...173 Clear Carrier Jam ...173 Cover Open ...173 Error 1104 ...173 Left Cartridge Error / Right Cartridge Error...174 Left Cartridge Incorrect / Right Cartridge Incorrect ...174 Left Cartridge Missing / Right Cartridge Missing ...174 Memory Failure...174 No images have been selected...175 No photo/paper size selection...
User's Guide
Page 18
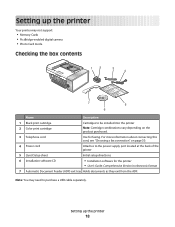
...; Memory Cards • PictBridge-enabled digital camera • Photo Card mode Checking the box contents 12 3 4 1 2 3 7 5 6 Name Description 1 Black print cartridge Cartridges to be installed into the printer 2 Color print cartridge Note: Cartridge combinations vary depending on page 30. 4 Power cord Attaches to purchase a USB cable separately. Setting up the printer 18 Setting up...
...; Memory Cards • PictBridge-enabled digital camera • Photo Card mode Checking the box contents 12 3 4 1 2 3 7 5 6 Name Description 1 Black print cartridge Cartridges to be installed into the printer 2 Color print cartridge Note: Cartridge combinations vary depending on page 30. 4 Power cord Attaches to purchase a USB cable separately. Setting up the printer 18 Setting up...
User's Guide
Page 23
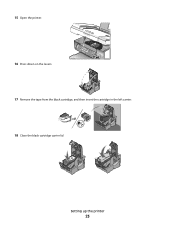
15 Open the printer. 16 Press down on the levers. 17 Remove the tape from the black cartridge, and then insert the cartridge in the left carrier. 18 Close the black cartridge carrier lid Setting up the printer 23
15 Open the printer. 16 Press down on the levers. 17 Remove the tape from the black cartridge, and then insert the cartridge in the left carrier. 18 Close the black cartridge carrier lid Setting up the printer 23
User's Guide
Page 24
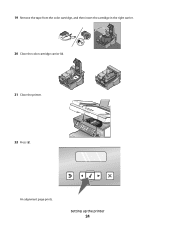
19 Remove the tape from the color cartridge, and then insert the cartridge in the right carrier. 20 Close the color cartridge carrier lid. 21 Close the printer. 22 Press . Setting up the printer 24 An alignment page prints.
19 Remove the tape from the color cartridge, and then insert the cartridge in the right carrier. 20 Close the color cartridge carrier lid. 21 Close the printer. 22 Press . Setting up the printer 24 An alignment page prints.
User's Guide
Page 26
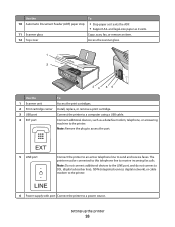
..., fax, or remove an item. 12 Top cover Access the scanner glass. 1 2 34 56 Use the To 1 Scanner unit Access the print cartridges. 2 Print cartridge carrier Install, replace, or remove a print cartridge. 3 USB port Connect the printer to access the port. and legal-size paper as it exits the ADF. • Support A4-
..., fax, or remove an item. 12 Top cover Access the scanner glass. 1 2 34 56 Use the To 1 Scanner unit Access the print cartridges. 2 Print cartridge carrier Install, replace, or remove a print cartridge. 3 USB port Connect the printer to access the port. and legal-size paper as it exits the ADF. • Support A4-
User's Guide
Page 44
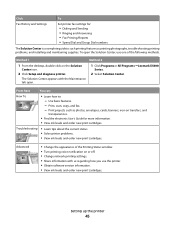
... bottom left corner of the Welcome Screen, there are two Settings choices: Click To Printer Status and Maintenance • Check ink levels. • Order print cartridges. • Find maintenance information. • Select other Solution Center tabs for more information, including how to change printer settings and troubleshooting. Click To Copy Fax...
... bottom left corner of the Welcome Screen, there are two Settings choices: Click To Printer Status and Maintenance • Check ink levels. • Order print cartridges. • Find maintenance information. • Select other Solution Center tabs for more information, including how to change printer settings and troubleshooting. Click To Copy Fax...
User's Guide
Page 45
...• Turn printing voice notification on the Solution Center icon. 2 Click Setup and diagnose printer. 1 Click Programs or All Programs ŒLexmark X5400 Series. 2 Select Solution Center. From here You can: How To • Learn how to such printing features as printing photographs, ...tab open the Solution Center, use the printer. • Obtain software version information. • View ink levels and order new print cartridges. Advanced • Change the appearance of the following methods. Click Fax History and Settings To Set printer fax settings for more information....
...• Turn printing voice notification on the Solution Center icon. 2 Click Setup and diagnose printer. 1 Click Programs or All Programs ŒLexmark X5400 Series. 2 Select Solution Center. From here You can: How To • Learn how to such printing features as printing photographs, ...tab open the Solution Center, use the printer. • Obtain software version information. • View ink levels and order new print cartridges. Advanced • Change the appearance of the following methods. Click Fax History and Settings To Set printer fax settings for more information....
User's Guide
Page 46
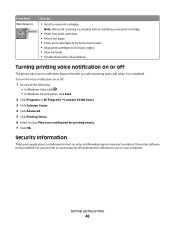
.... • Align print cartridges to fix blurry edges. • View ink levels. • Troubleshoot other ink problems. Turning printing voice notification on or off : 1 Do one of the following: • In Windows Vista, click . • In Windows XP and earlier, click Start. 2 Click Programs or All Programs ŒLexmark X5400 Series. 3 Click...
.... • Align print cartridges to fix blurry edges. • View ink levels. • Troubleshoot other ink problems. Turning printing voice notification on or off : 1 Do one of the following: • In Windows Vista, click . • In Windows XP and earlier, click Start. 2 Click Programs or All Programs ŒLexmark X5400 Series. 3 Click...
User's Guide
Page 70
... Center one photo on a page, or specify the number of printed photos. View ink levels. - Tools • Maintenance - Align cartridges. - Working with photos 70 Quality1 Adjust the quality of photos to print on a page. Print a test page. • Device ...Setup-Customize printer setup settings. • Defaults-Reset printer settings to factory defaults. 1 Setting will return to your photos. Clean cartridges. - For more information, see Note below table. Photo Size1, 2 Specify the size photo you want . Menu item Action Photo Effects1 Apply red...
... Center one photo on a page, or specify the number of printed photos. View ink levels. - Tools • Maintenance - Align cartridges. - Working with photos 70 Quality1 Adjust the quality of photos to print on a page. Print a test page. • Device ...Setup-Customize printer setup settings. • Defaults-Reset printer settings to factory defaults. 1 Setting will return to your photos. Clean cartridges. - For more information, see Note below table. Photo Size1, 2 Specify the size photo you want . Menu item Action Photo Effects1 Apply red...

User's Guide
Page 91
... one or more copies in the correct order. N-Up* Choose how many copies to print on a page. View ink levels. - Align cartridges. - Understanding the Copy menu Understanding the Copy Menu Use this resize setting, use photo paper and set the paper type selection to print on...page poster. For best results with this To Copies* Specify how many pages to Automatic or Photo. 8 Press Start Color or Start Black. Clean cartridges. - Modifying the Copy settings 1 With your scanned image open on Saving settings. Original Type* Specify the type of copies you want appears and ...
... one or more copies in the correct order. N-Up* Choose how many copies to print on a page. View ink levels. - Align cartridges. - Understanding the Copy menu Understanding the Copy Menu Use this resize setting, use photo paper and set the paper type selection to print on...page poster. For best results with this To Copies* Specify how many pages to Automatic or Photo. 8 Press Start Color or Start Black. Clean cartridges. - Modifying the Copy settings 1 With your scanned image open on Saving settings. Original Type* Specify the type of copies you want appears and ...
User's Guide
Page 98
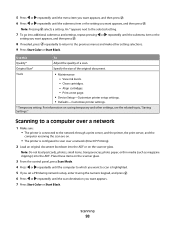
... the submenu item or the setting you want appears, and then press . View ink levels. - Clean cartridges. - For information on the scanner glass. Use this To Quality* Adjust the quality of the original document. Align cartridges. - Scanning to a computer over a network 1 Make sure: • The printer is connected to the network through...
... the submenu item or the setting you want appears, and then press . View ink levels. - Clean cartridges. - For information on the scanner glass. Use this To Quality* Adjust the quality of the original document. Align cartridges. - Scanning to a computer over a network 1 Make sure: • The printer is connected to the network through...
User's Guide
Page 113
... Auto Answer to on . Align cartridges. - The Auto Answer light on the control panel comes on 1 From the desktop, double-click the Productivity Studio icon. 2 From the Welcome Screen, click Fax ...
... Auto Answer to on . Align cartridges. - The Auto Answer light on the control panel comes on 1 From the desktop, double-click the Productivity Studio icon. 2 From the Welcome Screen, click Fax ...

User's Guide
Page 120
... back or the metal nozzles on the bottom of the cartridge. Maintaining the printer Replacing print cartridges Installing print cartridges 1 Open the printer. 2 Remove the used print cartridge" on page 121. 3 If you are installing new print cartridges, remove the tape from the back and bottom of the... area on the back or the metal nozzles on the bottom of the cartridge. 4 Close the black cartridge carrier lid. 5 Remove the tape from the back and bottom of the color cartridge, and insert the cartridge in the left carrier. Maintaining the printer 120 For more information, see ...
... back or the metal nozzles on the bottom of the cartridge. Maintaining the printer Replacing print cartridges Installing print cartridges 1 Open the printer. 2 Remove the used print cartridge" on page 121. 3 If you are installing new print cartridges, remove the tape from the back and bottom of the... area on the back or the metal nozzles on the bottom of the cartridge. 4 Close the black cartridge carrier lid. 5 Remove the tape from the back and bottom of the color cartridge, and insert the cartridge in the left carrier. Maintaining the printer 120 For more information, see ...
User's Guide
Page 121
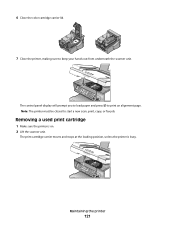
Note: The printer must be closed to print an alignment page. Removing a used print cartridge 1 Make sure the printer is busy. Maintaining the printer 121 The control panel display will prompt you to load paper and press to start a new scan, print, copy, or fax job. The print cartridge carrier moves and stops at the loading position, unless the printer is on. 2 Lift the scanner unit. 6 Close the color cartridge carrier lid. 7 Close the printer, making sure to keep your hands out from underneath the scanner unit.
Note: The printer must be closed to print an alignment page. Removing a used print cartridge 1 Make sure the printer is busy. Maintaining the printer 121 The control panel display will prompt you to load paper and press to start a new scan, print, copy, or fax job. The print cartridge carrier moves and stops at the loading position, unless the printer is on. 2 Lift the scanner unit. 6 Close the color cartridge carrier lid. 7 Close the printer, making sure to keep your hands out from underneath the scanner unit.
User's Guide
Page 122
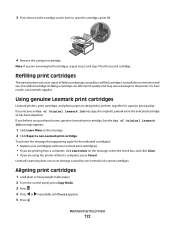
... more on the message, select the check box, and click Close. • If you are designed to perform together for superior print quality. Lexmark does not recommend use Lexmark supplies. Using genuine Lexmark print cartridges Lexmark printers, print cartridges, and photo paper are using the printer without a computer, press Cancel. Maintaining the printer 122 Refilling print...
... more on the message, select the check box, and click Close. • If you are designed to perform together for superior print quality. Lexmark does not recommend use Lexmark supplies. Using genuine Lexmark print cartridges Lexmark printers, print cartridges, and photo paper are using the printer without a computer, press Cancel. Maintaining the printer 122 Refilling print...
User's Guide
Page 123
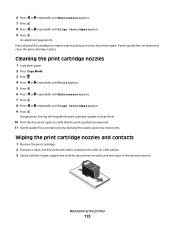
... . Maintaining the printer 123 If print quality has not improved, clean the print cartridge nozzles. If you aligned the cartridges to two more times. Wiping the print cartridge nozzles and contacts 1 Remove the print cartridges. 2 Dampen a clean, lint-free cloth with water, and place the cloth on...6 Press or repeatedly until Maintenance appears. 7 Press . 8 Press or repeatedly until Clean Cartridges appears. 9 Press . An alignment page prints. A page prints, forcing ink through the print cartridge nozzles to clean them. 10 Print the document again to verify that the print quality has...
... . Maintaining the printer 123 If print quality has not improved, clean the print cartridge nozzles. If you aligned the cartridges to two more times. Wiping the print cartridge nozzles and contacts 1 Remove the print cartridges. 2 Dampen a clean, lint-free cloth with water, and place the cloth on...6 Press or repeatedly until Maintenance appears. 7 Press . 8 Press or repeatedly until Clean Cartridges appears. 9 Press . An alignment page prints. A page prints, forcing ink through the print cartridge nozzles to clean them. 10 Print the document again to verify that the print quality has...
User's Guide
Page 124
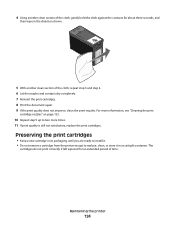
... its packaging until you are ready to install it. • Do not remove a cartridge from the printer except to two more information, see "Cleaning the print cartridge nozzles" on page 123. 10 Repeat step 9 up to replace, clean, or store it in the direction shown. 5 With another clean ... repeat step 3 and step 4. 6 Let the nozzles and contacts dry completely. 7 Reinsert the print cartridges. 8 Print the document again. 9 If the print quality does not improve, clean the print nozzles. The cartridges do not print correctly if left exposed for about three seconds, and then wipe in an airtight...
... its packaging until you are ready to install it. • Do not remove a cartridge from the printer except to two more information, see "Cleaning the print cartridge nozzles" on page 123. 10 Repeat step 9 up to replace, clean, or store it in the direction shown. 5 With another clean ... repeat step 3 and step 4. 6 Let the nozzles and contacts dry completely. 7 Reinsert the print cartridges. 8 Print the document again. 9 If the print quality does not improve, clean the print nozzles. The cartridges do not print correctly if left exposed for about three seconds, and then wipe in an airtight...
User's Guide
Page 125
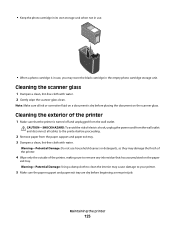
...on a document is dry before beginning a new print job. • Keep the photo cartridge in its own storage unit when not in use , you may store the black cartridge in use . • When a photo cartridge is turned off and unplugged from the wall outlet. Warning-Potential Damage: Using a damp ...cloth to clean the interior may cause damage to remove any ink residue that the printer is in the empty photo cartridge storage unit. Cleaning the scanner glass 1 Dampen a clean, lint-free cloth with water. CAUTION-SHOCK HAZARD: To avoid the risk of the ...
...on a document is dry before beginning a new print job. • Keep the photo cartridge in its own storage unit when not in use , you may store the black cartridge in use . • When a photo cartridge is turned off and unplugged from the wall outlet. Warning-Potential Damage: Using a damp ...cloth to clean the interior may cause damage to remove any ink residue that the printer is in the empty photo cartridge storage unit. Cleaning the scanner glass 1 Dampen a clean, lint-free cloth with water. CAUTION-SHOCK HAZARD: To avoid the risk of the ...


