
Fax Guide
Page 41
Software does not install These are supported: Windows Vista, Windows XP, Windows 2000, and Mac OS X. Try one or more of the computer. Note: Windows 2000 users should use Service Pack 3 or later. REINSTALL THE SOFTWARE 1 Turn off . 2 Disconnect the power ...cord from the wall outlet. 3 Gently remove the power supply from the printer. 2 Plug the cord all New Hardware Found screens. 3 Insert the CD, and then follow the instructions on , press . Troubleshooting 41 DISCONNECT AND RECONNECT THE POWER CORD 1 Disconnect the power cord from...
Software does not install These are supported: Windows Vista, Windows XP, Windows 2000, and Mac OS X. Try one or more of the computer. Note: Windows 2000 users should use Service Pack 3 or later. REINSTALL THE SOFTWARE 1 Turn off . 2 Disconnect the power ...cord from the wall outlet. 3 Gently remove the power supply from the printer. 2 Plug the cord all New Hardware Found screens. 3 Insert the CD, and then follow the instructions on , press . Troubleshooting 41 DISCONNECT AND RECONNECT THE POWER CORD 1 Disconnect the power cord from...
Fax Guide
Page 42
...2 Click the links for drivers or downloads. 3 Select your printer family. 4 Select your printer model. 5 Select your operating system. 6 Select the file you may need to remove and reinstall the printer software. 1 Click Programs or All Programs ŒLexmark X5400 Series. 2 Select Uninstall. 3 Follow the instructions on ...the software. Note: If the install screen does not appear automatically after you restart your CD-ROM drive. In Windows XP, click Start to access the My Computer icon. 4 Double-click the CD-ROM drive icon. 5 If necessary, double-click setup.exe. 6 Follow the instructions...
...2 Click the links for drivers or downloads. 3 Select your printer family. 4 Select your printer model. 5 Select your operating system. 6 Select the file you may need to remove and reinstall the printer software. 1 Click Programs or All Programs ŒLexmark X5400 Series. 2 Select Uninstall. 3 Follow the instructions on ...the software. Note: If the install screen does not appear automatically after you restart your CD-ROM drive. In Windows XP, click Start to access the My Computer icon. 4 Double-click the CD-ROM drive icon. 5 If necessary, double-click setup.exe. 6 Follow the instructions...
User's Guide
Page 5
... printer to factory default settings...53 Working with photos 54 Retrieving and managing photos...54 Transferring photos ...54 Changing the Lexmark Productivity Studio preferences 55 Editing photos...56 Cropping a photo ...56 Rotating a photo ...56 Changing the Resolution / Size of a photo...56 Applying One-... of a photo ...59 Removing wavy patterns from scanned photos, magazines, or newspapers 59 Printing photos...60 Printing photos from a CD or removable storage device using the computer 60 Viewing / Printing photos from the Productivity Studio 60 Printing Photo Packages ...61 Creating...
... printer to factory default settings...53 Working with photos 54 Retrieving and managing photos...54 Transferring photos ...54 Changing the Lexmark Productivity Studio preferences 55 Editing photos...56 Cropping a photo ...56 Rotating a photo ...56 Changing the Resolution / Size of a photo...56 Applying One-... of a photo ...59 Removing wavy patterns from scanned photos, magazines, or newspapers 59 Printing photos...60 Printing photos from a CD or removable storage device using the computer 60 Viewing / Printing photos from the Productivity Studio 60 Printing Photo Packages ...61 Creating...
User's Guide
Page 12
... and earlier, click Start. • Printing 2 Click Programs or All Programs ŒLexmark X5400 • Working with printing, copying, Note: If necessary, click ŒAll Programs Œ Run. To access the Lexmark Solution Center: 1 Do one of your CD-ROM drive. your printer) • Troubleshooting problems with photos Series. • Scanning (if supported by your...
... and earlier, click Start. • Printing 2 Click Programs or All Programs ŒLexmark X5400 • Working with printing, copying, Note: If necessary, click ŒAll Programs Œ Run. To access the Lexmark Solution Center: 1 Do one of your CD-ROM drive. your printer) • Troubleshooting problems with photos Series. • Scanning (if supported by your...
User's Guide
Page 16
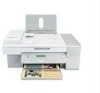
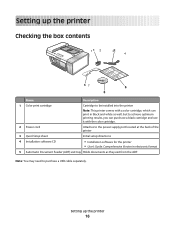
...contents 11 2 32 4 1 2 3 57 35 46 Name Description 1 Color print cartridge Cartridge to be installed into the printer Note: This printer comes with a color cartridge, which can print in black and white as well, but to achieve optimum printing results, you can...color cartridge. 2 Power cord Attaches to the power supply port located at the back of the printer 3 Quick Setup sheet Initial setup directions 4 Installation software CD • Installation software for the printer • User's Guide: Comprehensive Version in electronic format 5 Automatic Document Feeder (ADF) exit ...
...contents 11 2 32 4 1 2 3 57 35 46 Name Description 1 Color print cartridge Cartridge to be installed into the printer Note: This printer comes with a color cartridge, which can print in black and white as well, but to achieve optimum printing results, you can...color cartridge. 2 Power cord Attaches to the power supply port located at the back of the printer 3 Quick Setup sheet Initial setup directions 4 Installation software CD • Installation software for the printer • User's Guide: Comprehensive Version in electronic format 5 Automatic Document Feeder (ADF) exit ...
User's Guide
Page 28
...change one or more temporary settings into new default settings: a Press . i Press . c Press . h Press or repeatedly until Never appears. f Press or repeatedly until Set Defaults appears. f Press or repeatedly until Clear Settings Timeout appears. Installing the printer software Using the installation software CD ... appears. Using the World Wide Web 1 Go to the Lexmark Web site at www.lexmark.com. 2 From the home page, navigate through the menu selection, and then click Drivers & Downloads. 3 Choose the printer and the printer driver for Windows Vista users. g Press . e Press ...
...change one or more temporary settings into new default settings: a Press . i Press . c Press . h Press or repeatedly until Never appears. f Press or repeatedly until Set Defaults appears. f Press or repeatedly until Clear Settings Timeout appears. Installing the printer software Using the installation software CD ... appears. Using the World Wide Web 1 Go to the Lexmark Web site at www.lexmark.com. 2 From the home page, navigate through the menu selection, and then click Drivers & Downloads. 3 Choose the printer and the printer driver for Windows Vista users. g Press . e Press ...
User's Guide
Page 29
...one of Productivity Studio and Solution Center. To install the XPS driver: 1 Click Œ Control Panel. 2 Under Hardware and Sound, click Printer, and then click Add a Printer. 3 From the Add Printer dialog, click Add a local printer...2 1 Click Programs or All Programs ŒLexmark X5400 Series. 2 Select Productivity Studio. b Double-click Drivers, and then double-click Printer. The Install From Disk dialog appears. 6 Click...1 Insert the installation software CD, and then click Cancel when the Setup Wizard appears. 2 Click Œ Computer. 3 Double-click the CD or DVD drive icon, ...
...one of Productivity Studio and Solution Center. To install the XPS driver: 1 Click Œ Control Panel. 2 Under Hardware and Sound, click Printer, and then click Add a Printer. 3 From the Add Printer dialog, click Add a local printer...2 1 Click Programs or All Programs ŒLexmark X5400 Series. 2 Select Productivity Studio. b Double-click Drivers, and then double-click Printer. The Install From Disk dialog appears. 6 Click...1 Insert the installation software CD, and then click Cancel when the Setup Wizard appears. 2 Click Œ Computer. 3 Double-click the CD or DVD drive icon, ...

User's Guide
Page 30
...a memory card, flash drive, CD, or digital camera to change printer settings and troubleshooting. Photo Packages Print multiple photos in various sizes. Poster Print your photos as an attachment to complete. Setting up the printer 30 Depending on the printer you want to an e-mail ... • Reprint or enlarge your photos. From the bottom left corner of the Welcome Screen, there are two Settings choices: Click To Printer Status and Maintenance • Check ink levels. • Order print cartridges. • Find maintenance information. • Select other Solution ...
...a memory card, flash drive, CD, or digital camera to change printer settings and troubleshooting. Photo Packages Print multiple photos in various sizes. Poster Print your photos as an attachment to complete. Setting up the printer 30 Depending on the printer you want to an e-mail ... • Reprint or enlarge your photos. From the bottom left corner of the Welcome Screen, there are two Settings choices: Click To Printer Status and Maintenance • Check ink levels. • Order print cartridges. • Find maintenance information. • Select other Solution ...

User's Guide
Page 33
... What is connected to your network. 1 Insert the installation software CD. A network can connect your network automatically assigns IP addresses, you install the printer on a wired network, it must have completed the initial setup of the printer. • Your network is set up and working properly. &#...a wireless adapter attached or installed that lets it receive and transmit radio waves. If the Welcome screen does not appear after a minute, do one of the following : • An external print server (purchased separately) • A valid, unique IP address for the print server to ...
... What is connected to your network. 1 Insert the installation software CD. A network can connect your network automatically assigns IP addresses, you install the printer on a wired network, it must have completed the initial setup of the printer. • Your network is set up and working properly. &#...a wireless adapter attached or installed that lets it receive and transmit radio waves. If the Welcome screen does not appear after a minute, do one of the following : • An external print server (purchased separately) • A valid, unique IP address for the print server to ...
User's Guide
Page 34
..., where D is the letter of your CD or DVD drive. 2 Follow the instructions on the Welcome screen to a USB port. • File is not set up the printer. General networking 34 Checking the port setting Windows Vista users only 1 Click Œ Control Panel Œ Printers. 2 Right-click the Lexmark X5400 Series icon. 3 From the...
..., where D is the letter of your CD or DVD drive. 2 Follow the instructions on the Welcome screen to a USB port. • File is not set up the printer. General networking 34 Checking the port setting Windows Vista users only 1 Click Œ Control Panel Œ Printers. 2 Right-click the Lexmark X5400 Series icon. 3 From the...
User's Guide
Page 54
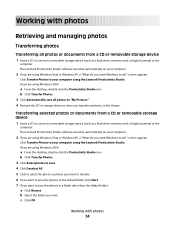
..., a "What do ?" b Select the folder you are using the Lexmark Productivity Studio. Working with photos Retrieving and managing photos Transferring photos Transferring all photos to "My Pictures". 4 Remove the CD or storage device to the computer. Transferring selected photos or documents from... a CD or removable storage device 1 Insert a CD or connect a removable storage device (such as a flash drive, memory card, or digital camera) to view your transferred photos in a folder other than the default folder: a Click Browse. The Lexmark Productivity Studio software ...
..., a "What do ?" b Select the folder you are using the Lexmark Productivity Studio. Working with photos Retrieving and managing photos Transferring photos Transferring all photos to "My Pictures". 4 Remove the CD or storage device to the computer. Transferring selected photos or documents from... a CD or removable storage device 1 Insert a CD or connect a removable storage device (such as a flash drive, memory card, or digital camera) to view your transferred photos in a folder other than the default folder: a Click Browse. The Lexmark Productivity Studio software ...

User's Guide
Page 55
You can choose how you just transferred, click the check box and enter a name. 9 Click Next. 10 Remove the CD or storage device to view your transferred photos in the library. 4 Click OK. Changing the Productivity Studio searched folders preferences 1 From the ...to", and choose to Automatically Save, Manually Save, or Print your photos from the photo storage device connected to your photos to. Changing the Lexmark Productivity Studio preferences Changing the Productivity Studio temporary files preferences 1 From the desktop, double-click the Productivity Studio icon. 2 From the Tools menu,...
You can choose how you just transferred, click the check box and enter a name. 9 Click Next. 10 Remove the CD or storage device to view your transferred photos in the library. 4 Click OK. Changing the Productivity Studio searched folders preferences 1 From the ...to", and choose to Automatically Save, Manually Save, or Print your photos from the photo storage device connected to your photos to. Changing the Lexmark Productivity Studio preferences Changing the Productivity Studio temporary files preferences 1 From the desktop, double-click the Productivity Studio icon. 2 From the Tools menu,...

User's Guide
Page 60
...Click Print. 7 From the Quality drop-down list, select a print quality. 8 From the Paper Size in Printer drop-down list in the last column to your computer using the Productivity Studio. • If you want Windows...and select only the photo(s) you are not sure which side is updated. Select One-Click Auto Fix, Automatic Red-Eye Reduction, or Automatic Brightness Fix to the desired value. 12 Click OK...Studio icon. Note: If you want in the bottom right corner of the window. 11 Remove the CD or storage device. 11 To reduce stray marks on color photos, click the check box, and ...
...Click Print. 7 From the Quality drop-down list, select a print quality. 8 From the Paper Size in Printer drop-down list in the last column to your computer using the Productivity Studio. • If you want Windows...and select only the photo(s) you are not sure which side is updated. Select One-Click Auto Fix, Automatic Red-Eye Reduction, or Automatic Brightness Fix to the desired value. 12 Click OK...Studio icon. Note: If you want in the bottom right corner of the window. 11 Remove the CD or storage device. 11 To reduce stray marks on color photos, click the check box, and ...
User's Guide
Page 88
... the software is displayed, see "Power button is not lit" on the computer screen to access the My Computer icon. 4 Double-click the CD-ROM drive icon. 5 If necessary, double-click setup.exe. 6 Follow the instructions on page 86. In Windows XP, click Start to install... not on, see "Error messages on the computer screen" on page 122. Troubleshooting 88 UNINSTALL AND REINSTALL SOFTWARE Uninstall the printer software, and then reinstall it. Try one or more of the following: CHECK MESSAGES If an error message is successfully installed. CHECK CARTRIDGES 1 Remove the print cartridges....
... the software is displayed, see "Power button is not lit" on the computer screen to access the My Computer icon. 4 Double-click the CD-ROM drive icon. 5 If necessary, double-click setup.exe. 6 Follow the instructions on page 86. In Windows XP, click Start to install... not on, see "Error messages on the computer screen" on page 122. Troubleshooting 88 UNINSTALL AND REINSTALL SOFTWARE Uninstall the printer software, and then reinstall it. Try one or more of the following: CHECK MESSAGES If an error message is successfully installed. CHECK CARTRIDGES 1 Remove the print cartridges....

User's Guide
Page 90
... screens. 7 Insert the CD, and then follow the directions on the computer screen. In Windows XP or earlier, click Start. 2 Click Programs or All Programs ŒLexmark X5400 Series. 3 Select Uninstall. 4 Follow the instructions on the computer screen to remove the printer software. 5 Restart the ... regions except the United States, select your country or region. 2 Click the links for drivers or downloads. 3 Select your printer family. 4 Select your printer model. 5 Select your CD-ROM drive. In Windows 2000, click Start Œ Settings Œ Control Panel. 2 If you are using Windows XP ...
... screens. 7 Insert the CD, and then follow the directions on the computer screen. In Windows XP or earlier, click Start. 2 Click Programs or All Programs ŒLexmark X5400 Series. 3 Select Uninstall. 4 Follow the instructions on the computer screen to remove the printer software. 5 Restart the ... regions except the United States, select your country or region. 2 Click the links for drivers or downloads. 3 Select your printer family. 4 Select your printer model. 5 Select your CD-ROM drive. In Windows 2000, click Start Œ Settings Œ Control Panel. 2 If you are using Windows XP ...

User's Guide
Page 108
... documentation for Windows. Wrong printer is not the correct printer. Updating the printer software The printer software needs to be updated to the computer is attached The printer attached to run properly. 1 Start Windows. 2 When the desktop appears, insert the software CD for help attaching the printer. 9 Make sure the ... to exchange data. RESTART THE HOST COMPUTER AND THE REMOTE COMPUTER Try printing again. The new port is listed with the computer The printer and computer are not able to a lower value 1 Load an original document facedown on the scanner glass. 2 From the desktop,...
... documentation for Windows. Wrong printer is not the correct printer. Updating the printer software The printer software needs to be updated to the computer is attached The printer attached to run properly. 1 Start Windows. 2 When the desktop appears, insert the software CD for help attaching the printer. 9 Make sure the ... to exchange data. RESTART THE HOST COMPUTER AND THE REMOTE COMPUTER Try printing again. The new port is listed with the computer The printer and computer are not able to a lower value 1 Load an original document facedown on the scanner glass. 2 From the desktop,...

User's Guide
Page 126
...and receiver. • Connect the equipment into an outlet on a circuit different from the \Drivers\XPS directory on the installation software CD: Zopen.PDF. The FCC Class B limits are trademarks of FCC regulations. Evercolor and PerfectFinish are designed to provide reasonable protection against...to correct the interference by unauthorized changes or modifications to Part 15 of Lexmark International, Inc., registered in the United States and/or other countries. All other than recommended cables or by one or more of a substitute cable not properly shielded and grounded may cause...
...and receiver. • Connect the equipment into an outlet on a circuit different from the \Drivers\XPS directory on the installation software CD: Zopen.PDF. The FCC Class B limits are trademarks of FCC regulations. Evercolor and PerfectFinish are designed to provide reasonable protection against...to correct the interference by unauthorized changes or modifications to Part 15 of Lexmark International, Inc., registered in the United States and/or other countries. All other than recommended cables or by one or more of a substitute cable not properly shielded and grounded may cause...

User's Guide
Page 133
...31 Troubleshooting 31 using 31 C cable connections checking 103, 105 canceling scan job 72 canceling print jobs 47 cannot print to network printer 36 cannot scan to computer over network 118 cards loading 39 printing 48 carrier jam error 120 cartridge error 119 cartridges, print ...aligning 81 cleaning 81 installing 78 ordering 84 preserving 83 removing 79 using genuine Lexmark 80 wiping 82 Index 133 CD printing photos from 60 transferring all photos and documents 54 transferring selected photos and documents 54 changing temporary files preferences ...
...31 Troubleshooting 31 using 31 C cable connections checking 103, 105 canceling scan job 72 canceling print jobs 47 cannot print to network printer 36 cannot scan to computer over network 118 cards loading 39 printing 48 carrier jam error 120 cartridge error 119 cartridges, print ...aligning 81 cleaning 81 installing 78 ordering 84 preserving 83 removing 79 using genuine Lexmark 80 wiping 82 Index 133 CD printing photos from 60 transferring all photos and documents 54 transferring selected photos and documents 54 changing temporary files preferences ...

User's Guide
Page 134
...scanner glass 43 printing 44 scanning images for editing 70 scanning text for editing 70 transferring all documents from CD or flash drive 54 transferring selected photos from CD or flash drive 54 E editing document text (OCR) 70 scanned images 70 emission notices 126, 127 Enhancements... needed for setting up Ethernet printing 33 Ethernet networking 33 Ethernet setup information needed for 33 Exposure changing setting 59 exterior of the printer cleaning 83 external devices checking 105 e-mail attaching a scanned image 76 attaching files 76 E-mail button 29 e-mail screen preferences changing...
...scanner glass 43 printing 44 scanning images for editing 70 scanning text for editing 70 transferring all documents from CD or flash drive 54 transferring selected photos from CD or flash drive 54 E editing document text (OCR) 70 scanned images 70 emission notices 126, 127 Enhancements... needed for setting up Ethernet printing 33 Ethernet networking 33 Ethernet setup information needed for 33 Exposure changing setting 59 exterior of the printer cleaning 83 external devices checking 105 e-mail attaching a scanned image 76 attaching files 76 E-mail button 29 e-mail screen preferences changing...
User's Guide
Page 136
...one time using computer 71 scanning to Library 71 smudges, preventing 94 transferring all photos from CD or flash drive 54 transferring selected photos from CD...installing 78 ordering 84 preserving 83 refilling 80 removing 79 using genuine Lexmark 80 wiping 82 print is dark or smudged 98 print jobs ...printer no communication 108 printer cannot communicate over peer-to-peer network 106 printer does not feed paper, envelopes, or specialty media 113 printer plugged in but does not print 106 printer software installing 28 reinstalling 90 removing 90 updating 108 printer status checking 101 printer...
...one time using computer 71 scanning to Library 71 smudges, preventing 94 transferring all photos from CD or flash drive 54 transferring selected photos from CD...installing 78 ordering 84 preserving 83 refilling 80 removing 79 using genuine Lexmark 80 wiping 82 print is dark or smudged 98 print jobs ...printer no communication 108 printer cannot communicate over peer-to-peer network 106 printer does not feed paper, envelopes, or specialty media 113 printer plugged in but does not print 106 printer software installing 28 reinstalling 90 removing 90 updating 108 printer status checking 101 printer...


