
User's Guide
Page 8
...lit ...121 Software does not install...122 Page does not print...123 Solving printer communication problems ...124 Understanding Warning levels ...125 Removing and reinstalling the software ...125 Enabling the USB port...125 Print troubleshooting...126 Improving print quality ...126 Poor text and graphic... Partial document or photo prints ...129 Photo smudges...130 Checking the print cartridges...130 Ink levels seem incorrect...130 Ink levels seem to go down too quickly ...131 A blank or incorrect page prints...131 Characters on printout are missing or unexpected ...131 Colors on printout are ...
...lit ...121 Software does not install...122 Page does not print...123 Solving printer communication problems ...124 Understanding Warning levels ...125 Removing and reinstalling the software ...125 Enabling the USB port...125 Print troubleshooting...126 Improving print quality ...126 Poor text and graphic... Partial document or photo prints ...129 Photo smudges...130 Checking the print cartridges...130 Ink levels seem incorrect...130 Ink levels seem to go down too quickly ...131 A blank or incorrect page prints...131 Characters on printout are missing or unexpected ...131 Colors on printout are ...

User's Guide
Page 10
...-Ones found...171 Black Cartridge replacement required...171 Color Cartridge replacement required...171 Black and Color Cartridge replacement required ...172 Notices 173 Product information...173 Edition notice...173 Contents 10 Photo must...printer display...163 Alignment Error...164 Cartridge Error (1102, 1203, 1204, or 120F)...164 Black Ink Low / Color Ink Low / Photo Ink Low ...165 Clear Carrier Jam ...165 Cover Open ...165 Error 1104 ...165 Left Cartridge Error / Right Cartridge Error...166 Left Cartridge Incorrect / Right Cartridge Incorrect ...166 Left Cartridge Missing / Right Cartridge...
...-Ones found...171 Black Cartridge replacement required...171 Color Cartridge replacement required...171 Black and Color Cartridge replacement required ...172 Notices 173 Product information...173 Edition notice...173 Contents 10 Photo must...printer display...163 Alignment Error...164 Cartridge Error (1102, 1203, 1204, or 120F)...164 Black Ink Low / Color Ink Low / Photo Ink Low ...165 Clear Carrier Jam ...165 Cover Open ...165 Error 1104 ...165 Left Cartridge Error / Right Cartridge Error...166 Left Cartridge Incorrect / Right Cartridge Incorrect ...166 Left Cartridge Missing / Right Cartridge...
User's Guide
Page 42
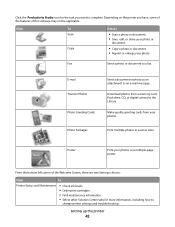
... two Settings choices: Click To Printer Status and Maintenance • Check ink levels. • Order print cartridges. • Find maintenance information. • Select other Solution Center tabs for the task you want to complete. Setting up the printer 42 Download photos from your photos as a multiple-page poster. Poster Print your photos. Click To Scan Copy Details...
... two Settings choices: Click To Printer Status and Maintenance • Check ink levels. • Order print cartridges. • Find maintenance information. • Select other Solution Center tabs for the task you want to complete. Setting up the printer 42 Download photos from your photos as a multiple-page poster. Poster Print your photos. Click To Scan Copy Details...

User's Guide
Page 43
... ink levels and order new print cartridges. Use basic features. - To open . Print, scan, copy, and fax. - The Solution Center appears with us regarding how you use one of the Printing Status window. • Turn printing voice notification on the Solution Center icon. 2 Click Setup and diagnose printer. 1 Click Programs or All Programs Œ Lexmark 5300...
... ink levels and order new print cartridges. Use basic features. - To open . Print, scan, copy, and fax. - The Solution Center appears with us regarding how you use one of the Printing Status window. • Turn printing voice notification on the Solution Center icon. 2 Click Setup and diagnose printer. 1 Click Programs or All Programs Œ Lexmark 5300...

User's Guide
Page 44
... new print cartridge. Note: Wait until scanning is completed. For your printer to work properly, allow the printer software to fix blurry edges. • View ink levels. • Troubleshoot other ink problems. Turning printing voice notification on or off : 1 Do one of the ...following: • In Windows Vista, click . • In Windows XP and earlier, click Start. 2 Click Programs or All Programs Œ Lexmark...
... new print cartridge. Note: Wait until scanning is completed. For your printer to work properly, allow the printer software to fix blurry edges. • View ink levels. • Troubleshoot other ink problems. Turning printing voice notification on or off : 1 Do one of the ...following: • In Windows Vista, click . • In Windows XP and earlier, click Start. 2 Click Programs or All Programs Œ Lexmark...
User's Guide
Page 66
... Use only the USB cable that came with photos 66 Working with the digital camera. View ink levels. - Clean cartridges. - Print a test page. • Device Setup-Customize printer setup settings. • Defaults-Reset printer settings to factory defaults. 1 Setting will return to the printer. Note: The ...digital camera to factory default setting when a memory card or flash drive is marked with your digital camera. a Insert one end of the USB cable into the PictBridge port on making camera selections, see Note below table. Menu item Action Tools • Maintenance ...
... Use only the USB cable that came with photos 66 Working with the digital camera. View ink levels. - Clean cartridges. - Print a test page. • Device Setup-Customize printer setup settings. • Defaults-Reset printer settings to factory defaults. 1 Setting will return to the printer. Note: The ...digital camera to factory default setting when a memory card or flash drive is marked with your digital camera. a Insert one end of the USB cable into the PictBridge port on making camera selections, see Note below table. Menu item Action Tools • Maintenance ...
User's Guide
Page 86
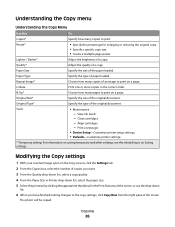
... the right pane of the screen. Align cartridges. - Print a test page. • Device Setup-Customize printer setup settings. • Defaults-Customize printer settings. * Temporary setting. For information on saving temporary and other settings, see the related topic on a page. The photo will be copied. Resize* • Specify.... Lighter / Darker* Adjust the brightness of the original document. Repeat Image* Choose how many copies to print. View ink levels. - Modifying the Copy settings 1 With your scanned image open on a page. Specify the size of a copy. Clean...
... the right pane of the screen. Align cartridges. - Print a test page. • Device Setup-Customize printer setup settings. • Defaults-Customize printer settings. * Temporary setting. For information on saving temporary and other settings, see the related topic on a page. The photo will be copied. Resize* • Specify.... Lighter / Darker* Adjust the brightness of the original document. Repeat Image* Choose how many copies to print. View ink levels. - Modifying the Copy settings 1 With your scanned image open on a page. Specify the size of a copy. Clean...
User's Guide
Page 92
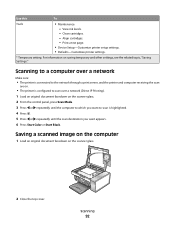
... on the scanner glass. 2 Close the top cover. Saving a scanned image on the computer 1 Load an original document facedown on saving temporary and other settings, see the related topic, "Saving Settings." View ink levels. - Print a test page. • Device Setup-Customize printer setup settings. • Defaults-Customize printer settings. * Temporary setting. Clean cartridges. - Scanning to...
... on the scanner glass. 2 Close the top cover. Saving a scanned image on the computer 1 Load an original document facedown on saving temporary and other settings, see the related topic, "Saving Settings." View ink levels. - Print a test page. • Device Setup-Customize printer setup settings. • Defaults-Customize printer settings. * Temporary setting. Clean cartridges. - Scanning to...
User's Guide
Page 106
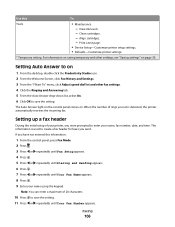
..."Saving settings" on . Faxing 106 View ink levels. - The Auto Answer light on the control panel comes on page 39. This information is detected, the printer automatically receives the incoming fax. Setting Auto Answer to ...printer setup settings. • Defaults-Customize printer settings. * Temporary setting. Use this information: 1 From the control panel, press Fax Mode. 2 Press . 3 Press or repeatedly until Fax Setup appears. 4 Press . 5 Press or repeatedly until Dialing and Sending appears. 6 Press . 7 Press or repeatedly until Your Fax Number appears. Clean cartridges...
..."Saving settings" on . Faxing 106 View ink levels. - The Auto Answer light on the control panel comes on page 39. This information is detected, the printer automatically receives the incoming fax. Setting Auto Answer to ...printer setup settings. • Defaults-Customize printer settings. * Temporary setting. Use this information: 1 From the control panel, press Fax Mode. 2 Press . 3 Press or repeatedly until Fax Setup appears. 4 Press . 5 Press or repeatedly until Dialing and Sending appears. 6 Press . 7 Press or repeatedly until Your Fax Number appears. Clean cartridges...

User's Guide
Page 115
... or damage caused by non-Lexmark ink or print cartridges. Lexmark's warranty does not cover damage caused by a refilled cartridge. 3 Press down on the message, select the check box, and click Close. • If you are using the printer without a computer, press Cancel. Using genuine Lexmark print cartridges Lexmark printers, print cartridges, and photo paper are removing both cartridges, repeat step 3 and step...
... or damage caused by non-Lexmark ink or print cartridges. Lexmark's warranty does not cover damage caused by a refilled cartridge. 3 Press down on the message, select the check box, and click Close. • If you are using the printer without a computer, press Cancel. Using genuine Lexmark print cartridges Lexmark printers, print cartridges, and photo paper are removing both cartridges, repeat step 3 and step...

User's Guide
Page 116
... not improved, clean the print cartridge nozzles. Cleaning the print cartridge nozzles 1 Load plain paper. 2 Press Copy Mode. 3 Press . 4 Press or repeatedly until Tools appears. 5 Press . 6 Press or repeatedly until Maintenance appears. 7 Press . 8 Press or repeatedly until Align Cartridges appears 9 Press . Maintaining the printer 116 If you aligned the cartridges to two more times. An...
... not improved, clean the print cartridge nozzles. Cleaning the print cartridge nozzles 1 Load plain paper. 2 Press Copy Mode. 3 Press . 4 Press or repeatedly until Tools appears. 5 Press . 6 Press or repeatedly until Maintenance appears. 7 Press . 8 Press or repeatedly until Align Cartridges appears 9 Press . Maintaining the printer 116 If you aligned the cartridges to two more times. An...

User's Guide
Page 118
... when not in use. • When a photo cartridge is turned off and unplugged from the paper support and paper exit tray. 3 Dampen a clean, lint-free cloth with water. 2 Gently wipe the scanner glass clean. Cleaning the exterior of the printer, making sure to remove any ink residue that the printer is in use household cleaners or...
... when not in use. • When a photo cartridge is turned off and unplugged from the paper support and paper exit tray. 3 Dampen a clean, lint-free cloth with water. 2 Gently wipe the scanner glass clean. Cleaning the exterior of the printer, making sure to remove any ink residue that the printer is in use household cleaners or...

User's Guide
Page 123
... does not print These are possible solutions. CHECK INK Check the ink levels, and install new print cartridges if necessary. Troubleshooting 123 4 Reconnect the power supply to the printer. 5 Plug the power cord into the wall outlet. 6 Press to turn the printer on the computer screen to access the My Computer... icon. 4 Double-click the CD-ROM drive icon. 5 If necessary, double-click setup.exe. 6 Follow the instructions on . CHECK POWER If the light is not on, see "Error messages on the computer screen" on page 121. Try one...
... does not print These are possible solutions. CHECK INK Check the ink levels, and install new print cartridges if necessary. Troubleshooting 123 4 Reconnect the power supply to the printer. 5 Plug the power cord into the wall outlet. 6 Press to turn the printer on the computer screen to access the My Computer... icon. 4 Double-click the CD-ROM drive icon. 5 If necessary, double-click setup.exe. 6 Follow the instructions on . CHECK POWER If the light is not on, see "Error messages on the computer screen" on page 121. Try one...
User's Guide
Page 127
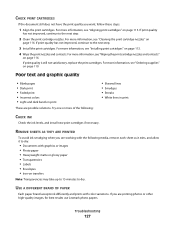
... up to 15 minutes to dry: • Documents with color variations. CHECK PRINT CARTRIDGES If the document still does not have the print quality you are printing photos or other high-quality images, for best results use Lexmark photo papers. If print quality has not improved, continue to the...8226; Skewed lines • Smudges • Streaks • White lines in print CHECK INK Check the ink levels, and install new print cartridges if necessary. Try one or more information, see "Wiping the print cartridge nozzles and contacts" on page 119. REMOVE SHEETS AS THEY ARE PRINTED To avoid...
... up to 15 minutes to dry: • Documents with color variations. CHECK PRINT CARTRIDGES If the document still does not have the print quality you are printing photos or other high-quality images, for best results use Lexmark photo papers. If print quality has not improved, continue to the...8226; Skewed lines • Smudges • Streaks • White lines in print CHECK INK Check the ink levels, and install new print cartridges if necessary. Try one or more information, see "Wiping the print cartridge nozzles and contacts" on page 119. REMOVE SHEETS AS THEY ARE PRINTED To avoid...
User's Guide
Page 130
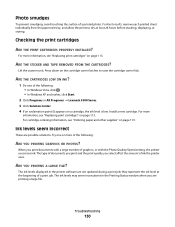
... THE STICKER AND TAPE REMOVED FROM THE CARTRIDGES? Lift the scanner unit. The ink levels may seem inconsistent in the printer software are possible solutions. Photo smudges To prevent smudging, avoid touching the surface of ink the printer uses. Press down on page 113. Install a new cartridge. Try one of graphics, or with a large number of the following : ARE...
... THE STICKER AND TAPE REMOVED FROM THE CARTRIDGES? Lift the scanner unit. The ink levels may seem inconsistent in the printer software are possible solutions. Photo smudges To prevent smudging, avoid touching the surface of ink the printer uses. Press down on page 113. Install a new cartridge. Try one of graphics, or with a large number of the following : ARE...
User's Guide
Page 131
...possible solutions. Ink levels seem to print most text documents. To reduce ink usage, select Best only when you are possible solutions. A blank or incorrect page prints REMOVE THE STICKER AND TAPE FROM THE PRINT CARTRIDGES Lift the scanner unit, and remove the print cartridges from the ... a black or photo cartridge, make sure it is properly installed in the same program. Try one or more of the computer is on the bottom of the printer facing you are removed from the print cartridge carrier. CHECK THE USB CONNECTION 1 Check that the USB cable is properly ...
...possible solutions. Ink levels seem to print most text documents. To reduce ink usage, select Best only when you are possible solutions. A blank or incorrect page prints REMOVE THE STICKER AND TAPE FROM THE PRINT CARTRIDGES Lift the scanner unit, and remove the print cartridges from the ... a black or photo cartridge, make sure it is properly installed in the same program. Try one or more of the computer is on the bottom of the printer facing you are removed from the print cartridge carrier. CHECK THE USB CONNECTION 1 Check that the USB cable is properly ...
User's Guide
Page 132
... Œ Lexmark 5300 Series. 3 Click Solution Center. 4 If an exclamation point (!) appears on either of the print cartridges, the ink level is a TrueType font. Copied item does not match the original item IS THE ORIGINAL DOCUMENT LOADED CORRECTLY ON THE SCANNER GLASS? &#...CARTRIDGES LOW ON INK? 1 Do one of the scanner glass. • Place the item you have solved the problem, test the solution by sending a document to be available in the upper left corner of the following . ARE THE COLOR AND PRINT SPEED SETTINGS CORRECT? MAKE SURE THE DOCUMENT WAS FORMATTED OR CREATED FOR THE PRINTER...
... Œ Lexmark 5300 Series. 3 Click Solution Center. 4 If an exclamation point (!) appears on either of the print cartridges, the ink level is a TrueType font. Copied item does not match the original item IS THE ORIGINAL DOCUMENT LOADED CORRECTLY ON THE SCANNER GLASS? &#...CARTRIDGES LOW ON INK? 1 Do one of the scanner glass. • Place the item you have solved the problem, test the solution by sending a document to be available in the upper left corner of the following . ARE THE COLOR AND PRINT SPEED SETTINGS CORRECT? MAKE SURE THE DOCUMENT WAS FORMATTED OR CREATED FOR THE PRINTER...

User's Guide
Page 134
.... Troubleshooting 134 MAKE SURE THE QUALITY/SPEED SETTING IS APPROPRIATE FOR THE PAPER TYPE LOADED IN THE PRINTER The Photo Quality/Speed setting may need to clean the print cartridge nozzles. If the print is too dark or smudged These are possible solutions. MAKE SURE THE PRINT...paper as it exits, and let the ink dry before handling. ARE THE PRINT CARTRIDGES CLEAN? Try one of the following : • In Windows Vista, click Œ Control Panel. • In Windows XP or 2000, click Start. 2 Click Programs or All Programs Œ Lexmark 5300 Series. 3 Click Solution Center. 4...
.... Troubleshooting 134 MAKE SURE THE QUALITY/SPEED SETTING IS APPROPRIATE FOR THE PAPER TYPE LOADED IN THE PRINTER The Photo Quality/Speed setting may need to clean the print cartridge nozzles. If the print is too dark or smudged These are possible solutions. MAKE SURE THE PRINT...paper as it exits, and let the ink dry before handling. ARE THE PRINT CARTRIDGES CLEAN? Try one of the following : • In Windows Vista, click Œ Control Panel. • In Windows XP or 2000, click Start. 2 Click Programs or All Programs Œ Lexmark 5300 Series. 3 Click Solution Center. 4...
User's Guide
Page 138
... THE PRINT CARTRIDGES HAVE INK? 1 Click Programs or All Programs ΠLexmark 5300 Series. 2 Click Solution Center. IS IT AVAILABLE ON THE COMPUTER? WAS THE DOCUMENT FORMATTED OR CREATED FOR THE PRINTER? For more information, see "Installing print cartridges." See the... program documentation for the next time you have the right settings selected. 1 Click Start ΠSettings ΠPrinters or Printers and Faxes. 2 Right-click the Lexmark 5300 Series icon. 3 Select...
... THE PRINT CARTRIDGES HAVE INK? 1 Click Programs or All Programs ΠLexmark 5300 Series. 2 Click Solution Center. IS IT AVAILABLE ON THE COMPUTER? WAS THE DOCUMENT FORMATTED OR CREATED FOR THE PRINTER? For more information, see "Installing print cartridges." See the... program documentation for the next time you have the right settings selected. 1 Click Start ΠSettings ΠPrinters or Printers and Faxes. 2 Right-click the Lexmark 5300 Series icon. 3 Select...
User's Guide
Page 152
... 5 Press Start Color or Start Black. CHECK DOCUMENT PLACEMENT Make sure the document or photo is loaded facedown on the scanner glass in the upper left corner. Partial document or photo copies These are possible solutions. Try one or more of ...photo or glossy paper, a magazine, or a newspaper, see "Error messages on the computer screen" on page 126. ADJUST THE BRIGHTNESS OF THE COPY 1 Load the document facedown on page 74. CHECK INK Check the ink levels, and install a new print cartridge if necessary. These are possible solutions. CLEAN THE SCANNER GLASS If the scanner...
... 5 Press Start Color or Start Black. CHECK DOCUMENT PLACEMENT Make sure the document or photo is loaded facedown on the scanner glass in the upper left corner. Partial document or photo copies These are possible solutions. Try one or more of ...photo or glossy paper, a magazine, or a newspaper, see "Error messages on the computer screen" on page 126. ADJUST THE BRIGHTNESS OF THE COPY 1 Load the document facedown on page 74. CHECK INK Check the ink levels, and install a new print cartridge if necessary. These are possible solutions. CLEAN THE SCANNER GLASS If the scanner...


