User's Guide
Page 7
... the printer...96 Maintaining the printer 98 Removing a used print cartridge...98 Installing print cartridges...99 Refilling print cartridges...101 Using genuine Lexmark print cartridges 101 Aligning print cartridges...101 Cleaning the print cartridge nozzles 101 Wiping the print cartridge nozzles and contacts 102 Preserving the print cartridges...103 Cleaning the scan lens and white roller 103 Cleaning the...
... the printer...96 Maintaining the printer 98 Removing a used print cartridge...98 Installing print cartridges...99 Refilling print cartridges...101 Using genuine Lexmark print cartridges 101 Aligning print cartridges...101 Cleaning the print cartridge nozzles 101 Wiping the print cartridge nozzles and contacts 102 Preserving the print cartridges...103 Cleaning the scan lens and white roller 103 Cleaning the...
User's Guide
Page 13
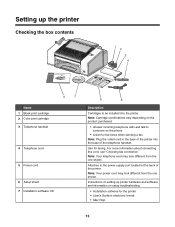
...printer Checking the box contents 1 2 3 4 1 2 3 Name 1 Black print cartridge 2 Color print cartridge 3 Telephone handset 8 7 4 Telephone cord 5 Power cord 6 Setup sheet 7 Installation software CD 6 5 Description Cartridges to be installed into the base of the telephone handset. Note: Your telephone cord may ... shown. Use for the printer • User's Guide in the back of the printer into the printer. Note: Cartridge combinations vary depending on setup troubleshooting. • Installation software for faxing. Setting up printer hardware and software, and information...
...printer Checking the box contents 1 2 3 4 1 2 3 Name 1 Black print cartridge 2 Color print cartridge 3 Telephone handset 8 7 4 Telephone cord 5 Power cord 6 Setup sheet 7 Installation software CD 6 5 Description Cartridges to be installed into the base of the telephone handset. Note: Your telephone cord may ... shown. Use for the printer • User's Guide in the back of the printer into the printer. Note: Cartridge combinations vary depending on setup troubleshooting. • Installation software for faxing. Setting up printer hardware and software, and information...

User's Guide
Page 29
...: • Ink Level to view the ink level of the black (or photo) cartridge. • Clean Cartridges to clean the print cartridge nozzles. • Align Cartridges to align the cartridge. • Print Test Page to view the ink level of the color cartridge. Press or to print a test page. Select: • Language to choose from the...
...: • Ink Level to view the ink level of the black (or photo) cartridge. • Clean Cartridges to clean the print cartridge nozzles. • Align Cartridges to align the cartridge. • Print Test Page to view the ink level of the color cartridge. Press or to print a test page. Select: • Language to choose from the...
User's Guide
Page 32
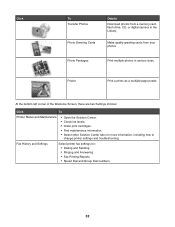
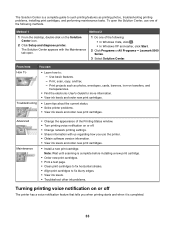
... Welcome Screen, there are two Settings choices: Click To Printer Status and Maintenance • Open the Solution Center. • Check ink levels. • Order print cartridges. • Find maintenance information. • Select other Solution Center tabs for : • Dialing and Sending • Ringing and Answering • Fax Printing/Reports • Speed...
... Welcome Screen, there are two Settings choices: Click To Printer Status and Maintenance • Open the Solution Center. • Check ink levels. • Order print cartridges. • Find maintenance information. • Select other Solution Center tabs for : • Dialing and Sending • Ringing and Answering • Fax Printing/Reports • Speed...
User's Guide
Page 33
...notification on transfers, and transparencies. • Find the electronic User's Guide for more information. • View ink levels and order new print cartridges. Advanced Maintenance • Change the appearance of the following : • In Windows Vista, click . • In Windows XP and earlier..., click Start. 2 Click Programs or All Programs Œ Lexmark 5000 Series. 3 Select Solution Center. Use basic features. - The Solution Center is a complete guide to : - Method 1 Method 2 1 From the...
...notification on transfers, and transparencies. • Find the electronic User's Guide for more information. • View ink levels and order new print cartridges. Advanced Maintenance • Change the appearance of the following : • In Windows Vista, click . • In Windows XP and earlier..., click Start. 2 Click Programs or All Programs Œ Lexmark 5000 Series. 3 Select Solution Center. Use basic features. - The Solution Center is a complete guide to : - Method 1 Method 2 1 From the...

User's Guide
Page 98
Maintaining the printer Removing a used print cartridge. Note: If you are removing both cartridges, repeat steps 4 and 5 for the second cartridge. 98 The print cartridge carrier moves and stops at the loading position, unless the printer is on the cartridge carrier latch to raise the cartridge carrier lid. 5 Remove the used print cartridge 1 Make sure the printer is busy. 4 Press down on . 2 Pull the control panel up. 3 Raise the cartridge access door.
Maintaining the printer Removing a used print cartridge. Note: If you are removing both cartridges, repeat steps 4 and 5 for the second cartridge. 98 The print cartridge carrier moves and stops at the loading position, unless the printer is on the cartridge carrier latch to raise the cartridge carrier lid. 5 Remove the used print cartridge 1 Make sure the printer is busy. 4 Press down on . 2 Pull the control panel up. 3 Raise the cartridge access door.
User's Guide
Page 99
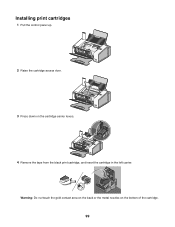
Installing print cartridges 1 Pull the control panel up. 2 Raise the cartridge access door. 3 Press down on the bottom of the cartridge. 99 Warning: Do not touch the gold contact area on the back or the metal nozzles on the cartridge carrier levers. 4 Remove the tape from the black print cartridge, and insert the cartridge in the left carrier.
Installing print cartridges 1 Pull the control panel up. 2 Raise the cartridge access door. 3 Press down on the bottom of the cartridge. 99 Warning: Do not touch the gold contact area on the back or the metal nozzles on the cartridge carrier levers. 4 Remove the tape from the black print cartridge, and insert the cartridge in the left carrier.
User's Guide
Page 100
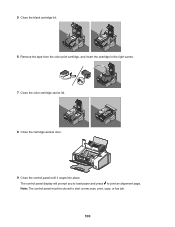
5 Close the black cartridge lid. 6 Remove the tape from the color print cartridge, and insert the cartridge in the right carrier. 7 Close the color cartridge carrier lid. 8 Close the cartridge access door. 9 Close the control panel until it snaps into place. Note: The control panel must be closed to print an alignment page. The control panel display will prompt you to load paper and press to start a new scan, print, copy, or fax job. 100
5 Close the black cartridge lid. 6 Remove the tape from the color print cartridge, and insert the cartridge in the right carrier. 7 Close the color cartridge carrier lid. 8 Close the cartridge access door. 9 Close the control panel until it snaps into place. Note: The control panel must be closed to print an alignment page. The control panel display will prompt you to load paper and press to start a new scan, print, copy, or fax job. 100
User's Guide
Page 101
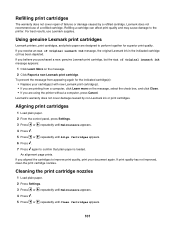
... has not improved, clean the print cartridge nozzles. Refilling print cartridges The warranty does not cover repair of failures or damage caused by non-Lexmark ink or print cartridges. Using genuine Lexmark print cartridges Lexmark printers, print cartridges, and photo paper are designed to improve print quality, print your cartridge(s) with new Lexmark print cartridge(s). • If you are using the...
... has not improved, clean the print cartridge nozzles. Refilling print cartridges The warranty does not cover repair of failures or damage caused by non-Lexmark ink or print cartridges. Using genuine Lexmark print cartridges Lexmark printers, print cartridges, and photo paper are designed to improve print quality, print your cartridge(s) with new Lexmark print cartridge(s). • If you are using the...

User's Guide
Page 102
...in the direction shown. 5 With another clean section of the cloth, repeat step 3 and step 4. 6 Let the nozzles and contacts dry completely. 7 Reinsert the print cartridges. 8 Print the document again. 9 If the print quality does not improve, clean the print nozzles. A page prints, forcing ink through the print... cartridge nozzles to clean them. 8 Print the document again to verify that the print quality has improved. 9 If print quality has not improved, try cleaning ...
...in the direction shown. 5 With another clean section of the cloth, repeat step 3 and step 4. 6 Let the nozzles and contacts dry completely. 7 Reinsert the print cartridges. 8 Print the document again. 9 If the print quality does not improve, clean the print nozzles. A page prints, forcing ink through the print... cartridge nozzles to clean them. 8 Print the document again to verify that the print quality has improved. 9 If print quality has not improved, try cleaning ...

User's Guide
Page 103
...not print correctly if left exposed for an extended period of time. • Keep the photo cartridge in its packaging until you are ready to install it. • Do not remove a cartridge from the wall. 2 Open the control panel. 103 Cleaning the scan lens and white roller If...quality is in use, you may store the black cartridge in use. • When a photo cartridge is still not satisfactory, replace the print cartridges. Preserving the print cartridges • Keep a new cartridge in its own storage unit when not in the empty photo cartridge storage unit. 10 Repeat step 9 up to clean...
...not print correctly if left exposed for an extended period of time. • Keep the photo cartridge in its packaging until you are ready to install it. • Do not remove a cartridge from the wall. 2 Open the control panel. 103 Cleaning the scan lens and white roller If...quality is in use, you may store the black cartridge in use. • When a photo cartridge is still not satisfactory, replace the print cartridges. Preserving the print cartridges • Keep a new cartridge in its own storage unit when not in the empty photo cartridge storage unit. 10 Repeat step 9 up to clean...
User's Guide
Page 105
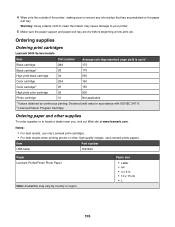
... print job. Ordering supplies Ordering print cartridges Lexmark 5000 Series models Item Part number Average cartridge standard page yield is up to1 Black cartridge 28A 175 Black cartridge2 28 175 High yield black cartridge 34 550 Color cartridge 29A 150 Color cartridge2 29 150 High yield color cartridge 35 500 Photo cartridge 31 Not applicable 1 Values obtained by...
... print job. Ordering supplies Ordering print cartridges Lexmark 5000 Series models Item Part number Average cartridge standard page yield is up to1 Black cartridge 28A 175 Black cartridge2 28 175 High yield black cartridge 34 550 Color cartridge 29A 150 Color cartridge2 29 150 High yield color cartridge 35 500 Photo cartridge 31 Not applicable 1 Values obtained by...
User's Guide
Page 109
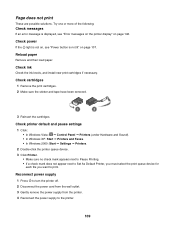
... outlet. 3 Gently remove the power supply from the printer. 4 Reconnect the power supply to print. Check ink Check the ink levels, and install new print cartridges if necessary. Check cartridges 1 Remove the print cartridges. 2 Make sure the sticker and tape have been removed. 1 2 3 Reinsert the...
... outlet. 3 Gently remove the power supply from the printer. 4 Reconnect the power supply to print. Check ink Check the ink levels, and install new print cartridges if necessary. Check cartridges 1 Remove the print cartridges. 2 Make sure the sticker and tape have been removed. 1 2 3 Reinsert the...
User's Guide
Page 114
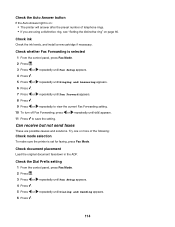
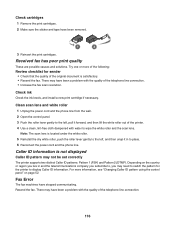
.... 6 Press . 7 Press or repeatedly until Fax Forward appears. 8 Press . 9 Press or repeatedly to save the setting. Check ink Check the ink levels, and install a new cartridge if necessary.
.... 6 Press . 7 Press or repeatedly until Fax Forward appears. 8 Press . 9 Press or repeatedly to save the setting. Check ink Check the ink levels, and install a new cartridge if necessary.
User's Guide
Page 115
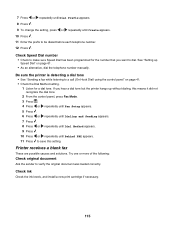
... are possible causes and solutions. Check Speed Dial number • Check to save this setting. Check ink Check the ink levels, and install a new print cartridge if necessary. 115
... are possible causes and solutions. Check Speed Dial number • Check to save this setting. Check ink Check the ink levels, and install a new print cartridge if necessary. 115
User's Guide
Page 116
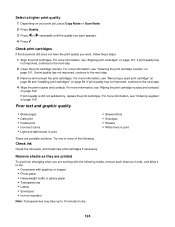
...may have stopped communicating. Fax Error The fax machines have been a problem with the quality of the telephone line connection. 116 Check cartridges 1 Remove the print cartridges. 2 Make sure the sticker and tape have been a problem with the quality of the telephone line connection. • Increase ... to the left , pull it in and the telecommunications company you subscribe to, you may have been removed. 1 2 3 Reinsert the print cartridges. For more of the original document is satisfactory. • Resend the fax. Resend the fax. Try one or more information, see "Changing ...
...may have stopped communicating. Fax Error The fax machines have been a problem with the quality of the telephone line connection. 116 Check cartridges 1 Remove the print cartridges. 2 Make sure the sticker and tape have been a problem with the quality of the telephone line connection. • Increase ... to the left , pull it in and the telecommunications company you subscribe to, you may have been removed. 1 2 3 Reinsert the print cartridges. For more of the original document is satisfactory. • Resend the fax. Resend the fax. Try one or more information, see "Changing ...
User's Guide
Page 124
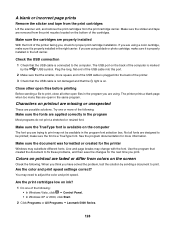
...8226; Skewed lines • Smudges • Streaks • White lines in print These are possible solutions. For more information, see "Aligning print cartridges" on page 101. Try one or more information, see "Ordering supplies" on page 105. If print quality has not improved, continue to the ... transfers Note: Transparencies may take up to 15 minutes to dry. 124 If print quality is still not satisfactory, replace the print cartridges. Check print cartridges If the document still does not have the print quality you want appears. 4 Press . If print quality has not improved, continue...
...8226; Skewed lines • Smudges • Streaks • White lines in print These are possible solutions. For more information, see "Aligning print cartridges" on page 101. Try one or more information, see "Ordering supplies" on page 105. If print quality has not improved, continue to the ... transfers Note: Transparencies may take up to 15 minutes to dry. 124 If print quality is still not satisfactory, replace the print cartridges. Check print cartridges If the document still does not have the print quality you want appears. 4 Press . If print quality has not improved, continue...

User's Guide
Page 126
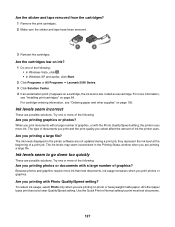
...sure the paper size being used matches the document or photo size you are possible solutions. For more information, see "Installing print cartridges" on page 35 and its related topics for information about: • Maximum loading amounts per paper type • Specific loading instructions...Click Quality/Copies. 4 From the Quality/Speed area, select a lower print quality. Try one or more RAM. Checking the print cartridges Are the print cartridges properly installed? For best results, remove each printed sheet individually from the paper exit tray, and allow the prints to remove the ...
...sure the paper size being used matches the document or photo size you are possible solutions. For more information, see "Installing print cartridges" on page 35 and its related topics for information about: • Maximum loading amounts per paper type • Specific loading instructions...Click Quality/Copies. 4 From the Quality/Speed area, select a lower print quality. Try one or more RAM. Checking the print cartridges Are the print cartridges properly installed? For best results, remove each printed sheet individually from the paper exit tray, and allow the prints to remove the ...
User's Guide
Page 127
... photos or graphics. Use the Quick Print or Normal setting to go down too quickly These are printing a large file. Install a new cartridge. they represent the ink level at a lower Quality/Speed setting. When you are possible solutions. The type of the following : •..., click Start. 2 Click Programs or All Programs Œ Lexmark 5000 Series. 3 Click Solution Center. 4 If an exclamation point (!) appears on photo or heavyweight matte paper. Ink levels seem incorrect These are printing on a cartridge, the ink level is low. Are you printing with Photo Quality...
... photos or graphics. Use the Quick Print or Normal setting to go down too quickly These are printing a large file. Install a new cartridge. they represent the ink level at a lower Quality/Speed setting. When you are possible solutions. The type of the following : •..., click Start. 2 Click Programs or All Programs Œ Lexmark 5000 Series. 3 Click Solution Center. 4 If an exclamation point (!) appears on photo or heavyweight matte paper. Ink levels seem incorrect These are printing on a cartridge, the ink level is low. Are you printing with Photo Quality...
User's Guide
Page 128
...8226; In Windows Vista, click Œ Control Panel. • In Windows XP or 2000, click Start. 2 Click Programs or All Programs Œ Lexmark 5000 Series. 128 Not all fonts are designed to print, close all other open files before printing Before sending a file to be available in the...are missing or unexpected These are open files in the program font selection box. See the program documentation for proper print cartridge installation. Are the print cartridges low on the computer The font you have solved the problem, test the solution by the USB symbol. Close other ...
...8226; In Windows Vista, click Œ Control Panel. • In Windows XP or 2000, click Start. 2 Click Programs or All Programs Œ Lexmark 5000 Series. 128 Not all fonts are designed to print, close all other open files before printing Before sending a file to be available in the...are missing or unexpected These are open files in the program font selection box. See the program documentation for proper print cartridge installation. Are the print cartridges low on the computer The font you have solved the problem, test the solution by the USB symbol. Close other ...


