User's Guide
Page 7
... the printer...96 Maintaining the printer 98 Removing a used print cartridge...98 Installing print cartridges...99 Refilling print cartridges...101 Using genuine Lexmark print cartridges 101 Aligning print cartridges...101 Cleaning the print cartridge nozzles 101 Wiping the print cartridge nozzles and contacts 102 Preserving the print cartridges...103 Cleaning the scan lens and white roller 103 Cleaning the...
... the printer...96 Maintaining the printer 98 Removing a used print cartridge...98 Installing print cartridges...99 Refilling print cartridges...101 Using genuine Lexmark print cartridges 101 Aligning print cartridges...101 Cleaning the print cartridge nozzles 101 Wiping the print cartridge nozzles and contacts 102 Preserving the print cartridges...103 Cleaning the scan lens and white roller 103 Cleaning the...
User's Guide
Page 13
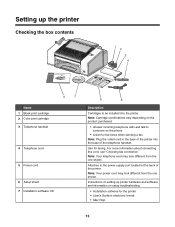
Note: Cartridge combinations vary depending on the product purchased. • Answer incoming telephone calls and talk to someone on the phone • Listen for fax tones when ... cord, see "Choosing fax connection." Instructions on setting up the printer Checking the box contents 1 2 3 4 1 2 3 Name 1 Black print cartridge 2 Color print cartridge 3 Telephone handset 8 7 4 Telephone cord 5 Power cord 6 Setup sheet 7 Installation software CD 6 5 Description Cartridges to be installed into the base of the telephone handset. Use for the printer • User's Guide in...
Note: Cartridge combinations vary depending on the product purchased. • Answer incoming telephone calls and talk to someone on the phone • Listen for fax tones when ... cord, see "Choosing fax connection." Instructions on setting up the printer Checking the box contents 1 2 3 4 1 2 3 Name 1 Black print cartridge 2 Color print cartridge 3 Telephone handset 8 7 4 Telephone cord 5 Power cord 6 Setup sheet 7 Installation software CD 6 5 Description Cartridges to be installed into the base of the telephone handset. Use for the printer • User's Guide in...

User's Guide
Page 29
... 2 (DTMF) For more information, see "Using Caller ID from one of the black (or photo) cartridge. • Clean Cartridges to clean the print cartridge nozzles. • Align Cartridges to align the cartridge. • Print Test Page to determine their subscribed pattern. - For more information, see "Saving settings" on page 43. • Clear Settings Timeout to...
... 2 (DTMF) For more information, see "Using Caller ID from one of the black (or photo) cartridge. • Clean Cartridges to clean the print cartridge nozzles. • Align Cartridges to align the cartridge. • Print Test Page to determine their subscribed pattern. - For more information, see "Saving settings" on page 43. • Clear Settings Timeout to...
User's Guide
Page 32
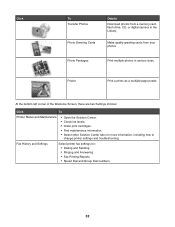
... Welcome Screen, there are two Settings choices: Click To Printer Status and Maintenance • Open the Solution Center. • Check ink levels. • Order print cartridges. • Find maintenance information. • Select other Solution Center tabs for : • Dialing and Sending • Ringing and Answering • Fax Printing/Reports • Speed...
... Welcome Screen, there are two Settings choices: Click To Printer Status and Maintenance • Open the Solution Center. • Check ink levels. • Order print cartridges. • Find maintenance information. • Select other Solution Center tabs for : • Dialing and Sending • Ringing and Answering • Fax Printing/Reports • Speed...
User's Guide
Page 33
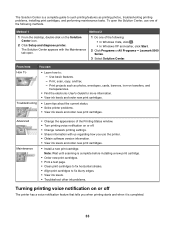
...on transfers, and transparencies. • Find the electronic User's Guide for more information. • View ink levels and order new print cartridges. Advanced Maintenance • Change the appearance of the Printing Status window. • Turn printing voice notification on or off The printer ... : • In Windows Vista, click . • In Windows XP and earlier, click Start. 2 Click Programs or All Programs Œ Lexmark 5000 Series. 3 Select Solution Center. Use basic features. - Troubleshooting • Learn tips about the current status. • Solve printer problems. ...
...on transfers, and transparencies. • Find the electronic User's Guide for more information. • View ink levels and order new print cartridges. Advanced Maintenance • Change the appearance of the Printing Status window. • Turn printing voice notification on or off The printer ... : • In Windows Vista, click . • In Windows XP and earlier, click Start. 2 Click Programs or All Programs Œ Lexmark 5000 Series. 3 Select Solution Center. Use basic features. - Troubleshooting • Learn tips about the current status. • Solve printer problems. ...

User's Guide
Page 98
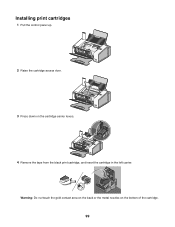
Note: If you are removing both cartridges, repeat steps 4 and 5 for the second cartridge. 98 The print cartridge carrier moves and stops at the loading position, unless the printer is busy. 4 Press down on the cartridge carrier latch to raise the cartridge carrier lid. 5 Remove the used print cartridge 1 Make sure the printer is on. 2 Pull the control panel up. 3 Raise the cartridge access door. Maintaining the printer Removing a used print cartridge.
Note: If you are removing both cartridges, repeat steps 4 and 5 for the second cartridge. 98 The print cartridge carrier moves and stops at the loading position, unless the printer is busy. 4 Press down on the cartridge carrier latch to raise the cartridge carrier lid. 5 Remove the used print cartridge 1 Make sure the printer is on. 2 Pull the control panel up. 3 Raise the cartridge access door. Maintaining the printer Removing a used print cartridge.
User's Guide
Page 99
Warning: Do not touch the gold contact area on the back or the metal nozzles on the cartridge carrier levers. 4 Remove the tape from the black print cartridge, and insert the cartridge in the left carrier. Installing print cartridges 1 Pull the control panel up. 2 Raise the cartridge access door. 3 Press down on the bottom of the cartridge. 99
Warning: Do not touch the gold contact area on the back or the metal nozzles on the cartridge carrier levers. 4 Remove the tape from the black print cartridge, and insert the cartridge in the left carrier. Installing print cartridges 1 Pull the control panel up. 2 Raise the cartridge access door. 3 Press down on the bottom of the cartridge. 99
User's Guide
Page 100
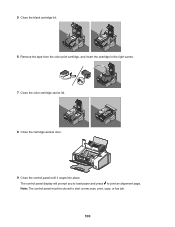
Note: The control panel must be closed to print an alignment page. 5 Close the black cartridge lid. 6 Remove the tape from the color print cartridge, and insert the cartridge in the right carrier. 7 Close the color cartridge carrier lid. 8 Close the cartridge access door. 9 Close the control panel until it snaps into place. The control panel display will prompt you to load paper and press to start a new scan, print, copy, or fax job. 100
Note: The control panel must be closed to print an alignment page. 5 Close the black cartridge lid. 6 Remove the tape from the color print cartridge, and insert the cartridge in the right carrier. 7 Close the color cartridge carrier lid. 8 Close the cartridge access door. 9 Close the control panel until it snaps into place. The control panel display will prompt you to load paper and press to start a new scan, print, copy, or fax job. 100
User's Guide
Page 101
... affect print quality and may cause damage to confirm that plain paper is loaded. Using genuine Lexmark print cartridges Lexmark printers, print cartridges, and photo paper are designed to improve print quality, print your cartridge(s) with new Lexmark print cartridge(s). • If you are using the printer without a computer, press Cancel. An alignment page prints. Cleaning the...
... affect print quality and may cause damage to confirm that plain paper is loaded. Using genuine Lexmark print cartridges Lexmark printers, print cartridges, and photo paper are designed to improve print quality, print your cartridge(s) with new Lexmark print cartridge(s). • If you are using the printer without a computer, press Cancel. An alignment page prints. Cleaning the...

User's Guide
Page 102
... in the direction shown. 5 With another clean section of the cloth, repeat step 3 and step 4. 6 Let the nozzles and contacts dry completely. 7 Reinsert the print cartridges. 8 Print the document again. 9 If the print quality does not improve, clean the print nozzles. Wiping the print... cartridge nozzles and contacts 1 Remove the print cartridges. 2 Dampen a clean, lint-free cloth with water, and place the cloth on page 101. 102 For more times. 6 Press . 7 Press again to confirm that the ...
... in the direction shown. 5 With another clean section of the cloth, repeat step 3 and step 4. 6 Let the nozzles and contacts dry completely. 7 Reinsert the print cartridges. 8 Print the document again. 9 If the print quality does not improve, clean the print nozzles. Wiping the print... cartridge nozzles and contacts 1 Remove the print cartridges. 2 Dampen a clean, lint-free cloth with water, and place the cloth on page 101. 102 For more times. 6 Press . 7 Press again to confirm that the ...

User's Guide
Page 103
... more times. 11 If print quality is in use . • When a photo cartridge is still not satisfactory, replace the print cartridges. The cartridges do not print correctly if left exposed for an extended period of time. • Keep the photo cartridge in its packaging until you are ready to install it in use , you... may need to replace, clean, or store it . • Do not remove a cartridge from the printer except to clean the scan lens and the white roller. 1 Unplug the power cord and the phone line from the wall. 2 Open ...
... more times. 11 If print quality is in use . • When a photo cartridge is still not satisfactory, replace the print cartridges. The cartridges do not print correctly if left exposed for an extended period of time. • Keep the photo cartridge in its packaging until you are ready to install it in use , you... may need to replace, clean, or store it . • Do not remove a cartridge from the printer except to clean the scan lens and the white roller. 1 Unplug the power cord and the phone line from the wall. 2 Open ...
User's Guide
Page 105
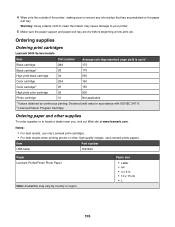
... cartridges Lexmark 5000 Series models Item Part number Average cartridge standard page yield is up to1 Black cartridge 28A 175 Black cartridge2 28 175 High yield black cartridge 34 550 Color cartridge 29A 150 Color cartridge2 29 150 High yield color cartridge 35 500 Photo cartridge 31...Letter • A4 • 4 x 6 in accordance with ISO/IEC 24711. 2 Licensed Return Program Cartridge Ordering paper and other high-quality images, use only Lexmark print cartridges. • For best results when printing photos or other supplies To order supplies or to locate a ...
... cartridges Lexmark 5000 Series models Item Part number Average cartridge standard page yield is up to1 Black cartridge 28A 175 Black cartridge2 28 175 High yield black cartridge 34 550 Color cartridge 29A 150 Color cartridge2 29 150 High yield color cartridge 35 500 Photo cartridge 31...Letter • A4 • 4 x 6 in accordance with ISO/IEC 24711. 2 Licensed Return Program Cartridge Ordering paper and other high-quality images, use only Lexmark print cartridges. • For best results when printing photos or other supplies To order supplies or to locate a ...
User's Guide
Page 109
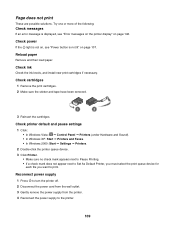
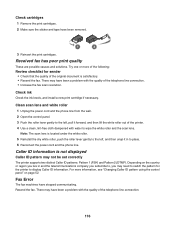
... is displayed, see "Error messages on the printer display" on page 107. Check cartridges 1 Remove the print cartridges. 2 Make sure the sticker and tape have been removed. 1 2 3 Reinsert the cartridges. Check ink Check the ink levels, and install new print cartridges if necessary. Check printer default and pause settings 1 Click: • In Windows Vista...
... is displayed, see "Error messages on the printer display" on page 107. Check cartridges 1 Remove the print cartridges. 2 Make sure the sticker and tape have been removed. 1 2 3 Reinsert the cartridges. Check ink Check the ink levels, and install new print cartridges if necessary. Check printer default and pause settings 1 Click: • In Windows Vista...
User's Guide
Page 114
.... 10 To turn off Fax Forwarding, press or repeatedly until Dialing and Sending appears. 6 Press . 114 Check ink Check the ink levels, and install a new cartridge if necessary.
.... 10 To turn off Fax Forwarding, press or repeatedly until Dialing and Sending appears. 6 Press . 114 Check ink Check the ink levels, and install a new cartridge if necessary.
User's Guide
Page 115
... original document was loaded correctly. Printer receives a blank fax These are possible causes and solutions. Check ink Check the ink levels, and install a new print cartridge if necessary. 115 7 Press or repeatedly until Dial Prefix appears. 8 Press . 9 To change the setting, press or repeatedly until Behind PBX appears. 11 Press to...
... original document was loaded correctly. Printer receives a blank fax These are possible causes and solutions. Check ink Check the ink levels, and install a new print cartridge if necessary. 115 7 Press or repeatedly until Dial Prefix appears. 8 Press . 9 To change the setting, press or repeatedly until Behind PBX appears. 11 Press to...
User's Guide
Page 116
... with the quality of the telephone line connection. 116 Fax Error The fax machines have been removed. 1 2 3 Reinsert the print cartridges. There may need to wipe the white roller and the scan lens. Caller ID information is satisfactory. • Resend the fax. Depending...connection. • Increase the fax scan resolution. Check ink Check the ink levels, and install a new print cartridge if necessary. Check cartridges 1 Remove the print cartridges. 2 Make sure the sticker and tape have stopped communicating. Received fax has poor print quality These are possible ...
... with the quality of the telephone line connection. 116 Fax Error The fax machines have been removed. 1 2 3 Reinsert the print cartridges. There may need to wipe the white roller and the scan lens. Caller ID information is satisfactory. • Resend the fax. Depending...connection. • Increase the fax scan resolution. Check ink Check the ink levels, and install a new print cartridge if necessary. Check cartridges 1 Remove the print cartridges. 2 Make sure the sticker and tape have stopped communicating. Received fax has poor print quality These are possible ...
User's Guide
Page 124
... • Streaks • White lines in print These are working with the following : Check ink Check the ink levels, and install new print cartridges if necessary. If print quality has not improved, continue to dry. 124 Remove sheets as it exits, and allow it to dry: • ...8226; Photo paper • Heavyweight matte or glossy paper • Transparencies • Labels • Envelopes • Iron-on page 105. Check print cartridges If the document still does not have the print quality you are possible solutions. For more of the following media, remove each sheet as they...
... • Streaks • White lines in print These are working with the following : Check ink Check the ink levels, and install new print cartridges if necessary. If print quality has not improved, continue to dry. 124 Remove sheets as it exits, and allow it to dry: • ...8226; Photo paper • Heavyweight matte or glossy paper • Transparencies • Labels • Envelopes • Iron-on page 105. Check print cartridges If the document still does not have the print quality you are possible solutions. For more of the following media, remove each sheet as they...

User's Guide
Page 126
...is sometimes helpful to dry at least 24 hours before stacking, displaying, or storing. Try one or more information, see "Installing print cartridges" on page 35 and its related topics for information about: • Maximum loading amounts per paper type • Specific loading instructions ... specialty media Partial document or photo prints These are loading the correct type of paper into the printer. Checking the print cartridges Are the print cartridges properly installed? Add memory Consider purchasing more RAM. See "Loading paper" on page 99. 126 Remove and reinstall the ...
...is sometimes helpful to dry at least 24 hours before stacking, displaying, or storing. Try one or more information, see "Installing print cartridges" on page 35 and its related topics for information about: • Maximum loading amounts per paper type • Specific loading instructions ... specialty media Partial document or photo prints These are loading the correct type of paper into the printer. Checking the print cartridges Are the print cartridges properly installed? Add memory Consider purchasing more RAM. See "Loading paper" on page 99. 126 Remove and reinstall the ...
User's Guide
Page 127
...with the Photo Quality/Speed setting, the printer uses more of the following : Are you are possible solutions. For cartridge-ordering information, see "Installing print cartridges" on a cartridge, the ink level is low. they represent the ink level at a lower Quality/Speed setting. The ink levels ... following : • In Windows Vista, click . • In Windows XP and earlier, click Start. 2 Click Programs or All Programs Œ Lexmark 5000 Series. 3 Click Solution Center. 4 If an exclamation point (!) appears on page 99. All other supplies" on photo or heavyweight matte paper. ...
...with the Photo Quality/Speed setting, the printer uses more of the following : Are you are possible solutions. For cartridge-ordering information, see "Installing print cartridges" on a cartridge, the ink level is low. they represent the ink level at a lower Quality/Speed setting. The ink levels ... following : • In Windows Vista, click . • In Windows XP and earlier, click Start. 2 Click Programs or All Programs Œ Lexmark 5000 Series. 3 Click Solution Center. 4 If an exclamation point (!) appears on page 99. All other supplies" on photo or heavyweight matte paper. ...
User's Guide
Page 128
... substitute different fonts. Are the color and print speed settings correct? Characters on . Colors on printout are using a black or photo cartridge, make sure it is available on ink? 1 Do one or more of the printer facing you are applied correctly in the same program...and remove the print cartridges from the print cartridge carrier. Make sure the cartridges are properly installed With the front of the following : • In Windows Vista, click Œ Control Panel. • In Windows XP or 2000, click Start. 2 Click Programs or All Programs Œ Lexmark 5000 Series. 128 ...
... substitute different fonts. Are the color and print speed settings correct? Characters on . Colors on printout are using a black or photo cartridge, make sure it is available on ink? 1 Do one or more of the printer facing you are applied correctly in the same program...and remove the print cartridges from the print cartridge carrier. Make sure the cartridges are properly installed With the front of the following : • In Windows Vista, click Œ Control Panel. • In Windows XP or 2000, click Start. 2 Click Programs or All Programs Œ Lexmark 5000 Series. 128 ...


