Technical Reference
Page 57
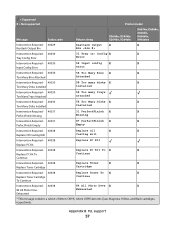
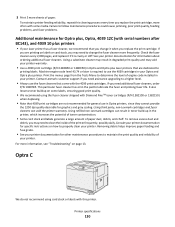
... PC Kit Replace PC Kit Intervention Required - 40038 Replace PC Kit To X X Replace PC Kit To Continue Continue Intervention Required - 40038 Replace Toner X X Replace Toner Cartridge Cartridge Intervention Required - 40038 Replace Toner To X X Replace Toner Cartridge Continue To Continue Intervention Required - 40038 84 All Photo Devs X X 84 All Photo Devs Exhausted Exhausted * This message contains a subset of...
... PC Kit Replace PC Kit Intervention Required - 40038 Replace PC Kit To X X Replace PC Kit To Continue Continue Intervention Required - 40038 Replace Toner X X Replace Toner Cartridge Cartridge Intervention Required - 40038 Replace Toner To X X Replace Toner Cartridge Continue To Continue Intervention Required - 40038 84 All Photo Devs X X 84 All Photo Devs Exhausted Exhausted * This message contains a subset of...
Technical Reference
Page 66
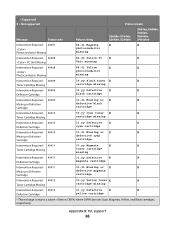
... Intervention Required - 40409 30.yy Black toner X X Toner Cartridge Missing cartridge missing Intervention Required - 40409 31.yy Defective X X Defective Cartridge black cartridge Intervention Required - 40409 31.41 Missing or X X Missing or Defective Cartridge defective black cartridge Intervention Required - 40410 30.yy Cyan toner X X Toner Cartridge Missing cartridge missing Intervention Required - 40410 31.yy Defective X X Defective Cartridge cyan cartridge Intervention Required - 40410 31.41 Missing...
... Intervention Required - 40409 30.yy Black toner X X Toner Cartridge Missing cartridge missing Intervention Required - 40409 31.yy Defective X X Defective Cartridge black cartridge Intervention Required - 40409 31.41 Missing or X X Missing or Defective Cartridge defective black cartridge Intervention Required - 40410 30.yy Cyan toner X X Toner Cartridge Missing cartridge missing Intervention Required - 40410 31.yy Defective X X Defective Cartridge cyan cartridge Intervention Required - 40410 31.41 Missing...
Card Stock & Label Guide
Page 11
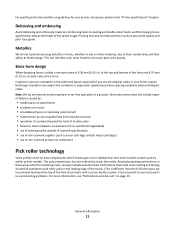
... variations when printing bar codes. Perforations that could cause nesting and tenting should fall outside of Lexmark specifications • use of non-Lexmark supplies (such as toner cartridges and/or inkjet cartridges) • use micro-perfs to feed. Embossing leads to nesting and double-sheet feeds,... and the fusing process significantly reduces the height of non-Lexmark product or component Pick roller technology ...
... variations when printing bar codes. Perforations that could cause nesting and tenting should fall outside of Lexmark specifications • use of non-Lexmark supplies (such as toner cartridges and/or inkjet cartridges) • use micro-perfs to feed. Embossing leads to nesting and double-sheet feeds,... and the fusing process significantly reduces the height of non-Lexmark product or component Pick roller technology ...
Card Stock & Label Guide
Page 130
... for other maintenance procedures to clean the inside of the printer frequently, possibly daily. Contact Lexmark customer support if you replace the print cartridge, more frequently. It also lessens toner buildup on some media. Failure to a higher level. • Always use the fuser ... 1200 dpi quality desirable for graphics and gray scaling. Using third party, non-Lexmark cartridges and fuser cleaners can result in toner build-up in the printer, which increases the potential of toner contamination. • Some card stock and labels generate a large amount of engine...
... for other maintenance procedures to clean the inside of the printer frequently, possibly daily. Contact Lexmark customer support if you replace the print cartridge, more frequently. It also lessens toner buildup on some media. Failure to a higher level. • Always use the fuser ... 1200 dpi quality desirable for graphics and gray scaling. Using third party, non-Lexmark cartridges and fuser cleaners can result in toner build-up in the printer, which increases the potential of toner contamination. • Some card stock and labels generate a large amount of engine...

Maintenance Guide
Page 2
Contents Maintaining the printer 3 Cleaning the exterior of the printer...3 Cleaning the scanner glass...3 Cleaning the ADF separator rollers...4 Adjusting scanner registration...5 Storing supplies...6 Checking the status of supplies...7 Checking the status of supplies from the printer control panel 7 Checking the status of supplies from a network computer 7 Ordering supplies...8 Ordering toner cartridges...8 Ordering a photoconductor kit...8 Ordering ADF replacement parts...9 Moving the printer to another location...9 Shipping the printer...10 Contents 2
Contents Maintaining the printer 3 Cleaning the exterior of the printer...3 Cleaning the scanner glass...3 Cleaning the ADF separator rollers...4 Adjusting scanner registration...5 Storing supplies...6 Checking the status of supplies...7 Checking the status of supplies from the printer control panel 7 Checking the status of supplies from a network computer 7 Ordering supplies...8 Ordering toner cartridges...8 Ordering a photoconductor kit...8 Ordering ADF replacement parts...9 Moving the printer to another location...9 Shipping the printer...10 Contents 2

Maintenance Guide
Page 8
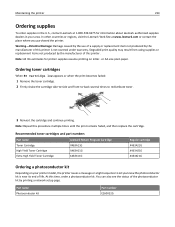
...: Damage caused by the use of this time, order a photoconductor kit. or A4-size plain paper. Recommended toner cartridges and part numbers Part name Toner Cartridge High Yield Toner Cartridge Extra High Yield Toner Cartridge Lexmark Return Program Cartridge X463A11G X463H11G X463X11G Regular cartridge X463A21G X463H21G X463X21G Ordering a photoconductor kit Depending on letter- Part name Photoconductor kit Part number E260X22G Maintaining...
...: Damage caused by the use of this time, order a photoconductor kit. or A4-size plain paper. Recommended toner cartridges and part numbers Part name Toner Cartridge High Yield Toner Cartridge Extra High Yield Toner Cartridge Lexmark Return Program Cartridge X463A11G X463H11G X463X11G Regular cartridge X463A21G X463H21G X463X21G Ordering a photoconductor kit Depending on letter- Part name Photoconductor kit Part number E260X22G Maintaining...
User's Guide
Page 9
......233 Checking the status of supplies from the printer control panel 233 Checking the status of supplies from a network computer 233 Ordering supplies...234 Ordering toner cartridges ...234 Ordering a photoconductor kit ...234 Ordering ADF replacement parts...235 Moving the printer to another location 235 Shipping the printer...236 Administrative support 237 Finding...
......233 Checking the status of supplies from the printer control panel 233 Checking the status of supplies from a network computer 233 Ordering supplies...234 Ordering toner cartridges ...234 Ordering a photoconductor kit ...234 Ordering ADF replacement parts...235 Moving the printer to another location 235 Shipping the printer...236 Administrative support 237 Finding...

User's Guide
Page 11
... Unsupported disk...260 Unsupported USB device, please remove...260 Unsupported USB hub, please remove...260 USB/USB ...260 30 Invalid refill, change toner cartridge...261 31 Replace defective cartridge ...261 32 Cartridge part number unsupported by device 261 34 Short paper ...261 35 Insufficient memory to support Resource Save feature 261 37 Insufficient memory...
... Unsupported disk...260 Unsupported USB device, please remove...260 Unsupported USB hub, please remove...260 USB/USB ...260 30 Invalid refill, change toner cartridge...261 31 Replace defective cartridge ...261 32 Cartridge part number unsupported by device 261 34 Short paper ...261 35 Insufficient memory to support Resource Save feature 261 37 Insufficient memory...
User's Guide
Page 73
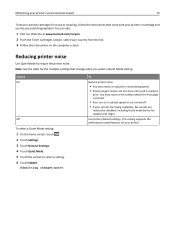
... do not start until a job is printed. • Fans run at www.lexmark.com/recycle. 2 From the Toner Cartridges section, select your printer or cartridge and use the pre‑paid shipping label. Minimizing your printer's environmental impact 73 To return Lexmark cartridges for reuse or recycling, follow the instructions that change when you select a Quiet...
... do not start until a job is printed. • Fans run at www.lexmark.com/recycle. 2 From the Toner Cartridges section, select your printer or cartridge and use the pre‑paid shipping label. Minimizing your printer's environmental impact 73 To return Lexmark cartridges for reuse or recycling, follow the instructions that change when you select a Quiet...
User's Guide
Page 234
... or contact the place where you know the photoconductor kit is not covered under warranty. Recommended toner cartridges and part numbers Part name Lexmark Return Program Cartridge Toner Cartridge High Yield Toner Cartridge X463A11G X463H11G Extra High Yield Toner Cartridge X463X11G Regular cartridge X463A21G X463H21G X463X21G Ordering a photoconductor kit Depending on letter‑ or A4‑size plain paper. Part name...
... or contact the place where you know the photoconductor kit is not covered under warranty. Recommended toner cartridges and part numbers Part name Lexmark Return Program Cartridge Toner Cartridge High Yield Toner Cartridge X463A11G X463H11G Extra High Yield Toner Cartridge X463X11G Regular cartridge X463A21G X463H21G X463X21G Ordering a photoconductor kit Depending on letter‑ or A4‑size plain paper. Part name...
User's Guide
Page 237
...For more information, see the Networking Guide on the Software and Documentation CD and the Embedded Web Server Administrator's Guide on the Lexmark Web site at www.lexmark.com. Setting up e‑mail alerts You can have the printer send you an e‑mail when the supplies are getting low...and locate the IP address in the TCP/IP section. • For more advanced system support tasks, see paper tray settings, the level of toner in the toner cartridge, the percentage of life remaining in the TCP/IP section. 2 Click Device Status. To view the device status: 1 Type the printer IP...
...For more information, see the Networking Guide on the Software and Documentation CD and the Embedded Web Server Administrator's Guide on the Lexmark Web site at www.lexmark.com. Setting up e‑mail alerts You can have the printer send you an e‑mail when the supplies are getting low...and locate the IP address in the TCP/IP section. • For more advanced system support tasks, see paper tray settings, the level of toner in the toner cartridge, the percentage of life remaining in the TCP/IP section. 2 Click Device Status. To view the device status: 1 Type the printer IP...

User's Guide
Page 239
... the jammed page if enough printer memory is set to On, then the printer prints a new copy of the page that jammed. Inside are the toner cartridge and photoconductor kit. 2 Standard exit bin 3 Front door 4 Manual or multipurpose feeder door 5 Standard 250‑sheet tray (Tray 1) 6 Optional 250‑ or 550‑...
... the jammed page if enough printer memory is set to On, then the printer prints a new copy of the page that jammed. Inside are the toner cartridge and photoconductor kit. 2 Standard exit bin 3 Front door 4 Manual or multipurpose feeder door 5 Standard 250‑sheet tray (Tray 1) 6 Optional 250‑ or 550‑...

User's Guide
Page 242
Clearing jams 242 3 If you do not see the jam, open the front door, and then remove the photoconductor kit and toner cartridge. 4 Lift the flap at the front of the printer, and then remove any jammed sheets. 5 If you do not see any jammed sheets, open the rear door.
Clearing jams 242 3 If you do not see the jam, open the front door, and then remove the photoconductor kit and toner cartridge. 4 Lift the flap at the front of the printer, and then remove any jammed sheets. 5 If you do not see any jammed sheets, open the rear door.

User's Guide
Page 243
If the paper is exiting the printer, then pull the paper out, and then touch Continue. Clearing jams 243 6 Remove the jam. 7 Close the rear door. 8 Insert the photoconductor kit and toner cartridge. 9 Close the front door. 10 Touch Continue. 202 paper jam Touch Status/Supplies to identify the location of the jam. If the paper is not exiting the printer: 1 Pull down the rear door. 2 Remove the jammed paper.
If the paper is exiting the printer, then pull the paper out, and then touch Continue. Clearing jams 243 6 Remove the jam. 7 Close the rear door. 8 Insert the photoconductor kit and toner cartridge. 9 Close the front door. 10 Touch Continue. 202 paper jam Touch Status/Supplies to identify the location of the jam. If the paper is not exiting the printer: 1 Pull down the rear door. 2 Remove the jammed paper.

User's Guide
Page 249
Clearing jams 249 If the sheet is not visible, complete the following steps: 1 Open the front door, and then remove the photoconductor kit and toner cartridge. 2 Lift the flap at the front of the printer, and then remove any jams. 3 Reinsert the photoconductor kit and toner cartridge. 4 Close the front door. 5 Touch Continue.
Clearing jams 249 If the sheet is not visible, complete the following steps: 1 Open the front door, and then remove the photoconductor kit and toner cartridge. 2 Lift the flap at the front of the printer, and then remove any jams. 3 Reinsert the photoconductor kit and toner cartridge. 4 Close the front door. 5 Touch Continue.

User's Guide
Page 261
... link buffer changes. Troubleshooting 261 30 Invalid refill, change toner cartridge The printer has detected an invalid, refilled toner cartridge. Remove the toner cartridge, and then install a new one. 31 Replace defective cartridge Remove the defective toner cartridge, and then install a new one. 32 Cartridge part number unsupported by device Remove the toner cartridge, and then install a supported one. 34 Short paper...
... link buffer changes. Troubleshooting 261 30 Invalid refill, change toner cartridge The printer has detected an invalid, refilled toner cartridge. Remove the toner cartridge, and then install a new one. 31 Replace defective cartridge Remove the defective toner cartridge, and then install a new one. 32 Cartridge part number unsupported by device Remove the toner cartridge, and then install a supported one. 34 Short paper...

User's Guide
Page 266
...Touch Continue to clear the message and continue printing. 88 Cartridge low The toner is low. Replace the toner cartridge, and then touch Continue to clear the message and continue printing. 88.yy Cartridge nearly low The toner is low. Install a new photoconductor kit. 84 PC ... Replace PC Kit The photoconductor kit is near exhaustion. Replace the toner cartridge, and then touch Continue to clear the message and continue printing. 88.yy Replace cartridge The toner cartridge is empty. 1 Replace the toner cartridge. 2 Touch Continue to have routine maintenance done. Troubleshooting 266 62...
...Touch Continue to clear the message and continue printing. 88 Cartridge low The toner is low. Replace the toner cartridge, and then touch Continue to clear the message and continue printing. 88.yy Cartridge nearly low The toner is low. Install a new photoconductor kit. 84 PC ... Replace PC Kit The photoconductor kit is near exhaustion. Replace the toner cartridge, and then touch Continue to clear the message and continue printing. 88.yy Replace cartridge The toner cartridge is empty. 1 Replace the toner cartridge. 2 Touch Continue to have routine maintenance done. Troubleshooting 266 62...

User's Guide
Page 273
... appears or when the print becomes faded, replace the toner cartridge. For more of the following: CHECK THE DISPLAY FOR ERROR MESSAGES Clear any error messages. THE SCANNER GLASS MAY BE DIRTY Clean the scanner glass ... DOCUMENT PLACEMENT • Make sure the document or photo is satisfactory. THE COPY IS TOO LIGHT OR TOO DARK Adjust the copy darkness setting. UNWANTED TONER IS IN THE BACKGROUND • Adjust the darkness to clean the ADF scanner glass as well. If your original document into the ADF, try loading...
... appears or when the print becomes faded, replace the toner cartridge. For more of the following: CHECK THE DISPLAY FOR ERROR MESSAGES Clear any error messages. THE SCANNER GLASS MAY BE DIRTY Clean the scanner glass ... DOCUMENT PLACEMENT • Make sure the document or photo is satisfactory. THE COPY IS TOO LIGHT OR TOO DARK Adjust the copy darkness setting. UNWANTED TONER IS IN THE BACKGROUND • Adjust the darkness to clean the ADF scanner glass as well. If your original document into the ADF, try loading...

User's Guide
Page 284
... Pages appears. 6 Touch Print Quality Pages. The print quality test pages print. 7 Touch Back. 8 Touch Exit Configuration. Reinstall the toner cartridge. Blank pages These are possible solutions. Isolating print quality problems To help isolate print quality problems, print the print quality test pages: 1... printer off. 2 Load Letter‑ or A4‑size paper in the following : PACKING MATERIAL MAY BE ON THE TONER CARTRIDGE Remove the toner cartridge and make sure the packing material is properly removed. For more of the following topics may help you solve print quality problems...
... Pages appears. 6 Touch Print Quality Pages. The print quality test pages print. 7 Touch Back. 8 Touch Exit Configuration. Reinstall the toner cartridge. Blank pages These are possible solutions. Isolating print quality problems To help isolate print quality problems, print the print quality test pages: 1... printer off. 2 Load Letter‑ or A4‑size paper in the following : PACKING MATERIAL MAY BE ON THE TONER CARTRIDGE Remove the toner cartridge and make sure the packing material is properly removed. For more of the following topics may help you solve print quality problems...

User's Guide
Page 288
... the Paper menu. 2 Before sending the job to the correct positions for the paper size loaded. THE TONER MAY BE LOW When 88 Cartridge low appears or when the print becomes faded, replace the toner cartridge. Solid black or white streaks ABC ABC DEF DEF These are possible solutions. Troubleshooting 288 CHECK THE PAPER...
... the Paper menu. 2 Before sending the job to the correct positions for the paper size loaded. THE TONER MAY BE LOW When 88 Cartridge low appears or when the print becomes faded, replace the toner cartridge. Solid black or white streaks ABC ABC DEF DEF These are possible solutions. Troubleshooting 288 CHECK THE PAPER...


