
Setup and User's Guide
Page 2
... call 0628-481500. Any reference to a product, program, or service is not intended to Lexmark International Ltd., Marketing and Services Department, Westhorpe House, Westhorpe, Marlow Bucks SL7 3RQ. OptraImage and MarkTrack are the property of purchase. In the United Kingdom and Eire, send to state... or imply that only that product, program, or service may be made to Lexmark International, Inc., Department F95/032-2, 740 West ...
... call 0628-481500. Any reference to a product, program, or service is not intended to Lexmark International Ltd., Marketing and Services Department, Westhorpe House, Westhorpe, Marlow Bucks SL7 3RQ. OptraImage and MarkTrack are the property of purchase. In the United Kingdom and Eire, send to state... or imply that only that product, program, or service may be made to Lexmark International, Inc., Department F95/032-2, 740 West ...

Setup and User's Guide
Page 3
OptraImage Setup and User's Guide For use with the following models: OptraImage 212/222 OptraImage 312/322 OptraImage 514/524 OptraImage 715/725 OptraImage Color 1200r OptraImage Color 1200p OptraImage W810s OptraImage W810p OptraImage T612s OptraImage T612p
OptraImage Setup and User's Guide For use with the following models: OptraImage 212/222 OptraImage 312/322 OptraImage 514/524 OptraImage 715/725 OptraImage Color 1200r OptraImage Color 1200p OptraImage W810s OptraImage W810p OptraImage T612s OptraImage T612p

Setup and User's Guide
Page 9
Product Overview About the product 2 Supported printers 2 Guide to models and functions 3 OptraImage multifunction options 3 OptraImage multifunction solutions 3 Control panel guide 4 Control panel function modes 6 1
Product Overview About the product 2 Supported printers 2 Guide to models and functions 3 OptraImage multifunction options 3 OptraImage multifunction solutions 3 Control panel guide 4 Control panel function modes 6 1

Setup and User's Guide
Page 10
... server, or as a network printer -- Send copies from the scan unit to your printer using the scan unit and the OptraImage control panel. ❏ Scan to fax a scanned document using the OptraImage control panel. ❏ Send and receive faxes -- Supported printers • Optra S, Se (xxx5) • Optra K • Optra Color 45... M410 2 Install the MarkNet N2501e or N2401e print server and set up your printer on the MarkNet N2501e to your network -- About the product The OptraImage multifunction solution lets you: ❏ Use your printer as e-mail.
... server, or as a network printer -- Send copies from the scan unit to your printer using the scan unit and the OptraImage control panel. ❏ Scan to fax a scanned document using the OptraImage control panel. ❏ Send and receive faxes -- Supported printers • Optra S, Se (xxx5) • Optra K • Optra Color 45... M410 2 Install the MarkNet N2501e or N2401e print server and set up your printer on the MarkNet N2501e to your network -- About the product The OptraImage multifunction solution lets you: ❏ Use your printer as e-mail.

Setup and User's Guide
Page 11
Guide to models and functions OptraImage multifunction options Model number Copy function Fax function OptraImage 212 X OptraImage 222 X X OptraImage 312 X OptraImage 322 X X OptraImage 514 X OptraImage 524 X X OptraImage 715 X OptraImage 725 X X Scan to network function X X X X X X X X OptraImage multifunction solutions Model number Copy function Fax function OptraImage X X Color 1200r OptraImage X Color 1200p OptraImage W810s X X OptraImage W810p X OptraImage T612s X X OptraImage T612p X Scan to network function X X X X X X 3
Guide to models and functions OptraImage multifunction options Model number Copy function Fax function OptraImage 212 X OptraImage 222 X X OptraImage 312 X OptraImage 322 X X OptraImage 514 X OptraImage 524 X X OptraImage 715 X OptraImage 725 X X Scan to network function X X X X X X X X OptraImage multifunction solutions Model number Copy function Fax function OptraImage X X Color 1200r OptraImage X Color 1200p OptraImage W810s X X OptraImage W810p X OptraImage T612s X X OptraImage T612p X Scan to network function X X X X X X 3

Setup and User's Guide
Page 14
...Scan Mode repeatedly until you must set up each e-mail recipient using the numeric keypad on the OptraImage control panel, and then press Go/Send to send the fax. Scan to Profile (back to ... servers to appear on the control panel, you must define your scan profiles to appear on the OptraImage control panel, you must set the basic fax Enter number information during setup, press Fax/Scan Mode...make a copy simply by placing the document in the scan unit and pressing Go/Send on the OptraImage control panel. In fax mode, enter the fax phone number of your configured FTP servers, you must...
...Scan Mode repeatedly until you must set up each e-mail recipient using the numeric keypad on the OptraImage control panel, and then press Go/Send to send the fax. Scan to Profile (back to ... servers to appear on the control panel, you must define your scan profiles to appear on the OptraImage control panel, you must set the basic fax Enter number information during setup, press Fax/Scan Mode...make a copy simply by placing the document in the scan unit and pressing Go/Send on the OptraImage control panel. In fax mode, enter the fax phone number of your configured FTP servers, you must...

Setup and User's Guide
Page 15
... setup page 18 Set an IP address in the MarkNet print server 18 Set required fax information 20 Configure scan to network functions 23 Restrict OptraImage usage 28 Verify the setup 30 Solve setup problems 31 7
... setup page 18 Set an IP address in the MarkNet print server 18 Set required fax information 20 Configure scan to network functions 23 Restrict OptraImage usage 28 Verify the setup 30 Solve setup problems 31 7

Setup and User's Guide
Page 16
...printer. All power cords, fax/phone cables, and network cables should be turned off. Following setup, all cords and cables attached to a network during the OptraImage setup, all equipment should be unplugged from a wall outlet. This includes all equipment may have finished, verify the printer hardware setup by printing the menu...trays, duplex hardware, and any other options you may be plugged into properly grounded or fax/phone wall outlets and turned on it during the OptraImage setup. 3 When you have purchased. 2 If you attach your printer to the PC, printer, MarkNet print server...
...printer. All power cords, fax/phone cables, and network cables should be turned off. Following setup, all cords and cables attached to a network during the OptraImage setup, all equipment should be unplugged from a wall outlet. This includes all equipment may have finished, verify the printer hardware setup by printing the menu...trays, duplex hardware, and any other options you may be plugged into properly grounded or fax/phone wall outlets and turned on it during the OptraImage setup. 3 When you have purchased. 2 If you attach your printer to the PC, printer, MarkNet print server...

Setup and User's Guide
Page 17
...printer is not plugged into the card or the wall outlet. For detailed instructions about installing option cards. MarkNet N2501e print server ports SCSI port (OptraImage control panel attaches here) Ethernet 10/100 port (uses RJ-45 cable) Fax Modem port (uses RJ-11 cable) MarkNet N2401e print server ...ports SCSI port (OptraImage control panel attaches here) Ethernet 10/100 port (uses RJ-45 cable) 9 Install the MarkNet N2501e or N2401e print server in the printer See ...
...printer is not plugged into the card or the wall outlet. For detailed instructions about installing option cards. MarkNet N2501e print server ports SCSI port (OptraImage control panel attaches here) Ethernet 10/100 port (uses RJ-45 cable) Fax Modem port (uses RJ-11 cable) MarkNet N2401e print server ...ports SCSI port (OptraImage control panel attaches here) Ethernet 10/100 port (uses RJ-45 cable) 9 Install the MarkNet N2501e or N2401e print server in the printer See ...

Setup and User's Guide
Page 18
...switches are shipped without any overlays attached. 3 Check control panel and scan unit switch settings Control panel switch settings Before connecting the OptraImage control panel to the other hardware, check the dip switch settings. Important: Because the indicator lights need to the next step. 1... Choose the overlays in the down position (on the OptraImage control panel. 2 Attach the control panel overlays ❏ If you received a control panel with the English overlays already attached. Some ...
...switches are shipped without any overlays attached. 3 Check control panel and scan unit switch settings Control panel switch settings Before connecting the OptraImage control panel to the other hardware, check the dip switch settings. Important: Because the indicator lights need to the next step. 1... Choose the overlays in the down position (on the OptraImage control panel. 2 Attach the control panel overlays ❏ If you received a control panel with the English overlays already attached. Some ...

Setup and User's Guide
Page 19
...cables, choose a good location for information about default switch and termination settings. If you purchased an OptraImage 514/524, refer to the right. Termination switch SCSI ID (default is 6) If you purchased an OptraImage 212/222, 312/322, Color 1200r, Color 1200p, T612s, or T612p, make sure the ...terminator is the recommended OptraImage setup. 11 Scan unit SCSI ID and termination settings If you purchased an OptraImage 715/725, W810s, or W810p, make sure the SCSI ID is set to 6 and the termination switch...
...cables, choose a good location for information about default switch and termination settings. If you purchased an OptraImage 514/524, refer to the right. Termination switch SCSI ID (default is 6) If you purchased an OptraImage 212/222, 312/322, Color 1200r, Color 1200p, T612s, or T612p, make sure the ...terminator is the recommended OptraImage setup. 11 Scan unit SCSI ID and termination settings If you purchased an OptraImage 715/725, W810s, or W810p, make sure the SCSI ID is set to 6 and the termination switch...

Setup and User's Guide
Page 20
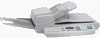
...information, see "Moving the scan unit" on its original position before moving the scan unit. 5 Remove scan unit shipping retainer or carrier bracket OptraImage 212/222, 312/322, Color 1200, T612 Remove the shipping retainer before using the scan unit. 1 Place the scanner on page 83. ...Use position Return the shipping retainer to the documentation that shipped with the scan unit. 12 Shipping position OptraImage 514/524 For information about the scan unit you purchased with your OptraImage 514/524, refer to its side. 2 Remove the retainer screw. 3 Pull out the shipping retainer,...
...information, see "Moving the scan unit" on its original position before moving the scan unit. 5 Remove scan unit shipping retainer or carrier bracket OptraImage 212/222, 312/322, Color 1200, T612 Remove the shipping retainer before using the scan unit. 1 Place the scanner on page 83. ...Use position Return the shipping retainer to the documentation that shipped with the scan unit. 12 Shipping position OptraImage 514/524 For information about the scan unit you purchased with your OptraImage 514/524, refer to its side. 2 Remove the retainer screw. 3 Pull out the shipping retainer,...

Setup and User's Guide
Page 21
Shipping position Operation position 13 OptraImage 715/725 and W810 Remove the carrier bracket before using the scan unit. 1 Place the scan unit on its left side extended over the edge. Caution: Do not turn the scan unit upside down or on the edge of a flat surface with its side. Correct 2 Move the carrier bracket from its shipping position to the operation position.
Shipping position Operation position 13 OptraImage 715/725 and W810 Remove the carrier bracket before using the scan unit. 1 Place the scan unit on its left side extended over the edge. Caution: Do not turn the scan unit upside down or on the edge of a flat surface with its side. Correct 2 Move the carrier bracket from its shipping position to the operation position.

Setup and User's Guide
Page 22
... paper rack gently. Output paper rack extension 6 Insert the three clasp-joints on the document cover as shown. 6 Install the ADF on your scan unit OptraImage 212/222, 312/322, Color 1200, T612 1 Raise the document cover to about 45 degrees. 2 Place the ADF paper chute to about 30 degrees...
... paper rack gently. Output paper rack extension 6 Insert the three clasp-joints on the document cover as shown. 6 Install the ADF on your scan unit OptraImage 212/222, 312/322, Color 1200, T612 1 Raise the document cover to about 45 degrees. 2 Place the ADF paper chute to about 30 degrees...

Setup and User's Guide
Page 23
Pin Claw Pin Claw 15 Hook the pins in the claws on the chute. 3 Install the ADF output stacker. OptraImage 514/524 For information about installing the ADF of your originals according to the documentation that shipped with the metal leg attached. 2 Extend the paper chute enough to accommodate the length of your OptraImage 514/524 scan unit, refer to the paper guide settings on the scan unit. OptraImage 715/725 and W810 1 Raise the ADF and secure it with the scan unit.
Pin Claw Pin Claw 15 Hook the pins in the claws on the chute. 3 Install the ADF output stacker. OptraImage 514/524 For information about installing the ADF of your originals according to the documentation that shipped with the metal leg attached. 2 Extend the paper chute enough to accommodate the length of your OptraImage 514/524 scan unit, refer to the paper guide settings on the scan unit. OptraImage 715/725 and W810 1 Raise the ADF and secure it with the scan unit.

Setup and User's Guide
Page 25
... of powering on . The control panel power comes on the printer. 17 h Turn the scan unit on : first the scan unit, and then the printer. OptraImage control panel Power supply Power cord c Connect the power supply to the power cord, but do not plug the power cord into the wall yet...
... of powering on . The control panel power comes on the printer. 17 h Turn the scan unit on : first the scan unit, and then the printer. OptraImage control panel Power supply Power cord c Connect the power supply to the power cord, but do not plug the power cord into the wall yet...

Setup and User's Guide
Page 26
Click View Documentation and look on the network. Some OptraImage functions, like scanning to your network, cannot be configured using the control panel and require that you think it in the MarkNet print server ❏ ... printer is not attached to a network, skip to step 11. ❏ If you have a TCP/IP environment, skip to the next step and use the OptraImage control panel method of configuring to set the IP address, look for the MarkNet link.
Click View Documentation and look on the network. Some OptraImage functions, like scanning to your network, cannot be configured using the control panel and require that you think it in the MarkNet print server ❏ ... printer is not attached to a network, skip to step 11. ❏ If you have a TCP/IP environment, skip to the next step and use the OptraImage control panel method of configuring to set the IP address, look for the MarkNet link.

Setup and User's Guide
Page 28
...required fax information is set using the numeric keypad, buttons, and menus on the print server and set the required fax information. ❏ OptraImage control panel -- If your printer is sent ❏ an identification of the business or other entity, or other individual sending the message &#...Commission. Use this method if your printer is locally-attached, or if your browser to access the MarkNet resident web server stored on the OptraImage control panel. Two ways to set the required fax information required by the FCC. ❏ MarkNet resident web server (recommended) -- ...
...required fax information is set using the numeric keypad, buttons, and menus on the print server and set the required fax information. ❏ OptraImage control panel -- If your printer is sent ❏ an identification of the business or other entity, or other individual sending the message &#...Commission. Use this method if your printer is locally-attached, or if your browser to access the MarkNet resident web server stored on the OptraImage control panel. Two ways to set the required fax information required by the FCC. ❏ MarkNet resident web server (recommended) -- ...
Setup and User's Guide
Page 29
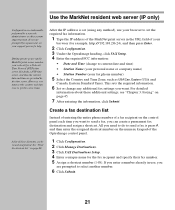
...network for help. Eastern (USA and Canada, Eastern Standard Time). Create a fax destination list Instead of entering the entire phone number of the OptraImage control panel. 1 Click Configuration. 2 Click Manage Destinations. 3 Click FAX Destinations Setup. 4 Enter a unique name for example, http://192....168.236.24), and then press Enter. 2 Click Configuration. 3 Under the OptraImage heading, click FAX Setup. 4 Enter the required FCC information: • Date and Time (change any method), use , you are prompted to get...
...network for help. Eastern (USA and Canada, Eastern Standard Time). Create a fax destination list Instead of entering the entire phone number of the OptraImage control panel. 1 Click Configuration. 2 Click Manage Destinations. 3 Click FAX Destinations Setup. 4 Enter a unique name for example, http://192....168.236.24), and then press Enter. 2 Click Configuration. 3 Under the OptraImage heading, click FAX Setup. 4 Enter the required FCC information: • Date and Time (change any method), use , you are prompted to get...

Setup and User's Guide
Page 30
Use the OptraImage control panel If you have finished entering your Station Name. SAVED briefly appears. After the last menu item has been entered, Setup Complete appears. For ...
Use the OptraImage control panel If you have finished entering your Station Name. SAVED briefly appears. After the last menu item has been entered, Setup Complete appears. For ...