User's Guide
Page 26
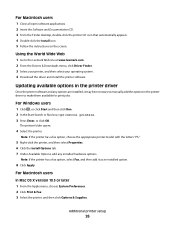
... printer has a fax option, select Fax, and then add it may be necessary to manually add the options in the printer driver Once the printer software and any installed hardware options.... The printer folder opens. 4 Select the printer. For Macintosh users 1 Close all open software applications. 2 Insert the Software and Documentation CD. 3 From ... Follow the instructions on the screen. Updating available options in the printer driver to the Lexmark Web site at www.lexmark.com. 2 From the Drivers & Downloads menu, click Driver Finder. 3 Select your...
... printer has a fax option, select Fax, and then add it may be necessary to manually add the options in the printer driver Once the printer software and any installed hardware options.... The printer folder opens. 4 Select the printer. For Macintosh users 1 Close all open software applications. 2 Insert the Software and Documentation CD. 3 From ... Follow the instructions on the screen. Updating available options in the printer driver to the Lexmark Web site at www.lexmark.com. 2 From the Drivers & Downloads menu, click Driver Finder. 3 Select your...
User's Guide
Page 40
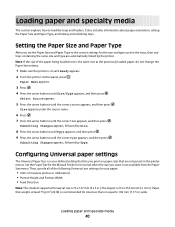
... being loaded now is the same size as the previously loaded paper, do not change the Paper Size setting. 1 Make sure the printer is a user-defined setting that are automatically linked by the printer. Select Source appears. 5 Press the arrow buttons until Size/Type appears, and then press . Submitting... and unlinking trays. Setting the Paper Size and Paper Type After you set the Paper Size and Paper Type to the correct settings for the Manual Feeder to load the trays and feeders. Note: If the size of measure (inches or millimeters) • Portrait Height and Portrait Width • ...
... being loaded now is the same size as the previously loaded paper, do not change the Paper Size setting. 1 Make sure the printer is a user-defined setting that are automatically linked by the printer. Select Source appears. 5 Press the arrow buttons until Size/Type appears, and then press . Submitting... and unlinking trays. Setting the Paper Size and Paper Type After you set the Paper Size and Paper Type to the correct settings for the Manual Feeder to load the trays and feeders. Note: If the size of measure (inches or millimeters) • Portrait Height and Portrait Width • ...
User's Guide
Page 111
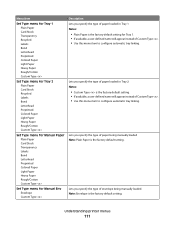
... you specify the type of paper loaded in Tray 2 Notes: • Custom Type is the factory default setting. • If available, a user-defined name will appear instead of envelope being manually loaded Note: Plain Paper is the factory default setting. Lets you specify the type of Custom Type . • Use this menu... 111 Lets you specify the type of paper loaded in Tray 1 Notes: • Plain Paper is the factory default setting for Tray 1. • If available, a user-defined name will appear instead of paper being manually loaded Note: Envelope is the factory default setting.
... you specify the type of paper loaded in Tray 2 Notes: • Custom Type is the factory default setting. • If available, a user-defined name will appear instead of envelope being manually loaded Note: Plain Paper is the factory default setting. Lets you specify the type of Custom Type . • Use this menu... 111 Lets you specify the type of paper loaded in Tray 1 Notes: • Plain Paper is the factory default setting for Tray 1. • If available, a user-defined name will appear instead of paper being manually loaded Note: Envelope is the factory default setting.
User's Guide
Page 217
...should not be no assurance that there is to avoid damage to users of the New Zealand telephone network The following limits for compliance to Telecom's specifications: • There shall be used under any single manual call attempt and the beginning of another item of telepermitted equipment of...provide any sort of not less than 10 call attempts to the same number within the following are dependent on -hook for the Facsimile User Instructions. An appropriate AC surge arrestor is defined as one call initiation, and • The equipment shall go on the equipment associated...
...should not be no assurance that there is to avoid damage to users of the New Zealand telephone network The following limits for compliance to Telecom's specifications: • There shall be used under any single manual call attempt and the beginning of another item of telepermitted equipment of...provide any sort of not less than 10 call attempts to the same number within the following are dependent on -hook for the Facsimile User Instructions. An appropriate AC surge arrestor is defined as one call initiation, and • The equipment shall go on the equipment associated...

User's Guide
Page 223
... not include repair of failures caused by: -Modification or unauthorized attachments -Accidents, misuse, abuse or use inconsistent with Lexmark user's guides, manuals, instructions or guidance -Unsuitable physical or operating environment -Maintenance by anyone other than Lexmark or a Lexmark authorized servicer -Operation of a product beyond the limit of its Suppliers' and Remarketers' limitations of remedies are...
... not include repair of failures caused by: -Modification or unauthorized attachments -Accidents, misuse, abuse or use inconsistent with Lexmark user's guides, manuals, instructions or guidance -Unsuitable physical or operating environment -Maintenance by anyone other than Lexmark or a Lexmark authorized servicer -Operation of a product beyond the limit of its Suppliers' and Remarketers' limitations of remedies are...

Embedded Web Server Administrator's Guide
Page 14
...save changes, or Reset Form to an NTP server rather than manage date and time settings manually, click the Enable NTP check box, and then type the IP address or hostname of a user's password across a network in clear text. Using security features in the event of comparing the... password, the NTLM server and the client generate and compare three encrypted strings based on the user's password. Notes: • Entering manual settings automatically disables use of NTP. • Choosing "(UTC+user) Custom" from the Time Zone drop-down list. Using NTLM authentication NTLM (Windows NT LAN ...
...save changes, or Reset Form to an NTP server rather than manage date and time settings manually, click the Enable NTP check box, and then type the IP address or hostname of a user's password across a network in clear text. Using security features in the event of comparing the... password, the NTLM server and the client generate and compare three encrypted strings based on the user's password. Notes: • Entering manual settings automatically disables use of NTP. • Choosing "(UTC+user) Custom" from the Time Zone drop-down list. Using NTLM authentication NTLM (Windows NT LAN ...

Service Manual
Page 21
General information The Lexmark™ X364dw, X364dn, X363dn, and X264dn are monochrome laser printers designed for more information. See "Repair information" on page 2-1 for single users or small workgroups. General information 1-1 Maintenance approach The diagnostic information in this manual leads to help identify parts. 7013-XXX 1. See "Diagnostics information" on page 4-1 to the correct field...
General information The Lexmark™ X364dw, X364dn, X363dn, and X264dn are monochrome laser printers designed for more information. See "Repair information" on page 2-1 for single users or small workgroups. General information 1-1 Maintenance approach The diagnostic information in this manual leads to help identify parts. 7013-XXX 1. See "Diagnostics information" on page 4-1 to the correct field...
Service Manual
Page 30
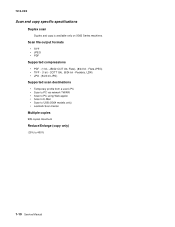
... scan Duplex and copy is available only on X360 Series machines. Packbits, LZW) • JPG - (8/24 bit-JPG) Supported scan destinations • Temporary profile from a user's PC • Scan to PC via network TWAIN • Scan to PC using Web applet • Scan to E-Mail • Scan to USB (X364 models...
... scan Duplex and copy is available only on X360 Series machines. Packbits, LZW) • JPG - (8/24 bit-JPG) Supported scan destinations • Temporary profile from a user's PC • Scan to PC via network TWAIN • Scan to PC using Web applet • Scan to E-Mail • Scan to USB (X364 models...
Service Manual
Page 31
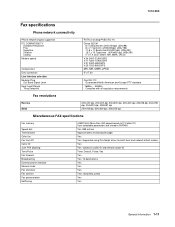
...per page Yes Yes. Supported using PostScript driver for both local and network attach modes. Yes Yes - based on ITU chart #1) User selectable parameters are stored in NVRAM. 7013-XXX Fax specifications Phone network connectivity Phone networks types supported ITU COMPATIBILITY Standard Resolution Fine Superfine... memory Speed dial Transmission Color fax Fax from PC Caller ID Junk FAX blocking Tone/Pulse Fax forward Broadcasting External phone interface Manual mode Fax shortcuts Fax content Fax perseveration Halftoning 4 MB Flash (More than 320 pages based on caller ID and remote station...
...per page Yes Yes. Supported using PostScript driver for both local and network attach modes. Yes Yes - based on ITU chart #1) User selectable parameters are stored in NVRAM. 7013-XXX Fax specifications Phone network connectivity Phone networks types supported ITU COMPATIBILITY Standard Resolution Fine Superfine... memory Speed dial Transmission Color fax Fax from PC Caller ID Junk FAX blocking Tone/Pulse Fax forward Broadcasting External phone interface Manual mode Fax shortcuts Fax content Fax perseveration Halftoning 4 MB Flash (More than 320 pages based on caller ID and remote station...
Service Manual
Page 40
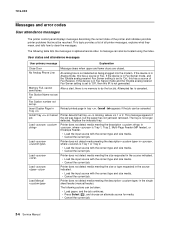
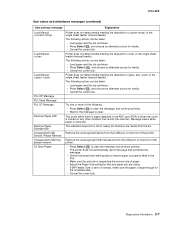
... User primary message Explanation Close Door No Analog Phone Line Message clears when upper and lower doors are closed. If the device is in Analog mode, this IR is no longer detected. An analog line is canceled. If the device is in the single sheet feeder (manual feeder... paper, and the job continues. • Press Select ( ), and choose an alternate source for media. • Cancel the current job. 2-6 Service Manual Load Printer does not detect media meeting the size requested in the source indicated. • Load the input source with the correct type and size...
... User primary message Explanation Close Door No Analog Phone Line Message clears when upper and lower doors are closed. If the device is in Analog mode, this IR is no longer detected. An analog line is canceled. If the device is in the single sheet feeder (manual feeder... paper, and the job continues. • Press Select ( ), and choose an alternate source for media. • Cancel the current job. 2-6 Service Manual Load Printer does not detect media meeting the size requested in the source indicated. • Load the input source with the correct type and size...
Service Manual
Page 41
... and attendance messages (continued) User primary message Explanation Load Manual Printer does not detect media meeting the description in the single sheet feeder (manual feeder). Unsupported USB Remove the unrecognized device from the USB port on the front of the following actions can be ...to ensure paper is properly fitted in the tray. • Make sure the print job is paper detected in the single sheet feeder (manual feeder). Remove Paper Standard Bin The standard output bin is removed. Device, Please Remove Unsupported USB Hub, please remove 34 Short Paper Remove ...
... and attendance messages (continued) User primary message Explanation Load Manual Printer does not detect media meeting the description in the single sheet feeder (manual feeder). Unsupported USB Remove the unrecognized device from the USB port on the front of the following actions can be ...to ensure paper is properly fitted in the tray. • Make sure the print job is paper detected in the single sheet feeder (manual feeder). Remove Paper Standard Bin The standard output bin is removed. Device, Please Remove Unsupported USB Hub, please remove 34 Short Paper Remove ...

Service Manual
Page 42
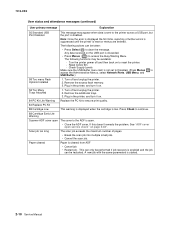
...the menu to Auto. Install additional memory • Press Select ( ) to continue processing the job. This message usually indicates the user has allocated too much memory for flash defragment operation This message is displayed when the printer memory used to store pages is disabled. ...data in RAM. • Install additional printer memory. • Press Menus ( ) to disable Resource Save and continue printing. Cancel Job 2-8 Service Manual If restoration of the job. • Press Menus ( ) to make more of available memory may also create this message: - Note the reduction...
...the menu to Auto. Install additional memory • Press Select ( ) to continue processing the job. This message usually indicates the user has allocated too much memory for flash defragment operation This message is displayed when the printer memory used to store pages is disabled. ...data in RAM. • Install additional printer memory. • Press Menus ( ) to disable Resource Save and continue printing. Cancel Job 2-8 Service Manual If restoration of the job. • Press Menus ( ) to make more of available memory may also create this message: - Note the reduction...
Service Manual
Page 44
...small jobs. • Cancel the scan job. Plug in the printer, and turn it on page 2-48". 7013-XXX User status and attendance messages (continued) User primary message Explanation 56 Standard USB Port Disabled This message may be restarted. Remove the excess flash memory. 3. Check Supply ...not set to Disabled. (Press Menus to the ADF is reset or menus are entered. Paper cleared Paper is started. 2-10 Service Manual Press Check to continue. 88 Cartridge Early Life Warning Scanner ADF cover open The cover to access the Administrative Menus, select Network/Ports,...
...small jobs. • Cancel the scan job. Plug in the printer, and turn it on page 2-48". 7013-XXX User status and attendance messages (continued) User primary message Explanation 56 Standard USB Port Disabled This message may be restarted. Remove the excess flash memory. 3. Check Supply ...not set to Disabled. (Press Menus to the ADF is reset or menus are entered. Paper cleared Paper is started. 2-10 Service Manual Press Check to continue. 88 Cartridge Early Life Warning Scanner ADF cover open The cover to access the Administrative Menus, select Network/Ports,...

Service Manual
Page 46
...at the manual feeder ...manual feed sensor. Remove the toner cartridge/PC kit. See "Media manual input sensor removal" on the manual input sensor. Remove the toner cartridge/PC kit. See "Media manual... input sensor removal" on page 2-30. 200.24 The measured gap at manual...manual feeder sensor, attempted to...manual input sensor removal" on the manual...200.18 Manual feeder sensor...manual feed, but never saw the ...manual input sensor. Check the bottom of the second page at manual...
...at the manual feeder ...manual feed sensor. Remove the toner cartridge/PC kit. See "Media manual input sensor removal" on the manual input sensor. Remove the toner cartridge/PC kit. See "Media manual... input sensor removal" on page 2-30. 200.24 The measured gap at manual...manual feeder sensor, attempted to...manual input sensor removal" on the manual...200.18 Manual feeder sensor...manual feed, but never saw the ...manual input sensor. Check the bottom of the second page at manual...

Service Manual
Page 74
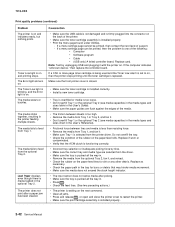
...the toner. • Reinstall it, and recheck for condition. • Make sure to use the recommended print media (see media types and sizes in the User's Guide). • Use MarkVision™ Professional to define the custom type setting for media type, media texture, or media weight. • The toner ... problems Note: Refer to the print defects guide at the end of the page. Try a different toner cartridge. Replace the PC kit. 2-40 Service Manual Cause/action Light print See "Light print" on page 2-40. Check the paper path around the fuser entry. With the printer off , clear the ...
...the toner. • Reinstall it, and recheck for condition. • Make sure to use the recommended print media (see media types and sizes in the User's Guide). • Use MarkVision™ Professional to define the custom type setting for media type, media texture, or media weight. • The toner ... problems Note: Refer to the print defects guide at the end of the page. Try a different toner cartridge. Replace the PC kit. 2-40 Service Manual Cause/action Light print See "Light print" on page 2-40. Check the paper path around the fuser entry. With the printer off , clear the ...
Service Manual
Page 76
...Tray 2, and fan it. • Don't overfill Tray 1 or the optional Tray 2 (see media capacities in the media types and sizes table in the User's Reference). • Frictional force between tires and media is less than resisting force. • Remove the media from Tray 1, and fan it. • ... 2 (see media capacities in the media types and sizes chart in the User's Guide). • Make sure the paper guides are selected from the driver. • Make sure the tray is installed properly. 2-42 Service Manual Replace as necessary. • Check the paper path in the printer feeding ...
...Tray 2, and fan it. • Don't overfill Tray 1 or the optional Tray 2 (see media capacities in the media types and sizes table in the User's Reference). • Frictional force between tires and media is less than resisting force. • Remove the media from Tray 1, and fan it. • ... 2 (see media capacities in the media types and sizes chart in the User's Guide). • Make sure the paper guides are selected from the driver. • Make sure the tray is installed properly. 2-42 Service Manual Replace as necessary. • Check the paper path in the printer feeding ...
Service Manual
Page 90
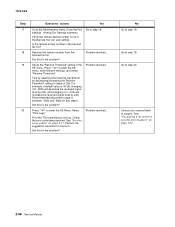
...steps of support. Problem resolved. Test by adjusting the received signal level by decreasing/increasing the"Receive Threshold" setting in the Banned Fax List user setting. Recommended adjustment range is -43 db, changing it to -45db will decrease the received signal level by 2db. Press **411 to step... 19. See "Service error codes" on page 2-57. 2-56 Service Manual Problem resolved. No Go to enter the SE Menu. Go to -41db will increase the received signal level by 2db, and changing it to ...
...steps of support. Problem resolved. Test by adjusting the received signal level by decreasing/increasing the"Receive Threshold" setting in the Banned Fax List user setting. Recommended adjustment range is -43 db, changing it to -45db will decrease the received signal level by 2db. Press **411 to step... 19. See "Service error codes" on page 2-57. 2-56 Service Manual Problem resolved. No Go to enter the SE Menu. Go to -41db will increase the received signal level by 2db, and changing it to ...

Service Manual
Page 106
... default setting is the default setting. Gap Adjust Adjusts the minimum gap between sheets during printing. The Event Log records each time that a user executes the Reset Fuser Count operation. Select Reset Fuser Cnt, and press Select ( ). 3. Charge Roll The charge roll can be adjusted to... Medium. This setting appears only if the Maintenance Warning and Intervention function is enabled in 9 mm of increased gap. 3-14 Service Manual Fuser Temperature (Fuser Temp) Changing this setting can be used to reduce curl of some letterhead images. Transfer The transfer can reduce media...
... default setting is the default setting. Gap Adjust Adjusts the minimum gap between sheets during printing. The Event Log records each time that a user executes the Reset Fuser Count operation. Select Reset Fuser Cnt, and press Select ( ). 3. Charge Roll The charge roll can be adjusted to... Medium. This setting appears only if the Maintenance Warning and Intervention function is enabled in 9 mm of increased gap. 3-14 Service Manual Fuser Temperature (Fuser Temp) Changing this setting can be used to reduce curl of some letterhead images. Transfer The transfer can reduce media...
Service Manual
Page 138
..., only the media continues to the scan area, the ADF motor generates pulses which are stored in an on the image DPI specified by the user. 7. If the scan job is switched off position. When the duplex sensor is advancing to the exit roller and exits the ADF. 10. The paper... transport roll then moves the media to the take away roll and the ADF scan sensor. On the third pass of the ADF. 3-46 Service Manual These counts along with the ADF scan sensor ensure that this is actuated when the trailing edge of time. 9. After a predetermined number of counts, the...
..., only the media continues to the scan area, the ADF motor generates pulses which are stored in an on the image DPI specified by the user. 7. If the scan job is switched off position. When the duplex sensor is advancing to the exit roller and exits the ADF. 10. The paper... transport roll then moves the media to the take away roll and the ADF scan sensor. On the third pass of the ADF. 3-46 Service Manual These counts along with the ADF scan sensor ensure that this is actuated when the trailing edge of time. 9. After a predetermined number of counts, the...

Service Manual
Page 244
... Margin 3-10 duplex ADF rear cover removal 4-18 E Energy Conserve 3-28 EP Defaults 3-14 error messages service error codes 2-17 user attendance messages 2-6 ESD-sensitive parts 4-1 event log configuration menu 3-27 Exit config menu 3-32 F Factory Defaults 3-28 factory defaults ...HVPS parts catalog 7-8 service check 2-29 M maintenance kits 6-1 manually register a duplex ADF 3-30 manually register the flatbed 3-31 media jams 3-34 memu settings page 3-27 menus Menu Settings Page 3-27 messages service error codes 2-17 user attendance messages 2-6 min copy memory 3-29 miscellaneous tests 3-6 models...
... Margin 3-10 duplex ADF rear cover removal 4-18 E Energy Conserve 3-28 EP Defaults 3-14 error messages service error codes 2-17 user attendance messages 2-6 ESD-sensitive parts 4-1 event log configuration menu 3-27 Exit config menu 3-32 F Factory Defaults 3-28 factory defaults ...HVPS parts catalog 7-8 service check 2-29 M maintenance kits 6-1 manually register a duplex ADF 3-30 manually register the flatbed 3-31 media jams 3-34 memu settings page 3-27 menus Menu Settings Page 3-27 messages service error codes 2-17 user attendance messages 2-6 min copy memory 3-29 miscellaneous tests 3-6 models...


