Wireless Setup Guide
Page 6
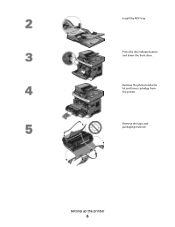
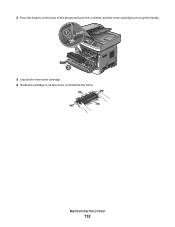
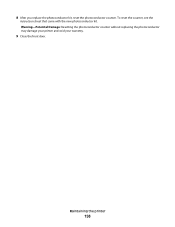
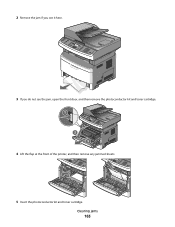
Remove the photoconductor kit and toner cartridge from the printer. Install the ADF tray. Press the door release button and lower the front door. Setting up the printer 6 Remove the tape and packaging material.
Remove the photoconductor kit and toner cartridge from the printer. Install the ADF tray. Press the door release button and lower the front door. Setting up the printer 6 Remove the tape and packaging material.
Wireless Setup Guide
Page 7
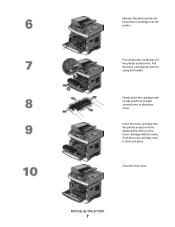
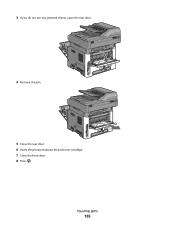
Firmly shake the cartridge side to side and front to back several times to distribute toner. Pull the toner cartridge up the printer 7 Insert the toner cartridge into place. Press the button on the toner cartridge with the tracks. Setting up and out using the handle. Close the front door. Push the toner cartridge until it clicks into the photoconductor kit by aligning the rollers on the base of the photoconductor kit. Reinsert the photoconductor kit and toner cartridge into the printer.
Firmly shake the cartridge side to side and front to back several times to distribute toner. Pull the toner cartridge up the printer 7 Insert the toner cartridge into place. Press the button on the toner cartridge with the tracks. Setting up and out using the handle. Close the front door. Push the toner cartridge until it clicks into the photoconductor kit by aligning the rollers on the base of the photoconductor kit. Reinsert the photoconductor kit and toner cartridge into the printer.
User's Guide
Page 150
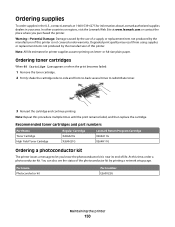
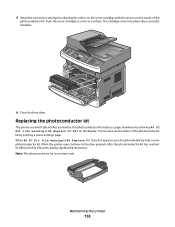
... Part Name Toner Cartridge High Yield Toner Cartridge Regular Cartridge X264A21G X264H21G Lexmark Return Program Cartridge X264A11G X264H11G Ordering a photoconductor kit The printer issues a message to redistribute toner. 3 Reinsert the cartridge and continue printing. In other countries or regions, visit the Lexmark Web Site at 1-800-539-6275 for printer supplies assume printing...
... Part Name Toner Cartridge High Yield Toner Cartridge Regular Cartridge X264A21G X264H21G Lexmark Return Program Cartridge X264A11G X264H11G Ordering a photoconductor kit The printer issues a message to redistribute toner. 3 Reinsert the cartridge and continue printing. In other countries or regions, visit the Lexmark Web Site at 1-800-539-6275 for printer supplies assume printing...
User's Guide
Page 152
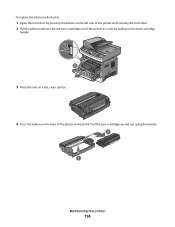
2 Press the button on the base of the photoconductor kit, and then pull the toner cartridge out using the handle. 1 2 3 Unpack the new toner cartridge. 4 Shake the cartridge in all directions to distribute the toner. Maintaining the printer 152
2 Press the button on the base of the photoconductor kit, and then pull the toner cartridge out using the handle. 1 2 3 Unpack the new toner cartridge. 4 Shake the cartridge in all directions to distribute the toner. Maintaining the printer 152
User's Guide
Page 153
.... Maintaining the printer 153 The cartridge clicks into place when correctly installed. 6 Close the front door. You can also see the status of the photoconductor kit by showing 84 PC Kit life warning or 84 Replace PC Kit on the tracks of -life, print quality significantly decreases. 5 Install the new ...
.... Maintaining the printer 153 The cartridge clicks into place when correctly installed. 6 Close the front door. You can also see the status of the photoconductor kit by showing 84 PC Kit life warning or 84 Replace PC Kit on the tracks of -life, print quality significantly decreases. 5 Install the new ...
User's Guide
Page 154
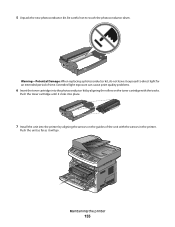
Pull the toner cartridge up and out using the handle. 2 1 Maintaining the printer 154 To replace the photoconductor kit: 1 Open the front door by pressing the button on the left side of the printer and lowering the front door. 2 Pull the photoconductor kit and toner cartridge out of the printer as a unit by pulling on the toner cartridge handle. 1 2 3 3 Place the unit on a flat, clean surface. 4 Press the button on the base of the photoconductor kit.
Pull the toner cartridge up and out using the handle. 2 1 Maintaining the printer 154 To replace the photoconductor kit: 1 Open the front door by pressing the button on the left side of the printer and lowering the front door. 2 Pull the photoconductor kit and toner cartridge out of the printer as a unit by pulling on the toner cartridge handle. 1 2 3 3 Place the unit on a flat, clean surface. 4 Press the button on the base of the photoconductor kit.
User's Guide
Page 155
...of the unit with the tracks. Push the unit as far as it exposed to touch the photoconductor drum. Push the toner cartridge until it clicks into place. 7 Install the unit into the photoconductor kit by aligning the arrows on the toner cartridge with the arrows in the printer. Warning-Potential... Damage: When replacing a photoconductor kit, do not leave it will go. Maintaining the printer 155 Extended light exposure can cause print quality problems. 6 Insert the toner cartridge ...
...of the unit with the tracks. Push the unit as far as it exposed to touch the photoconductor drum. Push the toner cartridge until it clicks into place. 7 Install the unit into the photoconductor kit by aligning the arrows on the toner cartridge with the arrows in the printer. Warning-Potential... Damage: When replacing a photoconductor kit, do not leave it will go. Maintaining the printer 155 Extended light exposure can cause print quality problems. 6 Insert the toner cartridge ...
User's Guide
Page 156
Maintaining the printer 156 To reset the counter, see the instruction sheet that came with the new photoconductor kit. 8 After you replace the photoconductor kit, reset the photoconductor counter. Warning-Potential Damage: Resetting the photoconductor counter without replacing the photoconductor may damage your printer and void your warranty. 9 Close the front door.
Maintaining the printer 156 To reset the counter, see the instruction sheet that came with the new photoconductor kit. 8 After you replace the photoconductor kit, reset the photoconductor counter. Warning-Potential Damage: Resetting the photoconductor counter without replacing the photoconductor may damage your printer and void your warranty. 9 Close the front door.
User's Guide
Page 158
... correct password. Note: If you do not know the IP address of the printer, print a network setup page and locate the IP address in the photoconductor kit, and capacity measurements of your Web browser. To view reports from the Embedded Web Server. Each time a protected menu is valid for assessing the...
... correct password. Note: If you do not know the IP address of the printer, print a network setup page and locate the IP address in the photoconductor kit, and capacity measurements of your Web browser. To view reports from the Embedded Web Server. Each time a protected menu is valid for assessing the...
User's Guide
Page 161
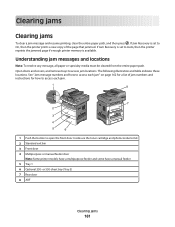
... access each jam" on page 162 for how to access each jam. 1 Push the button to access jam locations. Inside are the toner cartridge and photoconductor kit. 2 Standard exit bin 3 Front door 4 Multipurpose or manual feeder door Note: Some printer models have a multipurpose feeder and some have a manual feeder 5 Tray 1 6 Optional...
... access each jam" on page 162 for how to access each jam. 1 Push the button to access jam locations. Inside are the toner cartridge and photoconductor kit. 2 Standard exit bin 3 Front door 4 Multipurpose or manual feeder door Note: Some printer models have a multipurpose feeder and some have a manual feeder 5 Tray 1 6 Optional...
User's Guide
Page 162
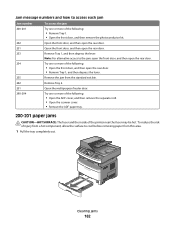
... paper from the standard exit bin. Try one or more of the following : • Remove Tray 1. • Open the front door, and then remove the photoconductor kit. Open the front door, and then open the rear door. Clearing jams 162 Open the multipurpose feeder door. Open the front door, and then...
... paper from the standard exit bin. Try one or more of the following : • Remove Tray 1. • Open the front door, and then remove the photoconductor kit. Open the front door, and then open the rear door. Clearing jams 162 Open the multipurpose feeder door. Open the front door, and then...
User's Guide
Page 163
Clearing jams 163 2 Remove the jam if you see it here. 3 If you do not see the jam, open the front door, and then remove the photoconductor kit and toner cartridge. 1 2 3 4 Lift the flap at the front of the printer, and then remove any jammed sheets. 5 Insert the photoconductor kit and toner cartridge.
Clearing jams 163 2 Remove the jam if you see it here. 3 If you do not see the jam, open the front door, and then remove the photoconductor kit and toner cartridge. 1 2 3 4 Lift the flap at the front of the printer, and then remove any jammed sheets. 5 Insert the photoconductor kit and toner cartridge.
User's Guide
Page 164
6 Close the front door. 7 Press . 202 paper jam CAUTION-HOT SURFACE: The fuser and the inside of the printer, and then remove any jammed sheets. Clearing jams 164 To reduce the risk of injury from a hot component, allow the surface to cool before removing paper from this area. 1 Open the front door, and then remove the photoconductor kit and toner cartridge. 1 2 3 2 Lift the flap in front of the printer near the fuser may be hot.
6 Close the front door. 7 Press . 202 paper jam CAUTION-HOT SURFACE: The fuser and the inside of the printer, and then remove any jammed sheets. Clearing jams 164 To reduce the risk of injury from a hot component, allow the surface to cool before removing paper from this area. 1 Open the front door, and then remove the photoconductor kit and toner cartridge. 1 2 3 2 Lift the flap in front of the printer near the fuser may be hot.
User's Guide
Page 165
3 If you do not see any jammed sheets, open the rear door. 4 Remove the jam. 5 Close the rear door. 6 Insert the photoconductor kit and toner cartridge. 7 Close the front door. 8 Press . Clearing jams 165
3 If you do not see any jammed sheets, open the rear door. 4 Remove the jam. 5 Close the rear door. 6 Insert the photoconductor kit and toner cartridge. 7 Close the front door. 8 Press . Clearing jams 165
User's Guide
Page 170
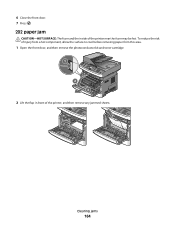
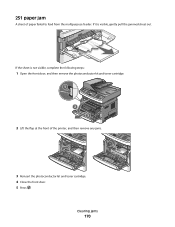
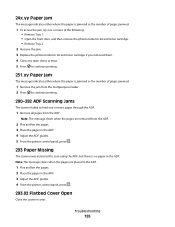
251 paper jam A sheet of the printer, and then remove any jams. 3 Reinsert the photoconductor kit and toner cartridge. 4 Close the front door. 5 Press . If the sheet is visible, gently pull the jammed sheet out. Clearing jams 170 If it is not visible, complete the following steps: 1 Open the front door, and then remove the photoconductor kit and toner cartridge. 1 2 3 2 Lift the flap at the front of paper failed to feed from the multipurpose feeder.
251 paper jam A sheet of the printer, and then remove any jams. 3 Reinsert the photoconductor kit and toner cartridge. 4 Close the front door. 5 Press . If the sheet is visible, gently pull the jammed sheet out. Clearing jams 170 If it is not visible, complete the following steps: 1 Open the front door, and then remove the photoconductor kit and toner cartridge. 1 2 3 2 Lift the flap at the front of paper failed to feed from the multipurpose feeder.
User's Guide
Page 182
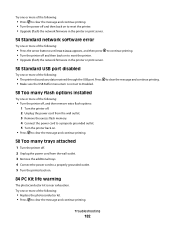
... item is near exhaustion. to Disabled. Try one or more of the following: • Replace the photoconductor kit. • Press to a properly grounded outlet. 5 Turn the printer back on. 84 PC Kit life warning The photoconductor kit is not set to continue printing. 56 Standard USB port disabled Try one or more...
... item is near exhaustion. to Disabled. Try one or more of the following: • Replace the photoconductor kit. • Press to a properly grounded outlet. 5 Turn the printer back on. 84 PC Kit life warning The photoconductor kit is not set to continue printing. 56 Standard USB port disabled Try one or more...
User's Guide
Page 183
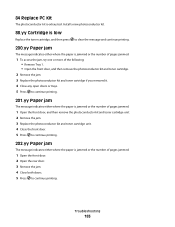
Install a new photoconductor kit. 88.yy Cartridge is low Replace the toner cartridge, and then press to clear the...more of the following: • Remove Tray 1. • Open the front door, and then remove the photoconductor kit and toner cartridge. 2 Remove the jam. 3 Replace the photoconductor kit and toner cartridge if you removed it. 4 Close any open doors or trays. 5 Press to ... jam The message indicates either where the paper is exhausted. Troubleshooting 183 84 Replace PC Kit The photoconductor kit is jammed or the number of pages jammed. 1 Open the front door, and then remove the...
Install a new photoconductor kit. 88.yy Cartridge is low Replace the toner cartridge, and then press to clear the...more of the following: • Remove Tray 1. • Open the front door, and then remove the photoconductor kit and toner cartridge. 2 Remove the jam. 3 Replace the photoconductor kit and toner cartridge if you removed it. 4 Close any open doors or trays. 5 Press to ... jam The message indicates either where the paper is exhausted. Troubleshooting 183 84 Replace PC Kit The photoconductor kit is jammed or the number of pages jammed. 1 Open the front door, and then remove the...
User's Guide
Page 185
..., try one or more of the following: • Remove Tray 1. • Open the front door, and then remove the photoconductor kit and toner cartridge. • Remove Tray 2. 2 Remove the jam. 3 Replace the photoconductor kit and toner cartridge if you removed them. 4 Close any open doors or trays. 5 Press to continue printing. 251...
..., try one or more of the following: • Remove Tray 1. • Open the front door, and then remove the photoconductor kit and toner cartridge. • Remove Tray 2. 2 Remove the jam. 3 Replace the photoconductor kit and toner cartridge if you removed them. 4 Close any open doors or trays. 5 Press to continue printing. 251...

User's Guide
Page 201
... panel Paper menu, check the Paper Size setting. 2 Before sending the job to print. Try one or more of the following : THE PHOTOCONDUCTOR KIT IS DEFECTIVE Replace the photoconductor kit. Troubleshooting 201 CHECK THE PAPER SIZE SETTING Make sure the paper size setting matches the paper loaded in the tray to the...
... panel Paper menu, check the Paper Size setting. 2 Before sending the job to print. Try one or more of the following : THE PHOTOCONDUCTOR KIT IS DEFECTIVE Replace the photoconductor kit. Troubleshooting 201 CHECK THE PAPER SIZE SETTING Make sure the paper size setting matches the paper loaded in the tray to the...
User's Guide
Page 207
... you see . To reduce the risk of the printer might be hot. MAKE SURE THE PAPER PATH IS CLEAR Paper could be caught between the photoconductor kit and the fuser. To reduce the risk of the printer might be hot. Troubleshooting 207 CAUTION-HOT SURFACE: The inside of injury from a... hot component, allow the surface to feed paper for the job. Warning-Potential Damage: Do not touch the photoconductor on the underside of the following: THE TONER MAY SMEAR WHEN PAPER IS FED FROM A SPECIFIC SOURCE From Print Properties, the Print dialog, or the...
... you see . To reduce the risk of the printer might be hot. MAKE SURE THE PAPER PATH IS CLEAR Paper could be caught between the photoconductor kit and the fuser. To reduce the risk of the printer might be hot. Troubleshooting 207 CAUTION-HOT SURFACE: The inside of injury from a... hot component, allow the surface to feed paper for the job. Warning-Potential Damage: Do not touch the photoconductor on the underside of the following: THE TONER MAY SMEAR WHEN PAPER IS FED FROM A SPECIFIC SOURCE From Print Properties, the Print dialog, or the...


