
Getting Started
Page 2
...The safety features of some parts may not always be obvious. This product is near the product and easily accessible. Connect the power supply cord to an electrical outlet that is designed, tested, and approved to a professional service person. Refer service or repairs,...standards with this product or make any electrical or cabling connections, such as the power supply cord or telephone, during a lightning storm. Lexmark is not responsible for the use of specific Lexmark components. Safety information Use only the power supply and power supply cord provided with the use of other ...
...The safety features of some parts may not always be obvious. This product is near the product and easily accessible. Connect the power supply cord to an electrical outlet that is designed, tested, and approved to a professional service person. Refer service or repairs,...standards with this product or make any electrical or cabling connections, such as the power supply cord or telephone, during a lightning storm. Lexmark is not responsible for the use of specific Lexmark components. Safety information Use only the power supply and power supply cord provided with the use of other ...
Getting Started
Page 17
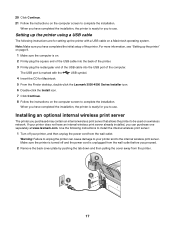
... more information, see "Setting up the printer using a USB cable The following instructions to install the internal wireless print server: 1 Turn off and the power cord is ready for Macintosh. 5 From the Finder desktop, double-click the Lexmark 3500-4500 Series Installer icon. 6 Double-click the Install icon...the printer" on page 9. 1 Make sure the computer is marked with a USB cable on a wireless network. The USB port is on the computer screen to your printer, and then unplug the power cord from the printer. 17 Installing an optional internal wireless print server The printer ...
... more information, see "Setting up the printer using a USB cable The following instructions to install the internal wireless print server: 1 Turn off and the power cord is ready for Macintosh. 5 From the Finder desktop, double-click the Lexmark 3500-4500 Series Installer icon. 6 Double-click the Install icon...the printer" on page 9. 1 Make sure the computer is marked with a USB cable on a wireless network. The USB port is on the computer screen to your printer, and then unplug the power cord from the printer. 17 Installing an optional internal wireless print server The printer ...
Getting Started
Page 26
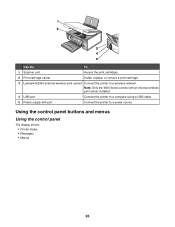
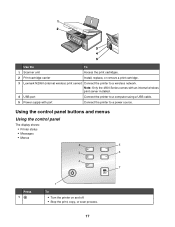
Using the control panel buttons and menus Using the control panel The display shows: • Printer status • Messages • Menus 26 Use the To 1 Scanner unit Access the print cartridges. 2 Print cartridge carrier Install, replace, or remove a print cartridge. 3 Lexmark N2050 (internal wireless print server) Connect the printer to a power source. Note: Only the 4500 Series comes with an internal wireless print server installed. 4 USB port Connect the printer to a computer using a USB cable. 5 Power supply with port Connect the printer to a wireless network.
Using the control panel buttons and menus Using the control panel The display shows: • Printer status • Messages • Menus 26 Use the To 1 Scanner unit Access the print cartridges. 2 Print cartridge carrier Install, replace, or remove a print cartridge. 3 Lexmark N2050 (internal wireless print server) Connect the printer to a power source. Note: Only the 4500 Series comes with an internal wireless print server installed. 4 USB port Connect the printer to a computer using a USB cable. 5 Power supply with port Connect the printer to a wireless network.
Getting Started
Page 48
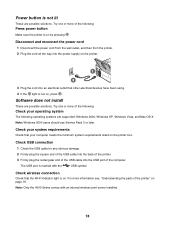
...Firmly plug the square end of the USB cable into the back of the printer. 3 Firmly plug the rectangular end of the USB cable into the wall outlet. 6 Press to turn the printer on , press . Disconnect and reconnect the power cord 1 Disconnect the power cord from the wall outlet, and then from... the printer. 4 Reconnect the power supply to the printer. 5 Plug the power cord into the USB port...
...Firmly plug the square end of the USB cable into the back of the printer. 3 Firmly plug the rectangular end of the USB cable into the wall outlet. 6 Press to turn the printer on , press . Disconnect and reconnect the power cord 1 Disconnect the power cord from the wall outlet, and then from... the printer. 4 Reconnect the power supply to the printer. 5 Plug the power cord into the USB port...
Getting Started
Page 50
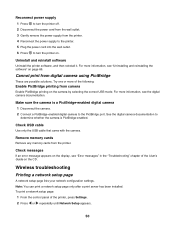
... only the USB cable that came with the camera. Check messages If an error message appears on the display, see the digital camera documentation. Reconnect power supply 1 Press to turn the printer on. Wireless troubleshooting Printing a network setup page A network setup page lists your network configuration settings. Note: You can print a ...
... only the USB cable that came with the camera. Check messages If an error message appears on the display, see the digital camera documentation. Reconnect power supply 1 Press to turn the printer on. Wireless troubleshooting Printing a network setup page A network setup page lists your network configuration settings. Note: You can print a ...
Getting Started
Page 52
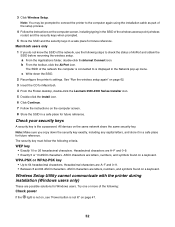
See "Run the wireless setup again" on page 62. 3 Insert the CD for Macintosh. 4 From the Finder desktop, double-click the Lexmark 3500-4500 Series Installer icon. 5 Double-click the Install icon. 6 Click Continue. 7 Follow the instructions on page 47. 52 Hexadecimal characters are A-F and ...the light is not on, see "Power button is displayed in a safe place for future reference. Hexadecimal characters are A-F and 0-9. • Between 8 and 64 ASCII characters. WPA-PSK or WPA2-PSK key • Up to the computer again using the installation cable as part of the wireless access point...
See "Run the wireless setup again" on page 62. 3 Insert the CD for Macintosh. 4 From the Finder desktop, double-click the Lexmark 3500-4500 Series Installer icon. 5 Double-click the Install icon. 6 Click Continue. 7 Follow the instructions on page 47. 52 Hexadecimal characters are A-F and ...the light is not on, see "Power button is displayed in a safe place for future reference. Hexadecimal characters are A-F and 0-9. • Between 8 and 64 ASCII characters. WPA-PSK or WPA2-PSK key • Up to the computer again using the installation cable as part of the wireless access point...
Getting Started
Page 57
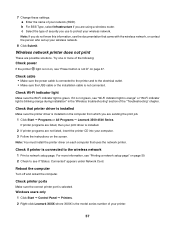
... sure the Wi-Fi indicator light is selected. Check cable • Make sure the power cable is connected to the printer and to the electrical outlet. • Make sure the USB cable or the installation cable is connected to see "Power button is installed on page 47. Check that printer ... which you are possible solutions. For more of the following: Check power If the printer light is installed. 2 If printer programs are sending the print job. 1 Click Start Œ Programs or All Programs Œ Lexmark 3500-4500 Series. If printer programs are listed, then your wireless network...
... sure the Wi-Fi indicator light is selected. Check cable • Make sure the power cable is connected to the printer and to the electrical outlet. • Make sure the USB cable or the installation cable is connected to see "Power button is installed on page 47. Check that printer ... which you are possible solutions. For more of the following: Check power If the printer light is installed. 2 If printer programs are sending the print job. 1 Click Start Œ Programs or All Programs Œ Lexmark 3500-4500 Series. If printer programs are listed, then your wireless network...

User's Guide
Page 2
..., see the Mac Help installed with the printer software. Connect the power supply cord to meet strict global safety standards with this product or make any electrical or cabling connections, such as the power supply cord or telephone, during a lightning storm. Refer service or ...repairs, other replacement parts. CAUTION: Do not set up this product or the manufacturer's authorized replacement power supply and power supply cord. The safety features of specific Lexmark components....
..., see the Mac Help installed with the printer software. Connect the power supply cord to meet strict global safety standards with this product or make any electrical or cabling connections, such as the power supply cord or telephone, during a lightning storm. Refer service or ...repairs, other replacement parts. CAUTION: Do not set up this product or the manufacturer's authorized replacement power supply and power supply cord. The safety features of specific Lexmark components....
User's Guide
Page 12
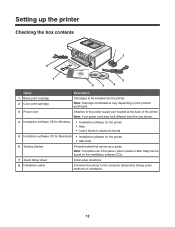
Note: Your power cord may look different from the one shown. 4 Installation software CD for Windows • Installation software for the printer • Help • User's Guide in ... be installed into the printer. Note: Cartridge combinations vary depending on the installation software CDs. 7 Quick Setup sheet Initial setup directions 8 Installation cable Connects the printer to the power supply port located at the back of installation. 12 Setting up the printer Checking the box contents Name Description 1 Black print cartridge 2 Color...
Note: Your power cord may look different from the one shown. 4 Installation software CD for Windows • Installation software for the printer • Help • User's Guide in ... be installed into the printer. Note: Cartridge combinations vary depending on the installation software CDs. 7 Quick Setup sheet Initial setup directions 8 Installation cable Connects the printer to the power supply port located at the back of installation. 12 Setting up the printer Checking the box contents Name Description 1 Black print cartridge 2 Color...
User's Guide
Page 17
Note: Only the 4500 Series comes with an internal wireless print server installed. 4 USB port Connect the printer to a computer using a USB cable. 5 Power supply with port Connect the printer to a wireless network. Using the control panel buttons and menus Using the control panel The display shows: • Printer ... the print, copy, or scan process. 17 Use the To 1 Scanner unit Access the print cartridges. 2 Print cartridge carrier Install, replace, or remove a print cartridge. 3 Lexmark N2050 (internal wireless print server) Connect the printer to...
Note: Only the 4500 Series comes with an internal wireless print server installed. 4 USB port Connect the printer to a computer using a USB cable. 5 Power supply with port Connect the printer to a wireless network. Using the control panel buttons and menus Using the control panel The display shows: • Printer ... the print, copy, or scan process. 17 Use the To 1 Scanner unit Access the print cartridges. 2 Print cartridge carrier Install, replace, or remove a print cartridge. 3 Lexmark N2050 (internal wireless print server) Connect the printer to...
User's Guide
Page 78
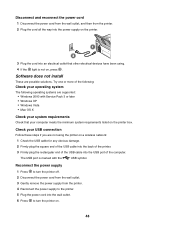
...of the USB cable into the USB port of the printer" on the printer box. Try one or more of the following operating systems are supported: Windows 2000, Windows XP, Windows Vista, and Mac OS X. Check your computer meets the minimum system requirements listed on page 16. Power button is ...solutions. Note: Windows 2000 users should use Service Pack 3 or later. The USB port is not on, press . Disconnect and reconnect the power cord 1 Disconnect the power cord from the wall outlet, and then from the printer. 2 Plug the cord all the way into an electrical outlet that your system ...
...of the USB cable into the USB port of the printer" on the printer box. Try one or more of the following operating systems are supported: Windows 2000, Windows XP, Windows Vista, and Mac OS X. Check your computer meets the minimum system requirements listed on page 16. Power button is ...solutions. Note: Windows 2000 users should use Service Pack 3 or later. The USB port is not on, press . Disconnect and reconnect the power cord 1 Disconnect the power cord from the wall outlet, and then from the printer. 2 Plug the cord all the way into an electrical outlet that your system ...
User's Guide
Page 96
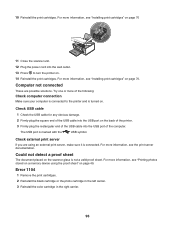
... valid proof sheet. Try one or more information, see "Installing print cartridges" on page 70 11 Close the scanner unit. 12 Plug the power cord into the wall outlet. 13 Press to the printer and is marked with the USB symbol. For more of the following: Check computer ...server documentation. For more information, see "Installing print cartridges" on . Check USB cable 1 Check the USB cable for any obvious damage. 2 Firmly plug the square end of the USB cable into the USB port of the USB cable into the USB port on . 14 Reinstall the print cartridges. Error 1104 1 Remove...
... valid proof sheet. Try one or more information, see "Installing print cartridges" on page 70 11 Close the scanner unit. 12 Plug the power cord into the wall outlet. 13 Press to the printer and is marked with the USB symbol. For more of the following: Check computer ...server documentation. For more information, see "Installing print cartridges" on . Check USB cable 1 Check the USB cable for any obvious damage. 2 Firmly plug the square end of the USB cable into the USB port of the USB cable into the USB port on . 14 Reinstall the print cartridges. Error 1104 1 Remove...


