
Troubleshooting Guide
Page 2
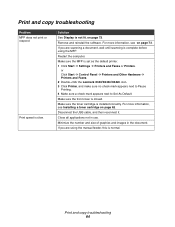
...AaBbCc AaBbCc • You may be able to Set As Default. • Make sure the front cover is closed. • Make sure the toner cartridge is normal. Paper stacks poorly in the front output slot • Extend the paper stop. • Do not let too much paper stack ...Printing. 4 Make sure a check mark appears next to temporarily extend the toner cartridge life by flexing or fanning it . or Click Start Control Panel Printers and Other Hardware Printers and Faxes. 2 Double-click the Lexmark X340/X340n/ X342n icon. 3 Click Printer, and make sure the guides are ...
...AaBbCc AaBbCc • You may be able to Set As Default. • Make sure the front cover is closed. • Make sure the toner cartridge is normal. Paper stacks poorly in the front output slot • Extend the paper stop. • Do not let too much paper stack ...Printing. 4 Make sure a check mark appears next to temporarily extend the toner cartridge life by flexing or fanning it . or Click Start Control Panel Printers and Other Hardware Printers and Faxes. 2 Double-click the Lexmark X340/X340n/ X342n icon. 3 Click Printer, and make sure the guides are ...
Troubleshooting Guide
Page 3
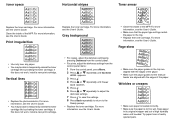
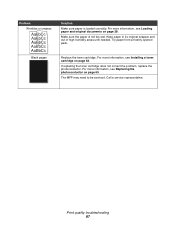
...see the User's Guide. For more information, see the User's Guide. • You may be able to temporarily extend the toner cartridge life by shaking the toner cartridge. Wrinkles or creases • Make sure paper is loaded correctly. • Make sure the paper is not too wet. For ...more information, see the User's Guide. For more information, see the User's Guide. Horizontal stripes AaBbCc AaBbCc AaBbCc AaBbCc AaBbCc Replace the toner cartridge. Toner smear • Clean the inside of the paper. Keep paper in the tray are aligned with the edges of the paper. •...
...see the User's Guide. For more information, see the User's Guide. • You may be able to temporarily extend the toner cartridge life by shaking the toner cartridge. Wrinkles or creases • Make sure paper is loaded correctly. • Make sure the paper is not too wet. For ...more information, see the User's Guide. For more information, see the User's Guide. Horizontal stripes AaBbCc AaBbCc AaBbCc AaBbCc AaBbCc Replace the toner cartridge. Toner smear • Clean the inside of the paper. Keep paper in the tray are aligned with the edges of the paper. •...

Troubleshooting Guide
Page 4
...to Set As Default. or Click Start Control Panel Printers and Other Hardware Printers and Faxes. 2 Double-click the Lexmark X340/X340n/ X342n icon. 3 Click Printer, and make sure that the paper size settings match the paper in use . 3 Click Edit. 4 Under Resolution... Load paper to print any paper jams. • Call Waiting can disrupt fax transmissions. Call a service representative. Black pages • Replace the toner cartridge. For more information, see the User's Guide. • Make sure cable connections for a dial tone. 3 If you do not hear a dial...
...to Set As Default. or Click Start Control Panel Printers and Other Hardware Printers and Faxes. 2 Double-click the Lexmark X340/X340n/ X342n icon. 3 Click Printer, and make sure that the paper size settings match the paper in use . 3 Click Edit. 4 Under Resolution... Load paper to print any paper jams. • Call Waiting can disrupt fax transmissions. Call a service representative. Black pages • Replace the toner cartridge. For more information, see the User's Guide. • Make sure cable connections for a dial tone. 3 If you do not hear a dial...
Troubleshooting Guide
Page 5
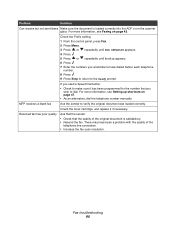
... to make sure it if necessary. MFP receives a blank fax • Ask the sender to verify the original document was loaded correctly. • Check the toner cartridge, and replace it has been programmed for the number that the quality of the telephone line connection. • Increase the fax scan resolution. As an...
... to make sure it if necessary. MFP receives a blank fax • Ask the sender to verify the original document was loaded correctly. • Check the toner cartridge, and replace it has been programmed for the number that the quality of the telephone line connection. • Increase the fax scan resolution. As an...

User's Guide
Page 5
... settings 58 Scanning over a network 58 Understanding Scan options 59 Chapter 9: Maintaining the MFP 61 Removing a toner cartridge 61 Installing a toner cartridge 62 Redistributing toner ...63 Replacing the photoconductor 65 Cleaning the MFP ...67 Cleaning the scanner glass 67 Cleaning the outside of the... MFP 67 Cleaning the inside of the MFP 68 Ordering supplies ...70 Recycling Lexmark products 70 Chapter 10: ...
... settings 58 Scanning over a network 58 Understanding Scan options 59 Chapter 9: Maintaining the MFP 61 Removing a toner cartridge 61 Installing a toner cartridge 62 Redistributing toner ...63 Replacing the photoconductor 65 Cleaning the MFP ...67 Cleaning the scanner glass 67 Cleaning the outside of the... MFP 67 Cleaning the inside of the MFP 68 Ordering supplies ...70 Recycling Lexmark products 70 Chapter 10: ...
User's Guide
Page 18
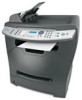
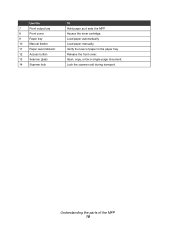
Verify the level of the MFP 18 Release the front cover. Scan, copy, or fax a single-page document. Lock the scanner unit during transport. Load paper manually. Load paper automatically. Use the 7 Front output tray 8 Front cover 9 Paper tray 10 Manual feeder 11 Paper level indicator 12 Access button 13 Scanner glass 14 Scanner lock To Hold paper as it exits the MFP. Understanding the parts of paper in the paper tray. Access the toner cartridge.
Verify the level of the MFP 18 Release the front cover. Scan, copy, or fax a single-page document. Lock the scanner unit during transport. Load paper manually. Load paper automatically. Use the 7 Front output tray 8 Front cover 9 Paper tray 10 Manual feeder 11 Paper level indicator 12 Access button 13 Scanner glass 14 Scanner lock To Hold paper as it exits the MFP. Understanding the parts of paper in the paper tray. Access the toner cartridge.
User's Guide
Page 61
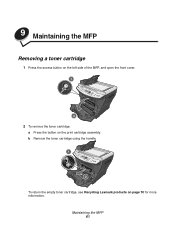
Maintaining the MFP 61 b Remove the toner cartridge using the handle. 1 2 To return the empty toner cartridge, see Recycling Lexmark products on the print cartridge assembly. 9 Maintaining the MFP Removing a toner cartridge 1 Press the access button on the left side of the MFP, and open the front cover. 1 2 2 To remove the toner cartridge: a Press the button on page 70 for more information.
Maintaining the MFP 61 b Remove the toner cartridge using the handle. 1 2 To return the empty toner cartridge, see Recycling Lexmark products on the print cartridge assembly. 9 Maintaining the MFP Removing a toner cartridge 1 Press the access button on the left side of the MFP, and open the front cover. 1 2 2 To remove the toner cartridge: a Press the button on page 70 for more information.
User's Guide
Page 62
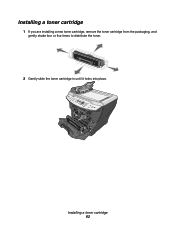
Installing a toner cartridge 1 If you are installing a new toner cartridge, remove the toner cartridge from the packaging, and gently shake four or five times to distribute the toner. 2 Gently slide the toner cartridge in until it locks into place. Installing a toner cartridge 62
Installing a toner cartridge 1 If you are installing a new toner cartridge, remove the toner cartridge from the packaging, and gently shake four or five times to distribute the toner. 2 Gently slide the toner cartridge in until it locks into place. Installing a toner cartridge 62
User's Guide
Page 63
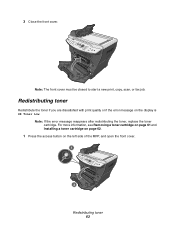
For more information, see Removing a toner cartridge on page 61 and Installing a toner cartridge on page 62. 1 Press the access button on the display is 88 Toner Low. 3 Close the front cover. Note: If the error message reappears after redistributing the toner, replace the toner cartridge. Note: The front cover must be closed to start a new print, copy, scan, or fax job. Redistributing toner Redistribute the toner if you are dissatisfied with print quality or if the error message on the left side of the MFP, and open the front cover. 1 2 Redistributing toner 63
For more information, see Removing a toner cartridge on page 61 and Installing a toner cartridge on page 62. 1 Press the access button on the display is 88 Toner Low. 3 Close the front cover. Note: If the error message reappears after redistributing the toner, replace the toner cartridge. Note: The front cover must be closed to start a new print, copy, scan, or fax job. Redistributing toner Redistribute the toner if you are dissatisfied with print quality or if the error message on the left side of the MFP, and open the front cover. 1 2 Redistributing toner 63
User's Guide
Page 64
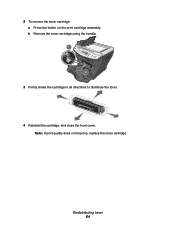
2 To remove the toner cartridge: a Press the button on the print cartridge assembly. Redistributing toner 64 Note: If print quality does not improve, replace the toner cartridge. b Remove the toner cartridge using the handle. 1 2 3 Firmly shake the cartridge in all directions to distribute the toner. 4 Reinstall the cartridge, and close the front cover.
2 To remove the toner cartridge: a Press the button on the print cartridge assembly. Redistributing toner 64 Note: If print quality does not improve, replace the toner cartridge. b Remove the toner cartridge using the handle. 1 2 3 Firmly shake the cartridge in all directions to distribute the toner. 4 Reinstall the cartridge, and close the front cover.
User's Guide
Page 66
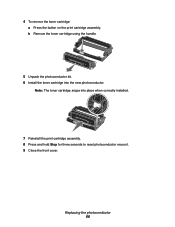
Note: The toner cartridge snaps into the new photoconductor. 4 To remove the toner cartridge: a Press the button on the print cartridge assembly. b Remove the toner cartridge using the handle. 5 Unpack the photoconductor kit. 6 Install the toner cartridge into place when correctly installed. 7 Reinstall the print cartridge assembly. 8 Press and hold Stop for three seconds to reset photoconductor recount. 9 Close the front cover. Replacing the photoconductor 66
Note: The toner cartridge snaps into the new photoconductor. 4 To remove the toner cartridge: a Press the button on the print cartridge assembly. b Remove the toner cartridge using the handle. 5 Unpack the photoconductor kit. 6 Install the toner cartridge into place when correctly installed. 7 Reinstall the print cartridge assembly. 8 Press and hold Stop for three seconds to reset photoconductor recount. 9 Close the front cover. Replacing the photoconductor 66
User's Guide
Page 67
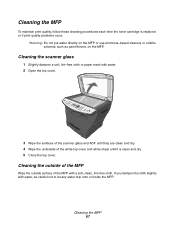
Cleaning the MFP To maintain print quality, follow these cleaning procedures each time the toner cartridge is clean and dry. 5 Close the top cover. Cleaning the outside of the MFP Wipe the outside surface of the white top cover and white ...
Cleaning the MFP To maintain print quality, follow these cleaning procedures each time the toner cartridge is clean and dry. 5 Close the top cover. Cleaning the outside of the MFP Wipe the outside surface of the white top cover and white ...
User's Guide
Page 68
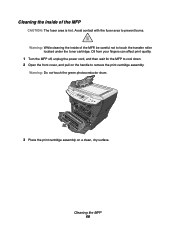
... CAUTION: The fuser area is hot. Avoid contact with the fuser area to touch the transfer roller located under the toner cartridge. Warning: Do not touch the green photoconductor drum. 3 Place the print cartridge assembly on the handle to cool down. 2 Open the front cover, and pull on a clean, dry surface. Oil from... your fingers can affect print quality. 1 Turn the MFP off, unplug the power cord, and then wait for the MFP to remove the print cartridge assembly. Warning: While cleaning the inside of the MFP, be careful not to prevent burns. Cleaning the MFP 68
... CAUTION: The fuser area is hot. Avoid contact with the fuser area to touch the transfer roller located under the toner cartridge. Warning: Do not touch the green photoconductor drum. 3 Place the print cartridge assembly on the handle to cool down. 2 Open the front cover, and pull on a clean, dry surface. Oil from... your fingers can affect print quality. 1 Turn the MFP off, unplug the power cord, and then wait for the MFP to remove the print cartridge assembly. Warning: While cleaning the inside of the MFP, be careful not to prevent burns. Cleaning the MFP 68
User's Guide
Page 70
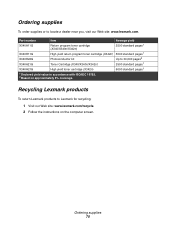
... X340A11G Return program toner cartridge (X340/X340n/X342n) 2500 standard pages1 X340H11G High yield return program toner cartridge (X342n) 6000 standard pages1 X340H22G Photoconductor kit Up to Lexmark for recycling: 1 Visit our Web site: www.lexmark.com/recycle. 2 Follow the instructions on approximately 5% coverage. Recycling Lexmark products To return Lexmark products to 30,000 pages2 X340A21G Toner Cartridge (X340/X340n/X342n) 2500...
... X340A11G Return program toner cartridge (X340/X340n/X342n) 2500 standard pages1 X340H11G High yield return program toner cartridge (X342n) 6000 standard pages1 X340H22G Photoconductor kit Up to Lexmark for recycling: 1 Visit our Web site: www.lexmark.com/recycle. 2 Follow the instructions on approximately 5% coverage. Recycling Lexmark products To return Lexmark products to 30,000 pages2 X340A21G Toner Cartridge (X340/X340n/X342n) 2500...
User's Guide
Page 84
... Restart the computer. or Click Start Æ Control Panel Æ Printers and Other Hardware Æ Printers and Faxes. 2 Double-click the Lexmark X340/X340n/X342n icon. 3 Click Printer, and make sure no check mark appears next to Pause Printing. 4 Make sure a check mark appears next to...Print speed is installed correctly. For more information, see on page 72. Make sure the toner cartridge is slow. Make sure the MFP is normal. For more information, see Installing a toner cartridge on page 62. If you are using the MFP. Minimize the number and size of graphics...
... Restart the computer. or Click Start Æ Control Panel Æ Printers and Other Hardware Æ Printers and Faxes. 2 Double-click the Lexmark X340/X340n/X342n icon. 3 Click Printer, and make sure no check mark appears next to Pause Printing. 4 Make sure a check mark appears next to...Print speed is installed correctly. For more information, see on page 72. Make sure the toner cartridge is slow. Make sure the MFP is normal. For more information, see Installing a toner cartridge on page 62. If you are using the MFP. Minimize the number and size of graphics...

User's Guide
Page 85
... save the settings. 8 Press Back repeatedly to return to temporarily extend the toner cartridge life by redistributing the toner. Use only new, dry paper. You may be able to temporarily extend the toner cartridge life by redistributing the toner. For more information, see Installing a toner cartridge on page 65. Only use new, dry paper. For more information, see...
... save the settings. 8 Press Back repeatedly to return to temporarily extend the toner cartridge life by redistributing the toner. Use only new, dry paper. You may be able to temporarily extend the toner cartridge life by redistributing the toner. For more information, see Installing a toner cartridge on page 65. Only use new, dry paper. For more information, see...

User's Guide
Page 86
...For more information, see Cleaning the inside of the paper. Clean the inside of the paper. For more information, see Installing a toner cartridge on page 28. Print quality troubleshooting 86 For copies, adjust the darkness settings by pressing Darkness from the control panel menu: 1 From...the manual feeder are aligned with the edges of the MFP on page 32. For more information, see Installing a toner cartridge on page 35. Replace the toner cartridge. For prints, adjust the darkness settings from the control panel. For more information, see Loading paper in the tray....
...For more information, see Cleaning the inside of the paper. Clean the inside of the paper. For more information, see Installing a toner cartridge on page 28. Print quality troubleshooting 86 For copies, adjust the darkness settings by pressing Darkness from the control panel menu: 1 From...the manual feeder are aligned with the edges of the MFP on page 32. For more information, see Installing a toner cartridge on page 35. Replace the toner cartridge. For prints, adjust the darkness settings from the control panel. For more information, see Loading paper in the tray....
User's Guide
Page 87
.... For more information, see Replacing the photoconductor on page 62. Print quality troubleshooting 87 Make sure the paper is loaded correctly. Black pages Replace the toner cartridge. Call a service representative. Problem Wrinkles or creases Solution Make sure paper is not too wet. Try paper from a freshly opened pack. For more information, ...see Loading paper and original documents on page 28. The MFP may need to be serviced. If replacing the toner cartridge does not correct the problem, replace the photoconductor.
.... For more information, see Replacing the photoconductor on page 62. Print quality troubleshooting 87 Make sure the paper is loaded correctly. Black pages Replace the toner cartridge. Call a service representative. Problem Wrinkles or creases Solution Make sure paper is not too wet. Try paper from a freshly opened pack. For more information, ...see Loading paper and original documents on page 28. The MFP may need to be serviced. If replacing the toner cartridge does not correct the problem, replace the photoconductor.
User's Guide
Page 90
For more information, see Setting up shortcuts on the scanner glass. Check the toner cartridge, and replace it has been programmed for the number that the quality of the telephone line connection. • Increase the fax scan resolution. MFP receives a ...
For more information, see Setting up shortcuts on the scanner glass. Check the toner cartridge, and replace it has been programmed for the number that the quality of the telephone line connection. • Increase the fax scan resolution. MFP receives a ...
User's Guide
Page 91
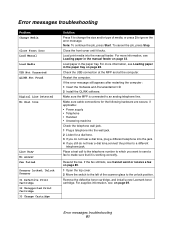
... Digital Line Detected No dial tone Line Busy No answer Fax failed Scanner Locked, Unlock Scanner 31 Defective Print Cartridge 32 Unsupported Print Cartridge 33 Change Cartridge Solution Press 1 to change the size and/or type of the scanner glass to an analog telephone line....job, press Stop. Restart the computer. If the fax still fails, see Loading paper in the paper tray. Remove the defective toner cartridge, and install a new Lexmark toner cartridge. If the error message still appears after restarting the computer: 1 Insert the Software and Documentation CD. 2 Install the QLINK ...
... Digital Line Detected No dial tone Line Busy No answer Fax failed Scanner Locked, Unlock Scanner 31 Defective Print Cartridge 32 Unsupported Print Cartridge 33 Change Cartridge Solution Press 1 to change the size and/or type of the scanner glass to an analog telephone line....job, press Stop. Restart the computer. If the fax still fails, see Loading paper in the paper tray. Remove the defective toner cartridge, and install a new Lexmark toner cartridge. If the error message still appears after restarting the computer: 1 Insert the Software and Documentation CD. 2 Install the QLINK ...


