

Wireless Setup Guide
Page 3
... the printer on a wireless network 11 Adding the printer to a network using MAC address filtering 11 Connecting to a wireless network using Windows 13 Installing the printer on a wireless network (Windows 13 Connecting to a wireless network using Macintosh 15 Installing the printer on a wireless network (Macintosh 15 Troubleshooting wireless setup 19 Connecting using...
... the printer on a wireless network 11 Adding the printer to a network using MAC address filtering 11 Connecting to a wireless network using Windows 13 Installing the printer on a wireless network (Windows 13 Connecting to a wireless network using Macintosh 15 Installing the printer on a wireless network (Macintosh 15 Troubleshooting wireless setup 19 Connecting using...

Wireless Setup Guide
Page 10
... directly to a wired network using an Ethernet cable For detailed steps, see "Connecting using an Ethernet network" on page 30. Connect to a wireless network using Windows For detailed steps, see "Information you will need to set up the printer on a wireless network" on page 11 and "Installing the printer on a wireless... detailed steps, see "Information you will need to set up the printer on a wireless network" on page 11 and "Installing the printer on a wireless network (Windows)" on page 15.
... directly to a wired network using an Ethernet cable For detailed steps, see "Connecting using an Ethernet network" on page 30. Connect to a wireless network using Windows For detailed steps, see "Information you will need to set up the printer on a wireless network" on page 11 and "Installing the printer on a wireless... detailed steps, see "Information you will need to set up the printer on a wireless network" on page 11 and "Installing the printer on a wireless network (Windows)" on page 15.
Wireless Setup Guide
Page 13
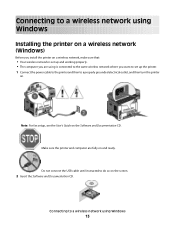
... the same wireless network where you are fully on and ready. Do not connect the USB cable until instructed to a wireless network using Windows 13 Connecting to do so on the screen. 2 Insert the Software and Documentation CD. Connecting to a wireless network using... Windows Installing the printer on a wireless network (Windows) Before you install the printer on a wireless network, make sure that: • Your wireless network is set up and working properly. • The ...
... the same wireless network where you are fully on and ready. Do not connect the USB cable until instructed to a wireless network using Windows 13 Connecting to do so on the screen. 2 Insert the Software and Documentation CD. Connecting to a wireless network using... Windows Installing the printer on a wireless network (Windows) Before you install the printer on a wireless network, make sure that: • Your wireless network is set up and working properly. • The ...

Wireless Setup Guide
Page 14
... telephone cable. 9 Follow the on-screen instructions to complete the software installation. Notes: • After the printer is the recommended path to a wireless network using Windows 14 Connecting to choose.
... telephone cable. 9 Follow the on-screen instructions to complete the software installation. Notes: • After the printer is the recommended path to a wireless network using Windows 14 Connecting to choose.

Wireless Setup Guide
Page 20
... TO THE WIRELESS ROUTER Although the possible distance between devices in the address field of the wireless access point: a Open a command prompt: In Windows Vista 1 Click . 2 Click All Programs Œ Accessories. 3 Click Command Prompt. CHECK WHETHER THE PRINTER IS ON THE SAME WIRELESS NETWORK .... • If there are possible solutions. Make sure the SSID the printer is generally 100-150 feet. Troubleshooting wireless setup 20 In Windows XP and earlier 1 Click Start. 2 Click All Programs or Programs Œ Accessories Œ Command Prompt. Refer to the documentation that...
... TO THE WIRELESS ROUTER Although the possible distance between devices in the address field of the wireless access point: a Open a command prompt: In Windows Vista 1 Click . 2 Click All Programs Œ Accessories. 3 Click Command Prompt. CHECK WHETHER THE PRINTER IS ON THE SAME WIRELESS NETWORK .... • If there are possible solutions. Make sure the SSID the printer is generally 100-150 feet. Troubleshooting wireless setup 20 In Windows XP and earlier 1 Click Start. 2 Click All Programs or Programs Œ Accessories Œ Command Prompt. Refer to the documentation that...

Wireless Setup Guide
Page 27
... Software and Documentation CD, and run the Wireless Setup Utility again. DISABLE THIRD-PARTY FIREWALLS • If a non-Microsoft software firewall is selected. VERIFY THAT WINDOWS IS WORKING PROPERLY • Try restarting the computer. • Try installing the printer driver again. • Try uninstalling and then reinstalling the printer driver. Re...
... Software and Documentation CD, and run the Wireless Setup Utility again. DISABLE THIRD-PARTY FIREWALLS • If a non-Microsoft software firewall is selected. VERIFY THAT WINDOWS IS WORKING PROPERLY • Try restarting the computer. • Try installing the printer driver again. • Try uninstalling and then reinstalling the printer driver. Re...

Wireless Setup Guide
Page 28
... working properly. If the printer and computer are configured correctly, and the wireless network is a firewall (other than the Windows firewall) on the computer Third-party (non-Microsoft) firewalls can interfere with your wireless access point into the address field of the ...following : In Windows Vista 1 Click . 2 Click All Programs ΠAccessories. 3 Click Command Prompt. In Windows XP and earlier 1 Click Start. 2 Click All Programs or Programs ΠAccessories ΠCommand ...
... working properly. If the printer and computer are configured correctly, and the wireless network is a firewall (other than the Windows firewall) on the computer Third-party (non-Microsoft) firewalls can interfere with your wireless access point into the address field of the ...following : In Windows Vista 1 Click . 2 Click All Programs ΠAccessories. 3 Click Command Prompt. In Windows XP and earlier 1 Click Start. 2 Click All Programs or Programs ΠAccessories ΠCommand ...

Wireless Setup Guide
Page 29
... part of the setup process. 5 Store the SSID and the WEP key or WPA passphrase in the SSID of the following: • In Windows Vista, click . • In Windows XP and earlier, click Start. 2 Click All Programs or Programs, and then select the printer program folder from the list. 3 Click Wireless Setup...
... part of the setup process. 5 Store the SSID and the WEP key or WPA passphrase in the SSID of the following: • In Windows Vista, click . • In Windows XP and earlier, click Start. 2 Click All Programs or Programs, and then select the printer program folder from the list. 3 Click Wireless Setup...

Wireless Setup Guide
Page 33
... of wireless network that you and others can identify it communicate directly with multiple computers or other devices. Basic Service Set describes the type of a Windows computer A hardware address that connects multiple devices on a wired network See "SSID (Service Set Identifier)" on the network. Each device on wireless routers or access...
... of wireless network that you and others can identify it communicate directly with multiple computers or other devices. Basic Service Set describes the type of a Windows computer A hardware address that connects multiple devices on a wired network See "SSID (Service Set Identifier)" on the network. Each device on wireless routers or access...

Wireless Setup Guide
Page 35
...M MAC address, finding 11 Macintosh wireless network installation 15 N network printer does not show up in printer selection list during installation (Windows) 28 network setup page printing 19 P power 26 printer does not print 27 wireless 28 printing network setup page 19 S selecting connection...24 wireless network configuration information 11 does not appear in network list 24 installation, using Macintosh 15 installation, using Windows 13 troubleshooting 19 wireless troubleshooting cannot print over wireless network 20 network printer does not show up in printer selection list ...
...M MAC address, finding 11 Macintosh wireless network installation 15 N network printer does not show up in printer selection list during installation (Windows) 28 network setup page printing 19 P power 26 printer does not print 27 wireless 28 printing network setup page 19 S selecting connection...24 wireless network configuration information 11 does not appear in network list 24 installation, using Macintosh 15 installation, using Windows 13 troubleshooting 19 wireless troubleshooting cannot print over wireless network 20 network printer does not show up in printer selection list ...
User's Guide
Page 10
...The printer software is greater than 18 kg (40 lbs) and requires two or more trained personnel to view the appropriate support site. Lexmark Support Web site-support.lexmark.com Note: Select your region, and then select your printer. It is important to install any options, leave enough room for the printer..., updates, and technical support: • Documentation • Driver downloads • Live chat support • E-mail support • Telephone support Warranty information Find it here Windows or Mac Help-Open a printer software program or application, and then click Help.
...The printer software is greater than 18 kg (40 lbs) and requires two or more trained personnel to view the appropriate support site. Lexmark Support Web site-support.lexmark.com Note: Select your region, and then select your printer. It is important to install any options, leave enough room for the printer..., updates, and technical support: • Documentation • Driver downloads • Live chat support • E-mail support • Telephone support Warranty information Find it here Windows or Mac Help-Open a printer software program or application, and then click Help.

User's Guide
Page 25
... the printer. Additional printer setup 25 A user default setting remains in effect until you need to install the software after setup, follow these instructions: For Windows users 1 Close all the factory default settings. If you access the menu again, choose another network setup page. After the menu settings page prints, Ready...
... the printer. Additional printer setup 25 A user default setting remains in effect until you need to install the software after setup, follow these instructions: For Windows users 1 Close all the factory default settings. If you access the menu again, choose another network setup page. After the menu settings page prints, Ready...
User's Guide
Page 26
... has a fax option, select Fax, and then add it may be necessary to manually add the options in the printer driver to the Lexmark Web site at www.lexmark.com. 2 From the Drivers & Downloads menu, click Driver Finder. 3 Select your printer, and then select your operating system. 4 Download... the driver and install the printer software. For Windows users 1 Click , or click Start and then click Run. 2 In the Start Search or Run box, type ...
... has a fax option, select Fax, and then add it may be necessary to manually add the options in the printer driver to the Lexmark Web site at www.lexmark.com. 2 From the Drivers & Downloads menu, click Driver Finder. 3 Select your printer, and then select your operating system. 4 Download... the driver and install the printer software. For Windows users 1 Click , or click Start and then click Run. 2 In the Start Search or Run box, type ...

User's Guide
Page 28
... Install Printer and Software. 4 Click Agree to do so on the Software and Documentation CD. Additional printer setup 28 Installing the printer on a wireless network (Windows) Before you install the printer on a wireless network, make sure that: • Your wireless network is connected to the same wireless network where you are...
... Install Printer and Software. 4 Click Agree to do so on the Software and Documentation CD. Additional printer setup 28 Installing the printer on a wireless network (Windows) Before you install the printer on a wireless network, make sure that: • Your wireless network is connected to the same wireless network where you are...
User's Guide
Page 32
For Windows users 1 Insert the Software and Documentation CD. b For AppleTalk printing: In Mac OS X version 10.5 1 From the Apple menu, choose System Preferences. 2 Click Print & Fax. 3 ...
For Windows users 1 Insert the Software and Documentation CD. b For AppleTalk printing: In Mac OS X version 10.5 1 From the Apple menu, choose System Preferences. 2 Click Print & Fax. 3 ...

User's Guide
Page 49
• Load envelopes with stamps, clasps, snaps, windows, coated linings, or self-stick adhesives. Warning-Potential Damage: Never use envelopes with the flap side down and the stamp location in the position shown. These envelopes may severely damage the printer. 4 Squeeze and slide the guides to support the paper. 5 Slide the paper gently into the multipurpose feeder until it comes to a stop. Loading paper and specialty media 49 Make sure the paper fits loosely and is not bent or wrinkled. 6 From the printer control panel, set the Paper Size and Paper Type.
• Load envelopes with stamps, clasps, snaps, windows, coated linings, or self-stick adhesives. Warning-Potential Damage: Never use envelopes with the flap side down and the stamp location in the position shown. These envelopes may severely damage the printer. 4 Squeeze and slide the guides to support the paper. 5 Slide the paper gently into the multipurpose feeder until it comes to a stop. Loading paper and specialty media 49 Make sure the paper fits loosely and is not bent or wrinkled. 6 From the printer control panel, set the Paper Size and Paper Type.

User's Guide
Page 60
... or 1G sizes) Printing 60 b Customize the settings as needed in the Page Setup dialog: 1 With a document open , click File Print. The following : For Windows users a With a document open , choose File > Page Setup. 2 Choose a paper size or create a custom size to match the loaded paper. 3 Do one of the printer...
... or 1G sizes) Printing 60 b Customize the settings as needed in the Page Setup dialog: 1 With a document open , click File Print. The following : For Windows users a With a document open , choose File > Page Setup. 2 Choose a paper size or create a custom size to match the loaded paper. 3 Do one of the printer...
User's Guide
Page 64
...able to withstand temperatures up to Rough. Tips on using labels Print samples on the labels being considered for laser printers. Printing 64 Have windows, holes, perforations, cutouts, or embossing - When printing on transparencies: • Feed transparencies from the standard 250-sheet tray or the ...designed specifically for use before buying large quantities. Check with the manufacturer or vendor to ensure the envelopes can be printed at www.lexmark.com/publications. Use up to fit the width of high humidity (over 60%) and the high printing temperature may wrinkle or ...
...able to withstand temperatures up to Rough. Tips on using labels Print samples on the labels being considered for laser printers. Printing 64 Have windows, holes, perforations, cutouts, or embossing - When printing on transparencies: • Feed transparencies from the standard 250-sheet tray or the ...designed specifically for use before buying large quantities. Check with the manufacturer or vendor to ensure the envelopes can be printed at www.lexmark.com/publications. Use up to fit the width of high humidity (over 60%) and the high printing temperature may wrinkle or ...

User's Guide
Page 67
... 1 Press . The printer folder opens. 4 Double-click the printer icon. 5 Select the job to cancel. 3 From the keyboard, press Delete. A list of the window, click the Delete icon. For Macintosh users In Mac OS X version 10.5 or later: 1 From the Apple menu, choose System Preferences. 2 Click Print & Fax, ...and then double-click the printer icon. 3 From the printer window, select the job to cancel. 4 From the icon bar at the top of print jobs appears in the right corner of the taskbar. 1 Double-click...
... 1 Press . The printer folder opens. 4 Double-click the printer icon. 5 Select the job to cancel. 3 From the keyboard, press Delete. A list of the window, click the Delete icon. For Macintosh users In Mac OS X version 10.5 or later: 1 From the Apple menu, choose System Preferences. 2 Click Print & Fax, ...and then double-click the printer icon. 3 From the printer window, select the job to cancel. 4 From the icon bar at the top of print jobs appears in the right corner of the taskbar. 1 Double-click...

User's Guide
Page 68
Printing 68 4 From the printer window, select the job to cancel. 5 From the icon bar at the top of the window, click the Delete icon.
Printing 68 4 From the printer window, select the job to cancel. 5 From the icon bar at the top of the window, click the Delete icon.


