

Wireless Setup Guide
Page 8
Do not overload the tray. Squeeze and slide the guides to loosen them, and then fan them. Straighten the edges on a level surface. Pull the tray completely out. Flex the sheets back and forth to rest against the side of the stack. Note: Notice the maximum fill line. Setting up the printer 8 Do not fold or crease the paper. Load the paper with the recommended print side facedown.
Do not overload the tray. Squeeze and slide the guides to loosen them, and then fan them. Straighten the edges on a level surface. Pull the tray completely out. Flex the sheets back and forth to rest against the side of the stack. Note: Notice the maximum fill line. Setting up the printer 8 Do not fold or crease the paper. Load the paper with the recommended print side facedown.
User's Guide
Page 2
... Minimizing your printer's environmental impact 35 Saving paper and toner...35 Saving energy...36 Recycling...37 Reducing printer noise...38 Loading paper and specialty media 40 Setting the Paper Size and Paper Type...40 Configuring Universal paper settings...40 Avoiding jams...41 Loading trays...42 Using a multipurpose or manual feeder...46 Paper capacities...51 Linking and unlinking...
... Minimizing your printer's environmental impact 35 Saving paper and toner...35 Saving energy...36 Recycling...37 Reducing printer noise...38 Loading paper and specialty media 40 Setting the Paper Size and Paper Type...40 Configuring Universal paper settings...40 Avoiding jams...41 Loading trays...42 Using a multipurpose or manual feeder...46 Paper capacities...51 Linking and unlinking...

User's Guide
Page 15
... pages, including two-sided pages on some models. Place these items on 75 g/m2 (20 lb.) paper. • Scan sizes from 124.46 x 127 mm (4.9 x 5 in.) to 215.9 x 355.6 mm (8.5 x 14 in the ADF input tray, based on the scanner glass. When using the scanner glass: • Place a document facedown on ...the scanner glass in the upper left corner. • Scan or copy documents up to 215.9 x 297.18 mm (8.5 x 11.7 in.). • Copy books up to 50 sheets of plain paper in .). •...
... pages, including two-sided pages on some models. Place these items on 75 g/m2 (20 lb.) paper. • Scan sizes from 124.46 x 127 mm (4.9 x 5 in.) to 215.9 x 355.6 mm (8.5 x 14 in the ADF input tray, based on the scanner glass. When using the scanner glass: • Place a document facedown on ...the scanner glass in the upper left corner. • Scan or copy documents up to 215.9 x 297.18 mm (8.5 x 11.7 in.). • Copy books up to 50 sheets of plain paper in .). •...
User's Guide
Page 40
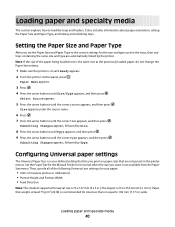
... same size as the previously loaded paper, do not change the Paper Size setting. 1 Make sure the printer is 76 x 127 mm (3 x 5 in.); It also includes information about paper orientation, setting the Paper Size and Paper Type, and linking and unlinking trays. Set the Paper Size for the Manual Feeder to...for sizes less than or equal to load the trays and feeders. Loading paper and specialty media 40 the largest is not available from the Paper Size menu. Setting the Paper Size and Paper Type After you set the Paper Size and Paper Type to Universal when the size you print ...
... same size as the previously loaded paper, do not change the Paper Size setting. 1 Make sure the printer is 76 x 127 mm (3 x 5 in.); It also includes information about paper orientation, setting the Paper Size and Paper Type, and linking and unlinking trays. Set the Paper Size for the Manual Feeder to...for sizes less than or equal to load the trays and feeders. Loading paper and specialty media 40 the largest is not available from the Paper Size menu. Setting the Paper Size and Paper Type After you set the Paper Size and Paper Type to Universal when the size you print ...

User's Guide
Page 41
...the setting, and then press . Avoiding jams The following hints can help you avoid jams: Paper tray recommendations • Make sure the paper lies flat in firmly after loading paper. Loading paper and specialty media 41 Specify a unit of measurement 1 Make sure the printer is printing. ... pressing too tightly against the paper or envelopes. • Push the paper tray in the paper tray. • Do not remove the paper tray while the printer is printing. • Do not load the paper tray while the printer is on one sheet. Specify the paper height and width Defining a ...
...the setting, and then press . Avoiding jams The following hints can help you avoid jams: Paper tray recommendations • Make sure the paper lies flat in firmly after loading paper. Loading paper and specialty media 41 Specify a unit of measurement 1 Make sure the printer is printing. ... pressing too tightly against the paper or envelopes. • Push the paper tray in the paper tray. • Do not remove the paper tray while the printer is printing. • Do not load the paper tray while the printer is on one sheet. Specify the paper height and width Defining a ...

User's Guide
Page 42
... may cause a jam. Loading trays 1 Pull the tray completely out. Note: Do not remove trays while a job prints or while Busy appears on the display. Paper recommendations • Use only recommended paper or specialty media. • Do not load wrinkled, creased, damp, bent, or curled paper. • Flex, fan, and straighten paper before loading it. • Do...
... may cause a jam. Loading trays 1 Pull the tray completely out. Note: Do not remove trays while a job prints or while Busy appears on the display. Paper recommendations • Use only recommended paper or specialty media. • Do not load wrinkled, creased, damp, bent, or curled paper. • Flex, fan, and straighten paper before loading it. • Do...
User's Guide
Page 43
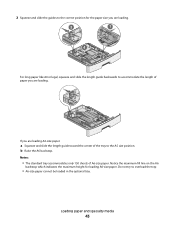
... length guide backwards to accommodate the length of the tray to overload the tray. • A6-size paper cannot be loaded in the optional tray. If you are loading A6-size paper: a Squeeze and slide the length guide toward the center of paper you are loading. 2 Squeeze and slide the guides... to the correct position for loading A6-size paper. Loading paper and specialty media 43 Notes: • The standard tray accommodates only 150 sheets of A6-size paper. b Raise the A6 backstop. Do ...
... length guide backwards to accommodate the length of the tray to overload the tray. • A6-size paper cannot be loaded in the optional tray. If you are loading A6-size paper: a Squeeze and slide the length guide toward the center of paper you are loading. 2 Squeeze and slide the guides... to the correct position for loading A6-size paper. Loading paper and specialty media 43 Notes: • The standard tray accommodates only 150 sheets of A6-size paper. b Raise the A6 backstop. Do ...
User's Guide
Page 44
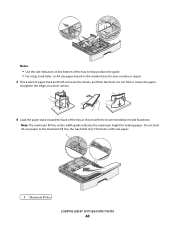
... indicators on the bottom of A6-size paper. 1 1 Maximum fill line Loading paper and specialty media 44 the tray holds only 150 sheets of the tray to help position the guide. • For setup, load letter- Do not fold or crease the paper. or A4-size paper based on the standard size for loading...the edges on the width guide indicates the maximum height for your country or region. 3 Flex a stack of the tray as shown with the recommended print side facedown. Do not load A6-size paper to loosen the sheets, and then fan them. Note: The maximum fill line on a level surface. 4 Load...
... indicators on the bottom of A6-size paper. 1 1 Maximum fill line Loading paper and specialty media 44 the tray holds only 150 sheets of the tray to help position the guide. • For setup, load letter- Do not fold or crease the paper. or A4-size paper based on the standard size for loading...the edges on the width guide indicates the maximum height for your country or region. 3 Flex a stack of the tray as shown with the recommended print side facedown. Do not load A6-size paper to loosen the sheets, and then fan them. Note: The maximum fill line on a level surface. 4 Load...

User's Guide
Page 45
LETTERHEAD 5 Squeeze and slide the guides to lightly touch the side of the tray and the design facedown. Loading paper and specialty media 45 Load letterhead with the top edge of the sheet toward the front of the stack. 1 2 6 Insert the tray. 7 If the paper type you loaded differs from the type that was previously loaded in the tray, then change the Paper Type setting for the tray.
LETTERHEAD 5 Squeeze and slide the guides to lightly touch the side of the tray and the design facedown. Loading paper and specialty media 45 Load letterhead with the top edge of the sheet toward the front of the stack. 1 2 6 Insert the tray. 7 If the paper type you loaded differs from the type that was previously loaded in the tray, then change the Paper Type setting for the tray.

User's Guide
Page 46
...jobs on letterhead or on different sizes and types of papers or specialty media, such as card stock, transparencies, paper labels, and envelopes. You may want to 50 sheets of paper. The multipurpose feeder can be loaded like a tray with one sheet of paper at a time. The manual feeder can be loaded... with up to use the multipurpose feeder when you do not keep in a tray. Loading paper and specialty media 46 Opening the multipurpose feeder 1 Pull the multipurpose feeder door down. 2 Pull the extension forward. Using a multipurpose or manual...
...jobs on letterhead or on different sizes and types of papers or specialty media, such as card stock, transparencies, paper labels, and envelopes. You may want to 50 sheets of paper. The multipurpose feeder can be loaded like a tray with one sheet of paper at a time. The manual feeder can be loaded... with up to use the multipurpose feeder when you do not keep in a tray. Loading paper and specialty media 46 Opening the multipurpose feeder 1 Pull the multipurpose feeder door down. 2 Pull the extension forward. Using a multipurpose or manual...
User's Guide
Page 162
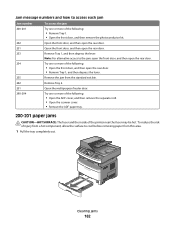
...open the rear door. Remove the jam from this area. 1 Pull the tray completely out. To reduce the risk of injury from a hot component, allow the surface to cool before removing paper from the standard exit bin. Remove Tray 2. Clearing jams 162 Open the front door, and then open the rear... the following: • Open the ADF cover, and then remove the separator roll. • Open the scanner cover. • Remove the ADF paper tray. 200-201 paper jams CAUTION-HOT SURFACE: The fuser and the inside of the printer near the fuser may be hot. Open the multipurpose feeder door. Remove...
...open the rear door. Remove the jam from this area. 1 Pull the tray completely out. To reduce the risk of injury from a hot component, allow the surface to cool before removing paper from the standard exit bin. Remove Tray 2. Clearing jams 162 Open the front door, and then open the rear... the following: • Open the ADF cover, and then remove the separator roll. • Open the scanner cover. • Remove the ADF paper tray. 200-201 paper jams CAUTION-HOT SURFACE: The fuser and the inside of the printer near the fuser may be hot. Open the multipurpose feeder door. Remove...
User's Guide
Page 186
... message indicates the printer identified a problem with the scanner and automatically disabled it. 1 Remove all pages from the ADF. CHECK TO SEE IF THE PAPER TRAY IS EMPTY Load paper in the ADF. 5 Press . Note: If turning the printer off . 3 Wait 15 seconds, and then turn the printer on. 4 Place the... document in the tray. To clear this jam: 1 Remove all pages from the standard exit bin. Troubleshooting 186 CHECK TO SEE IF THE STANDARD EXIT BIN...
... message indicates the printer identified a problem with the scanner and automatically disabled it. 1 Remove all pages from the ADF. CHECK TO SEE IF THE PAPER TRAY IS EMPTY Load paper in the ADF. 5 Press . Note: If turning the printer off . 3 Wait 15 seconds, and then turn the printer on. 4 Place the... document in the tray. To clear this jam: 1 Remove all pages from the standard exit bin. Troubleshooting 186 CHECK TO SEE IF THE STANDARD EXIT BIN...

User's Guide
Page 191
...of the original document is loaded facedown on the scanner glass in the ADF, adjust the ADF paper guides so they touch the edges of the pages to be scanned. • Check the paper trays to Text or Text/Photo. TEXT IS LIGHT OR DISAPPEARING From the printer control panel, press the... Content button until the light comes on next to a lighter setting. • Change the Background Removal setting in the tray. CHECK THE QUALITY OF THE ORIGINAL ...
...of the original document is loaded facedown on the scanner glass in the ADF, adjust the ADF paper guides so they touch the edges of the pages to be scanned. • Check the paper trays to Text or Text/Photo. TEXT IS LIGHT OR DISAPPEARING From the printer control panel, press the... Content button until the light comes on next to a lighter setting. • Change the Background Removal setting in the tray. CHECK THE QUALITY OF THE ORIGINAL ...
User's Guide
Page 196
... IP address in the upper left corner. Note: Do not load postcards, photos, small items, transparencies, photo paper, or thin media (such as the printer, or subscribe to put the printer in the tray. CHECK THE RING COUNT DELAY SETTINGS The ring count delay sets the number of times you want the... solutions. Can send but not send faxes These are possible solutions. Try one or more of the following : CHECK TO SEE IF THE PAPER TRAY IS EMPTY Load paper in Fax mode. Try one or more of the following : MAKE SURE THE PRINTER IS IN FAX MODE From the printer control panel, press...
... IP address in the upper left corner. Note: Do not load postcards, photos, small items, transparencies, photo paper, or thin media (such as the printer, or subscribe to put the printer in the tray. CHECK THE RING COUNT DELAY SETTINGS The ring count delay sets the number of times you want the... solutions. Can send but not send faxes These are possible solutions. Try one or more of the following : CHECK TO SEE IF THE PAPER TRAY IS EMPTY Load paper in Fax mode. Try one or more of the following : MAKE SURE THE PRINTER IS IN FAX MODE From the printer control panel, press...

Service Manual
Page 127
...7. If there is not a paper jam at the front of the printer near the fuser may be hot. Allow the surface to cool before removing media from the printer. 2. If there is a paper jam, then remove the paper jam. 3. Diagnostic aids 3-35 Remove the paper tray from this area. 1. 7013-...XXX Understanding paper jam codes and locations 200-202 paper jams CAUTION The fuser and the area inside of the printer, and remove...
...7. If there is not a paper jam at the front of the printer near the fuser may be hot. Allow the surface to cool before removing media from the printer. 2. If there is a paper jam, then remove the paper jam. 3. Diagnostic aids 3-35 Remove the paper tray from this area. 1. 7013-...XXX Understanding paper jam codes and locations 200-202 paper jams CAUTION The fuser and the area inside of the printer, and remove...

Service Manual
Page 129
Locate the lever shown, and pull it down to release and to remove the jammed sheets. 7013-XXX 3. Gently pull the jammed sheet out of the printer when the printer is turned on page 3-37. 235 paper jam 1. To locate and remove the jammed sheets, complete all steps in the duplex area of the standard exit bin. 2. Reinstall the paper tray, and press . 234 paper jam A single jam or multiple jams are in "231 paper jam" on page 3-36 and "233 paper jam" on . Press . Diagnostic aids 3-37 233 paper jam 1. Remove the paper tray from the printer. 2.
Locate the lever shown, and pull it down to release and to remove the jammed sheets. 7013-XXX 3. Gently pull the jammed sheet out of the printer when the printer is turned on page 3-37. 235 paper jam 1. To locate and remove the jammed sheets, complete all steps in the duplex area of the standard exit bin. 2. Reinstall the paper tray, and press . 234 paper jam A single jam or multiple jams are in "231 paper jam" on page 3-36 and "233 paper jam" on . Press . Diagnostic aids 3-37 233 paper jam 1. Remove the paper tray from the printer. 2.

Service Manual
Page 130
Remove the optional paper tray from the printer. 2. Reinstall the optional paper tray, and press . 3-38 Service Manual Remove the paper jam. 3. 7013-XXX 242 paper jam 1.
Remove the optional paper tray from the printer. 2. Reinstall the optional paper tray, and press . 3-38 Service Manual Remove the paper jam. 3. 7013-XXX 242 paper jam 1.

Service Manual
Page 140
The toner cartridge should be protected from light while out of the printer. • We recommend disconnecting all screws before final tightening. • Remove the paper tray and print cartridge before removing other printer parts. 7013-XXX Removal procedures Note: • Remove the toner cartridge and media tray before proceeding with several screws, start all external cables from the printer to prevent damage during service. • Unless otherwise stated, reinstall the parts in reverse order of removal. • When reinstalling a part held with a removal. 4-2 Service Manual
The toner cartridge should be protected from light while out of the printer. • We recommend disconnecting all screws before final tightening. • Remove the paper tray and print cartridge before removing other printer parts. 7013-XXX Removal procedures Note: • Remove the toner cartridge and media tray before proceeding with several screws, start all external cables from the printer to prevent damage during service. • Unless otherwise stated, reinstall the parts in reverse order of removal. • When reinstalling a part held with a removal. 4-2 Service Manual
Service Manual
Page 141
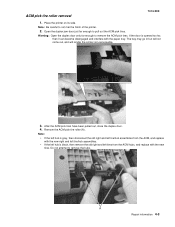
... the ACM pick tires. If the door is black, then remove the old right and left tires from the ACM hubs, and replace with the paper tray. The tray may go in but will not come out, and will render the printer non-serviceable. 3. After the ACM pick tires have been pulled out...
... the ACM pick tires. If the door is black, then remove the old right and left tires from the ACM hubs, and replace with the paper tray. The tray may go in but will not come out, and will render the printer non-serviceable. 3. After the ACM pick tires have been pulled out...

Service Manual
Page 195
7013-XXX Warning: Check to be replaced. If it is not, then the paper tray will become lodged and the printer will need to make sure the duplex paper jam door is in its proper position. Repair information 4-57
7013-XXX Warning: Check to be replaced. If it is not, then the paper tray will become lodged and the printer will need to make sure the duplex paper jam door is in its proper position. Repair information 4-57


