
User's Guide
Page 154
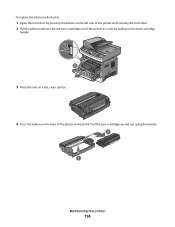
To replace the photoconductor kit: 1 Open the front door by pressing the button on the left side of the printer and lowering the front door. 2 Pull the photoconductor kit and toner cartridge out of the printer as a unit by pulling on the toner cartridge handle. 1 2 3 3 Place the unit on a flat, clean surface. 4 Press the button on the base of the photoconductor kit. Pull the toner cartridge up and out using the handle. 2 1 Maintaining the printer 154
To replace the photoconductor kit: 1 Open the front door by pressing the button on the left side of the printer and lowering the front door. 2 Pull the photoconductor kit and toner cartridge out of the printer as a unit by pulling on the toner cartridge handle. 1 2 3 3 Place the unit on a flat, clean surface. 4 Press the button on the base of the photoconductor kit. Pull the toner cartridge up and out using the handle. 2 1 Maintaining the printer 154
User's Guide
Page 155
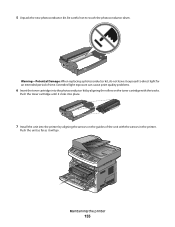
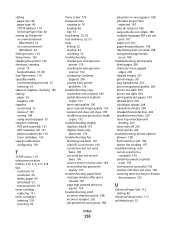
... on the guides of time. 5 Unpack the new photoconductor kit. Push the unit as far as it exposed to touch the photoconductor drum. Push the toner cartridge until it clicks into place. 7 Install the unit into the photoconductor kit by aligning the arrows on the toner cartridge with... the arrows in the printer. Maintaining the printer 155 Warning-Potential Damage: When replacing a photoconductor kit, do not leave it will go. Be careful...
... on the guides of time. 5 Unpack the new photoconductor kit. Push the unit as far as it exposed to touch the photoconductor drum. Push the toner cartridge until it clicks into place. 7 Install the unit into the photoconductor kit by aligning the arrows on the toner cartridge with... the arrows in the printer. Maintaining the printer 155 Warning-Potential Damage: When replacing a photoconductor kit, do not leave it will go. Be careful...
User's Guide
Page 183
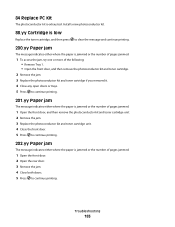
... 1 Open the front door, and then remove the photoconductor kit and toner cartridge unit. 2 Remove the jam. 3 Replace the photoconductor kit and toner cartridge unit. 4 Close the front door. 5 Press to continue printing. Troubleshooting 183 Install a new photoconductor kit. 88.yy Cartridge is low Replace the toner ... more of the following: • Remove Tray 1. • Open the front door, and then remove the photoconductor kit and toner cartridge. 2 Remove the jam. 3 Replace the photoconductor kit and toner cartridge if you removed it. 4 Close any open doors or trays. 5 Press to continue ...
... 1 Open the front door, and then remove the photoconductor kit and toner cartridge unit. 2 Remove the jam. 3 Replace the photoconductor kit and toner cartridge unit. 4 Close the front door. 5 Press to continue printing. Troubleshooting 183 Install a new photoconductor kit. 88.yy Cartridge is low Replace the toner ... more of the following: • Remove Tray 1. • Open the front door, and then remove the photoconductor kit and toner cartridge. 2 Remove the jam. 3 Replace the photoconductor kit and toner cartridge if you removed it. 4 Close any open doors or trays. 5 Press to continue ...
User's Guide
Page 232
... side 55 recycled paper using 56 recycling 213 Lexmark packaging 38 Lexmark products 38 toner cartridges 38 WEEE statement 212 reducing a copy 73 Index 232 Remove packaging material, check 179 Remove paper from standard output bin 179 replacing photoconductor kit 153 toner cartridge 151 reports viewing 158 ...options 106, 107 scan troubleshooting cannot scan from a computer 193 partial document or photo scans 193 scan was not successful 192 scanner unit does not close 189 scanning takes too long or freezes the computer 192 scanner Automatic Document Feeder (ADF) 15 functions 14 scanner glass...
... side 55 recycled paper using 56 recycling 213 Lexmark packaging 38 Lexmark products 38 toner cartridges 38 WEEE statement 212 reducing a copy 73 Index 232 Remove packaging material, check 179 Remove paper from standard output bin 179 replacing photoconductor kit 153 toner cartridge 151 reports viewing 158 ...options 106, 107 scan troubleshooting cannot scan from a computer 193 partial document or photo scans 193 scan was not successful 192 scanner unit does not close 189 scanning takes too long or freezes the computer 192 scanner Automatic Document Feeder (ADF) 15 functions 14 scanner glass...
User's Guide
Page 233
... supplies 148 supplies conserving 35 status of 149 storing 148 using recycled paper 35 supplies, ordering ADF pick assembly 151 ADF separator roll 151 photoconductor kit 150 toner cartridges 150 supply notifications configuring 159 T TCP/IP menu 119 telecommunication notices 215, 216, 217, 218 tips card stock...troubleshooting, copy copier does not respond 189 partial document or photo copies 191 poor copy quality 190 poor scanned image quality 193 scanner unit does not close 189 unable to pause print job to make copies 192 troubleshooting, display display is blank 176 display shows only diamonds...
... supplies 148 supplies conserving 35 status of 149 storing 148 using recycled paper 35 supplies, ordering ADF pick assembly 151 ADF separator roll 151 photoconductor kit 150 toner cartridges 150 supply notifications configuring 159 T TCP/IP menu 119 telecommunication notices 215, 216, 217, 218 tips card stock...troubleshooting, copy copier does not respond 189 partial document or photo copies 191 poor copy quality 190 poor scanned image quality 193 scanner unit does not close 189 unable to pause print job to make copies 192 troubleshooting, display display is blank 176 display shows only diamonds...

Maintenance Guide
Page 11
Maintaining the printer 11 To replace the photoconductor kit: 1 Open the front door by pressing the button on the left side of the printer and lowering the front door. 2 Pull the photoconductor kit and toner cartridge out of the printer as a unit by pulling on the toner cartridge handle. 3 Place the unit on a flat, clean surface. 4 Press the button on the base of the photoconductor kit. Pull the toner cartridge up and out using the handle.
Maintaining the printer 11 To replace the photoconductor kit: 1 Open the front door by pressing the button on the left side of the printer and lowering the front door. 2 Pull the photoconductor kit and toner cartridge out of the printer as a unit by pulling on the toner cartridge handle. 3 Place the unit on a flat, clean surface. 4 Press the button on the base of the photoconductor kit. Pull the toner cartridge up and out using the handle.
Maintenance Guide
Page 12
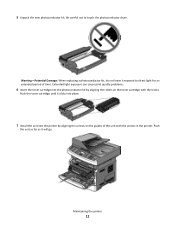
.... 7 Install the unit into the photoconductor kit by aligning the arrows on the toner cartridge with the arrows in the printer. Push the toner cartridge until it will go. Maintaining the printer 12 Be careful not to direct light for an extended period of the unit with the tracks.... 5 Unpack the new photoconductor kit. Extended light exposure can cause print quality problems. 6 Insert the toner cartridge into the printer by aligning the...
.... 7 Install the unit into the photoconductor kit by aligning the arrows on the toner cartridge with the arrows in the printer. Push the toner cartridge until it will go. Maintaining the printer 12 Be careful not to direct light for an extended period of the unit with the tracks.... 5 Unpack the new photoconductor kit. Extended light exposure can cause print quality problems. 6 Insert the toner cartridge into the printer by aligning the...
Service Manual
Page 33
...stimulated emission of radiation Liquid crystal display Liquid Crystal Module Laser Diode Light emitting diode Long edge feed Lexmark Embedded Solution (applications) Laser Scanning Unit Low Voltage Low voltage power supply Magenta Megabyte Motor Driver Control Multifunction Device Multifunction Printer Message handling Motor...Memory Operator correctable failure Oil coating roll Original Equipment Manufacturer Overhead projector Optical photo conductor Optical Sensor Photoconductor Portable Document Format Problem isolation charts Personal identification number 7013-XXX General information 1-13
...stimulated emission of radiation Liquid crystal display Liquid Crystal Module Laser Diode Light emitting diode Long edge feed Lexmark Embedded Solution (applications) Laser Scanning Unit Low Voltage Low voltage power supply Magenta Megabyte Motor Driver Control Multifunction Device Multifunction Printer Message handling Motor...Memory Operator correctable failure Oil coating roll Original Equipment Manufacturer Overhead projector Optical photo conductor Optical Sensor Photoconductor Portable Document Format Problem isolation charts Personal identification number 7013-XXX General information 1-13

Service Manual
Page 131
... of paper or specialty media failed to feed completely from the front of the multipurpose feeder. Align, and insert the unit. 4. Part of paper. 3. Open the front door, and remove the photoconductor kit and toner cartridge. 2. Close the front door, and press . Lift the flap at the front of the printer, and...
... of paper or specialty media failed to feed completely from the front of the multipurpose feeder. Align, and insert the unit. 4. Part of paper. 3. Open the front door, and remove the photoconductor kit and toner cartridge. 2. Close the front door, and press . Lift the flap at the front of the printer, and...


