Getting Started
Page 6
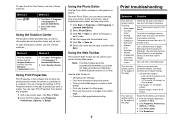
...2 Click Properties, Preferences, Options, or Setup. 3 Click Print Layout. 4 Click Borderless. Method 2 1 Click Start Æ Programs or All programs Æ Lexmark 2400 Series. 2 Select All-In-One Center. To open , click File Æ Print. 2 From the Print dialog, click Properties, Preferences, Options, or ... • Change printer settings. • Find more information about the printer status and ink level. Use a different brand of the page Check the ink level, and install a new print cartridge if necessary. Transparencies may take up to 15 minutes to edit. 4 Edit the image...
...2 Click Properties, Preferences, Options, or Setup. 3 Click Print Layout. 4 Click Borderless. Method 2 1 Click Start Æ Programs or All programs Æ Lexmark 2400 Series. 2 Select All-In-One Center. To open , click File Æ Print. 2 From the Print dialog, click Properties, Preferences, Options, or ... • Change printer settings. • Find more information about the printer status and ink level. Use a different brand of the page Check the ink level, and install a new print cartridge if necessary. Transparencies may take up to 15 minutes to edit. 4 Edit the image...
Getting Started
Page 7
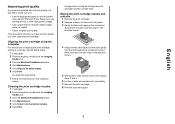
...Lexmark Premium Photo Paper if you want, align the print cartridge. Wiping the print cartridge nozzles and contacts 1 Remove the print cartridge. 2 Dampen a clean, lint-free cloth with the print quality of the cloth, repeat steps 3 and 4. 6 Let the nozzles and contacts dry completely. 7 Reinsert the print cartridge.... 5 Click Align to fix blurry edges. 6 Click Print. A page prints, forcing ink through the print cartridge nozzles to fix horizontal streaks. 6 Click Print. Cleaning the print cartridge nozzles 1 Load paper. 2 From the desktop, double-click the Imaging Studio icon. 3...
...Lexmark Premium Photo Paper if you want, align the print cartridge. Wiping the print cartridge nozzles and contacts 1 Remove the print cartridge. 2 Dampen a clean, lint-free cloth with the print quality of the cloth, repeat steps 3 and 4. 6 Let the nozzles and contacts dry completely. 7 Reinsert the print cartridge.... 5 Click Align to fix blurry edges. 6 Click Print. A page prints, forcing ink through the print cartridge nozzles to fix horizontal streaks. 6 Click Print. Cleaning the print cartridge nozzles 1 Load paper. 2 From the desktop, double-click the Imaging Studio icon. 3...
Getting Started
Page 8
...period ends 12 months later. To obtain warranty service you may be required to claims against any product. Limitation of all print cartridges, programs, data, and removable storage media (unless directed otherwise by you . This is true even if you transfer this product... damages. This limited warranty gives you present this statement as ink) not furnished by Lexmark • Products, components, parts, materials, software, or interfaces not furnished by anyone other rights that vary from Lexmark or a Lexmark remarketer, referred to that caused the damages. If this product...
...period ends 12 months later. To obtain warranty service you may be required to claims against any product. Limitation of all print cartridges, programs, data, and removable storage media (unless directed otherwise by you . This is true even if you transfer this product... damages. This limited warranty gives you present this statement as ink) not furnished by Lexmark • Products, components, parts, materials, software, or interfaces not furnished by anyone other rights that vary from Lexmark or a Lexmark remarketer, referred to that caused the damages. If this product...


