User's Guide
Page 7
... with helpful resources. Resource Setup sheet CD Lexmark Web site Description Instructions on : • Upgrades-Software upgrade information • Customer Support-Contact information, order status, and warranty • Downloads-Drivers • Solutions-Troubleshooting hints and tips • Reference-Product documentation and product specifications 7 http://support.lexmark.com Information on how to the All-In...
... with helpful resources. Resource Setup sheet CD Lexmark Web site Description Instructions on : • Upgrades-Software upgrade information • Customer Support-Contact information, order status, and warranty • Downloads-Drivers • Solutions-Troubleshooting hints and tips • Reference-Product documentation and product specifications 7 http://support.lexmark.com Information on how to the All-In...
User's Guide
Page 9
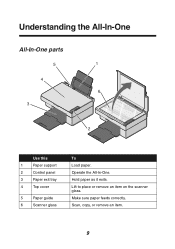
Hold paper as it exits. Lift to place or remove an item on the scanner glass. Operate the All-In-One. Make sure paper feeds correctly. Scan, copy, or remove an item. 9 Understanding the All-In-One All-In-One parts 5 1 4 6 3 2 Use this 1 Paper support 2 Control panel 3 Paper exit tray 4 Top cover 5 Paper guide 6 Scanner glass To Load paper.
Hold paper as it exits. Lift to place or remove an item on the scanner glass. Operate the All-In-One. Make sure paper feeds correctly. Scan, copy, or remove an item. 9 Understanding the All-In-One All-In-One parts 5 1 4 6 3 2 Use this 1 Paper support 2 Control panel 3 Paper exit tray 4 Top cover 5 Paper guide 6 Scanner glass To Load paper.
User's Guide
Page 10
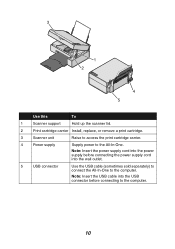
Note: Insert the power supply cord into the power supply before connecting the power supply cord into the USB connector before connecting to the computer. 10 Note: Insert the USB cable into the wall outlet. 5 USB connector Use the USB cable (sometimes sold separately) to connect the All-In-One to the All-In-One. 3 1 2 4 5 Use this To 1 Scanner support Hold up the scanner lid. 2 Print cartridge carrier Install, replace, or remove a print cartridge. 3 Scanner unit Raise to access the print cartridge carrier. 4 Power supply Supply power to the computer.
Note: Insert the power supply cord into the power supply before connecting the power supply cord into the USB connector before connecting to the computer. 10 Note: Insert the USB cable into the wall outlet. 5 USB connector Use the USB cable (sometimes sold separately) to connect the All-In-One to the All-In-One. 3 1 2 4 5 Use this To 1 Scanner support Hold up the scanner lid. 2 Print cartridge carrier Install, replace, or remove a print cartridge. 3 Scanner unit Raise to access the print cartridge carrier. 4 Power supply Supply power to the computer.
User's Guide
Page 18
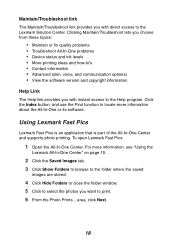
... and copyright information Help Link The Help link provides you with direct access to the Lexmark Solution Center. Using Lexmark Fast Pics Lexmark Fast Pics is an application that is part of the All-In-One Center and supports photo printing. For more information about the All-In-One or its software. Click ...the Index button, and use the Find function to locate more information, see "Using the Lexmark All-In-One Center" on page 15. 2 Click the ...
... and copyright information Help Link The Help link provides you with direct access to the Lexmark Solution Center. Using Lexmark Fast Pics Lexmark Fast Pics is an application that is part of the All-In-One Center and supports photo printing. For more information about the All-In-One or its software. Click ...the Index button, and use the Find function to locate more information, see "Using the Lexmark All-In-One Center" on page 15. 2 Click the ...
User's Guide
Page 27
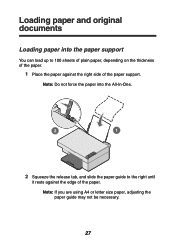
Note: Do not force the paper into the paper support You can load up to the right until it rests against the right side of the paper. Note: If you are using A4 or letter size paper, adjusting the paper guide may not be necessary. 27 Loading paper and original documents Loading paper into the All-In-One. 2 1 2 Squeeze the release tab, and slide the paper guide to 100 sheets of plain paper, depending on the thickness of the paper. 1 Place the paper against the edge of the paper support.
Note: Do not force the paper into the paper support You can load up to the right until it rests against the right side of the paper. Note: If you are using A4 or letter size paper, adjusting the paper guide may not be necessary. 27 Loading paper and original documents Loading paper into the All-In-One. 2 1 2 Squeeze the release tab, and slide the paper guide to 100 sheets of plain paper, depending on the thickness of the paper. 1 Place the paper against the edge of the paper support.

User's Guide
Page 28
... inkjet • The print side is facing you read them carefully. • You load the photo paper vertically against the right side of the paper support. • The paper guide rests against the edge of the photo paper.
... inkjet • The print side is facing you read them carefully. • You load the photo paper vertically against the right side of the paper support. • The paper guide rests against the edge of the photo paper.

User's Guide
Page 29
Load Banner paper Make sure • You remove any paper from the paper support before inserting banner paper. • You select A4 or letter size Banner paper in ...If the cards came with instructions, you . • The cards are loaded vertically against the right side of the paper support. • You do not force the cards into the All-In-One. • You squeeze and slide the paper ...8226; You load the leading edge of the banner paper into the All-In-One against the right side of the support, as shown. • You squeeze and slide the paper guide to the left side of the cards. 29 Note...
Load Banner paper Make sure • You remove any paper from the paper support before inserting banner paper. • You select A4 or letter size Banner paper in ...If the cards came with instructions, you . • The cards are loaded vertically against the right side of the paper support. • You do not force the cards into the All-In-One. • You squeeze and slide the paper ...8226; You load the leading edge of the banner paper into the All-In-One against the right side of the support, as shown. • You squeeze and slide the paper guide to the left side of the cards. 29 Note...
User's Guide
Page 30
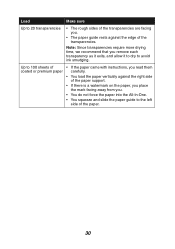
... to 20 transparencies • The rough sides of the transparencies are facing you. • The paper guide rests against the right side of the paper support. • If there is a watermark on the paper, you place the mark facing away from you remove each transparency as it exits, and allow it...
... to 20 transparencies • The rough sides of the transparencies are facing you. • The paper guide rests against the right side of the paper support. • If there is a watermark on the paper, you place the mark facing away from you remove each transparency as it exits, and allow it...

User's Guide
Page 31
Note: Do not load envelopes with: • Holes, perforations, or deep embossing • Metal clasps, string ties, or metal folding bars • Exposed flap adhesive 31 Load Up to 10 envelopes Make sure • The print side is facing you. • The envelopes are loaded vertically against the right side of the paper support. • The stamp location is in the upper left corner. • The paper guide rests against the edge of the envelopes.
Note: Do not load envelopes with: • Holes, perforations, or deep embossing • Metal clasps, string ties, or metal folding bars • Exposed flap adhesive 31 Load Up to 10 envelopes Make sure • The print side is facing you. • The envelopes are loaded vertically against the right side of the paper support. • The stamp location is in the upper left corner. • The paper guide rests against the edge of the envelopes.
User's Guide
Page 33
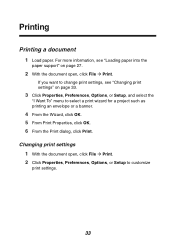
Changing print settings 1 With the document open , click File Æ Print. If you want to change print settings, see "Loading paper into the paper support" on page 33. 3 Click Properties, Preferences, Options, or Setup, and select the "I Want To" menu to customize print settings. 33 Printing Printing a document 1 Load paper. ...
Changing print settings 1 With the document open , click File Æ Print. If you want to change print settings, see "Loading paper into the paper support" on page 33. 3 Click Properties, Preferences, Options, or Setup, and select the "I Want To" menu to customize print settings. 33 Printing Printing a document 1 Load paper. ...
User's Guide
Page 52
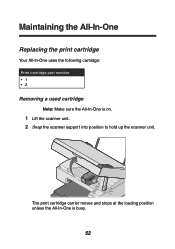
The print cartridge carrier moves and stops at the loading position unless the All-In-One is on. 1 Lift the scanner unit. 2 Snap the scanner support into position to hold up the scanner unit. Maintaining the All-In-One Replacing the print cartridge Your All-In-One uses the following cartridge: Print cartridge part number •1 •2 Removing a used cartridge Note: Make sure the All-In-One is busy. 52
The print cartridge carrier moves and stops at the loading position unless the All-In-One is on. 1 Lift the scanner unit. 2 Snap the scanner support into position to hold up the scanner unit. Maintaining the All-In-One Replacing the print cartridge Your All-In-One uses the following cartridge: Print cartridge part number •1 •2 Removing a used cartridge Note: Make sure the All-In-One is busy. 52
User's Guide
Page 55
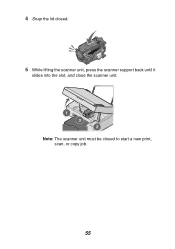
Note: The scanner unit must be closed . 5 While lifting the scanner unit, press the scanner support back until it slides into the slot, and close the scanner unit. 4 Snap the lid closed to start a new print, scan, or copy job. 55
Note: The scanner unit must be closed . 5 While lifting the scanner unit, press the scanner support back until it slides into the slot, and close the scanner unit. 4 Snap the lid closed to start a new print, scan, or copy job. 55
User's Guide
Page 56
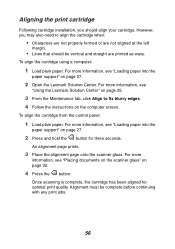
... glass. Once scanning is complete, the cartridge has been aligned for three seconds. For more information, see "Loading paper into the paper support" on page 32. 4 Press the button. Aligning the print cartridge Following cartridge installation, you may also need to fix blurry edges. ... quality. For more information, see "Placing documents on the scanner glass" on page 27. 2 Open the Lexmark Solution Center. For more information, see "Loading paper into the paper support" on the computer screen. To align the cartridge from the control panel: 1 Load plain paper. However,...
... glass. Once scanning is complete, the cartridge has been aligned for three seconds. For more information, see "Loading paper into the paper support" on page 32. 4 Press the button. Aligning the print cartridge Following cartridge installation, you may also need to fix blurry edges. ... quality. For more information, see "Placing documents on the scanner glass" on page 27. 2 Open the Lexmark Solution Center. For more information, see "Loading paper into the paper support" on the computer screen. To align the cartridge from the control panel: 1 Load plain paper. However,...

User's Guide
Page 57
For more information, see "Loading paper into the paper support" on page 27. 2 Click Start Æ Programs Æ Lexmark 2300 Series Æ Lexmark Solution Center. 3 From the Maintenance tab, click Clean to verify that is a heavier weight, is bright white, or is coated. • Select a higher print quality: 1 ...
For more information, see "Loading paper into the paper support" on page 27. 2 Click Start Æ Programs Æ Lexmark 2300 Series Æ Lexmark Solution Center. 3 From the Maintenance tab, click Clean to verify that is a heavier weight, is bright white, or is coated. • Select a higher print quality: 1 ...
User's Guide
Page 62
The following operating systems are supported: • Windows 98/Me • Windows 2000 • Windows XP 1 Remove the software CD. 2 Turn off the computer. 3 Restart the computer. 4 When the desktop appears, ...
The following operating systems are supported: • Windows 98/Me • Windows 2000 • Windows XP 1 Remove the software CD. 2 Turn off the computer. 3 Restart the computer. 4 When the desktop appears, ...
User's Guide
Page 65
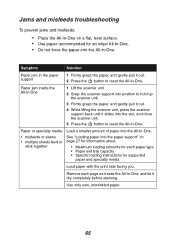
.... 2 Press the button to reset the All-In-One. Remove each paper type • Paper exit tray capacity • Specific loading instructions for supported paper and specialty media Load paper with the print side facing you. Use only new, unwrinkled paper. 65 Jams and misfeeds troubleshooting To prevent jams... of paper into the All-In-One. • misfeeds or skews • multiple sheets feed or stick together See "Loading paper into the paper support" on a flat, level surface. • Use paper recommended for each page as it exits the All-In-One, and let it slides into ...
.... 2 Press the button to reset the All-In-One. Remove each paper type • Paper exit tray capacity • Specific loading instructions for supported paper and specialty media Load paper with the print side facing you. Use only new, unwrinkled paper. 65 Jams and misfeeds troubleshooting To prevent jams... of paper into the All-In-One. • misfeeds or skews • multiple sheets feed or stick together See "Loading paper into the paper support" on a flat, level surface. • Use paper recommended for each page as it exits the All-In-One, and let it slides into ...
User's Guide
Page 69
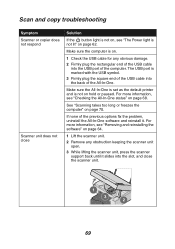
... light is not lit" on . 1 Check the USB cable for any obstruction keeping the scanner unit open. 3 While lifting the scanner unit, press the scanner support back until it . If none of the All-In-One.
... light is not lit" on . 1 Check the USB cable for any obstruction keeping the scanner unit open. 3 While lifting the scanner unit, press the scanner support back until it . If none of the All-In-One.
User's Guide
Page 71
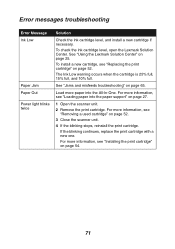
... To install a new cartridge, see "Loading paper into the All-In-One. See "Jams and misfeeds troubleshooting" on page 25. See "Using the Lexmark Solution Center" on page 65. For more information, see "Replacing the print cartridge" on page 27. 1 Open the scanner unit. 2 Remove the ...print cartridge. For more paper into the paper support" on page 52. To check the ink cartridge level, open the Lexmark Solution Center. Load more information, see "Removing a used cartridge" on page 54. 71
... To install a new cartridge, see "Loading paper into the All-In-One. See "Jams and misfeeds troubleshooting" on page 25. See "Using the Lexmark Solution Center" on page 65. For more information, see "Replacing the print cartridge" on page 27. 1 Open the scanner unit. 2 Remove the ...print cartridge. For more paper into the paper support" on page 52. To check the ink cartridge level, open the Lexmark Solution Center. Load more information, see "Removing a used cartridge" on page 54. 71

User's Guide
Page 73
...as a household product. This feature will cut the energy used . As an ENERGY STAR Partner, Lexmark International, Inc. It can be a participant in any area, including a residential area. Lexmark is a partnership effort with the requirements of the directives has been signed by up to 50 percent.... is applicable. This product satisfies the Class B limits of EN 55022 and safety requirements of Manufacturing and Technical Support, Lexmark International, S.A., Boigny, France. Korean MIC statement If this symbol appears on your product, the accompanying statement is applicable.
...as a household product. This feature will cut the energy used . As an ENERGY STAR Partner, Lexmark International, Inc. It can be a participant in any area, including a residential area. Lexmark is a partnership effort with the requirements of the directives has been signed by up to 50 percent.... is applicable. This product satisfies the Class B limits of EN 55022 and safety requirements of Manufacturing and Technical Support, Lexmark International, S.A., Boigny, France. Korean MIC statement If this symbol appears on your product, the accompanying statement is applicable.

User's Guide
Page 76
Printer Status 26 Troubleshooting 26 Lexmark Web site 60 loading 4 x 6 cards 29 banner paper 29 documents on scanner glass 32 envelopes 31 glossy paper 28 greeting cards 29...ordering supplies 60 out of paper 71 P paper exit tray 9 paper guide 9 paper jam 71 paper out 71 Paper Setup tab 24 paper support 9 paper, loading 27 photo cards 29 Photo Editor opening 20 task menus 21 using 20 photo paper 28 Photo Prints section 17 placing documents... 69 scanner glass cleaning 59 placing documents on 32 scanner unit 10 scanning 37 sending a fax 47 setup troubleshooting 61 software Lexmark All-In-One 76
Printer Status 26 Troubleshooting 26 Lexmark Web site 60 loading 4 x 6 cards 29 banner paper 29 documents on scanner glass 32 envelopes 31 glossy paper 28 greeting cards 29...ordering supplies 60 out of paper 71 P paper exit tray 9 paper guide 9 paper jam 71 paper out 71 Paper Setup tab 24 paper support 9 paper, loading 27 photo cards 29 Photo Editor opening 20 task menus 21 using 20 photo paper 28 Photo Prints section 17 placing documents... 69 scanner glass cleaning 59 placing documents on 32 scanner unit 10 scanning 37 sending a fax 47 setup troubleshooting 61 software Lexmark All-In-One 76

