
User's Guide
Page 2
... to you. All rights reserved. CAUTION: A caution identifies something that the manufacturer intends to make any electrical or cabling connections, such as the power supply cord or telephone, during a lightning storm. Warning: A warning identifies something that does not infringe any existing ... these changes will be incorporated in the products or the programs described may be made to the information herein; Lexmark and Lexmark with local law: LEXMARK INTERNATIONAL, INC., PROVIDES THIS PUBLICATION "AS IS" WITHOUT WARRANTY OF ANY KIND, EITHER EXPRESS OR IMPLIED, INCLUDING...
... to you. All rights reserved. CAUTION: A caution identifies something that the manufacturer intends to make any electrical or cabling connections, such as the power supply cord or telephone, during a lightning storm. Warning: A warning identifies something that does not infringe any existing ... these changes will be incorporated in the products or the programs described may be made to the information herein; Lexmark and Lexmark with local law: LEXMARK INTERNATIONAL, INC., PROVIDES THIS PUBLICATION "AS IS" WITHOUT WARRANTY OF ANY KIND, EITHER EXPRESS OR IMPLIED, INCLUDING...

User's Guide
Page 8
If problems occur, see "Setup troubleshooting" on the Lexmark 2300 Series Setup sheet. Unpacking the All-In-One To set up the All-In-One, follow the instructions on page 62. Opening the box These items are in the box with the All-In-One: Note: A USB cable may or may not be included. 5 1 2 43 1 Power supply cord 2 USB cable 3 Print cartridge 4 Setup sheet 5 Software CD 8
If problems occur, see "Setup troubleshooting" on the Lexmark 2300 Series Setup sheet. Unpacking the All-In-One To set up the All-In-One, follow the instructions on page 62. Opening the box These items are in the box with the All-In-One: Note: A USB cable may or may not be included. 5 1 2 43 1 Power supply cord 2 USB cable 3 Print cartridge 4 Setup sheet 5 Software CD 8
User's Guide
Page 10
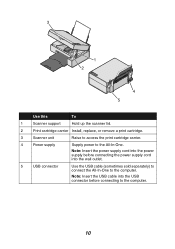
Note: Insert the power supply cord into the power supply before connecting the power supply cord into the USB connector before connecting to the computer. 10 Note: Insert the USB cable into the wall outlet. 5 USB connector Use the USB cable (sometimes sold separately) to connect the All-In-One to the All-In-One. 3 1 2 4 5 Use this To 1 Scanner support Hold up the scanner lid. 2 Print cartridge carrier Install, replace, or remove a print cartridge. 3 Scanner unit Raise to access the print cartridge carrier. 4 Power supply Supply power to the computer.
Note: Insert the power supply cord into the power supply before connecting the power supply cord into the USB connector before connecting to the computer. 10 Note: Insert the USB cable into the wall outlet. 5 USB connector Use the USB cable (sometimes sold separately) to connect the All-In-One to the All-In-One. 3 1 2 4 5 Use this To 1 Scanner support Hold up the scanner lid. 2 Print cartridge carrier Install, replace, or remove a print cartridge. 3 Scanner unit Raise to access the print cartridge carrier. 4 Power supply Supply power to the computer.
User's Guide
Page 69
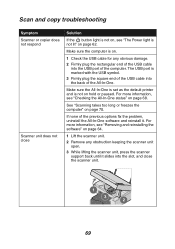
... scanner unit. 69 For more information, see "The Power light is marked with the USB symbol. 3 Firmly plug the square end of the USB cable into the slot, and close Solution If the button ...Lift the scanner unit. 2 Remove any obvious damage. 2 Firmly plug the rectangular end of the USB cable into the USB port of the previous options fix the problem, uninstall the All-In-One software and reinstall... sure the All-In-One is set as the default printer and is on. 1 Check the USB cable for any obstruction keeping the scanner unit open. 3 While lifting the scanner unit, press the scanner support...
... scanner unit. 69 For more information, see "The Power light is marked with the USB symbol. 3 Firmly plug the square end of the USB cable into the slot, and close Solution If the button ...Lift the scanner unit. 2 Remove any obvious damage. 2 Firmly plug the rectangular end of the USB cable into the USB port of the previous options fix the problem, uninstall the All-In-One software and reinstall... sure the All-In-One is set as the default printer and is on. 1 Check the USB cable for any obstruction keeping the scanner unit open. 3 While lifting the scanner unit, press the scanner support...
User's Guide
Page 77
... 28 postcards 29 transparencies 30 supplies ordering 60 recycling 60 install 62 Troubleshooting tab 26 U understanding Lexmark Solution Center 25 Print Properties 22 uninstalling software 64 USB cable 60 W Web site, Lexmark 60 wiping print cartridge nozzles 58 T top cover 9 transparencies 30 troubleshooting All-In-One does ...not print or respond 67 Ink Low message 71 paper jam 65 Paper Out message 71 poor graphic quality 70 power light is not ...
... 28 postcards 29 transparencies 30 supplies ordering 60 recycling 60 install 62 Troubleshooting tab 26 U understanding Lexmark Solution Center 25 Print Properties 22 uninstalling software 64 USB cable 60 W Web site, Lexmark 60 wiping print cartridge nozzles 58 T top cover 9 transparencies 30 troubleshooting All-In-One does ...not print or respond 67 Ink Low message 71 paper jam 65 Paper Out message 71 poor graphic quality 70 power light is not ...


