
Embedded Web Server Administrator's Guide
Page 14
...If Daylight Saving Time (DST) is Microsoft's solution for enabling authentication without requiring the transmission of an outage that prevents the printer from communicating with a trusted clock-typically the same one NTLM configuration on a supported device because each session by the Kerberos ...Kerberos servers require that key requests bear a recent timestamp (usually within 300 seconds), the printer clock must be registered to a single NT domain. Notes: • Entering manual settings automatically disables use of authentication that relies on the user's password. Using NTLM ...
...If Daylight Saving Time (DST) is Microsoft's solution for enabling authentication without requiring the transmission of an outage that prevents the printer from communicating with a trusted clock-typically the same one NTLM configuration on a supported device because each session by the Kerberos ...Kerberos servers require that key requests bear a recent timestamp (usually within 300 seconds), the printer clock must be registered to a single NT domain. Notes: • Entering manual settings automatically disables use of authentication that relies on the user's password. Using NTLM ...

Embedded Web Server Administrator's Guide
Page 24
...lists to designate when disk wiping should display a list of functions, instead of standard home screen icons such as Copy or Fax. 3 Verify that the printer is stolen. Encryption takes approximately two minutes, and a status bar will appear as "Exit Config Menu." 4 Press the down menus). • To ...Scheduled Disk Wiping. 3 Choose an existing Start value (the scheduled time and day will be lost. 3 If you have enabled Manual mode and wish to set up , the printer touch screen should occur, and then click Add. Repeat as needed to the Enable/Disable screen. Note: On some devices the ...
...lists to designate when disk wiping should display a list of functions, instead of standard home screen icons such as Copy or Fax. 3 Verify that the printer is stolen. Encryption takes approximately two minutes, and a status bar will appear as "Exit Config Menu." 4 Press the down menus). • To ...Scheduled Disk Wiping. 3 Choose an existing Start value (the scheduled time and day will be lost. 3 If you have enabled Manual mode and wish to set up , the printer touch screen should occur, and then click Add. Repeat as needed to the Enable/Disable screen. Note: On some devices the ...

User's Guide
Page 2
...printer!...10 Finding information about the printer...10 Selecting a location for the printer...11 Printer configurations...12 Basic functions of the scanner...14 Understanding the ADF and scanner glass...15 Understanding the printer control panel...16 Additional printer setup 20 Attaching cables...20 Installing printer software...20 Verifying printer... ...25 Adjusting Power Saver...26 Recycling...26 Recycling Lexmark products...26 Recycling Lexmark packaging...26 Returning Lexmark cartridges for reuse or recycling...27 Reducing printer noise...27 Loading paper and specialty media 29 Setting...
...printer!...10 Finding information about the printer...10 Selecting a location for the printer...11 Printer configurations...12 Basic functions of the scanner...14 Understanding the ADF and scanner glass...15 Understanding the printer control panel...16 Additional printer setup 20 Attaching cables...20 Installing printer software...20 Verifying printer... ...25 Adjusting Power Saver...26 Recycling...26 Recycling Lexmark products...26 Recycling Lexmark packaging...26 Returning Lexmark cartridges for reuse or recycling...27 Reducing printer noise...27 Loading paper and specialty media 29 Setting...
User's Guide
Page 13
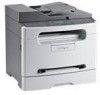
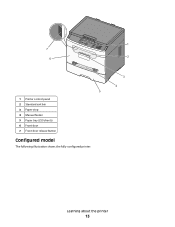
7 6 1@!. 4 GHI 2 ABC 5 JKL 3 DEF 7 PQRS 8 TUV 6 MNO * 9 WXYZ 0 # 1 2 5 1 Printer control panel 2 Standard exit bin 3 Paper stop 4 Manual feeder 5 Paper tray (250 sheets) 6 Front door 7 Front door release button Configured model The following illustration shows the fully configured printer: 3 4 Learning about the printer 13
7 6 1@!. 4 GHI 2 ABC 5 JKL 3 DEF 7 PQRS 8 TUV 6 MNO * 9 WXYZ 0 # 1 2 5 1 Printer control panel 2 Standard exit bin 3 Paper stop 4 Manual feeder 5 Paper tray (250 sheets) 6 Front door 7 Front door release button Configured model The following illustration shows the fully configured printer: 3 4 Learning about the printer 13

User's Guide
Page 14
...panel. • Send a fax to multiple fax destinations at the same time. • Scan documents and send them to -network capability. Learning about the printer 14 You can: • Make quick copies, or change the settings on selected models only. 1 8 7 1@!. 4 GHI 2 ABC 5 JKL 3... DEF 7 PQRS 8 TUV 6 MNO * 9 WXYZ 0 # 2 3 1 Automatic Document Feeder (ADF) 2 Printer control panel 3 Standard exit bin 4 Paper stop 5 Manual feeder 6 Paper tray (250 sheets) 7 Front door 8 Front door release button 4 5 6 Basic functions of the scanner The scanner provides copy,...
...panel. • Send a fax to multiple fax destinations at the same time. • Scan documents and send them to -network capability. Learning about the printer 14 You can: • Make quick copies, or change the settings on selected models only. 1 8 7 1@!. 4 GHI 2 ABC 5 JKL 3... DEF 7 PQRS 8 TUV 6 MNO * 9 WXYZ 0 # 2 3 1 Automatic Document Feeder (ADF) 2 Printer control panel 3 Standard exit bin 4 Paper stop 5 Manual feeder 6 Paper tray (250 sheets) 7 Front door 8 Front door release button 4 5 6 Basic functions of the scanner The scanner provides copy,...

User's Guide
Page 22
These instructions apply to install the printer on the network, and then click Finish. If the CD does not launch after a minute, then launch the CD manually: a Click , or click Start and then click Run. b In the Start Search or Run box, type D:\setup.exe, where D ...screen instructions. 5 Select Wired Network Attach, and then click Next. 6 Select the printer manufacturer from the list. 7 Select the printer model from the list, and then click Next. 8 Select the printer from the printer. Additional printer setup 22 After the network setup page prints, Ready appears. 5 Check the first ...
These instructions apply to install the printer on the network, and then click Finish. If the CD does not launch after a minute, then launch the CD manually: a Click , or click Start and then click Run. b In the Start Search or Run box, type D:\setup.exe, where D ...screen instructions. 5 Select Wired Network Attach, and then click Next. 6 Select the printer manufacturer from the list. 7 Select the printer model from the list, and then click Next. 8 Select the printer from the printer. Additional printer setup 22 After the network setup page prints, Ready appears. 5 Check the first ...
User's Guide
Page 29
.... Then, specify all of the following Universal size settings for your paper: • Units of paper, load the paper and then change the printer settings. 1 Make sure the printer is 76 x 127 mm (3 x 5 in .) wide. Set the Paper Size for sizes less than or equal to the paper source you want... to load the 250-sheet tray and the manual feeder. Select Source appears. 5 Press the arrow buttons until the paper source you print on and Ready appears. 2 From the printer control panel, press . Paper that weighs at least 75 g/m2 (20 lb) is a user-defined setting that are not preset in .). ...
.... Then, specify all of the following Universal size settings for your paper: • Units of paper, load the paper and then change the printer settings. 1 Make sure the printer is 76 x 127 mm (3 x 5 in .) wide. Set the Paper Size for sizes less than or equal to the paper source you want... to load the 250-sheet tray and the manual feeder. Select Source appears. 5 Press the arrow buttons until the paper source you print on and Ready appears. 2 From the printer control panel, press . Paper that weighs at least 75 g/m2 (20 lb) is a user-defined setting that are not preset in .). ...
User's Guide
Page 35
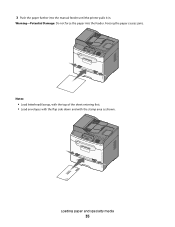
3 Push the paper further into the feeder. Forcing the paper causes jams. 1@!. 4 GHI 2 ABC 5 JKL 3 DEF 7 PQRS 8 TUV 6 MNO * 9 WXYZ 0 # Notes: • Load letterhead faceup, with the top of the sheet entering first. • Load envelopes with the flap side down and with the stamp area as shown. 1@!. 4 GHI 2 ABC 5 JKL 3 DEF 7 PQRS 8 TUV 6 MNO * 9 WXYZ 0 # Loading paper and specialty media 35 Warning-Potential Damage: Do not force the paper into the manual feeder until the printer pulls it in.
3 Push the paper further into the feeder. Forcing the paper causes jams. 1@!. 4 GHI 2 ABC 5 JKL 3 DEF 7 PQRS 8 TUV 6 MNO * 9 WXYZ 0 # Notes: • Load letterhead faceup, with the top of the sheet entering first. • Load envelopes with the flap side down and with the stamp area as shown. 1@!. 4 GHI 2 ABC 5 JKL 3 DEF 7 PQRS 8 TUV 6 MNO * 9 WXYZ 0 # Loading paper and specialty media 35 Warning-Potential Damage: Do not force the paper into the manual feeder until the printer pulls it in.
User's Guide
Page 36
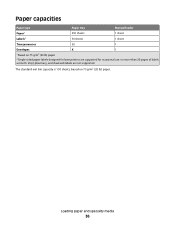
Loading paper and specialty media 36 The standard exit bin capacity is 150 sheets, based on 75 g/m2 (20 lb) paper 2 Single-sided paper labels designed for occasional use: no more than 20 pages of labels a month. Paper capacities Paper type Paper1 Labels2 Paper tray 250 sheets 50 sheets Manual feeder 1 sheet 1 sheet Transparencies 50 1 Envelopes X 1 1 Based on 75 g/m2 (20 lb) paper. Vinyl, pharmacy, and dual-web labels are supported for laser printers are not supported.
Loading paper and specialty media 36 The standard exit bin capacity is 150 sheets, based on 75 g/m2 (20 lb) paper 2 Single-sided paper labels designed for occasional use: no more than 20 pages of labels a month. Paper capacities Paper type Paper1 Labels2 Paper tray 250 sheets 50 sheets Manual feeder 1 sheet 1 sheet Transparencies 50 1 Envelopes X 1 1 Based on 75 g/m2 (20 lb) paper. Vinyl, pharmacy, and dual-web labels are supported for laser printers are not supported.
User's Guide
Page 37
...in.) wide. Short grain paper is not recommended for sizes less than or equal to 182 mm (7.17 in the same environment as the printer for paper to curl at least 75 g/m2 (20 lb) is exposed to feed the paper correctly. Paper characteristics The following paper characteristics affect... print quality and reliability. The manual feeder can automatically feed paper weights up to 163 g/m2 (43 lb bond) grain long. Excessive curl can cause paper feeding problems. Curl ...
...in.) wide. Short grain paper is not recommended for sizes less than or equal to 182 mm (7.17 in the same environment as the printer for paper to curl at least 75 g/m2 (20 lb) is exposed to feed the paper correctly. Paper characteristics The following paper characteristics affect... print quality and reliability. The manual feeder can automatically feed paper weights up to 163 g/m2 (43 lb bond) grain long. Excessive curl can cause paper feeding problems. Curl ...
User's Guide
Page 40
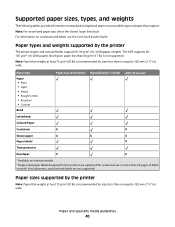
.... Paper type Paper • Plain • Light • Heavy • Rough/Cotton • Recycled • Custom Bond Paper tray (250 sheets) Manual feeder (1 sheet) ADF (30 sheets)1 Letterhead Colored Paper Card stock X X Glossy paper X X X Paper labels2 X Transparencies Envelopes X X 1 Available ...on selected models. 2 Single-sided paper labels designed for sizes less than 64 g/m2 (17 lb) is recommended for laser printers are not supported. Paper and specialty media guidelines 40 Note: For an unlisted paper size, select the closest larger listed size. Note:...
.... Paper type Paper • Plain • Light • Heavy • Rough/Cotton • Recycled • Custom Bond Paper tray (250 sheets) Manual feeder (1 sheet) ADF (30 sheets)1 Letterhead Colored Paper Card stock X X Glossy paper X X X Paper labels2 X Transparencies Envelopes X X 1 Available ...on selected models. 2 Single-sided paper labels designed for sizes less than 64 g/m2 (17 lb) is recommended for laser printers are not supported. Paper and specialty media guidelines 40 Note: For an unlisted paper size, select the closest larger listed size. Note:...

User's Guide
Page 43
... print job. Printing specialty documents Tips on using the Embedded Web Server, or from the standard 250-sheet tray or the manual feeder. • Use transparencies designed specifically for use before buying large quantities. • Before loading letterhead, fan the stack... can withstand that temperature, select those settings using letterhead • Use letterhead designed specifically for laser printers. • Print samples on the letterhead being considered for laser printers. "Using the manual feeder" on page 34 Tips on using can be printed at a temperature up to Rough....
... print job. Printing specialty documents Tips on using the Embedded Web Server, or from the standard 250-sheet tray or the manual feeder. • Use transparencies designed specifically for use before buying large quantities. • Before loading letterhead, fan the stack... can withstand that temperature, select those settings using letterhead • Use letterhead designed specifically for laser printers. • Print samples on the letterhead being considered for laser printers. "Using the manual feeder" on page 34 Tips on using can be printed at a temperature up to Rough....

User's Guide
Page 44
...avoid getting fingerprints on the transparencies. • Before loading transparencies, fan the stack to prevent sheets from the manual feeder. • Use envelopes designed specifically for laser printers. Are stuck together or damaged in the sealed or closed position - Have any way - Have rough, cockle,...or embossing - Have metal clasps, string ties, or folding bars - Printing 44 Tips on using labels Print samples on the Lexmark Web site at www.lexmark.com/publications. Have excessive curl or twist - Have rough, cockle, or laid finishes - For non-peel strip, self-seal ...
...avoid getting fingerprints on the transparencies. • Before loading transparencies, fan the stack to prevent sheets from the manual feeder. • Use envelopes designed specifically for laser printers. Are stuck together or damaged in the sealed or closed position - Have any way - Have rough, cockle,...or embossing - Have metal clasps, string ties, or folding bars - Printing 44 Tips on using labels Print samples on the Lexmark Web site at www.lexmark.com/publications. Have excessive curl or twist - Have rough, cockle, or laid finishes - For non-peel strip, self-seal ...
User's Guide
Page 45
...Heavy. Do not use labels with chemicals that may contaminate the printer. Adhesive material contaminates the printer and could void the printer and cartridge warranties. • Do not use labels in the paper tray or manual feeder. Many of the adhesive is not possible, remove a 1.6...creasing may cause labels to peel off during printing, resulting in .) away from the printer control panel Paper menu. - When printing on the card stock being considered for laser printers. Partial sheets may significantly affect the print quality and cause jams or other paper handling ...
...Heavy. Do not use labels with chemicals that may contaminate the printer. Adhesive material contaminates the printer and could void the printer and cartridge warranties. • Do not use labels in the paper tray or manual feeder. Many of the adhesive is not possible, remove a 1.6...creasing may cause labels to peel off during printing, resulting in .) away from the printer control panel Paper menu. - When printing on the card stock being considered for laser printers. Partial sheets may significantly affect the print quality and cause jams or other paper handling ...

User's Guide
Page 58
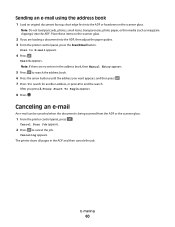
... appears. 5 Press to search the address book, or press the arrow buttons until Manual appears, and then press to select or enter an e-mail address. If you enter a number that is already in use, then you do not know ... a document into the ADF. Scan to select another number. E-mailing a document Sending an e-mail using the Embedded Web Server 1 Type the printer IP address into the address field of the printer, then print a network setup page and locate the IP address in the fields with a comma (,). 6 Select the scan settings (Format, Content...
... appears. 5 Press to search the address book, or press the arrow buttons until Manual appears, and then press to select or enter an e-mail address. If you enter a number that is already in use, then you do not know ... a document into the ADF. Scan to select another number. E-mailing a document Sending an e-mail using the Embedded Web Server 1 Type the printer IP address into the address field of the printer, then print a network setup page and locate the IP address in the fields with a comma (,). 6 Select the scan settings (Format, Content...

User's Guide
Page 59
... shortcut, or press 2 to that corresponds with the number or letter you press 2, Press Start To Begin appears. Manually entering an e-mail address After selecting Manual on the printer control panel, To appears on the first line, and a cursor appears on the scanner glass. Sending an e-mail ...photos, small items, transparencies, photo paper, or thin media (such as magazine clippings) into the ADF, then adjust the paper guides. 3 From the printer control panel, press the Scan/Email button. c Press 1 to search for that button appears. d Press 1 to enter another address, or press ...
... shortcut, or press 2 to that corresponds with the number or letter you press 2, Press Start To Begin appears. Manually entering an e-mail address After selecting Manual on the printer control panel, To appears on the first line, and a cursor appears on the scanner glass. Sending an e-mail ...photos, small items, transparencies, photo paper, or thin media (such as magazine clippings) into the ADF, then adjust the paper guides. 3 From the printer control panel, press the Scan/Email button. c Press 1 to search for that button appears. d Press 1 to enter another address, or press ...
User's Guide
Page 60
...search. Canceling an e-mail An e-mail can be canceled when the document is being scanned from the ADF or the scanner glass. 1 From the printer control panel, press . Note: Do not load postcards, photos, small items, transparencies, photo paper, or thin media (such as magazine clippings) ... panel, press the Scan/Email button. Place these items on the scanner glass. Scan to E-mail appears. 4 Press . The printer clears all pages in the address book, then Manual Entry appears. 5 Press to search the address book. 6 Press the arrow buttons until the address you want appears, and then press...
...search. Canceling an e-mail An e-mail can be canceled when the document is being scanned from the ADF or the scanner glass. 1 From the printer control panel, press . Note: Do not load postcards, photos, small items, transparencies, photo paper, or thin media (such as magazine clippings) ... panel, press the Scan/Email button. Place these items on the scanner glass. Scan to E-mail appears. 4 Press . The printer clears all pages in the address book, then Manual Entry appears. 5 Press to search the address book. 6 Press the arrow buttons until the address you want appears, and then press...

User's Guide
Page 73
...need to dial an outside line first. • Press to move the cursor to " line. Notes: • To cause a two- Sending a fax using the printer control panel 1 Load an original document faceup, short edge first into the ADF. Press . 5 Press 1 to enter another fax number, or press 2 to set ...the date and time manually, click inside the Manually Set Date & Time box, and then enter the current date and time. 6 Verify that the time zone is correct. 7 Click Submit. Note: ...
...need to dial an outside line first. • Press to move the cursor to " line. Notes: • To cause a two- Sending a fax using the printer control panel 1 Load an original document faceup, short edge first into the ADF. Press . 5 Press 1 to enter another fax number, or press 2 to set ...the date and time manually, click inside the Manually Set Date & Time box, and then enter the current date and time. 6 Verify that the time zone is correct. 7 Click Submit. Note: ...
User's Guide
Page 85
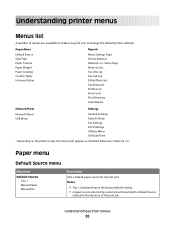
... Settings Copy Settings Fax Settings Print Settings Utilities Menu Set Date/Time * Depending on the printer setup, this menu item appears as Standard Network or Network . Paper menu Default Source menu Menu item Default Source Tray 1 Manual Paper Manual Env Description Sets a default paper source for all print jobs Notes: • Tray 1 (standard...
... Settings Copy Settings Fax Settings Print Settings Utilities Menu Set Date/Time * Depending on the printer setup, this menu item appears as Standard Network or Network . Paper menu Default Source menu Menu item Default Source Tray 1 Manual Paper Manual Env Description Sets a default paper source for all print jobs Notes: • Tray 1 (standard...

User's Guide
Page 86
...A4 is the international factory default setting. Lets you specify the size of the envelope being loaded in the manual feeder Note: Letter is the US factory default setting. Understanding printer menus 86 Lets you specify the paper size loaded in Tray 1 Note: Letter is the US factory ...default setting. Lets you specify the installed paper size and type in the selected tray or manual feeder. A4 is the international factory ...
...A4 is the international factory default setting. Lets you specify the size of the envelope being loaded in the manual feeder Note: Letter is the US factory default setting. Understanding printer menus 86 Lets you specify the paper size loaded in Tray 1 Note: Letter is the US factory ...default setting. Lets you specify the installed paper size and type in the selected tray or manual feeder. A4 is the international factory ...


