Embedded Web Server Administrator's Guide
Page 27
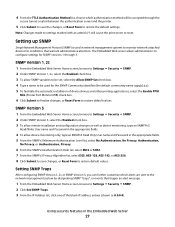
...170; Security ª SNMP. 2 Click Set SNMP Traps. 3 From the IP Address list, click one of device drivers and other printing applications, select the Enable PPM Mib (Printer Port Monitor MIB) check box. 6 Click Submit to finalize changes, or Reset Form to restore default values. Note: ... in network management systems to monitor network-attached devices for SNMP versions 1 through the secure tunnel created between the authentication server and the printer. 5 Click Submit to save changes, or Reset Form to restore default values. 4 From the TTLS Authentication Method list, choose which...
...170; Security ª SNMP. 2 Click Set SNMP Traps. 3 From the IP Address list, click one of device drivers and other printing applications, select the Enable PPM Mib (Printer Port Monitor MIB) check box. 6 Click Submit to finalize changes, or Reset Form to restore default values. Note: ... in network management systems to monitor network-attached devices for SNMP versions 1 through the secure tunnel created between the authentication server and the printer. 5 Click Submit to save changes, or Reset Form to restore default values. 4 From the TTLS Authentication Method list, choose which...

User's Guide
Page 11
...from direct sunlight, humidity extremes, or temperature fluctuations - The latest supplemental information, updates, and technical support: • Documentation • Driver downloads • Live chat support • E-mail support • Telephone support Warranty information Find it ready when you contact support so...country can be found on the Support Web site or on the store receipt and the back of the printer), and have it here Lexmark Support Web site-support.lexmark.com Note: Select your region, and then select your product to view the appropriate support site. Support ...
...from direct sunlight, humidity extremes, or temperature fluctuations - The latest supplemental information, updates, and technical support: • Documentation • Driver downloads • Live chat support • E-mail support • Telephone support Warranty information Find it ready when you contact support so...country can be found on the Support Web site or on the store receipt and the back of the printer), and have it here Lexmark Support Web site-support.lexmark.com Note: Select your region, and then select your product to view the appropriate support site. Support ...

User's Guide
Page 20
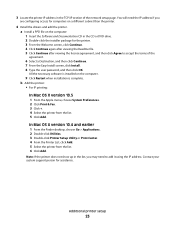
... cable. • For a network connection, connect an Ethernet cable before installing the printer CD. 3 1 2 1 Ethernet port 2 USB port 3 Printer power cord socket Installing printer software A printer driver is typically installed during the initial printer setup. The printer software is software that lets the computer communicate with the printer. Additional printer setup Attaching cables 1 Connect the power cord to the...
... cable. • For a network connection, connect an Ethernet cable before installing the printer CD. 3 1 2 1 Ethernet port 2 USB port 3 Printer power cord socket Installing printer software A printer driver is typically installed during the initial printer setup. The printer software is software that lets the computer communicate with the printer. Additional printer setup Attaching cables 1 Connect the power cord to the...

User's Guide
Page 21
...also provides important information that automatically appears. 4 Double-click the Install icon. 5 Follow the instructions on and Ready appears. 2 From the printer control panel, press . 3 Press the arrow buttons until Menu Settings Page appears, and then press . Note: If you select and save...all the factory default settings. Using the World Wide Web 1 Go to the Lexmark Web site at www.lexmark.com. 2 From the Drivers & Downloads menu, click Driver Finder. 3 Select your printer, and then select your printer is a network model and is attached to a network, print a network setup...
...also provides important information that automatically appears. 4 Double-click the Install icon. 5 Follow the instructions on and Ready appears. 2 From the printer control panel, press . 3 Press the arrow buttons until Menu Settings Page appears, and then press . Note: If you select and save...all the factory default settings. Using the World Wide Web 1 Go to the Lexmark Web site at www.lexmark.com. 2 From the Drivers & Downloads menu, click Driver Finder. 3 Select your printer, and then select your printer is a network model and is attached to a network, print a network setup...
User's Guide
Page 23
... to accept the terms of the network setup page. Contact your system support person for computers on a different subnet than the printer. 4 Install the drivers and add the printer. Note: If the printer does not show up in the list, you may need the IP address if you are configuring access for assistance. In...
... to accept the terms of the network setup page. Contact your system support person for computers on a different subnet than the printer. 4 Install the drivers and add the printer. Note: If the printer does not show up in the list, you may need the IP address if you are configuring access for assistance. In...
User's Guide
Page 45
...designed specifically for use labels in .) away from the printer control panel Paper menu. - Print samples on the card stock being considered for laser printers. Do not use before buying large quantities. Partial sheets also contaminate the printer and the cartridge with adhesive, and could void the ...printer and cartridge warranties. • Do not use labels with exposed adhesive. • Do not print within 1 mm (0.04 in a jam. The labels can significantly impact print quality. When printing on labels: • Use labels only in .) strip on the leading and driver...
...designed specifically for use labels in .) away from the printer control panel Paper menu. - Print samples on the card stock being considered for laser printers. Do not use before buying large quantities. Partial sheets also contaminate the printer and the cartridge with adhesive, and could void the ...printer and cartridge warranties. • Do not use labels with exposed adhesive. • Do not print within 1 mm (0.04 in a jam. The labels can significantly impact print quality. When printing on labels: • Use labels only in .) strip on the leading and driver...

User's Guide
Page 74
... buttons to select AM or PM. 8 Press . 9 Using the keypad, enter the date you want to send the fax. To install the fax driver, choose Add a printer, and then install the printer again with a different name, choosing the fax version of the fax recipient). 4 Click Fax. If the... printer clock is set to 12 Hour format, then use the fax driver for your printer. Note: Do not load postcards, photos, small items, transparencies, photo paper, or thin media (such as magazine clippings) into the...
... buttons to select AM or PM. 8 Press . 9 Using the keypad, enter the date you want to send the fax. To install the fax driver, choose Add a printer, and then install the printer again with a different name, choosing the fax version of the fax recipient). 4 Click Fax. If the... printer clock is set to 12 Hour format, then use the fax driver for your printer. Note: Do not load postcards, photos, small items, transparencies, photo paper, or thin media (such as magazine clippings) into the...

User's Guide
Page 99
...on a copy Note: 0 is the factory default setting. Description Allows fax jobs to begin receiving a fax Notes: • This menu item is used when the printer shares a line with a telephone. • 9 is the factory default setting. Adjusts the sharpness of the output Note: "Best for content 0-5 Shadow Detail -4...item Enable Fax Receive On Off Rings to Answer 1-25 Auto Answer Yes No Manual Answer Code 1-9 Description Allows driver to fax jobs to be received by the printer Note: Yes is the factory default setting. Lets you enter a code on the telephone number pad to be sent...
...on a copy Note: 0 is the factory default setting. Description Allows fax jobs to begin receiving a fax Notes: • This menu item is used when the printer shares a line with a telephone. • 9 is the factory default setting. Adjusts the sharpness of the output Note: "Best for content 0-5 Shadow Detail -4...item Enable Fax Receive On Off Rings to Answer 1-25 Auto Answer Yes No Manual Answer Code 1-9 Description Allows driver to fax jobs to be received by the printer Note: Yes is the factory default setting. Lets you enter a code on the telephone number pad to be sent...

User's Guide
Page 103
... Image Q. The printer driver default is the factory default setting. Understanding printer menus 103 Prints a border around each page image Note: None is the factory default setting. • To set Enhance Fine Lines using the Embedded Web Server, type the network printer IP address in ...• Both Directions darkens horizontal and vertical lines of a multiple-page sheet Notes: • Auto is the factory default setting. The printer chooses between portrait and landscape. • Long Edge uses landscape. • Short Edge uses portrait. Lightens or darkens the printed output ...
... Image Q. The printer driver default is the factory default setting. Understanding printer menus 103 Prints a border around each page image Note: None is the factory default setting. • To set Enhance Fine Lines using the Embedded Web Server, type the network printer IP address in ...• Both Directions darkens horizontal and vertical lines of a multiple-page sheet Notes: • Auto is the factory default setting. The printer chooses between portrait and landscape. • Long Edge uses landscape. • Short Edge uses portrait. Lightens or darkens the printed output ...
User's Guide
Page 126
...the Paper menu. 2 Before sending the job to the printer and the host computer, print server, or other network device. • The printer driver settings are correct. Turn the printer off , wait for about 10 seconds, and then turn the printer back on. This often fixes the problem. Try one ...or more of these possibilities, turn the printer off , wait about 10 seconds, and then ...
...the Paper menu. 2 Before sending the job to the printer and the host computer, print server, or other network device. • The printer driver settings are correct. Turn the printer off , wait for about 10 seconds, and then turn the printer back on. This often fixes the problem. Try one ...or more of these possibilities, turn the printer off , wait about 10 seconds, and then ...


