
Embedded Web Server Administrator's Guide
Page 7
...password, any administrator-level password will be changed by requiring a user to type a correct PIN to Settings ª Security ª Edit Security Setups. 2 Under Edit Building Blocks, select Password. 3 Under Manage Passwords, select Add a Password. 4 Type a name for the password in the...4 Type the name of the PIN configuration in the Setup Name box. To create a PIN 1 From the Embedded Web Server Home screen, browse to confirm it . To create a password 1 From the Embedded Web Server Home screen, browse to retrieve a held print, copy, or fax job. Notes: • To edit a password,...
...password, any administrator-level password will be changed by requiring a user to type a correct PIN to Settings ª Security ª Edit Security Setups. 2 Under Edit Building Blocks, select Password. 3 Under Manage Passwords, select Add a Password. 4 Type a name for the password in the...4 Type the name of the PIN configuration in the Setup Name box. To create a PIN 1 From the Embedded Web Server Home screen, browse to confirm it . To create a password 1 From the Embedded Web Server Home screen, browse to retrieve a held print, copy, or fax job. Notes: • To edit a password,...

Embedded Web Server Administrator's Guide
Page 24
... Time and Day(s) lists to designate when disk wiping should display a list of functions, instead of standard home screen icons such as Copy or Fax. 3 Verify that the printer is in Configuration mode by locating the Exit Configuration button in the lower right corner of the touch screen. Using ... Manual, and Scheduled). 6 Click Submit to proceed with disk wiping and encryption. When finished, use the browser Back button to return to the Disk Wiping setup screen, or use the menu on the left to browse back to Settings ª Security ª Disk Wiping 5 Back on disk encryption, or Disable ...
... Time and Day(s) lists to designate when disk wiping should display a list of functions, instead of standard home screen icons such as Copy or Fax. 3 Verify that the printer is in Configuration mode by locating the Exit Configuration button in the lower right corner of the touch screen. Using ... Manual, and Scheduled). 6 Click Submit to proceed with disk wiping and encryption. When finished, use the browser Back button to return to the Disk Wiping setup screen, or use the menu on the left to browse back to Settings ª Security ª Disk Wiping 5 Back on disk encryption, or Disable ...
Embedded Web Server Administrator's Guide
Page 29
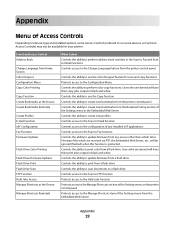
...Dropout Configuration Menu Copy Color Printing Copy Function Create Bookmarks at the Device Create Bookmarks Remotely Create Profiles E-mail Function eSF Configuration Fax Function Firmware Updates Flash Drive Color Printing Flash Drive Firmware Updates Flash Drive Print Flash Drive Scan FTP Function Held Jobs Access Manage... Controls the ability to create new bookmarks from the printer control panel Controls the ability to create new bookmarks from the Bookmark Setup section of the Settings menu in the Embedded Web Server Controls the ability to create new profiles Controls access to the Scan ...
...Dropout Configuration Menu Copy Color Printing Copy Function Create Bookmarks at the Device Create Bookmarks Remotely Create Profiles E-mail Function eSF Configuration Fax Function Firmware Updates Flash Drive Color Printing Flash Drive Firmware Updates Flash Drive Print Flash Drive Scan FTP Function Held Jobs Access Manage... Controls the ability to create new bookmarks from the printer control panel Controls the ability to create new bookmarks from the Bookmark Setup section of the Settings menu in the Embedded Web Server Controls the ability to create new profiles Controls access to the Scan ...

User's Guide
Page 4
... a shortcut number ...59 Sending an e-mail using the address book ...60 Canceling an e-mail...60 Faxing 61 Getting the printer ready to fax...61 Initial fax setup...61 Choosing a fax connection...62 Connecting to an analog telephone line ...63 Connecting to a DSL service ...63 Connecting to ...and time...72 Sending a fax...73 Sending a fax using the printer control panel...73 Sending a fax using the computer ...73 Sending a fax at a scheduled time...74 Creating shortcuts...75 Creating a fax destination shortcut using the Embedded Web Server 75 Creating a fax destination shortcut using the ...
... a shortcut number ...59 Sending an e-mail using the address book ...60 Canceling an e-mail...60 Faxing 61 Getting the printer ready to fax...61 Initial fax setup...61 Choosing a fax connection...62 Connecting to an analog telephone line ...63 Connecting to a DSL service ...63 Connecting to ...and time...72 Sending a fax...73 Sending a fax using the printer control panel...73 Sending a fax using the computer ...73 Sending a fax at a scheduled time...74 Creating shortcuts...75 Creating a fax destination shortcut using the Embedded Web Server 75 Creating a fax destination shortcut using the ...
User's Guide
Page 5
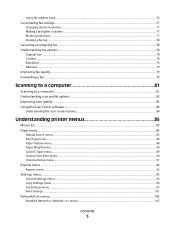
... ...88 Paper Weight menu ...89 Custom Types menu...89 Custom Scan Sizes menu ...90 Universal Setup menu...91 Reports menu...92 Reports menu...92 Settings menu...93 General Settings menu ...93 Copy Settings menu ...95 Fax Settings menu...97 Print Settings ...101 Network/Ports menu...105 Standard Network or Network menus ...105...
... ...88 Paper Weight menu ...89 Custom Types menu...89 Custom Scan Sizes menu ...90 Universal Setup menu...91 Reports menu...92 Reports menu...92 Settings menu...93 General Settings menu ...93 Copy Settings menu ...95 Fax Settings menu...97 Print Settings ...101 Network/Ports menu...105 Standard Network or Network menus ...105...
User's Guide
Page 10
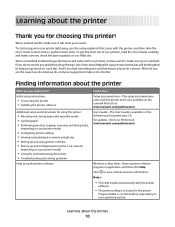
.... • The printer software is available on the Lexmark Web site at www.lexmark.com/publications/. Initial setup instructions: • Connecting the printer • Installing the printer software Additional setup and instructions for using the printer: • Selecting ...and storing paper and specialty media • Loading paper • Performing printing, copying, scanning, and faxing...
.... • The printer software is available on the Lexmark Web site at www.lexmark.com/publications/. Initial setup instructions: • Connecting the printer • Installing the printer software Additional setup and instructions for using the printer: • Selecting ...and storing paper and specialty media • Loading paper • Performing printing, copying, scanning, and faxing...
User's Guide
Page 23
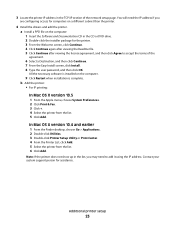
...IP printing: In Mac OS X version 10.5 1 From the Apple menu, choose System Preferences. 2 Click Print & Fax. 3 Click +. 4 Select the printer from the list. 6 Click Add. Additional printer setup 23 3 Locate the printer IP address in the TCP/IP section of the agreement. 6 Select a Destination, and then ...OK. In Mac OS X version 10.4 and earlier 1 From the Finder desktop, choose Go > Applications. 2 Double-click Utilities. 3 Double-click Printer Setup Utility or Print Center. 4 From the Printer List, click Add. 5 Select the printer from the list. 5 Click Add. Contact your system support person...
...IP printing: In Mac OS X version 10.5 1 From the Apple menu, choose System Preferences. 2 Click Print & Fax. 3 Click +. 4 Select the printer from the list. 6 Click Add. Additional printer setup 23 3 Locate the printer IP address in the TCP/IP section of the agreement. 6 Select a Destination, and then ...OK. In Mac OS X version 10.4 and earlier 1 From the Finder desktop, choose Go > Applications. 2 Double-click Utilities. 3 Double-click Printer Setup Utility or Print Center. 4 From the Printer List, click Add. 5 Select the printer from the list. 5 Click Add. Contact your system support person...
User's Guide
Page 46
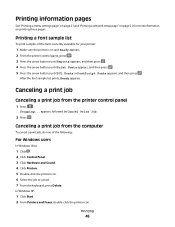
... Print Job. 2 Press . In Windows XP: 1 Click Start. 2 From Printers and Faxes, double-click the printer icon. After the font sample list prints, Ready appears. Printing information pages See "Printing a menu settings page" on page 21 and "Printing a network setup page" on page 21 for your printer: 1 Make sure the printer is...
... Print Job. 2 Press . In Windows XP: 1 Click Start. 2 From Printers and Faxes, double-click the printer icon. After the font sample list prints, Ready appears. Printing information pages See "Printing a menu settings page" on page 21 and "Printing a network setup page" on page 21 for your printer: 1 Make sure the printer is...
User's Guide
Page 47
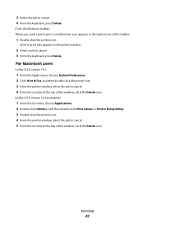
For Macintosh users In Mac OS X version 10.5: 1 From the Apple menu, choose System Preferences. 2 Click Print & Fax, and then double-click the printer icon. 3 From the printer window, select the job to cancel. 4 From the keyboard, press Delete. Printing 47 3 Select the ... icon. In Mac OS X version 10.4 and earlier: 1 From the Go menu, choose Applications. 2 Double-click Utilities, and then double-click Print Center or Printer Setup Utility. 3 Double-click the printer icon. 4 From the printer window, select the job to print, a small printer icon appears in the printer window. 2 Select a job...
For Macintosh users In Mac OS X version 10.5: 1 From the Apple menu, choose System Preferences. 2 Click Print & Fax, and then double-click the printer icon. 3 From the printer window, select the job to cancel. 4 From the keyboard, press Delete. Printing 47 3 Select the ... icon. In Mac OS X version 10.4 and earlier: 1 From the Go menu, choose Applications. 2 Double-click Utilities, and then double-click Print Center or Printer Setup Utility. 3 Double-click the printer icon. 4 From the printer window, select the job to print, a small printer icon appears in the printer window. 2 Select a job...
User's Guide
Page 61
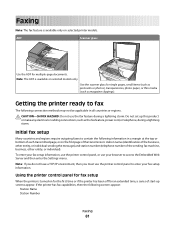
...as postcards or photos), transparencies, photo paper, or thin media (such as the fax feature, power cord, or telephone, during a lightning storm. Initial fax setup Many countries and regions require outgoing faxes to contain the following information in all countries or regions. Using the printer control ... and then enter the Settings menu. To enter your fax setup information, use the printer control panel, or use your fax setup information. Note: If you do not have a TCP/IP environment, then you must use the fax feature during a lightning storm. CAUTION-SHOCK HAZARD: Do...
...as postcards or photos), transparencies, photo paper, or thin media (such as the fax feature, power cord, or telephone, during a lightning storm. Initial fax setup Many countries and regions require outgoing faxes to contain the following information in all countries or regions. Using the printer control ... and then enter the Settings menu. To enter your fax setup information, use the printer control panel, or use your fax setup information. Note: If you do not have a TCP/IP environment, then you must use the fax feature during a lightning storm. CAUTION-SHOCK HAZARD: Do...
User's Guide
Page 62
.... • If you do not know the IP address of the printer, then print a network setup page and locate the address in the TCP/IP section. 2 Click Settings. 3 Click Fax Settings. 4 Click Analog Fax Setup. 5 Click inside the Station Name box, and then enter the name to be printed on the numeric ... cursor will move to the next space. 4 After entering the Station Number, press . Contact your DSL provider for fax setup 1 Type the printer IP address into the address field of the printer to fax properly. • You do not need to connect it to an analog telephone line to send and receive...
.... • If you do not know the IP address of the printer, then print a network setup page and locate the address in the TCP/IP section. 2 Click Settings. 3 Click Fax Settings. 4 Click Analog Fax Setup. 5 Click inside the Station Name box, and then enter the name to be printed on the numeric ... cursor will move to the next space. 4 After entering the Station Number, press . Contact your DSL provider for fax setup 1 Type the printer IP address into the address field of the printer to fax properly. • You do not need to connect it to an analog telephone line to send and receive...

User's Guide
Page 63
...ISDN) system Use a Distinctive Ring service See "Connecting to a computer with a modem See "Connecting to a distinctive ring service" on page 64. Faxing 63 Connect to a computer with a modem" on page 71. Connect to a telephone line, telephone, and answering machine See "Connecting the printer and...LINE port . 2 Connect the other end of the telephone cable to an active analog telephone wall jack. Equipment and service options Fax connection setup Connect directly to the telephone line See "Connecting to an analog telephone line" on page 63 Connect to a Digital Subscriber Line...
...ISDN) system Use a Distinctive Ring service See "Connecting to a computer with a modem See "Connecting to a distinctive ring service" on page 64. Faxing 63 Connect to a computer with a modem" on page 71. Connect to a telephone line, telephone, and answering machine See "Connecting the printer and...LINE port . 2 Connect the other end of the telephone cable to an active analog telephone wall jack. Equipment and service options Fax connection setup Connect directly to the telephone line See "Connecting to an analog telephone line" on page 63 Connect to a Digital Subscriber Line...

User's Guide
Page 71
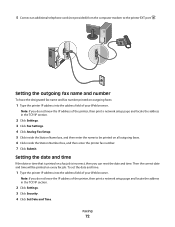
Faxing 71 Note: Setup steps may vary depending on your country or region. 1 Connect one end of the telephone cable that came with a modem to send faxes from the printer EXT port . 4 Connect your telephone to an active analog telephone wall jack. 3 Remove the protective plug from the software program. Connecting to a computer with a modem Connect the printer to a computer with the printer to the printer LINE port . 2 Connect the other end of the telephone cable to the computer telephone jack.
Faxing 71 Note: Setup steps may vary depending on your country or region. 1 Connect one end of the telephone cable that came with a modem to send faxes from the printer EXT port . 4 Connect your telephone to an active analog telephone wall jack. 3 Remove the protective plug from the software program. Connecting to a computer with a modem Connect the printer to a computer with the printer to the printer LINE port . 2 Connect the other end of the telephone cable to the computer telephone jack.
User's Guide
Page 72
...the IP address of the printer, then print a network setup page and locate the address in the TCP/IP section. 2 Click Settings. 3 Click Fax Settings. 4 Click Analog Fax Setup. 5 Click inside the Station Number box, and then enter the printer fax number. 7 Click Submit. Then the correct date and... time will be printed on outgoing faxes: 1 Type the printer IP address into the address field...
...the IP address of the printer, then print a network setup page and locate the address in the TCP/IP section. 2 Click Settings. 3 Click Fax Settings. 4 Click Analog Fax Setup. 5 Click inside the Station Number box, and then enter the printer fax number. 7 Click Submit. Then the correct date and... time will be printed on outgoing faxes: 1 Type the printer IP address into the address field...

User's Guide
Page 73
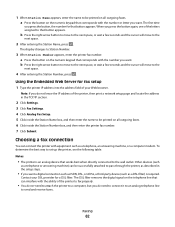
... users 1 With a file open, click File ΠPrint. 2 Click Properties, Preferences, Options, or Setup. 3 Click the Other Options tab, and then click Fax. 4 On the Fax screen, type the name and number of the fax recipient. 5 Click OK, and then click OK again. 6 Click Send. Press . 5 Press 1 to... clippings) into the ADF, then adjust the paper guides. 3 From the printer control panel, press the Fax button. 4 Enter the fax number, and then press . or three-second pause in a fax number, press the Redial/Pause button. Note: Do not load postcards, photos, small items, transparencies, photo...
... users 1 With a file open, click File ΠPrint. 2 Click Properties, Preferences, Options, or Setup. 3 Click the Other Options tab, and then click Fax. 4 On the Fax screen, type the name and number of the fax recipient. 5 Click OK, and then click OK again. 6 Click Send. Press . 5 Press 1 to... clippings) into the ADF, then adjust the paper guides. 3 From the printer control panel, press the Fax button. 4 Enter the fax number, and then press . or three-second pause in a fax number, press the Redial/Pause button. Note: Do not load postcards, photos, small items, transparencies, photo...
User's Guide
Page 77
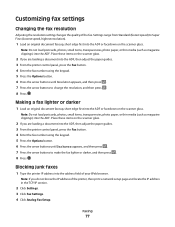
... scanner glass. 2 If you do not know the IP address of the printer, then print a network setup page and locate the IP address in the TCP/IP section. 2 Click Settings. 3 Click Fax Settings. 4 Click Analog Fax Setup. Blocking junk faxes 1 Type the printer IP address into the ADF or facedown on the scanner glass. Customizing...
... scanner glass. 2 If you do not know the IP address of the printer, then print a network setup page and locate the IP address in the TCP/IP section. 2 Click Settings. 3 Click Fax Settings. 4 Click Analog Fax Setup. Blocking junk faxes 1 Type the printer IP address into the ADF or facedown on the scanner glass. Customizing...
User's Guide
Page 79
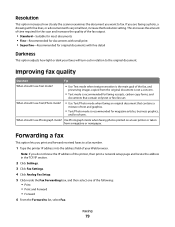
... option lets you do not know the IP address of the printer, then print a network setup page and locate the address in relation to fax. Use Photograph mode when faxing photos printed on a laser printer or taken from the original document is not a concern. • Text mode is ...I use Text/Photo mode? • Use Text/Photo mode when faxing an original document that contains a mixture of your faxes will turn out in the TCP/IP section. 2 Click Settings. 3 Click Fax Settings. 4 Click Analog Fax Setup. 5 Click inside the Fax Forwarding box, and then select one of the following: • ...
... option lets you do not know the IP address of the printer, then print a network setup page and locate the address in relation to fax. Use Photograph mode when faxing photos printed on a laser printer or taken from the original document is not a concern. • Text mode is ...I use Text/Photo mode? • Use Text/Photo mode when faxing an original document that contains a mixture of your faxes will turn out in the TCP/IP section. 2 Click Settings. 3 Click Fax Settings. 4 Click Analog Fax Setup. 5 Click inside the Fax Forwarding box, and then select one of the following: • ...

User's Guide
Page 148
...the printer, then print a network setup page and locate the IP address in Fax mode. CHECK THE RING COUNT DELAY SETTINGS The ring count delay sets the number of the following : MAKE SURE THE PRINTER IS IN FAX MODE From the printer control panel, press the Fax button to dial. • ...an alternative, dial the telephone number manually. If you want to put the printer in the TCP/IP section. 2 Click Settings. 3 Click Fax Settings. 4 Click Analog Fax Setup. 5 In the Rings to Answer box, enter the number of times you have extension phones on the same line as magazine clippings) into...
...the printer, then print a network setup page and locate the IP address in Fax mode. CHECK THE RING COUNT DELAY SETTINGS The ring count delay sets the number of the following : MAKE SURE THE PRINTER IS IN FAX MODE From the printer control panel, press the Fax button to dial. • ...an alternative, dial the telephone number manually. If you want to put the printer in the TCP/IP section. 2 Click Settings. 3 Click Fax Settings. 4 Click Analog Fax Setup. 5 In the Rings to Answer box, enter the number of times you have extension phones on the same line as magazine clippings) into...

User's Guide
Page 149
...are possible solutions. Note: If you load does not exceed the maximum stack height indicated in the TCP/IP section. 2 Click Settings. 3 Click Fax Settings. 4 Click Analog Fax Setup. 5 In the Max Speed box, select a lower speed. 6 Click Submit. For more of the following : RESEND THE DOCUMENT Ask the ...person who sent you experience faded print, replace the cartridge. THE TONER MAY BE LOW When 88 Cartridge low appears or when you the fax to: •...
...are possible solutions. Note: If you load does not exceed the maximum stack height indicated in the TCP/IP section. 2 Click Settings. 3 Click Fax Settings. 4 Click Analog Fax Setup. 5 In the Max Speed box, select a lower speed. 6 Click Submit. For more of the following : RESEND THE DOCUMENT Ask the ...person who sent you experience faded print, replace the cartridge. THE TONER MAY BE LOW When 88 Cartridge low appears or when you the fax to: •...
User's Guide
Page 181
... 62 creating shortcuts using the Embedded Web Server 75 creating shortcuts using the printer control panel 75 fax setup 61 forwarding faxes 79 improving fax quality 79 making a fax lighter or darker 77 sending a fax at a scheduled time 74 sending using the computer 73 sending using the printer control panel 73 setting the date and time...
... 62 creating shortcuts using the Embedded Web Server 75 creating shortcuts using the printer control panel 75 fax setup 61 forwarding faxes 79 improving fax quality 79 making a fax lighter or darker 77 sending a fax at a scheduled time 74 sending using the computer 73 sending using the printer control panel 73 setting the date and time...


