
Service Manual
Page 1
WinWriter™150c 4077-001 • Table of Contents • Start Diagnostics • Safety and Notices • Trademarks • Index • Manuals Menu Lexmark and Lexmark with diamond design are trademarks of Lexmark International, Inc., registered in the United States and/or other countries.
WinWriter™150c 4077-001 • Table of Contents • Start Diagnostics • Safety and Notices • Trademarks • Index • Manuals Menu Lexmark and Lexmark with diamond design are trademarks of Lexmark International, Inc., registered in the United States and/or other countries.

Service Manual
Page 4
... Roll Removal 34 Large Outside Gear Removal 35 Left Side Frame Assembly Removal 36 Maintenance Station Assembly Removal 37 Maintenance Wipers and Caps Removal 37 Manual Insert Tray Removal 37 Mid Frame Assembly Removal 37 Paper Feed Motor Removal 38 Paper Guide and EOF Flag Assembly Removal 38 Paper Load Door...
... Roll Removal 34 Large Outside Gear Removal 35 Left Side Frame Assembly Removal 36 Maintenance Station Assembly Removal 37 Maintenance Wipers and Caps Removal 37 Manual Insert Tray Removal 37 Mid Frame Assembly Removal 37 Paper Feed Motor Removal 38 Paper Guide and EOF Flag Assembly Removal 38 Paper Load Door...
Service Manual
Page 6
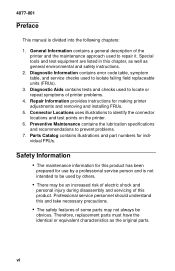
... used to repair it. vi Therefore, replacement parts must have the identical or equivalent characteristics as general environmental and safety instructions. 2. 4077-001 Preface 2 This manual is not intended to be used by others. • There may be an increased risk of electric shock and personal injury during disassembly and servicing...
... used to repair it. vi Therefore, replacement parts must have the identical or equivalent characteristics as general environmental and safety instructions. 2. 4077-001 Preface 2 This manual is not intended to be used by others. • There may be an increased risk of electric shock and personal injury during disassembly and servicing...

Service Manual
Page 10
... and the color cartridge on page 3. Print resolution is a personal, near laserquality inkjet printer. The black cartridge is directed, in this manual leads you complete the repair, perform tests as needed to a host computer. power off and power to determine the symptom and repair the...• 25 Watts - Begin with "Start" on the right. Idle Mode (power on - Printing (peak) Maintenance Approach The diagnostic information in the WinWriter 150c Printer Control program, to perform the head to the correct field replaceable unit (FRU) or part. 4077-001 General Information 8 The...
... and the color cartridge on page 3. Print resolution is a personal, near laserquality inkjet printer. The black cartridge is directed, in this manual leads you complete the repair, perform tests as needed to a host computer. power off and power to determine the symptom and repair the...• 25 Watts - Begin with "Start" on the right. Idle Mode (power on - Printing (peak) Maintenance Approach The diagnostic information in the WinWriter 150c Printer Control program, to perform the head to the correct field replaceable unit (FRU) or part. 4077-001 General Information 8 The...

Service Manual
Page 30
... card. Turn power off the printer and remove the carrier assembly without unplugging the printhead cable. If the power on light flashes as you to manually move the two pin jumper on to start the test. The voltage should go from +5 V dc to verify the encoder is moved. J13 2. If the...
... card. Turn power off the printer and remove the carrier assembly without unplugging the printhead cable. If the power on light flashes as you to manually move the two pin jumper on to start the test. The voltage should go from +5 V dc to verify the encoder is moved. J13 2. If the...
Service Manual
Page 31
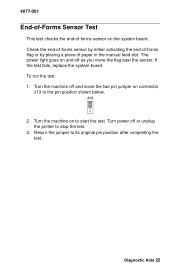
... the jumper to start the test. Diagnostic Aids 22 4077-001 End-of-Forms Sensor Test This test checks the end-of paper in the manual feed slot. The power light goes on to its original pin position after completing the test. J13 2. Turn power off as you move the two...
... the jumper to start the test. Diagnostic Aids 22 4077-001 End-of-Forms Sensor Test This test checks the end-of paper in the manual feed slot. The power light goes on to its original pin position after completing the test. J13 2. Turn power off as you move the two...
Service Manual
Page 32
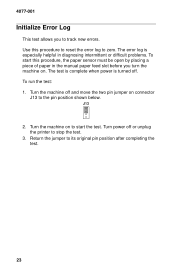
... pin position shown below. Turn the machine on to zero. To run the test: 1. The test is complete when power is especially helpful in the manual paper feed slot before you to its original pin position after completing the test. 23 4077-001 Initialize Error Log This test allows you turn...
... pin position shown below. Turn the machine on to zero. To run the test: 1. The test is complete when power is especially helpful in the manual paper feed slot before you to its original pin position after completing the test. 23 4077-001 Initialize Error Log This test allows you turn...

Service Manual
Page 39
Remove the paper load door and manual insert tray. 4. Pull up the bottom of the edge guides to maintain spring tension on the guides. Remove the printhead carrier assembly. 3. Unlatch the ejectors ...
Remove the paper load door and manual insert tray. 4. Pull up the bottom of the edge guides to maintain spring tension on the guides. Remove the printhead carrier assembly. 3. Unlatch the ejectors ...
Service Manual
Page 44
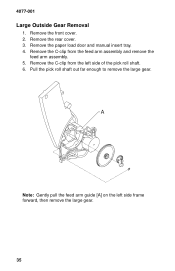
4077-001 Large Outside Gear Removal 1. Remove the rear cover. 3. Remove the C-clip from the left side frame forward, then remove the large gear. 35 A Note: Gently pull the feed arm guide [A] on the left side of the pick roll shaft. 6. Remove the front cover. 2. Remove the C-clip from the feed arm assembly and remove the feed arm assembly. 5. Pull the pick roll shaft out far enough to remove the large gear. Remove the paper load door and manual insert tray. 4.
4077-001 Large Outside Gear Removal 1. Remove the rear cover. 3. Remove the C-clip from the left side frame forward, then remove the large gear. 35 A Note: Gently pull the feed arm guide [A] on the left side of the pick roll shaft. 6. Remove the front cover. 2. Remove the C-clip from the feed arm assembly and remove the feed arm assembly. 5. Pull the pick roll shaft out far enough to remove the large gear. Remove the paper load door and manual insert tray. 4.
Service Manual
Page 45
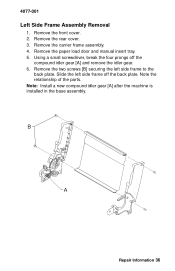
... gear. 6. B A Repair Information 36 Note: Install a new compound idler gear [A] after the machine is installed in the base assembly. Remove the paper load door and manual insert tray. 5. Using a small screwdriver, break the four prongs off the back plate. Note the relationship of the parts. Slide the left side frame to...
... gear. 6. B A Repair Information 36 Note: Install a new compound idler gear [A] after the machine is installed in the base assembly. Remove the paper load door and manual insert tray. 5. Using a small screwdriver, break the four prongs off the back plate. Note the relationship of the parts. Slide the left side frame to...
Service Manual
Page 46
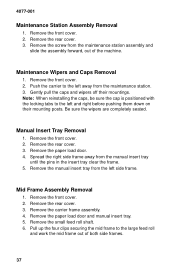
...the large feed roll and work the mid frame out of the machine. Remove the manual insert tray from the maintenance station assembly and slide the assembly forward, out of both side ...frames. 37 Remove the paper load door and manual insert tray. 5. Remove the carrier frame assembly. 4. Remove the rear cover. 3. Be sure the...wipers are completely seated. Pull up the four clips securing the mid frame to the left away from the manual insert tray until the pins in the insert tray clear the frame. 5. 4077-001 Maintenance Station Assembly ...
...the large feed roll and work the mid frame out of the machine. Remove the manual insert tray from the maintenance station assembly and slide the assembly forward, out of both side ...frames. 37 Remove the paper load door and manual insert tray. 5. Remove the carrier frame assembly. 4. Remove the rear cover. 3. Be sure the...wipers are completely seated. Pull up the four clips securing the mid frame to the left away from the manual insert tray until the pins in the insert tray clear the frame. 5. 4077-001 Maintenance Station Assembly ...
Service Manual
Page 49
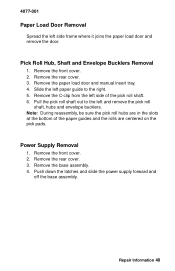
... 1. 4077-001 Paper Load Door Removal Spread the left and remove the pick roll shaft, hubs and envelope bucklers. Remove the paper load door and manual insert tray. 4.
... 1. 4077-001 Paper Load Door Removal Spread the left and remove the pick roll shaft, hubs and envelope bucklers. Remove the paper load door and manual insert tray. 4.

Service Manual
Page 54
... up and off the back plate. Remove the carrier frame assembly. 4. Slide the right side frame off the machine. 4. Remove the paper load door and manual insert tray. 5. To reassemble, place the cover over the tabs in slot [A] and release the cover latches. A A 3. Remove the two screws securing the right side...
... up and off the back plate. Remove the carrier frame assembly. 4. Slide the right side frame off the machine. 4. Remove the paper load door and manual insert tray. 5. To reassemble, place the cover over the tabs in slot [A] and release the cover latches. A A 3. Remove the two screws securing the right side...
Service Manual
Page 76
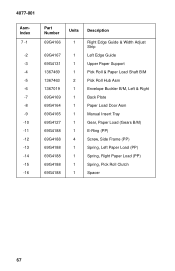
... Left Edge Guide Upper Paper Support Pick Roll & Paper Load Shaft B/M Pick Roll Hub Asm Envelope Buckler B/M, Left & Right Back Plate Paper Load Door Asm Manual Insert Tray Gear, Paper Load (Gears B/M) E-Ring (PP) Screw, Side Frame (PP) Spring, Left Paper Load (PP) Spring, Right Paper Load (PP) Spring, Pick Roll...
... Left Edge Guide Upper Paper Support Pick Roll & Paper Load Shaft B/M Pick Roll Hub Asm Envelope Buckler B/M, Left & Right Back Plate Paper Load Door Asm Manual Insert Tray Gear, Paper Load (Gears B/M) E-Ring (PP) Screw, Side Frame (PP) Spring, Left Paper Load (PP) Spring, Right Paper Load (PP) Spring, Pick Roll...
Service Manual
Page 79
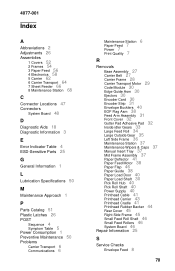
... Pad 32 Inside idler Gears 33 Large Feed Roll 34 Large Outside Gear 35 Left Side Frame 36 Maintenance Station 37 Maintenance Wipers & Caps 37 Manual Insert Tray 37 Mid Frame Assembly 37 Paper Deflector 41 Paper Feed Motor 38 Paper Flap 46 Paper Guide 38 Paper Load Door 40 Paper...
... Pad 32 Inside idler Gears 33 Large Feed Roll 34 Large Outside Gear 35 Left Side Frame 36 Maintenance Station 37 Maintenance Wipers & Caps 37 Manual Insert Tray 37 Mid Frame Assembly 37 Paper Deflector 41 Paper Feed Motor 38 Paper Flap 46 Paper Guide 38 Paper Load Door 40 Paper...

