Lexmark WinWriter 100 Support and Manuals
Get Help and Manuals for this Lexmark item
View All Support Options Below
Free Lexmark WinWriter 100 manuals!
Problems with Lexmark WinWriter 100?
Ask a Question
Free Lexmark WinWriter 100 manuals!
Problems with Lexmark WinWriter 100?
Ask a Question
Popular Lexmark WinWriter 100 Manual Pages
Service Manual - Page 1

WinWriter™ 100
4076-001
• Table of Contents
• Start Diagnostics • Safety and Notices • Trademarks • Index • Manuals Menu
Lexmark and Lexmark with diamond design are trademarks of Lexmark International, Inc., registered in the United States and/or other countries.
Service Manual - Page 7
....
4076-0WJ
• Consult your point of purchase or service representative for a Class B computing device, the printer cable must be shielded.
vii Canadian Department Of Communications Compliance ...violation of Communications. Part numbers for the various interface cables are: part number 1525612 for parallel interface, and part number 8509386 for digital apparatus, set out in the ...
Service Manual - Page 9

4076-0WJ
Trademarks
Lexmark is divided into memory unless as general environmental and safety instructions.
2.
ix Preface
This manual is a trademark of printer problems.
4. "Repair Information" provides instructions for individual FRUs. "Parts Catalog" contains illustrations and part numbers for making printer adjustments and removing and installing FRUs.
5. The following ...
Service Manual - Page 12
...in this manual will be serviced without being connected to verify the repair. Printing (peak)
Maintenance Approach
The diagnostic information in Draft mode. power off and power to adjust the bi-directional alignment. 4076-0WJ
General Information
7
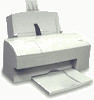
The WinWriter 100 4076 OWJ is a general purpose high-quality ink jet printer with a customer-replaceable print cartridge containing the ink and...
Service Manual - Page 13

...Unit Customer Setup Dynamic Random Access Memory Electrophotographic Process Electrostatic Discharge Field Replaceable Unit ...Problem Isolation Charts Picture Element Power-On Self Test Print Quality Enhancement Technology Printer Sharing Option Static Random Access Memory Used Parts Replacement Volts alternating current Volts direct current Zero Insertion Force
Unique Tools Required For Service...
Service Manual - Page 17
...; Fails to clean the print head
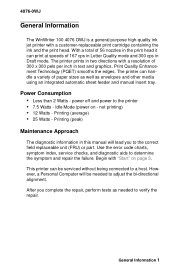
Operator Panel Problems
ACTION
Go to the "Transport Service Check" on page 9.
Carrier Transport Problems
SYMPTOM
• No carrier movement • Slow carrier movement • Carrier stops
Communications Problem
ACTION
Go to the "Maintenance Station Service Check" on page 17.
SYMPTOM
Printer not communicating with host.
4076-0WJ
Symptom Tables...
Service Manual - Page 18
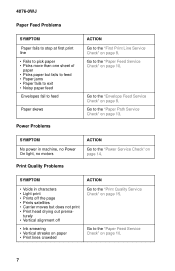
... print • Prints off
• Ink smearing • Vertical streaks on paper • Print lines crowded
ACTION Go to the "Print Quality Service Check" on page 15.
turely •...Problems
ACTION Go to the "First Print Line Service Check" on page 14. Go to the "Paper Feed Service Check" on page 13.
Go to the "Paper Feed Service Check" on page 8. Go to the "Envelope Feed Service...
Service Manual - Page 21
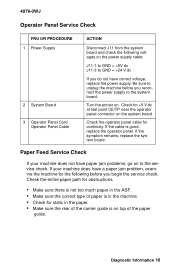
... paper jam problem, examine the machine for the following before you begin the service check. If the symptom remains, replace the system board...guide.
Diagnostic Information 10 Be sure to unplug the machine before you reconnect the power supply to the service check.
Paper Feed Service Check
If your machine does have correct voltage, replace the power supply. Turn the printer...
Service Manual - Page 22

... motor driver
on the system board • A bind in one direction only, replace the system board.
Binds in two directions. If you still have a failure after replacing the motor, replace the system...6
If the readings are incorrect, replace the motor. A noisy or chattering motor or a motor that fails to turn, can cause intermittent false paper jam errors. Check for loose or worn motor ...
Service Manual - Page 27

...Diagnostic Information 16 Ink smudging and smearing can be caused by paper problems or problems in the maintenance station.
Uneven vertical lines can be caused by worn parts in the ... guide and carrier guide rod
for wear or dirt. • Idler pulley parts for wear, damage,
or looseness. • Encoder strip for binds or dirt. Go to and perform the "Maintenance Station Service Check...
Service Manual - Page 28
... problems at the right margin. Check for obstructions blocking carrier movement.
If you cannot enter the test, replace the system board. Check for wear and dirt.
If the reading is fully seated.
4076-0WJ
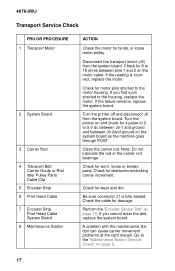
Transport Service Check
FRU OR PROCEDURE 1 Transport Motor
2 System Board
3 Carrier Rod
4 Transport Belt Carrier Guide or Rod Idler Pulley Parts...
Service Manual - Page 29

... the door opening on the service manual diskette. The next patterns are the purge pattern. These patterns repeat to verify all print cartridge nozzles are not working . Install the printer on a PC and run ...by a shortened version of the page. J12 is the code level and code level date. The jumper pattern is the print cartridge nozzle pattern. Return the jumper to run the bi-directional ...
Service Manual - Page 31
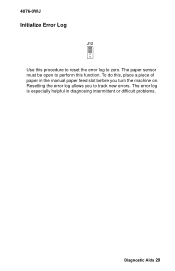
... turn the machine on. To do this, place a piece of paper in diagnosing intermittent or difficult problems.
Diagnostic Aids 20 The error log is especially helpful in the manual paper feed slot before you to perform this procedure to reset the error log to zero. The paper sensor must be open to track new...
Service Manual - Page 33
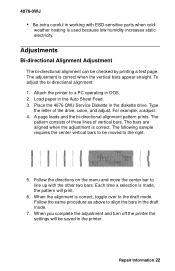
... the vertical bars appear straight.
To adjust the bi-directional alignment: 1. Place the 4076 OWJ Service Diskette in working with the other two bars. A page loads and the bi-directional alignment pattern prints. Repair Information 22 Attach the printer to align the bars in DOS. 2. Type
the letter of vertical bars. The
pattern...
Service Manual - Page 46

...guide from the latch and lift the guide from the system board. 5. When you reinstall the paper guide, be sure the front edge goes under the carrier guide.
35 If the paper guide is on the carrier clears the encoder strip. Remove the print cartridge. 3. Set...
latches out as you install the paper guide. Place the machine on the front of the left paper guide latch by carefully moving ...
Lexmark WinWriter 100 Reviews
We have not received any reviews for Lexmark yet.