Service Manual
Page 3
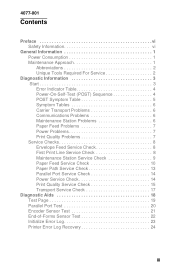
... Transport Problems 6 Communications Problems 6 Maintenance Station Problems 6 Paper Feed Problems 7 Power Problems 7 Print Quality Problems 7 Service Checks 8 Envelope Feed Service Check 8 First Print Line Service Check 8 Maintenance Station Service Check 9 Paper Feed Service Check 10 Paper Path Service Check 13 Parallel Port Service Check 14 Power Service Check 14 Print Quality Service Check 15 Transport Service Check 17 Diagnostic Aids 18 Test Page 19 Parallel Port Test 20 Encoder Sensor Test 21 End-of-Forms Sensor Test 22 Initialize Error Log 23 Printer Error Log...
... Transport Problems 6 Communications Problems 6 Maintenance Station Problems 6 Paper Feed Problems 7 Power Problems 7 Print Quality Problems 7 Service Checks 8 Envelope Feed Service Check 8 First Print Line Service Check 8 Maintenance Station Service Check 9 Paper Feed Service Check 10 Paper Path Service Check 13 Parallel Port Service Check 14 Power Service Check 14 Print Quality Service Check 15 Transport Service Check 17 Diagnostic Aids 18 Test Page 19 Parallel Port Test 20 Encoder Sensor Test 21 End-of-Forms Sensor Test 22 Initialize Error Log 23 Printer Error Log...
Service Manual
Page 6
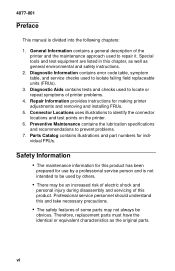
... and part numbers for making printer adjustments and removing and installing FRUs. 5. Therefore, replacement parts must have the identical or equivalent characteristics as general environmental and safety instructions. 2. General Information contains a general description of the printer and the maintenance approach used to isolate failing field replaceable units (FRUs). 3. Diagnostic Information contains error code table, symptom table, and service checks used to repair it. Repair Information provides instructions for individual FRUs. Connector Locations uses illustrations...
... and part numbers for making printer adjustments and removing and installing FRUs. 5. Therefore, replacement parts must have the identical or equivalent characteristics as general environmental and safety instructions. 2. General Information contains a general description of the printer and the maintenance approach used to isolate failing field replaceable units (FRUs). 3. Diagnostic Information contains error code table, symptom table, and service checks used to repair it. Repair Information provides instructions for individual FRUs. Connector Locations uses illustrations...

Service Manual
Page 10
... WinWriter 150c Printer Control program, to perform the head to a host computer. The user is installed on the left and the color cartridge on the right. Printing (average) • 25 Watts - Begin with "Start" on - Idle Mode (power on page 3. General Information 1 The black cartridge is directed, in this manual leads you complete the repair, perform tests as needed to the correct field replaceable unit (FRU) or part. Print resolution is a personal, near laserquality inkjet printer...
... WinWriter 150c Printer Control program, to perform the head to a host computer. The user is installed on the left and the color cartridge on the right. Printing (average) • 25 Watts - Begin with "Start" on - Idle Mode (power on page 3. General Information 1 The black cartridge is directed, in this manual leads you complete the repair, perform tests as needed to the correct field replaceable unit (FRU) or part. Print resolution is a personal, near laserquality inkjet printer...
Service Manual
Page 12
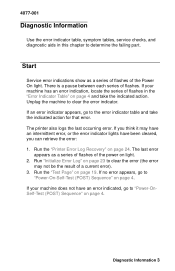
... flashes of the Power On light. If no error appears, go to "Power-OnSelf-Test (POST) Sequence" on page 4. The last error appears as a series of flashes of the power on light. 2. Diagnostic Information 3 If your machine does not have been cleared, you can retrieve the error: 1. Run "Initialize Error Log" on page 23 to clear the error indicator. 4077-001 Diagnostic Information 9 Use the error indicator table, symptom tables, service checks...
... flashes of the Power On light. If no error appears, go to "Power-OnSelf-Test (POST) Sequence" on page 4. The last error appears as a series of flashes of the power on light. 2. Diagnostic Information 3 If your machine does not have been cleared, you can retrieve the error: 1. Run "Initialize Error Log" on page 23 to clear the error indicator. 4077-001 Diagnostic Information 9 Use the error indicator table, symptom tables, service checks...

Service Manual
Page 13
... Service Check" on page 6, locate the symptom and take the indicated action. Turn your machine does not complete POST, locate the symptom in the following : 1. The paper feed gears turn the printer on it performs a POST. The carrier moves over the maintenance station and seals the printheads. 3. Replace the Code Module and/or system board. Replace the Code Module and/or system board. The power light...
... Service Check" on page 6, locate the symptom and take the indicated action. Turn your machine does not complete POST, locate the symptom in the following : 1. The paper feed gears turn the printer on it performs a POST. The carrier moves over the maintenance station and seals the printheads. 3. Replace the Code Module and/or system board. Replace the Code Module and/or system board. The power light...
Service Manual
Page 14
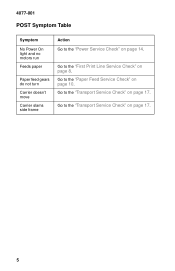
Go to the "Transport Service Check" on page 17. 5 Go to the "First Print Line Service Check" on page 17. Go to the "Transport Service Check" on page 8. Go to the "Paper Feed Service Check" on page 14. 4077-001 POST Symptom Table Symptom No Power On light and no motors run Feeds paper Paper feed gears do not turn Carrier doesn't move Carrier slams side frame Action Go to the "Power Service Check" on page 10.
Go to the "Transport Service Check" on page 17. 5 Go to the "First Print Line Service Check" on page 17. Go to the "Transport Service Check" on page 8. Go to the "Paper Feed Service Check" on page 14. 4077-001 POST Symptom Table Symptom No Power On light and no motors run Feeds paper Paper feed gears do not turn Carrier doesn't move Carrier slams side frame Action Go to the "Power Service Check" on page 10.
Service Manual
Page 16
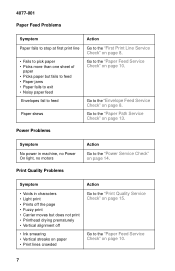
... one sheet of paper • Picks paper but does not print • Printhead drying prematurely • Vertical alignment off the page • Fuzzy print • Carrier moves but fails to feed • Paper jams • Paper fails to exit • Noisy paper feed Envelopes fail to feed Paper skews Action Go to the "First Print Line Service Check" on page 8. Symptom • Voids in machine, no Power On light, no motors Print Quality Problems Action Go to the "Power Service Check" on page 14...
... one sheet of paper • Picks paper but does not print • Printhead drying prematurely • Vertical alignment off the page • Fuzzy print • Carrier moves but fails to feed • Paper jams • Paper fails to exit • Noisy paper feed Envelopes fail to feed Paper skews Action Go to the "First Print Line Service Check" on page 8. Symptom • Voids in machine, no Power On light, no motors Print Quality Problems Action Go to the "Power Service Check" on page 14...

Service Manual
Page 17
...-of-Forms Sensor Test" on page 22 to the envelope load positions. Check the sensor for binds or damage. Diagnostic Information 8 Be sure the envelope guides are against the envelopes. First Print Line Service Check FRU 1 End-of-Forms Flag 2 End-of-Forms Sensor 3 System Board 4 Feed Arm Assembly Action Check the flag for dirt. 4077-001 Service Checks Envelope Feed Service Check FRU 1 Envelope Guide Action Be sure the envelope guides have been turned to check the end...
...-of-Forms Sensor Test" on page 22 to the envelope load positions. Check the sensor for binds or damage. Diagnostic Information 8 Be sure the envelope guides are against the envelopes. First Print Line Service Check FRU 1 End-of-Forms Flag 2 End-of-Forms Sensor 3 System Board 4 Feed Arm Assembly Action Check the flag for dirt. 4077-001 Service Checks Envelope Feed Service Check FRU 1 Envelope Guide Action Be sure the envelope guides have been turned to check the end...

Service Manual
Page 18
... on the sled of the printhead nozzles when the carrier is not being used to rise and seal the printheads. A worn cap causes the printhead nozzles to the left will uncap the printheads. Cleans the printhead nozzles during the print operation. 2. Check the maintenance station for worn or broken parts. A worn wiper causes degraded print quality just after a maintenance cleaning. Seals the printhead when it is moving to dry...
... on the sled of the printhead nozzles when the carrier is not being used to rise and seal the printheads. A worn cap causes the printhead nozzles to the left will uncap the printheads. Cleans the printhead nozzles during the print operation. 2. Check the maintenance station for worn or broken parts. A worn wiper causes degraded print quality just after a maintenance cleaning. Seals the printhead when it is moving to dry...

Service Manual
Page 19
... not too much paper in the sheet feeder. • Be sure the correct type of paper is not present, check for motor pins shorted to the motor housing. If you still have paper jam problems, continue with the service check. FRU 1 System Board Action With J5 disconnected and power on, check for static in the paper. If the voltage is being used. • Check for +24...
... not too much paper in the sheet feeder. • Be sure the correct type of paper is not present, check for motor pins shorted to the motor housing. If you still have paper jam problems, continue with the service check. FRU 1 System Board Action With J5 disconnected and power on, check for static in the paper. If the voltage is being used. • Check for +24...

Service Manual
Page 22
... or buckling the paper. • Be sure the correct type of paper into the exit tray. FRU Action 1 Large and Small Feed Rollers Check for wear and binds. 2 Small Feed Roller Check for worn, loose, or broken parts. Springs Paper Guide Paper Flap 3 Sheet Feeder Check the following before you begin this service check: • Check the entire paper path for obstructions. • Be sure the paper guides are not worn...
... or buckling the paper. • Be sure the correct type of paper into the exit tray. FRU Action 1 Large and Small Feed Rollers Check for wear and binds. 2 Small Feed Roller Check for worn, loose, or broken parts. Springs Paper Guide Paper Flap 3 Sheet Feeder Check the following before you begin this service check: • Check the entire paper path for obstructions. • Be sure the paper guides are not worn...
Service Manual
Page 23
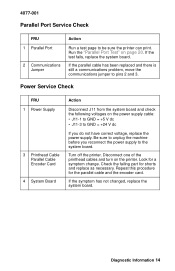
... correct voltage, replace the power supply. 4077-001 Parallel Port Service Check FRU 1 Parallel Port 2 Communications Jumper Action Run a test page to pins 2 and 3. Look for shorts and replace as necessary. Turn off the printer. Power Service Check FRU 1 Power Supply 3 Printhead Cable Parallel Cable Encoder Card 4 System Board Action Disconnect J11 from the system board and check the following voltages on page 20. Diagnostic Information 14 Disconnect one of the printhead cables and turn on the printer...
... correct voltage, replace the power supply. 4077-001 Parallel Port Service Check FRU 1 Parallel Port 2 Communications Jumper Action Run a test page to pins 2 and 3. Look for shorts and replace as necessary. Turn off the printer. Power Service Check FRU 1 Power Supply 3 Printhead Cable Parallel Cable Encoder Card 4 System Board Action Disconnect J11 from the system board and check the following voltages on page 20. Diagnostic Information 14 Disconnect one of the printhead cables and turn on the printer...
Service Manual
Page 25
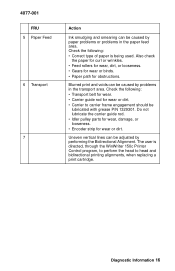
... to head and bidirectional printing alignments, when replacing a print cartridge. Blurred print and voids can be lubricated with grease P/N 1329301. Check the following : • Correct type of paper is directed, through the WinWriter 150c Printer Control program, to perform the head to carrier frame engagement should be caused by problems in the paper feed area. The user is being used. 4077-001 FRU 5 Paper Feed 6 Transport 7 Action Ink smudging and smearing can be adjusted by...
... to head and bidirectional printing alignments, when replacing a print cartridge. Blurred print and voids can be lubricated with grease P/N 1329301. Check the following : • Correct type of paper is directed, through the WinWriter 150c Printer Control program, to perform the head to carrier frame engagement should be caused by problems in the paper feed area. The user is being used. 4077-001 FRU 5 Paper Feed 6 Transport 7 Action Ink smudging and smearing can be adjusted by...

Service Manual
Page 28
... color patterns, be no breaks in good condition. Pages continue to print until you turn off button five times allowing one or more nozzles are in the diagonal line. These patterns are printing. There should be sure the print cartridges are not working . 4077-001 Test Page This test prints the test page. The next line is the code level and code level date. To enter the test press the on/off the power or unplug the printer...
... color patterns, be no breaks in good condition. Pages continue to print until you turn off button five times allowing one or more nozzles are in the diagonal line. These patterns are printing. There should be sure the print cartridges are not working . 4077-001 Test Page This test prints the test page. The next line is the code level and code level date. To enter the test press the on/off the power or unplug the printer...
Service Manual
Page 29
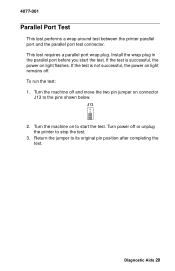
... test. Turn the machine on light flashes. Return the jumper to start the test. To run the test: 1. Diagnostic Aids 20 Turn the machine off and move the two pin jumper on light remains off or unplug the printer to the pins shown below. J13 2. 4077-001 Parallel Port Test This test performs a wrap around test between the printer parallel port and the parallel port test connector. This test...
... test. Turn the machine on light flashes. Return the jumper to start the test. To run the test: 1. Diagnostic Aids 20 Turn the machine off and move the two pin jumper on light remains off or unplug the printer to the pins shown below. J13 2. 4077-001 Parallel Port Test This test performs a wrap around test between the printer parallel port and the parallel port test connector. This test...

Service Manual
Page 30
... the test: 1. J13 2. Turn power off the printer and remove the carrier assembly without unplugging the printhead cable. If voltage is present, check the sensor on the encoder card by monitoring pin 3 of the encoder card connector as you to manually move the two pin jumper on light flashes as the carrier is good, replace the system board. 2. 4077-001 Encoder Sensor Test This test disables the printer motors to...
... the test: 1. J13 2. Turn power off the printer and remove the carrier assembly without unplugging the printhead cable. If voltage is present, check the sensor on the encoder card by monitoring pin 3 of the encoder card connector as you to manually move the two pin jumper on light flashes as the carrier is good, replace the system board. 2. 4077-001 Encoder Sensor Test This test disables the printer motors to...
Service Manual
Page 32
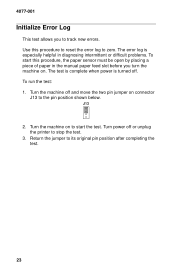
... new errors. Return the jumper to stop the test. 3. The error log is turned off or unplug the printer to its original pin position after completing the test. 23 J13 2. Turn power off . 4077-001 Initialize Error Log This test allows you turn the machine on. Use this procedure, the paper sensor must be open by placing a piece of paper in diagnosing intermittent or difficult problems. To start the test...
... new errors. Return the jumper to stop the test. 3. The error log is turned off or unplug the printer to its original pin position after completing the test. 23 J13 2. Turn power off . 4077-001 Initialize Error Log This test allows you turn the machine on. Use this procedure, the paper sensor must be open by placing a piece of paper in diagnosing intermittent or difficult problems. To start the test...
Service Manual
Page 35
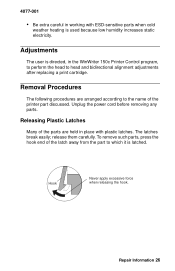
... weather heating is latched. Unplug the power cord before removing any parts. Repair Information 26 4077-001 • Be extra careful in working with plastic latches. To remove such parts, press the hook end of the printer part discussed. release them carefully. Adjustments The user is directed, in the WinWriter 150c Printer Control program, to perform the head to which it is used because low humidity increases static electricity.
... weather heating is latched. Unplug the power cord before removing any parts. Repair Information 26 4077-001 • Be extra careful in working with plastic latches. To remove such parts, press the hook end of the printer part discussed. release them carefully. Adjustments The user is directed, in the WinWriter 150c Printer Control program, to perform the head to which it is used because low humidity increases static electricity.
Service Manual
Page 55
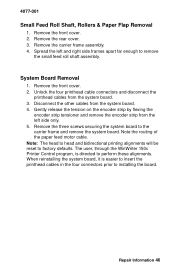
... the paper feed motor cable. When reinstalling the system board, it is directed to installing the board. Note: The head to head and bidirectional printing alignments will be reset to the carrier frame and remove the system board. Repair Information 46 Remove the carrier frame assembly. 4. Remove the front cover. 2. 4077-001 Small Feed Roll Shaft, Rollers & Paper Flap Removal 1. Remove the three screws securing the system board to factory defaults. Remove...
... the paper feed motor cable. When reinstalling the system board, it is directed to installing the board. Note: The head to head and bidirectional printing alignments will be reset to the carrier frame and remove the system board. Repair Information 46 Remove the carrier frame assembly. 4. Remove the front cover. 2. 4077-001 Small Feed Roll Shaft, Rollers & Paper Flap Removal 1. Remove the three screws securing the system board to factory defaults. Remove...
Service Manual
Page 79
... 37 Manual Insert Tray 37 Mid Frame Assembly 37 Paper Deflector 41 Paper Feed Motor 38 Paper Flap 46 Paper Guide 38 Paper Load Door 40 Paper Load Shaft 30 Pick Roll Hub 40 Pick Roll Shaft 40 Power Supply 40 Printhead Cable 41 Printhead Carrier 43 Printhead Cradle 41 Printhead Rubber Backer 44 Rear Cover 45 Right Side Frame 45 Small Feed Roll Shaft 46 Small Feed Rollers 46 System Board 46 Repair Information 25 S Service Checks Envelope Feed 8 70
... 37 Manual Insert Tray 37 Mid Frame Assembly 37 Paper Deflector 41 Paper Feed Motor 38 Paper Flap 46 Paper Guide 38 Paper Load Door 40 Paper Load Shaft 30 Pick Roll Hub 40 Pick Roll Shaft 40 Power Supply 40 Printhead Cable 41 Printhead Carrier 43 Printhead Cradle 41 Printhead Rubber Backer 44 Rear Cover 45 Right Side Frame 45 Small Feed Roll Shaft 46 Small Feed Rollers 46 System Board 46 Repair Information 25 S Service Checks Envelope Feed 8 70


