

Setup Guide
Page 2
...rights reserved. Operation is near the product and easily accessible. • Refer service or repairs, other countries, contact your printer hardware or software. Changes are periodically made at DFARS 252.227-7013 and in the U.S. these available in all countries ...left column for selecting print media to avoid the possibility of harmful emissions. CAUTION! A caution identifies something that the manufacturer intends to Lexmark International, Inc., Department F95/032-2, 740 West New Circle Road, Lexington, Kentucky 40550, U.S.A. Warning! A warning identifies something that ...
...rights reserved. Operation is near the product and easily accessible. • Refer service or repairs, other countries, contact your printer hardware or software. Changes are periodically made at DFARS 252.227-7013 and in the U.S. these available in all countries ...left column for selecting print media to avoid the possibility of harmful emissions. CAUTION! A caution identifies something that the manufacturer intends to Lexmark International, Inc., Department F95/032-2, 740 West New Circle Road, Lexington, Kentucky 40550, U.S.A. Warning! A warning identifies something that ...

Setup Guide
Page 3
... sources of information vi Step 1: Unpack the printer 1 Step 2: Install optional drawers 3 Step 3: Position the printer 5 Step 4: Install an optional duplex unit 8 Step 5: Install the print cartridge 11 Step 6: Apply an operator panel overlay 14 Step 7: Load paper 15 Loading 250-...
... sources of information vi Step 1: Unpack the printer 1 Step 2: Install optional drawers 3 Step 3: Position the printer 5 Step 4: Install an optional duplex unit 8 Step 5: Install the print cartridge 11 Step 6: Apply an operator panel overlay 14 Step 7: Load paper 15 Loading 250-...

Setup Guide
Page 4
...Printing a network setup page 38 Step 11: Configure for TCP/IP 39 Assigning a printer IP address 39 Verifying the IP settings 40 Configuring for Pull Printing 40 Step 12: Install printer drivers 41 Configuring for network printing 41 Configuring for local printing 44 Step 13: Distribute... information to users 46 Identifying printer users 46 Finding information 46 Distributing the information 47 Storing quick ...
...Printing a network setup page 38 Step 11: Configure for TCP/IP 39 Assigning a printer IP address 39 Verifying the IP settings 40 Configuring for Pull Printing 40 Step 12: Install printer drivers 41 Configuring for network printing 41 Configuring for local printing 44 Step 13: Distribute... information to users 46 Identifying printer users 46 Finding information 46 Distributing the information 47 Storing quick ...
Setup Guide
Page 5
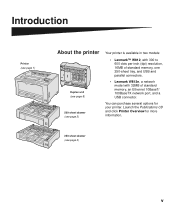
... options for more information. 250-sheet drawer (see page 3) Your printer is available in two models: • Lexmark™ W812, with 300 to 600 dots per inch (dpi) resolution, 16MB of standard memory, one 250-sheet tray, and USB and parallel connectors. • Lexmark W812n, a network model with 32MB of standard memory, an Ethernet...
... options for more information. 250-sheet drawer (see page 3) Your printer is available in two models: • Lexmark™ W812, with 300 to 600 dots per inch (dpi) resolution, 16MB of standard memory, one 250-sheet tray, and USB and parallel connectors. • Lexmark W812n, a network model with 32MB of standard memory, an Ethernet...
Setup Guide
Page 6
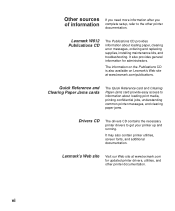
..., installing maintenance kits, and troubleshooting. vi Lexmark's Web site Visit our Web site at www.lexmark.com/publications. The information on the Publications CD is also available on Lexmark's Web site at www.lexmark.com for administrators. It may also contain printer utilities, screen fonts, and additional documentation. Lexmark W812 Publications CD The Publications CD provides information...
..., installing maintenance kits, and troubleshooting. vi Lexmark's Web site Visit our Web site at www.lexmark.com/publications. The information on the Publications CD is also available on Lexmark's Web site at www.lexmark.com for administrators. It may also contain printer utilities, screen fonts, and additional documentation. Lexmark W812 Publications CD The Publications CD provides information...

Setup Guide
Page 7
...safely. 400 mm (15.7 in.) 200 mm (7.9 in.) 200 mm (7.9 in.) 700 mm (27.5 in.) • Leave enough room to allow space around the printer for your printer. Free of air conditioners, heaters, or ventilators - A firm, level surface - It is installed, the rear clearance should be 500 mm (19.7 in .) 1 ...Select a location for proper ventilation. • Provide the proper environment: - Step 1: Unpack the printer 200 mm (7.9 in .). Clean, dry, and free of dust Note: When an optional duplex unit is also important to open the...
...safely. 400 mm (15.7 in.) 200 mm (7.9 in.) 200 mm (7.9 in.) 700 mm (27.5 in.) • Leave enough room to allow space around the printer for your printer. Free of air conditioners, heaters, or ventilators - A firm, level surface - It is installed, the rear clearance should be 500 mm (19.7 in .) 1 ...Select a location for proper ventilation. • Provide the proper environment: - Step 1: Unpack the printer 200 mm (7.9 in .). Clean, dry, and free of dust Note: When an optional duplex unit is also important to open the...

Setup Guide
Page 8
... • Drivers CD If any items are missing or damaged, refer to repack the printer. Save the carton and packing material in case you have the following items: • Printer with one 250-sheet tray • Power cord • Print cartridge • Setup Guide with Publications CD... Quick Reference card, Clearing Paper Jams card, and printer pocket 2 Unpack the printer Print cartridge 250-sheet tray Drivers CD Power cord 2 Remove all items from the box. Make sure you need to the Publications ...
... • Drivers CD If any items are missing or damaged, refer to repack the printer. Save the carton and packing material in case you have the following items: • Printer with one 250-sheet tray • Power cord • Print cartridge • Setup Guide with Publications CD... Quick Reference card, Clearing Paper Jams card, and printer pocket 2 Unpack the printer Print cartridge 250-sheet tray Drivers CD Power cord 2 Remove all items from the box. Make sure you need to the Publications ...

Setup Guide
Page 9
... drawer configurations. Step 2: Install optional drawers 250-sheet drawer 250-sheet drawers 500-sheet drawer 250-sheet drawer 500-sheet drawers 500-sheet drawer Your printer supports up to two additional paper drawers: • 250-sheet drawer-supports paper sizes up to install either A4 or letter size paper only, depending...
... drawer configurations. Step 2: Install optional drawers 250-sheet drawer 250-sheet drawers 500-sheet drawer 250-sheet drawer 500-sheet drawers 500-sheet drawer Your printer supports up to two additional paper drawers: • 250-sheet drawer-supports paper sizes up to install either A4 or letter size paper only, depending...

Setup Guide
Page 10
2 Place the drawer in the bottom of another drawer, align the guide pins on the bottom drawer with the holes in the location you have chosen for your printer. If you are installing the drawer on top of the top drawer. 3 Install another drawer, or continue with Step 3: "Position the printer" on page 5. 4 Install optional drawers
2 Place the drawer in the bottom of another drawer, align the guide pins on the bottom drawer with the holes in the location you have chosen for your printer. If you are installing the drawer on top of the top drawer. 3 Install another drawer, or continue with Step 3: "Position the printer" on page 5. 4 Install optional drawers

Setup Guide
Page 11
The printer weighs 19 kg (41.9 lb) and requires two people to position the printer. 1 Have someone help you lift the printer using the handholds on the sides of the printer. 2 Place the printer in the location you are ready to lift it safely. Once you have selected a location and set up any optional drawers, you have chosen. Position the printer 5 Step 3: Position the printer CAUTION!
The printer weighs 19 kg (41.9 lb) and requires two people to position the printer. 1 Have someone help you lift the printer using the handholds on the sides of the printer. 2 Place the printer in the location you are ready to lift it safely. Once you have selected a location and set up any optional drawers, you have chosen. Position the printer 5 Step 3: Position the printer CAUTION!

Setup Guide
Page 12
Make sure the printer is seated securely on the drawer with the holes in the bottom of the printer. If you are installing the printer on an optional drawer: a Align the guide pins on the option. 6 Position the printer
Make sure the printer is seated securely on the drawer with the holes in the bottom of the printer. If you are installing the printer on an optional drawer: a Align the guide pins on the option. 6 Position the printer

Setup Guide
Page 13
d Attach locking clips at the insertion point between any tape or packing material from the outside of the printer. There are two insertion points in the front and two in the rear. Task Install an optional duplex unit Install the print cartridge Go to page... 8 11 Position the printer 7 c Attach locking clips at the insertion point between the top drawer and the printer. e Insert the trays into the printer. 3 Remove any optional drawers. b Remove the trays. There are two insertion points in the front and two in the rear. What do I do next?
d Attach locking clips at the insertion point between any tape or packing material from the outside of the printer. There are two insertion points in the front and two in the rear. Task Install an optional duplex unit Install the print cartridge Go to page... 8 11 Position the printer 7 c Attach locking clips at the insertion point between the top drawer and the printer. e Insert the trays into the printer. 3 Remove any optional drawers. b Remove the trays. There are two insertion points in the front and two in the rear. What do I do next?

Setup Guide
Page 14
Step 4: Install an optional duplex unit CAUTION! Note: You need a small Phillips screwdriver to install the duplex unit. 1 Unpack the duplex unit and remove any packing material. 2 Use the special tool packed with the duplex unit to remove the two duplex covers on both sides of a sheet of the printer. 8 Install an optional duplex unit Your printer supports an optional duplex unit that lets you are installing a duplex unit sometime after setting up the printer, turn the printer off and unplug the power cord before continuing. If you print on the back of paper.
Step 4: Install an optional duplex unit CAUTION! Note: You need a small Phillips screwdriver to install the duplex unit. 1 Unpack the duplex unit and remove any packing material. 2 Use the special tool packed with the duplex unit to remove the two duplex covers on both sides of a sheet of the printer. 8 Install an optional duplex unit Your printer supports an optional duplex unit that lets you are installing a duplex unit sometime after setting up the printer, turn the printer off and unplug the power cord before continuing. If you print on the back of paper.

Setup Guide
Page 15
Make sure the connector near the bottom of the duplex unit connects properly with the printer. Screw 5 Open the duplex unit upper cover. 6 Tighten the attached screw in the back of the printer. 4 Lower the duplex unit into the holes in the center of the duplex unit. 7 Close the cover. 3 Insert the two tabs on the top edge of the duplex unit into place. Install an optional duplex unit 9
Make sure the connector near the bottom of the duplex unit connects properly with the printer. Screw 5 Open the duplex unit upper cover. 6 Tighten the attached screw in the back of the printer. 4 Lower the duplex unit into the holes in the center of the duplex unit. 7 Close the cover. 3 Insert the two tabs on the top edge of the duplex unit into place. Install an optional duplex unit 9

Setup Guide
Page 17
Step 5: Install the print cartridge Follow these instructions to install the print cartridge: 1 Press the release button on the left side of the printer, and then open the top cover. Install the print cartridge 11
Step 5: Install the print cartridge Follow these instructions to install the print cartridge: 1 Press the release button on the left side of the printer, and then open the top cover. Install the print cartridge 11

Setup Guide
Page 18
Discard the tabs. 3 Remove all cardboard or other packing material from inside the printer to remove them. Do not touch the photoconductor drum on the orange plastic packing tabs inside the printer. 4 Remove the print cartridge from its packing materials. 2 Push down and in on the bottom of the print cartridge. 12 Install the print cartridge Warning!
Discard the tabs. 3 Remove all cardboard or other packing material from inside the printer to remove them. Do not touch the photoconductor drum on the orange plastic packing tabs inside the printer. 4 Remove the print cartridge from its packing materials. 2 Push down and in on the bottom of the print cartridge. 12 Install the print cartridge Warning!

Setup Guide
Page 19
Task Apply an operator panel overlay Load paper Go to distribute the toner. 6 Place the cartridge on a flat surface and remove the toner seal. 7 Align the cartridge with the grooves in the printer. 8 Insert the cartridge as far as it will go. 9 Close the top cover. 5 Gently shake the cartridge in all directions to page... 14 15 Install the print cartridge 13 What do I do next?
Task Apply an operator panel overlay Load paper Go to distribute the toner. 6 Place the cartridge on a flat surface and remove the toner seal. 7 Align the cartridge with the grooves in the printer. 8 Insert the cartridge as far as it will go. 9 Close the top cover. 5 Gently shake the cartridge in all directions to page... 14 15 Install the print cartridge 13 What do I do next?

Setup Guide
Page 20
Refer to the Publications CD for instructions on changing the language of the text displayed on the operator panel, and then press it into place. 3 Peel the protective covering away from the overlay. Step 6: Apply an operator panel overlay If English is not your preferred language and your printer shipped with an operator panel overlay, attach the overlay that has the appropriately translated button names: 1 Peel the protective backing off the overlay. 2 Align the holes in the overlay with the buttons on the operator panel. 14 Apply an operator panel overlay
Refer to the Publications CD for instructions on changing the language of the text displayed on the operator panel, and then press it into place. 3 Peel the protective covering away from the overlay. Step 6: Apply an operator panel overlay If English is not your preferred language and your printer shipped with an operator panel overlay, attach the overlay that has the appropriately translated button names: 1 Peel the protective backing off the overlay. 2 Align the holes in the overlay with the buttons on the operator panel. 14 Apply an operator panel overlay

Setup Guide
Page 21
If you can hold anywhere from 650-1,400 sheets, depending on the configuration. Step 7: Load paper Your printer has one standard tray with a capacity of 250 sheets and a multipurpose feeder with a capacity of 400. labels or labels, card stock transparencies &#...other specialty media, refer to page... 16 21 22 Load paper 15 The following table lists page numbers where you have installed optional drawers, your printer can find loading instructions for a total capacity of 150 sheets, for each tray. paper1 transparencies, • 75 - Note: For information about loading...
If you can hold anywhere from 650-1,400 sheets, depending on the configuration. Step 7: Load paper Your printer has one standard tray with a capacity of 250 sheets and a multipurpose feeder with a capacity of 400. labels or labels, card stock transparencies &#...other specialty media, refer to page... 16 21 22 Load paper 15 The following table lists page numbers where you have installed optional drawers, your printer can find loading instructions for a total capacity of 150 sheets, for each tray. paper1 transparencies, • 75 - Note: For information about loading...

Setup Guide
Page 22
Loading letter, A4, A5, or JIS B5 size paper Follow these instructions to load paper into the printer. 1 Remove the tray, and then set it on a flat surface. 2 Remove the tray cover. Loading 250-sheet trays Follow these instructions to load paper that is long-edge fed into any of the tray. Make sure all packing materials have been removed from inside the tray. 16 Load paper 3 Squeeze the front guide lever and slide the guide to the front of the tray. 4 Slide the side guides toward the edges of the 250-sheet trays. Do not exceed the recommended capacity (see page 15).
Loading letter, A4, A5, or JIS B5 size paper Follow these instructions to load paper into the printer. 1 Remove the tray, and then set it on a flat surface. 2 Remove the tray cover. Loading 250-sheet trays Follow these instructions to load paper that is long-edge fed into any of the tray. Make sure all packing materials have been removed from inside the tray. 16 Load paper 3 Squeeze the front guide lever and slide the guide to the front of the tray. 4 Slide the side guides toward the edges of the 250-sheet trays. Do not exceed the recommended capacity (see page 15).

