
Setup Guide
Page 6
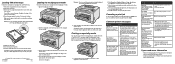
... loading paper, clearing error messages, ordering and replacing supplies, installing maintenance kits, and troubleshooting. It may also contain printer utilities, screen fonts, and additional documentation. Lexmark's Web site Visit our Web site at www.lexmark.com/publications. vi It also provides general information for updated printer drivers, utilities, and other printer documentation. Other sources of information If you need more information after you complete setup, refer to get your printer up and running. Lexmark W812...
... loading paper, clearing error messages, ordering and replacing supplies, installing maintenance kits, and troubleshooting. It may also contain printer utilities, screen fonts, and additional documentation. Lexmark's Web site Visit our Web site at www.lexmark.com/publications. vi It also provides general information for updated printer drivers, utilities, and other printer documentation. Other sources of information If you need more information after you complete setup, refer to get your printer up and running. Lexmark W812...
Setup Guide
Page 43
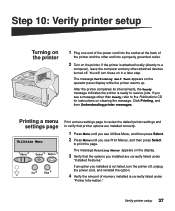
... . Printing a menu settings page Utilities Menu 1 Menu 2 Select 3 Return 4 Go 5 Stop 6 Print a menu settings page to review the default printer settings and to verify that printer options are installed correctly. 1 Press Menu until you see Utilities Menu, and then press Select. 2 Press Menu until you see a message other than Ready, refer to the Publications CD for instructions on the display. 3 Verify that the options you installed are correctly listed under "Printer Information." Verify printer setup 37 Step 10: Verify printer setup Turning...
... . Printing a menu settings page Utilities Menu 1 Menu 2 Select 3 Return 4 Go 5 Stop 6 Print a menu settings page to review the default printer settings and to verify that printer options are installed correctly. 1 Press Menu until you see Utilities Menu, and then press Select. 2 Press Menu until you see a message other than Ready, refer to the Publications CD for instructions on the display. 3 Verify that the options you installed are correctly listed under "Printer Information." Verify printer setup 37 Step 10: Verify printer setup Turning...
Setup Guide
Page 49
... printer driver packages from Lexmark's Web site at www.lexmark.com. A PPD for installing and using a standard network cable, such as Sun Solaris and Red Hat. You can download these tasks are available on the drivers CD and on the drivers CD. Install printer drivers 43 Visit Lexmark's Web site at www.lexmark.com for a complete list of supported UNIX and Linux platforms. The User's Guide in each computer you want to be able to print...
... printer driver packages from Lexmark's Web site at www.lexmark.com. A PPD for installing and using a standard network cable, such as Sun Solaris and Red Hat. You can download these tasks are available on the drivers CD and on the drivers CD. Install printer drivers 43 Visit Lexmark's Web site at www.lexmark.com for a complete list of supported UNIX and Linux platforms. The User's Guide in each computer you want to be able to print...
Setup Guide
Page 50
..., Windows 2000, and Windows XP Note: Using the custom printer driver provides enhanced functionality, such as printer status alerts. Supported connections Parallel or USB refers to the type of printer cable you may need to refer to the documentation that is locally attached to the printer using parallel and USB connections. Installation instructions Read the detailed online instructions on the local printing computer attached to the printer. Updated system and custom drivers are available on the drivers CD. Configuring...
..., Windows 2000, and Windows XP Note: Using the custom printer driver provides enhanced functionality, such as printer status alerts. Supported connections Parallel or USB refers to the type of printer cable you may need to refer to the documentation that is locally attached to the printer using parallel and USB connections. Installation instructions Read the detailed online instructions on the local printing computer attached to the printer. Updated system and custom drivers are available on the drivers CD. Configuring...
Quick Reference
Page 2
... File Print. 2 Click Properties (or Options, Printer, or Setup, depending on the application) to view the printer driver settings. 3 Select the tray containing the specialty media from the Media Type list box. 5 Click OK, and then send your administrator or Help desk if you see Job Menu / Cancel Job, and then press Select. Load Manual The printer is low on ) from the Form Source list box. 4 Select your media type (transparencies, envelopes, and so on toner. Message...
... File Print. 2 Click Properties (or Options, Printer, or Setup, depending on the application) to view the printer driver settings. 3 Select the tray containing the specialty media from the Media Type list box. 5 Click OK, and then send your administrator or Help desk if you see Job Menu / Cancel Job, and then press Select. Load Manual The printer is low on ) from the Form Source list box. 4 Select your media type (transparencies, envelopes, and so on toner. Message...
User's Reference
Page 36
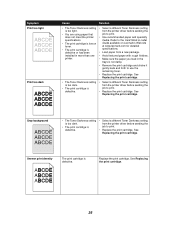
... use the remaining toner. • Replace the print cartridge. Refer to the Card Stock & Label Guide available on toner. • The print cartridge is defective or has been installed in the trays is defective. See Replacing the print cartridge. See Replacing the print cartridge. • The Toner Darkness setting is too dark. • The print cartridge is defective. • Select a different Toner Darkness setting from the printer driver before sending the job to print. • Replace the print cartridge. See Replacing the print cartridge. See Replacing...
... use the remaining toner. • Replace the print cartridge. Refer to the Card Stock & Label Guide available on toner. • The print cartridge is defective or has been installed in the trays is defective. See Replacing the print cartridge. See Replacing the print cartridge. • The Toner Darkness setting is too dark. • The print cartridge is defective. • Select a different Toner Darkness setting from the printer driver before sending the job to print. • Replace the print cartridge. See Replacing the print cartridge. See Replacing...
User's Reference
Page 43
... the printer driver associated with a picture only. Refer to exit Hex Trace mode. 43 We recommend Lexmark part number 1329605 (10 ft) or 1427498 (20 ft) for cable specifications. The printer is indicated with your Lexmark W812 printer. • If you are using the wrong interface cable, or the cable is not connected properly. Held jobs do not print (continued). The printer has received invalid data. Delete the job. Make sure the Paper Size and Paper Type...
... the printer driver associated with a picture only. Refer to exit Hex Trace mode. 43 We recommend Lexmark part number 1329605 (10 ft) or 1427498 (20 ft) for cable specifications. The printer is indicated with your Lexmark W812 printer. • If you are using the wrong interface cable, or the cable is not connected properly. Held jobs do not print (continued). The printer has received invalid data. Delete the job. Make sure the Paper Size and Paper Type...
User's Reference
Page 45
... driver settings and verify that the option is installed. Remove the option, and then reinstall it stops working. Cables connecting the option to your printer. Check the cable connections. The printer driver does not recognize that all the printer configuration settings are not attached correctly. Your printer driver may not automatically recognize that an option is attached to the printer are correct. 45 Refer to the Setup Guide for instructions. 16 Solving other option problems Symptom Cause Solution The option...
... driver settings and verify that the option is installed. Remove the option, and then reinstall it stops working. Cables connecting the option to your printer. Check the cable connections. The printer driver does not recognize that all the printer configuration settings are not attached correctly. Your printer driver may not automatically recognize that an option is attached to the printer are correct. 45 Refer to the Setup Guide for instructions. 16 Solving other option problems Symptom Cause Solution The option...
User's Reference
Page 58
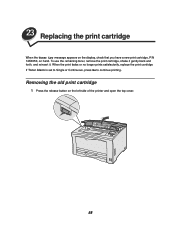
Removing the old print cartridge 1 Press the release button on hand. To use the remaining toner, remove the print cartridge, shake it gently back and forth, and reinsert it. 23 Replacing the print cartridge When the Toner Low message appears on the display, check that you have a new print cartridge, P/N 14K0050, on the left side of the printer and open the top cover. 58 When the print fades or no longer prints satisfactorily, replace the print cartridge If Toner Alarm is set to Single or Continuous, press Go to continue printing.
Removing the old print cartridge 1 Press the release button on hand. To use the remaining toner, remove the print cartridge, shake it gently back and forth, and reinsert it. 23 Replacing the print cartridge When the Toner Low message appears on the display, check that you have a new print cartridge, P/N 14K0050, on the left side of the printer and open the top cover. 58 When the print fades or no longer prints satisfactorily, replace the print cartridge If Toner Alarm is set to Single or Continuous, press Go to continue printing.
User's Reference
Page 77
... set the paper size dial to match the new size paper you see Size Sensing, and then press Select. When you are displayed on the operator panel. 5 Press Menu until you want to the Ready message. 77 When you switch to a different size paper, set to Auto, the default, the printer recognizes the size paper currently loaded in the 250-sheet or 500-sheet trays. Repeat for which you see Tray x Sensing, where x represents the number...
... set the paper size dial to match the new size paper you see Size Sensing, and then press Select. When you are displayed on the operator panel. 5 Press Menu until you want to the Ready message. 77 When you switch to a different size paper, set to Auto, the default, the printer recognizes the size paper currently loaded in the 250-sheet or 500-sheet trays. Repeat for which you see Tray x Sensing, where x represents the number...
User's Reference
Page 78
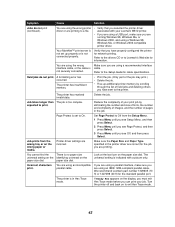
... paper you loaded. 78 Note: See Understanding the printer operator panel to identify the display and operator panel buttons if you need help. 1 Make sure the printer is correctly listed under "Installed Features." The message Printing Menus is displayed. 31 Printing a menu settings page Print the menu settings page to review the printer settings and to verify that the options you installed are correctly listed under "Printer Information." 6 Verify that the paper trays are configured for more information. 4 Verify that printer options are installed...
... paper you loaded. 78 Note: See Understanding the printer operator panel to identify the display and operator panel buttons if you need help. 1 Make sure the printer is correctly listed under "Installed Features." The message Printing Menus is displayed. 31 Printing a menu settings page Print the menu settings page to review the printer settings and to verify that the options you installed are correctly listed under "Printer Information." 6 Verify that the paper trays are configured for more information. 4 Verify that printer options are installed...
User's Reference
Page 81
... tables list all printer languages. The fonts in the PostScript emulation are compatible with the fonts in the HP4050 and include four additional fonts and many extra symbol sets to print samples of the most popular typefaces, like Courier and Times New Roman, are available for instructions on how to support extra languages and applications. You can select the resident fonts from your printer. PCL 6 emulation...
... tables list all printer languages. The fonts in the PostScript emulation are compatible with the fonts in the HP4050 and include four additional fonts and many extra symbol sets to print samples of the most popular typefaces, like Courier and Times New Roman, are available for instructions on how to support extra languages and applications. You can select the resident fonts from your printer. PCL 6 emulation...
User's Reference
Page 191
...canceling a print job 11 card stock guidelines 19 Character Set (PPDS Menu) 150 characteristics, print media card stock 19 labels 19 letterhead 18 paper 17 transparencies 18 Collation (Finishing Menu) 128 collation, enabling 128 complex page errors 170 Confidential Job (Job Menu) 134 Configure MP (Paper Menu) 138 Copies (Finishing Menu) 128 copies, specifying number 128 current menu settings 78 Custom Types (Paper Menu) 139 D Data Bits (Serial Menu) 154 Defragment Flash (Utilities Menu) 178 disabling 77 operator panel menus 75 Power Saver 76 size sensing 77 disk See hard disk Display Language...
...canceling a print job 11 card stock guidelines 19 Character Set (PPDS Menu) 150 characteristics, print media card stock 19 labels 19 letterhead 18 paper 17 transparencies 18 Collation (Finishing Menu) 128 collation, enabling 128 complex page errors 170 Confidential Job (Job Menu) 134 Configure MP (Paper Menu) 138 Copies (Finishing Menu) 128 copies, specifying number 128 current menu settings 78 Custom Types (Paper Menu) 139 D Data Bits (Serial Menu) 154 Defragment Flash (Utilities Menu) 178 disabling 77 operator panel menus 75 Power Saver 76 size sensing 77 disk See hard disk Display Language...

User's Reference
Page 192
... Unformatted Disk 124 64 Unsupported Disk Format 125 80 Scheduled Maintenance 125 88 Toner Low 125 900-999 Service 126 Activating Demo Mode 91 Activating Menu Changes 91 Activating PPDS 91 Busy 92 Cancelling Job 92 Change 92 Check Connection 93 Clearing Job Accounting Stat 93 Close Duplex Doors 93 Close Top Cover 93 Deactivating Demo Mode 94 Deactivating PPDS 94 Defragmenting 94 Delete All Jobs 95 Deleting Jobs 95 Disabling Menus 95 Disk...
... Unformatted Disk 124 64 Unsupported Disk Format 125 80 Scheduled Maintenance 125 88 Toner Low 125 900-999 Service 126 Activating Demo Mode 91 Activating Menu Changes 91 Activating PPDS 91 Busy 92 Cancelling Job 92 Change 92 Check Connection 93 Clearing Job Accounting Stat 93 Close Duplex Doors 93 Close Top Cover 93 Deactivating Demo Mode 94 Deactivating PPDS 94 Defragmenting 94 Delete All Jobs 95 Deleting Jobs 95 Disabling Menus 95 Disk...
User's Reference
Page 193
... numbers 66 options verifying installation with menu settings page 78 ordering 55 print cartridge 55 ordering supplies 55 Orientation (PCL Emul Menu) 147 Orientation (PPDS Menu) 152 P Page Format (PPDS Menu) 152 Page Protect (Setup Menu) 170 paper guidelines 18 storing 31 paper jams reprinting jammed pages 170 Paper Loading 250-sheet trays A3, JIS B4, legal, 8.5x13, 11x17 24 letter, A4, A5, JIS B5 21 500-sheet trays letter, A4 26 multipurpose feeder paper, envelopes, transparencies, label sheets, Hagaki cards 28 Paper Menu 139 Paper Menu 138 Configure MP 138 Custom Types...
... numbers 66 options verifying installation with menu settings page 78 ordering 55 print cartridge 55 ordering supplies 55 Orientation (PCL Emul Menu) 147 Orientation (PPDS Menu) 152 P Page Format (PPDS Menu) 152 Page Protect (Setup Menu) 170 paper guidelines 18 storing 31 paper jams reprinting jammed pages 170 Paper Loading 250-sheet trays A3, JIS B4, legal, 8.5x13, 11x17 24 letter, A4, A5, JIS B5 21 500-sheet trays letter, A4 26 multipurpose feeder paper, envelopes, transparencies, label sheets, Hagaki cards 28 Paper Menu 139 Paper Menu 138 Configure MP 138 Custom Types...
User's Reference
Page 195
duplexed jobs 33 envelopes 30 font samples 88 Hagaki cards 28 label sheets 28 menu settings page 78 specialty media 28 transparencies 28 problem solving clearing operator panel error messages 65 stopping printer 66 problems calling for service 46 incorrect characters print 43 job didn't print 42 job prints 43 from wrong tray 43 on wrong paper or media 43 large jobs do not collate 44 operator panel 42 blank 42 displays black diamonds 42 options operating incorrectly 45 stops working 45 paper feed frequent jams 40 jammed page does not reprint...
duplexed jobs 33 envelopes 30 font samples 88 Hagaki cards 28 label sheets 28 menu settings page 78 specialty media 28 transparencies 28 problem solving clearing operator panel error messages 65 stopping printer 66 problems calling for service 46 incorrect characters print 43 job didn't print 42 job prints 43 from wrong tray 43 on wrong paper or media 43 large jobs do not collate 44 operator panel 42 blank 42 displays black diamonds 42 options operating incorrectly 45 stops working 45 paper feed frequent jams 40 jammed page does not reprint...
Clearing Paper Jams
Page 2
... fuser. 3 Remove the print cartridge, and then set it . (See "Clearing 203 jams from the fuser A 203 Paper Jam occurs when paper jams in the duplex upper cover. Clearing 230/231/232 jams from the duplex unit A 230 Paper Jam occurs when paper jams at the top of the printer to clear the message. Clearing 203 jams from the fuser" for help .) 2 Open the duplex unit upper cover. 7 Close the duplex unit lower cover. 8 Remove the print cartridge and remove any jammed paper. Let it . 4 Open the print cartridge paper guide lever and remove any jammed paper. (See "Clearing 202 jams...
... fuser. 3 Remove the print cartridge, and then set it . (See "Clearing 203 jams from the fuser A 203 Paper Jam occurs when paper jams in the duplex upper cover. Clearing 230/231/232 jams from the duplex unit A 230 Paper Jam occurs when paper jams at the top of the printer to clear the message. Clearing 203 jams from the fuser" for help .) 2 Open the duplex unit upper cover. 7 Close the duplex unit lower cover. 8 Remove the print cartridge and remove any jammed paper. Let it . 4 Open the print cartridge paper guide lever and remove any jammed paper. (See "Clearing 202 jams...

Technical Reference
Page 54
...'s LaserJet 4050. 3 For the symbol sets supported by a particular font, find the font group (A, B, or C) for the font in Table 2-24, and then see Table 2-26: "Non-Text PCL Emulation Symbol Sets" on page 2-44 for each font. 2-42 PCL Type 1 Fonts Thirty of the Type 1 fonts have different font selection parameters in the forward and backward compatibility modes and 9 of printers. With the appropriate printer driver installed and selected, your software...
...'s LaserJet 4050. 3 For the symbol sets supported by a particular font, find the font group (A, B, or C) for the font in Table 2-24, and then see Table 2-26: "Non-Text PCL Emulation Symbol Sets" on page 2-44 for each font. 2-42 PCL Type 1 Fonts Thirty of the Type 1 fonts have different font selection parameters in the forward and backward compatibility modes and 9 of printers. With the appropriate printer driver installed and selected, your software...

Technical Reference
Page 269
... by the operator panel menus or through the Multipage Printing menu item. If the default paper source is not a manual paper source, ManualFeed is initialized at the start of each print job according to be ignored. For example, 2-Up means two page images are active. Specifies the color of the Feed Timeout menu item value. The following values are supported: True False Manual feed Automatic feed If ManualFeed...
... by the operator panel menus or through the Multipage Printing menu item. If the default paper source is not a manual paper source, ManualFeed is initialized at the start of each print job according to be ignored. For example, 2-Up means two page images are active. Specifies the color of the Feed Timeout menu item value. The following values are supported: True False Manual feed Automatic feed If ManualFeed...
Technical Reference
Page 426
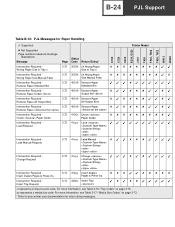
...PJL Support C720 C750 C910 E320, E322 J110 T420 T520, T522 T620, T622 W812 W820 Table B-12: PJL Messages for return string messages. Message Status Page Code Return String* Intervention Required Wrong Paper Size in Tray x 3-72 30034 34 Wrong Paper Size in Tray x Intervention Required Wrong Paper Size Manual Feed 3-72 30034 34 Wrong Paper Size Manual Feed Intervention Required Remove Paper Standard Bin 3-72 40019 Remove Paper Standard Bin Intervention Required Remove Paper Outbin 3-72 40019 Remove Paper Output Bin Intervention Required Remove Paper All Output Bins...
...PJL Support C720 C750 C910 E320, E322 J110 T420 T520, T522 T620, T622 W812 W820 Table B-12: PJL Messages for return string messages. Message Status Page Code Return String* Intervention Required Wrong Paper Size in Tray x 3-72 30034 34 Wrong Paper Size in Tray x Intervention Required Wrong Paper Size Manual Feed 3-72 30034 34 Wrong Paper Size Manual Feed Intervention Required Remove Paper Standard Bin 3-72 40019 Remove Paper Standard Bin Intervention Required Remove Paper Outbin 3-72 40019 Remove Paper Output Bin Intervention Required Remove Paper All Output Bins...

