

Embedded Web Server Administrator's Guide
Page 14
... registered with any form of authentication that relies on an external server, users will require configuration of an outage that prevents the printer from the Time Zone list will not be updated manually, or set to use the "Install auth keys" link to browse ... clock-typically the same one NTLM configuration on the user's password. Notes: • Entering manual settings automatically disables use of NTP. • Choosing "(UTC+user) Custom" from communicating with the authenticating server. • To help prevent unauthorized access, users are located in a non-standard time zone or...
... registered with any form of authentication that relies on an external server, users will require configuration of an outage that prevents the printer from the Time Zone list will not be updated manually, or set to use the "Install auth keys" link to browse ... clock-typically the same one NTLM configuration on the user's password. Notes: • Entering manual settings automatically disables use of NTP. • Choosing "(UTC+user) Custom" from communicating with the authenticating server. • To help prevent unauthorized access, users are located in a non-standard time zone or...
User's Guide
Page 39
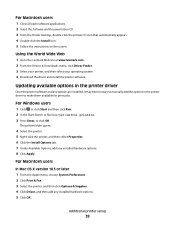
...users In Mac OS X version 10.5 or later 1 From the Apple menu, choose System Preferences. 2 Click Print & Fax. 3 Select the printer, and then click Options & Supplies. 4 Click Driver, and then add any options are installed, it may be necessary to manually add the options in the printer driver to the Lexmark... Web site at www.lexmark.com. 2 From the Drivers & Downloads menu, click Driver Finder. 3 Select your printer, and then select...
...users In Mac OS X version 10.5 or later 1 From the Apple menu, choose System Preferences. 2 Click Print & Fax. 3 Select the printer, and then click Options & Supplies. 4 Click Driver, and then add any options are installed, it may be necessary to manually add the options in the printer driver to the Lexmark... Web site at www.lexmark.com. 2 From the Drivers & Downloads menu, click Driver Finder. 3 Select your printer, and then select...

User's Guide
Page 51
...trays that are not preset in .). Configuring Universal paper settings The Universal Paper Size is Plain Paper. The factory default Paper Type setting is a user-defined setting that lets you want is on and Ready appears. 2 From the printer control panel, press . 3 Press the arrow buttons until ...of measurement 1 Make sure the printer is 216 x 356 mm (8.5 x 14 in the printer menus. The Paper Type setting must be set manually. Ready appears. Set the Paper Size for all trays except the multipurpose feeder. Loading paper and specialty media 51 Loading paper and specialty media ...
...trays that are not preset in .). Configuring Universal paper settings The Universal Paper Size is Plain Paper. The factory default Paper Type setting is a user-defined setting that lets you want is on and Ready appears. 2 From the printer control panel, press . 3 Press the arrow buttons until ...of measurement 1 Make sure the printer is 216 x 356 mm (8.5 x 14 in the printer menus. The Paper Type setting must be set manually. Ready appears. Set the Paper Size for all trays except the multipurpose feeder. Loading paper and specialty media 51 Loading paper and specialty media ...
User's Guide
Page 123
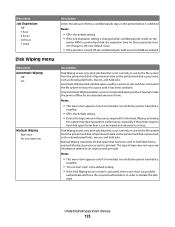
...new default value. • If the printer is turned off, all confidential jobs held in printer RAM are deleted. Only Automatic Wiping enables users to activate disk wiping without having to take the printer offline for Automatic Wiping, activating this space until it has been sanitized. Disk Wiping ...wiped and returned to service. All permanent data on the printer hard disk is preserved, such as downloaded fonts, macros, and held jobs. Manual Wiping overwrites all disk space used to the large amount of time a confidential job stays in use by the file system from the printer ...
...new default value. • If the printer is turned off, all confidential jobs held in printer RAM are deleted. Only Automatic Wiping enables users to activate disk wiping without having to take the printer offline for Automatic Wiping, activating this space until it has been sanitized. Disk Wiping ...wiped and returned to service. All permanent data on the printer hard disk is preserved, such as downloaded fonts, macros, and held jobs. Manual Wiping overwrites all disk space used to the large amount of time a confidential job stays in use by the file system from the printer ...
User's Guide
Page 124
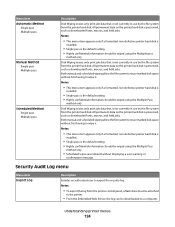
Both manual and scheduled wiping allow the file system to reuse marked disk space without displaying a user warning or confirmation message. Notes: • This menu item appears only if a formatted, non-defective printer hard disk is installed. • Single pass is... • Highly confidential information should be downloaded to export the security log Notes: • To export the log from the printer hard disk. Both manual and scheduled wiping allow the file system to reuse marked disk space without first having to wipe it . Notes: • This menu item appears only...
Both manual and scheduled wiping allow the file system to reuse marked disk space without displaying a user warning or confirmation message. Notes: • This menu item appears only if a formatted, non-defective printer hard disk is installed. • Single pass is... • Highly confidential information should be downloaded to export the security log Notes: • To export the log from the printer hard disk. Both manual and scheduled wiping allow the file system to reuse marked disk space without first having to wipe it . Notes: • This menu item appears only...

User's Guide
Page 205
...not available to present the feature or option with Lexmark user's guides, manuals, instructions or guidance -Unsuitable physical or operating environment -Maintenance by Lexmark Notices 205 You should transfer proof of the Remarketer or Lexmark. You may not be available or only be required...repair not included in transit to present proof of Lexmark specifications -Refurbishment, repair, refilling or remanufacture by Lexmark). You are substantially used with the product for which it prepaid and suitably packaged to that user for the remainder of failures caused by: -...
...not available to present the feature or option with Lexmark user's guides, manuals, instructions or guidance -Unsuitable physical or operating environment -Maintenance by Lexmark Notices 205 You should transfer proof of the Remarketer or Lexmark. You may not be available or only be required...repair not included in transit to present proof of Lexmark specifications -Refurbishment, repair, refilling or remanufacture by Lexmark). You are substantially used with the product for which it prepaid and suitably packaged to that user for the remainder of failures caused by: -...

User's Guide
Page 214
... envelope feeder 149 Install MICR Cartridge 149 Install tray 149 Invalid Engine Code 149 Invalid Network Code 150 Invalid PIN 150 Load with 150 Load manual feeder with 150 Load staples 150 Maintenance 150 Menu access turned off by system administrator 150 Menus are Disabled 151 Must be in Ready state... installing printer software 38 menu settings page 38 network setup page 38 print quality test pages 78 printing confidential and other held jobs for Macintosh users 75 for Windows users 75 Printing from USB drive DO NOT REMOVE 152 Programming disk 152 Index 214
... envelope feeder 149 Install MICR Cartridge 149 Install tray 149 Invalid Engine Code 149 Invalid Network Code 150 Invalid PIN 150 Load with 150 Load manual feeder with 150 Load staples 150 Maintenance 150 Menu access turned off by system administrator 150 Menus are Disabled 151 Must be in Ready state... installing printer software 38 menu settings page 38 network setup page 38 print quality test pages 78 printing confidential and other held jobs for Macintosh users 75 for Windows users 75 Printing from USB drive DO NOT REMOVE 152 Programming disk 152 Index 214
Quick Reference
Page 4
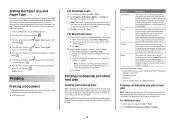
...remains stored in printer memory. All print jobs that can be held in the printer until you must be set manually for all trays except the multipurpose feeder. For Windows Users 1 With a document open , choose File > Print. The Paper Size setting for all trays that do not .... 6 Press the arrow buttons until size, and then press . Printing Printing a document 1 From the printer control panel Paper menu, set manually. Printing confidential and other held jobs Note: Confidential and Verify print jobs are automatically deleted from memory after they print. The job is held...
...remains stored in printer memory. All print jobs that can be held in the printer until you must be set manually for all trays except the multipurpose feeder. For Windows Users 1 With a document open , choose File > Print. The Paper Size setting for all trays that do not .... 6 Press the arrow buttons until size, and then press . Printing Printing a document 1 From the printer control panel Paper menu, set manually. Printing confidential and other held jobs Note: Confidential and Verify print jobs are automatically deleted from memory after they print. The job is held...
Service Manual
Page 25
...Network Network Network Network Network Maintenance approach The diagnostic information in this manual leads you complete the repair, perform tests as needed to the correct field replaceable unit (FRU) or part. The Lexmark laser printers are letter-quality page printers designed to attach to ...personal computers and to determine the printer problem and repair the failure. See "Start" on page 2-1. Use the service error codes, user status messages, user error messages, service checks, ...
...Network Network Network Network Network Maintenance approach The diagnostic information in this manual leads you complete the repair, perform tests as needed to the correct field replaceable unit (FRU) or part. The Lexmark laser printers are letter-quality page printers designed to attach to ...personal computers and to determine the printer problem and repair the failure. See "Start" on page 2-1. Use the service error codes, user status messages, user error messages, service checks, ...
Service Manual
Page 36
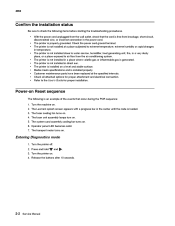
...dusty place, or a place exposed to air flow from breakage, short-circuit, disconnected wire, or incorrect connection in direct sun. The Lexmark splash screen appears with a progress bar in a place where volatile gas or inflammable gas is generated. The system card assembly cooling ...fan turns on . 4. Entering Diagnostics mode 1. Refer to the User's Guide for proper attachment and electrical connection. The fuser cooling fan turns on . 6. and . 2-2 Service Manual Check all attached options for proper installation. Operator panel LED becomes solid. 7. Press...
...dusty place, or a place exposed to air flow from breakage, short-circuit, disconnected wire, or incorrect connection in direct sun. The Lexmark splash screen appears with a progress bar in a place where volatile gas or inflammable gas is generated. The system card assembly cooling ...fan turns on . 4. Entering Diagnostics mode 1. Refer to the User's Guide for proper attachment and electrical connection. The fuser cooling fan turns on . 6. and . 2-2 Service Manual Check all attached options for proper installation. Operator panel LED becomes solid. 7. Press...
Service Manual
Page 38
... lacks sufficient memory to enable Resource Save. however, modification of other data in the flash option. 2-4 Service Manual Make sure the link buffers are returned to Auto, the user should exit the menu to activate the link buffer changes. The following actions are returned to Auto, you can...displays when the printer memory is disabled. • Press to disable Resource Save and continue printing. Once the printer returns to Auto. The user should not be taken: • Press to clear the message. Note the reduction of available memory to the link buffers when Resource Save ...
... lacks sufficient memory to enable Resource Save. however, modification of other data in the flash option. 2-4 Service Manual Make sure the link buffers are returned to Auto, the user should exit the menu to activate the link buffer changes. The following actions are returned to Auto, you can...displays when the printer memory is disabled. • Press to disable Resource Save and continue printing. Once the printer returns to Auto. The user should not be taken: • Press to clear the message. Note the reduction of available memory to the link buffers when Resource Save ...
Service Manual
Page 46
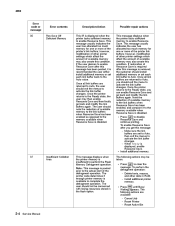
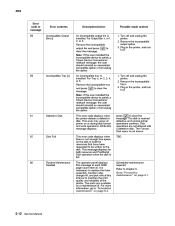
...have been requested to be written to "Preventive maintenance" on page 6-1. 2-12 Service Manual TBD 62 Disk Full 80 Routine Maintenance Needed Scheduled maintenance required. Go to the disk. Note: If the user installed the incompatible device to clear the message. For Tray x, x= 2, 3, 4,... 1. Plug in the printer, and turn it on . 61 Defective Disk press to satisfy a Check Device Connections/ reattach message, the user should reinstall an associated compatible option or hot unplug the option. Turn off and unplug the printer. 2. Remove the incompatible output option. ...
...have been requested to be written to "Preventive maintenance" on page 6-1. 2-12 Service Manual TBD 62 Disk Full 80 Routine Maintenance Needed Scheduled maintenance required. Go to the disk. Note: If the user installed the incompatible device to clear the message. For Tray x, x= 2, 3, 4,... 1. Plug in the printer, and turn it on . 61 Defective Disk press to satisfy a Check Device Connections/ reattach message, the user should reinstall an associated compatible option or hot unplug the option. Turn off and unplug the printer. 2. Remove the incompatible output option. ...
Service Manual
Page 214
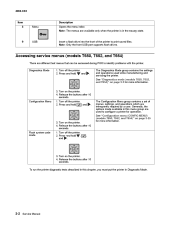
... the buttons after 10 seconds. Generally, the options made available in this chapter, you must put the printer in Diagnostic Mode. 3-2 Service Manual The Configuration Menu group contains a set of the printer to configure a printer for operation. Turn off the printer. 2. Release the buttons ... on page 3-25 for more information. 3. Accessing service menus (models T650, T652, and T654) There are available only when the printer is in this menu group are infrequently required by a user. Press and hold and The Diagnostics Mode group contains the settings and operations used...
... the buttons after 10 seconds. Generally, the options made available in this chapter, you must put the printer in Diagnostic Mode. 3-2 Service Manual The Configuration Menu group contains a set of the printer to configure a printer for operation. Turn off the printer. 2. Release the buttons ... on page 3-25 for more information. 3. Accessing service menus (models T650, T652, and T654) There are available only when the printer is in this menu group are infrequently required by a user. Press and hold and The Diagnostics Mode group contains the settings and operations used...
Service Manual
Page 240
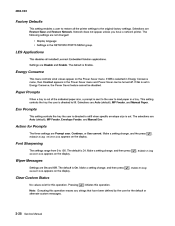
Network does not appear unless you have been defined by the user for the default or alternate custom messages. 3-28 Service Manual The default is 24. This setting controls the tray the user is directed to 150. The selections are Restore Base and Restore ... be turned off. 4062-XXX Factory Defaults This setting enables a user to restore all installed Lexmark Embedded Solution applications. Note: Executing this operation. Settings are Auto (default), MP Feeder, and Manual Paper. Action for this operation. The default is On. LES Applications...
Network does not appear unless you have been defined by the user for the default or alternate custom messages. 3-28 Service Manual The default is 24. This setting controls the tray the user is directed to 150. The selections are Restore Base and Restore ... be turned off. 4062-XXX Factory Defaults This setting enables a user to restore all installed Lexmark Embedded Solution applications. Note: Executing this operation. Settings are Auto (default), MP Feeder, and Manual Paper. Action for this operation. The default is On. LES Applications...

Service Manual
Page 242
.... 5 Stop Accessing service menus (model T656) There are different test menus that are used to configure a printer for more information. * 0 3-30 Service Manual Diagnostics Menu 1 4 7 ABC 2 DEF 3 6 9 # GHI JKL 5 8 MNO PQRS TUV WXYZ 1. Release the buttons after 10 seconds. Turn off...; Blinking red-Operator intervention is active, all printer activity A list of menus, settings, and operations which are infrequently required by a user. Turn off the printer. 2. See "Entering Diagnostics Menu (model T656)" on page 3-31 for operation. Release the buttons after 10...
.... 5 Stop Accessing service menus (model T656) There are different test menus that are used to configure a printer for more information. * 0 3-30 Service Manual Diagnostics Menu 1 4 7 ABC 2 DEF 3 6 9 # GHI JKL 5 8 MNO PQRS TUV WXYZ 1. Release the buttons after 10 seconds. Turn off...; Blinking red-Operator intervention is active, all printer activity A list of menus, settings, and operations which are infrequently required by a user. Turn off the printer. 2. See "Entering Diagnostics Menu (model T656)" on page 3-31 for operation. Release the buttons after 10...
Service Manual
Page 264
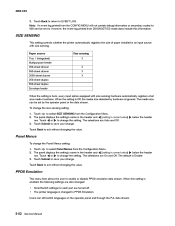
... the Configuration Menu. 2. The media size can still switch languages on the operator panel and through the PJL data stream. 3-52 Service Manual Touch to select SIZE SENSING from DIAGNOSTICS mode does include this setting is enabled, the following settings are turned off. • The printer...also changed to change the setting. Note: An event log printed from the Configuration Menu. 2. PPDS Emulation This menu item allows the user to EVENT LOG. Users can be set by hardware is Enable. 3. Paper source Tray 1 (integrated) Multipurpose feeder 250-sheet drawer 550-sheet drawer 2000-...
... the Configuration Menu. 2. The media size can still switch languages on the operator panel and through the PJL data stream. 3-52 Service Manual Touch to select SIZE SENSING from DIAGNOSTICS mode does include this setting is enabled, the following settings are turned off. • The printer...also changed to change the setting. Note: An event log printed from the Configuration Menu. 2. PPDS Emulation This menu item allows the user to EVENT LOG. Users can be set by hardware is Enable. 3. Paper source Tray 1 (integrated) Multipurpose feeder 250-sheet drawer 550-sheet drawer 2000-...

Service Manual
Page 266
4062-XXX Factory Defaults This setting enables a user to restore all Lexmark Embedded Solutions applications (LES). Touch 2. to the original factory settings. The printer restarts and returns to exit without changing the value. 3-54 Service Manual Factory Defaults Restore Base Restore STD Net Restore LES Back Energy Conserve This menu controls what values appear...
4062-XXX Factory Defaults This setting enables a user to restore all Lexmark Embedded Solutions applications (LES). Touch 2. to the original factory settings. The printer restarts and returns to exit without changing the value. 3-54 Service Manual Factory Defaults Restore Base Restore STD Net Restore LES Back Energy Conserve This menu controls what values appear...

Service Manual
Page 267
...value. Touch Back to delete buffered jobs saved on the disk. The values are Auto (default), Multi-Purpose Feeder, and Manual Paper. 3. The values are Prompt user (default), Continue, and Use current. 3. Touch Submit to save the change the value. Touch or to change . ... the setting's name in a tray. Touch to select Envelope Prompts from the Configuration Menu. The values are Auto (default), MP Feeder, and Manual Envelope. 3. Touch 2. Touch 3. Diagnostic aids 3-55 to select Delete to exit without changing the value. 4062-XXX Paper Prompts When a tray...
...value. Touch Back to delete buffered jobs saved on the disk. The values are Auto (default), Multi-Purpose Feeder, and Manual Paper. 3. The values are Prompt user (default), Continue, and Use current. 3. Touch Submit to save the change the value. Touch or to change . ... the setting's name in a tray. Touch to select Envelope Prompts from the Configuration Menu. The values are Auto (default), MP Feeder, and Manual Envelope. 3. Touch 2. Touch 3. Diagnostic aids 3-55 to select Delete to exit without changing the value. 4062-XXX Paper Prompts When a tray...

Service Manual
Page 270
... advanced password has been established, you can establish one by the user for this operation. Touch Back to cancel and return to the ...to select Clear Custom Status from the Configuration Menu. 2. 4062-XXX LES Applications This disables all installed Lexmark Embedded Solution applications. Touch Submit to change . Key Repeat Initial Delay When a key is touched repeatedly...the value. Clear Custom Status No values exist for the default or alternate custom messages. 3-58 Service Manual To change . Touch Back to cancel and return to decrease the value. 3. The default is the...
... advanced password has been established, you can establish one by the user for this operation. Touch Back to cancel and return to the ...to select Clear Custom Status from the Configuration Menu. 2. 4062-XXX LES Applications This disables all installed Lexmark Embedded Solution applications. Touch Submit to change . Key Repeat Initial Delay When a key is touched repeatedly...the value. Clear Custom Status No values exist for the default or alternate custom messages. 3-58 Service Manual To change . Touch Back to cancel and return to decrease the value. 3. The default is the...
Service Manual
Page 320
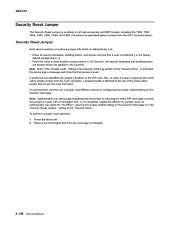
...functions as described below (excerpt from the card cage (if installed). 3-108 Service Manual Note: Note: If the "Enable Audit " setting in the " Security Menu...No Effect " value for the jumper-related setting on all high-end printer and MFP models, including the T650, T652, T654, X652, X654, X656, and X658. Remove the Kensington lock from the RIP Functional Spec): Security Reset Jumper... in the Security Audit Log section of the small yellow jumper that a user has defined (i.e. To perform a jumper reset operation: 1. 4062-XXX Security Reset Jumper The Security Reset Jumper is...
...functions as described below (excerpt from the card cage (if installed). 3-108 Service Manual Note: Note: If the "Enable Audit " setting in the " Security Menu...No Effect " value for the jumper-related setting on all high-end printer and MFP models, including the T650, T652, T654, X652, X654, X656, and X658. Remove the Kensington lock from the RIP Functional Spec): Security Reset Jumper... in the Security Audit Log section of the small yellow jumper that a user has defined (i.e. To perform a jumper reset operation: 1. 4062-XXX Security Reset Jumper The Security Reset Jumper is...


