
Clearing Jams Guide
Page 1
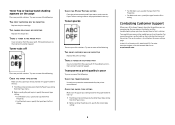
... 2 Push the release latch, and then open the front cover. 3 Lift and pull the print cartridge out of the cartridge. Warning-Potential Damage: The jammed paper may be covered with unfused toner which can help you must clear all jammed paper from the paper path and then press . Envelope recommendations...printing. • Do not load trays, the multipurpose feeder, or the envelope feeder while the printer is in the sealed or closed position - Lexmark™ T65x Clearing Jams Guide Clearing jams Avoiding jams The following hints can stain garments and skin. Load them . • Do not load ...
... 2 Push the release latch, and then open the front cover. 3 Lift and pull the print cartridge out of the cartridge. Warning-Potential Damage: The jammed paper may be covered with unfused toner which can help you must clear all jammed paper from the paper path and then press . Envelope recommendations...printing. • Do not load trays, the multipurpose feeder, or the envelope feeder while the printer is in the sealed or closed position - Lexmark™ T65x Clearing Jams Guide Clearing jams Avoiding jams The following hints can stain garments and skin. Load them . • Do not load ...
Troubleshooting Guide
Page 5
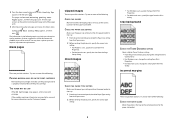
4 Press the down arrow button until Prt Quality Pgs appears, and then press . THE TONER MAY BE LOW When 88 Cartridge low appears, order a new print cartridge. Clipped images These are possible solutions. Incorrect margins These are possible solutions. The pages are possible ... from the Paper menu. 2 Before sending the job to the correct positions for service. Reinstall the print cartridge. Gray background CHECK THE TONER DARKNESS SETTING Select a lighter Toner Darkness setting: • From the printer control panel, change the setting from the Quality menu. •...
4 Press the down arrow button until Prt Quality Pgs appears, and then press . THE TONER MAY BE LOW When 88 Cartridge low appears, order a new print cartridge. Clipped images These are possible solutions. Incorrect margins These are possible solutions. The pages are possible ... from the Paper menu. 2 Before sending the job to the correct positions for service. Reinstall the print cartridge. Gray background CHECK THE TONER DARKNESS SETTING Select a lighter Toner Darkness setting: • From the printer control panel, change the setting from the Quality menu. •...
Troubleshooting Guide
Page 6
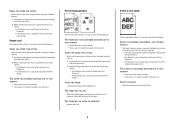
...from Print Properties. • For Macintosh users, specify the type from the Print dialog. THE TONER MAY BE LOW When 88 Cartridge low appears or when the print becomes faded, replace the print cartridge. CHECK THE PAPER Avoid textured paper with rough finishes. 6 THE PAPER HAS ABSORBED MOISTURE DUE TO...from the Print dialog and pop-up menus. Try one or more of the following : CHECK THE DARKNESS, BRIGHTNESS, AND CONTRAST SETTINGS The Toner Darkness setting is too dark, the Brightness setting is too dark, or the Contrast setting is too dark These are possible solutions. Print is...
...from Print Properties. • For Macintosh users, specify the type from the Print dialog. THE TONER MAY BE LOW When 88 Cartridge low appears or when the print becomes faded, replace the print cartridge. CHECK THE PAPER Avoid textured paper with rough finishes. 6 THE PAPER HAS ABSORBED MOISTURE DUE TO...from the Print dialog and pop-up menus. Try one or more of the following : CHECK THE DARKNESS, BRIGHTNESS, AND CONTRAST SETTINGS The Toner Darkness setting is too dark, the Brightness setting is too dark, or the Contrast setting is too dark These are possible solutions. Print is...
Troubleshooting Guide
Page 7
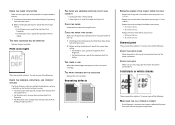
... defects 7 REPEATING MARKS OCCUR EVENLY DOWN THE PAGE Replace the charge rolls if the defects occur every 28.3 mm (1.11 in .). Replace the print cartridge if the defects occur every: • 47.8 mm (1.88 in.) • 96.8 mm (3.81 in.) Replace the fuser if the defects occur... are using paper that meets the printer specifications. THE PRINT CARTRIDGE MAY BE DEFECTIVE Replace the print cartridge. THE TONER IS LOW When 88 Cartridge Low appears, order a new print cartridge. THE PRINT CARTRIDGE MAY BE DEFECTIVE Replace the print cartridge. CHECK THE PAPER TYPE SETTING Make sure the paper type ...
... defects 7 REPEATING MARKS OCCUR EVENLY DOWN THE PAGE Replace the charge rolls if the defects occur every 28.3 mm (1.11 in .). Replace the print cartridge if the defects occur every: • 47.8 mm (1.88 in.) • 96.8 mm (3.81 in.) Replace the fuser if the defects occur... are using paper that meets the printer specifications. THE PRINT CARTRIDGE MAY BE DEFECTIVE Replace the print cartridge. THE TONER IS LOW When 88 Cartridge Low appears, order a new print cartridge. THE PRINT CARTRIDGE MAY BE DEFECTIVE Replace the print cartridge. CHECK THE PAPER TYPE SETTING Make sure the paper type ...
Troubleshooting Guide
Page 8
...feeder to cool before touching. MAKE SURE THE TONER IS DISTRIBUTED EVENLY IN THE PRINT CARTRIDGE Remove the print cartridge and shake it from the Print dialog and pop-up menus. THE PRINT CARTRIDGE MAY BE DEFECTIVE OR LOW ON TONER Replace the used print cartridge with a new one or more of injury from...These are the possible solutions. THE PAPER PATH MAY NOT BE CLEAR Check the paper path around the print cartridge. If the problem continues, the printer may need to redistribute the toner, and then reinstall it . Try one or more of injury from side to side to cool before touching...
...feeder to cool before touching. MAKE SURE THE TONER IS DISTRIBUTED EVENLY IN THE PRINT CARTRIDGE Remove the print cartridge and shake it from the Print dialog and pop-up menus. THE PRINT CARTRIDGE MAY BE DEFECTIVE OR LOW ON TONER Replace the used print cartridge with a new one or more of injury from...These are the possible solutions. THE PAPER PATH MAY NOT BE CLEAR Check the paper path around the print cartridge. If the problem continues, the printer may need to redistribute the toner, and then reinstall it . Try one or more of injury from side to side to cool before touching...
Troubleshooting Guide
Page 9
...Properties. • For Macintosh users, specify the type from the Print dialog. For other countries/regions, visit the Lexmark Web site at www.lexmark.com. 9 Toner rubs off These are possible solutions. Try one or more of the following : CHECK THE TRANSPARENCIES Use only transparencies ...MAY BE DEFECTIVE Replace the charge rolls. THERE IS TONER IN THE PAPER PATH Clean any toner from the paper path. Try one or more of the following : THE PRINT CARTRIDGE MAY BE DEFECTIVE Replace the print cartridge. Toner specks These are possible solutions. Transparency print quality is...
...Properties. • For Macintosh users, specify the type from the Print dialog. For other countries/regions, visit the Lexmark Web site at www.lexmark.com. 9 Toner rubs off These are possible solutions. Try one or more of the following : CHECK THE TRANSPARENCIES Use only transparencies ...MAY BE DEFECTIVE Replace the charge rolls. THERE IS TONER IN THE PAPER PATH Clean any toner from the paper path. Try one or more of the following : THE PRINT CARTRIDGE MAY BE DEFECTIVE Replace the print cartridge. Toner specks These are possible solutions. Transparency print quality is...
User's Guide
Page 83
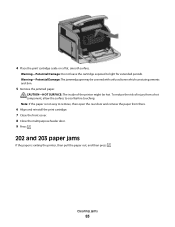
...jammed paper may be hot. Clearing jams 83 Warning-Potential Damage: Do not leave the cartridge exposed to remove, then open the rear door and remove the paper from a hot ...surface to cool before touching. CAUTION-HOT SURFACE: The inside of injury from there. 6 Align and reinstall the print cartridge. 7 Close the front cover. 8 Close the multipurpose feeder door. 9 Press . 202 and 203 paper jams If... the risk of the printer might be covered with unfused toner which can stain garments and skin. 5 Remove the jammed paper. 4 Place the print cartridge aside on a flat, smooth surface.
...jammed paper may be hot. Clearing jams 83 Warning-Potential Damage: Do not leave the cartridge exposed to remove, then open the rear door and remove the paper from a hot ...surface to cool before touching. CAUTION-HOT SURFACE: The inside of injury from there. 6 Align and reinstall the print cartridge. 7 Close the front cover. 8 Close the multipurpose feeder door. 9 Press . 202 and 203 paper jams If... the risk of the printer might be covered with unfused toner which can stain garments and skin. 5 Remove the jammed paper. 4 Place the print cartridge aside on a flat, smooth surface.
User's Guide
Page 157
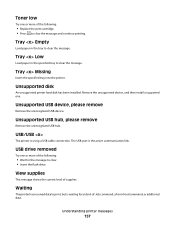
.... Remove the unsupported device, and then install a supported one. Unsupported disk An unsupported printer hard disk has been installed. Toner low Try one or more of the following : • Replace the print cartridge. • Press to clear the message. Unsupported USB device, please remove Remove the unrecognized USB device. View supplies This...
.... Remove the unsupported device, and then install a supported one. Unsupported disk An unsupported printer hard disk has been installed. Toner low Try one or more of the following : • Replace the print cartridge. • Press to clear the message. Unsupported USB device, please remove Remove the unrecognized USB device. View supplies This...
User's Guide
Page 164
...which contains all the items necessary to replace the pick rollers, the charge roll, the transfer roller, and the fuser. 88 Cartridge low The toner is exhausted. 1 Replace the print cartridge. 2 Press to clear the message. 200-282 Paper jam 1 Clear the paper path. 2 After clearing the paper path... hard disk. • Install a larger printer hard disk. Replace the print cartridge, and then press to clear the message and continue printing. 88.yy Cartridge nearly low The toner is low. Replace the print cartridge, and then press to clear the message and continue printing. 88.yy Replace...
...which contains all the items necessary to replace the pick rollers, the charge roll, the transfer roller, and the fuser. 88 Cartridge low The toner is exhausted. 1 Replace the print cartridge. 2 Press to clear the message. 200-282 Paper jam 1 Clear the paper path. 2 After clearing the paper path... hard disk. • Install a larger printer hard disk. Replace the print cartridge, and then press to clear the message and continue printing. 88.yy Cartridge nearly low The toner is low. Replace the print cartridge, and then press to clear the message and continue printing. 88.yy Replace...
User's Guide
Page 167
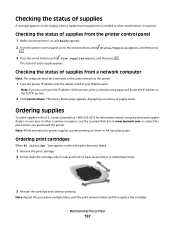
... status of supplies from a network computer Note: The computer must be connected to redistribute toner. 3 Reinsert the cartridge and continue printing. Note: If you purchased the printer. Maintaining the printer 167 Note: All life estimates for information about Lexmark authorized supplies dealers in the TCP/IP section. 2 Click Device Status. Checking the status...
... status of supplies from a network computer Note: The computer must be connected to redistribute toner. 3 Reinsert the cartridge and continue printing. Note: If you purchased the printer. Maintaining the printer 167 Note: All life estimates for information about Lexmark authorized supplies dealers in the TCP/IP section. 2 Click Device Status. Checking the status...
User's Guide
Page 169
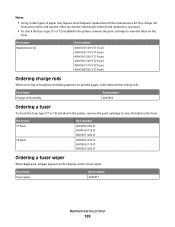
... (110 V T1 fuser) 40X4765 (220 V T1 fuser) 40X4766 (100 V T2 fuser) 40X4767 (110 V T2 fuser) 40X4768 (220 V T2 fuser) Ordering charge rolls When toner fog or background shading appears on the display, order a fuser wiper. The charge roll, fuser, pick rollers, and transfer roller can also be individually ordered... and replaced as necessary. • To check the fuser type (T1 or T2) installed in the printer, remove the print cartridge to view the label on the fuser. Part name Charge roll assembly Part number 40X5852 Ordering a fuser To check the fuser type (T1 or ...
... (110 V T1 fuser) 40X4765 (220 V T1 fuser) 40X4766 (100 V T2 fuser) 40X4767 (110 V T2 fuser) 40X4768 (220 V T2 fuser) Ordering charge rolls When toner fog or background shading appears on the display, order a fuser wiper. The charge roll, fuser, pick rollers, and transfer roller can also be individually ordered... and replaced as necessary. • To check the fuser type (T1 or T2) installed in the printer, remove the print cartridge to view the label on the fuser. Part name Charge roll assembly Part number 40X5852 Ordering a fuser To check the fuser type (T1 or ...
User's Guide
Page 170
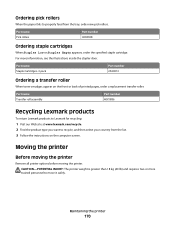
Part name Staple Cartridges-3 pack Part number 25A0013 Ordering a transfer roller When toner smudges appear on the computer screen. CAUTION-POTENTIAL INJURY: The printer weight is greater than 18 kg (40 lb) and requires two or more information, ... front or back of printed pages, order a replacement transfer roller. Part name Transfer roll assembly Part number 40X1886 Recycling Lexmark products To return Lexmark products to Lexmark for recycling: 1 Visit our Web site at www.lexmark.com/recycle. 2 Find the product type you want to recycle, and then select your country from the tray...
Part name Staple Cartridges-3 pack Part number 25A0013 Ordering a transfer roller When toner smudges appear on the computer screen. CAUTION-POTENTIAL INJURY: The printer weight is greater than 18 kg (40 lb) and requires two or more information, ... front or back of printed pages, order a replacement transfer roller. Part name Transfer roll assembly Part number 40X1886 Recycling Lexmark products To return Lexmark products to Lexmark for recycling: 1 Visit our Web site at www.lexmark.com/recycle. 2 Find the product type you want to recycle, and then select your country from the tray...
User's Guide
Page 172
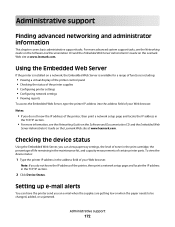
...Software and Documentation CD and the Embedded Web Server Administrator's Guide on the Lexmark Web site at www.lexmark.com. Setting up e-mail alerts You can view paper tray settings, the level of toner in the print cartridge, the percentage of your Web browser. Using the Embedded Web Server If ...the printer is installed on the Lexmark Web site at www.lexmark.com. Notes: • If you an e-mail when the supplies...
...Software and Documentation CD and the Embedded Web Server Administrator's Guide on the Lexmark Web site at www.lexmark.com. Setting up e-mail alerts You can view paper tray settings, the level of toner in the print cartridge, the percentage of your Web browser. Using the Embedded Web Server If ...the printer is installed on the Lexmark Web site at www.lexmark.com. Notes: • If you an e-mail when the supplies...

User's Guide
Page 184
Reinstall the print cartridge. CHECK THE PAPER SIZE SETTING Make sure the paper size setting matches the paper loaded in the tray to ...one or more information, contact Customer Support. Try one or more of the following : PACKING MATERIAL MAY BE ON THE PRINT CARTRIDGE Remove the print cartridge and make sure the packing material is properly removed. For more of the following : CHECK THE GUIDES Move the width and... in the tray: 1 From the printer control panel, check the Paper Size setting from the Page Setup dialog. THE TONER MAY BE LOW When 88 Cartridge low appears, order a new print...
Reinstall the print cartridge. CHECK THE PAPER SIZE SETTING Make sure the paper size setting matches the paper loaded in the tray to ...one or more information, contact Customer Support. Try one or more of the following : PACKING MATERIAL MAY BE ON THE PRINT CARTRIDGE Remove the print cartridge and make sure the packing material is properly removed. For more of the following : CHECK THE GUIDES Move the width and... in the tray: 1 From the printer control panel, check the Paper Size setting from the Page Setup dialog. THE TONER MAY BE LOW When 88 Cartridge low appears, order a new print...
Help Menu Pages
Page 39
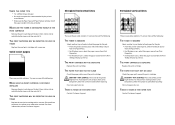
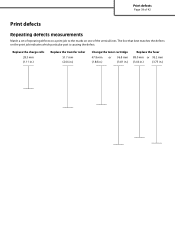
The line that best matches the defects on one of the vertical lines. Replace the charge rolls 28.3 mm (1.11 in.) Replace the transfer roller 51.7 mm (2.04 in.) Change the toner cartridge 47.8 mm or 96.8 mm (1.88 in.) (3.81 in.) Replace the fuser 88.0 mm or 95.2 mm (3.46 in.) (3.75 in.) Print defects Page 39 of 42 Print defects Repeating defects measurements Match a set of repeating defects on a print job to the marks on the print job indicates which particular part is causing the defect.
The line that best matches the defects on one of the vertical lines. Replace the charge rolls 28.3 mm (1.11 in.) Replace the transfer roller 51.7 mm (2.04 in.) Change the toner cartridge 47.8 mm or 96.8 mm (1.88 in.) (3.81 in.) Replace the fuser 88.0 mm or 95.2 mm (3.46 in.) (3.75 in.) Print defects Page 39 of 42 Print defects Repeating defects measurements Match a set of repeating defects on a print job to the marks on the print job indicates which particular part is causing the defect.
Service Manual
Page 42
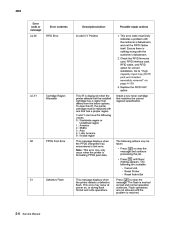
...Replace the RFID UHF option. This error may be replaced with the customer's datastream, and not the RFID Option itself. Install a new toner cartridge that differs from the below options. Note: This error may only occur when the printer is resolved. 2-8 Service Manual Check the RFID firmware...Printer - Flash operations are available: - The following actions may occur at power on page 4-130. 3. To clear this IR, the printer cartridge must be taken: • Press to clear the message and continue processing the job. • Press until the problem is formatting PPDS ...
...Replace the RFID UHF option. This error may be replaced with the customer's datastream, and not the RFID Option itself. Install a new toner cartridge that differs from the below options. Note: This error may only occur when the printer is resolved. 2-8 Service Manual Check the RFID firmware...Printer - Flash operations are available: - The following actions may occur at power on page 4-130. 3. To clear this IR, the printer cartridge must be taken: • Press to clear the message and continue processing the job. • Press until the problem is formatting PPDS ...
Service Manual
Page 47
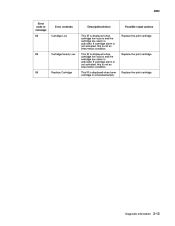
... is displayed when toner cartridge is activated. Diagnostic information 2-13 Replace the print cartridge. 88 Cartridge Nearly Low Replace the print cartridge. 88 Replace Cartridge Replace the print cartridge. If cartridge alarm is not activated, this is not an intervention condition. 4062 Error code or message 88 Error contents Description/Action Possible repair actions Cartridge Low This IR is...
... is displayed when toner cartridge is activated. Diagnostic information 2-13 Replace the print cartridge. 88 Cartridge Nearly Low Replace the print cartridge. 88 Replace Cartridge Replace the print cartridge. If cartridge alarm is not activated, this is not an intervention condition. 4062 Error code or message 88 Error contents Description/Action Possible repair actions Cartridge Low This IR is...

Service Manual
Page 219
...function is blank. Page three is solid black page and page four is to allow printing of the print quality test pages with the toner cartridge lockout function disabled. If Continuous is selected, the test pattern is pressed to cancel the test. If duplex is turned on, the ...Print Test Page: 1. The following is included in the DIAGNOSTICS version of the first print quality test page: Device information Printer revision levels Cartridge information Printer margin settings EP setup Printer setup Minimum stroke width Note: The print quality test pages can print on letter, legal, or ...
...function is blank. Page three is solid black page and page four is to allow printing of the print quality test pages with the toner cartridge lockout function disabled. If Continuous is selected, the test pattern is pressed to cancel the test. If duplex is turned on, the ...Print Test Page: 1. The following is included in the DIAGNOSTICS version of the first print quality test page: Device information Printer revision levels Cartridge information Printer margin settings EP setup Printer setup Minimum stroke width Note: The print quality test pages can print on letter, legal, or ...

Service Manual
Page 247
... printing of the print quality pages: • Values from EP SETUP in the DIAGNOSTICS version of the print quality test pages with the toner cartridge lockout function disabled. Note: The Print Test Page always prints on one -inch black squares located on , the pages are duplexed. Touch... problems. To run the Print Quality Test Pages, touch beside Printing Quality Test Pages from the Configuration menu (CONFIG MENU), however, a cartridge must always be printed from PRINT TESTS. Additional diagnostic information may be installed with two one side of the paper, regardless of the duplex...
... printing of the print quality pages: • Values from EP SETUP in the DIAGNOSTICS version of the print quality test pages with the toner cartridge lockout function disabled. Note: The Print Test Page always prints on one -inch black squares located on , the pages are duplexed. Touch... problems. To run the Print Quality Test Pages, touch beside Printing Quality Test Pages from the Configuration menu (CONFIG MENU), however, a cartridge must always be printed from PRINT TESTS. Additional diagnostic information may be installed with two one side of the paper, regardless of the duplex...

Service Manual
Page 585
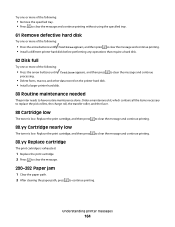
Note: If the defect appears on the printed side of a single-sided print job, replace the toner cartridge before replacing the fuser. For example, the distance between these two marks represents a repeating defect that best matches the defects on the print job indicates ...which means the charge rollers may be replaced. Replace the fuser 88.0 mm (3.46 in.) 95.2 mm (3.75 in.) Replace the toner cartridge 47.8 mm (1.88 in.) 96.8 mm (3.81 in.) Replace the transfer roller 51.7 mm (2.04 in.) Replace the charge rollers 28.3 mm (1.11 in .), which...
Note: If the defect appears on the printed side of a single-sided print job, replace the toner cartridge before replacing the fuser. For example, the distance between these two marks represents a repeating defect that best matches the defects on the print job indicates ...which means the charge rollers may be replaced. Replace the fuser 88.0 mm (3.46 in.) 95.2 mm (3.75 in.) Replace the toner cartridge 47.8 mm (1.88 in.) 96.8 mm (3.81 in.) Replace the transfer roller 51.7 mm (2.04 in.) Replace the charge rollers 28.3 mm (1.11 in .), which...


