User's Guide
Page 3
...Windows ...11 Macintosh ...15 UNIX/Linux ...16 Chapter 3: Installing drivers for network printing 17 Printing a network setup page ...17 Assigning a printer IP address ...17 Verifying the IP settings ...18 Windows ...18 Macintosh ...22 UNIX/Linux ...24 NetWare ...24 Chapter 4: Installing and ... ...25 Installing a duplex unit ...27 Installing memory or option cards ...28 Accessing the printer system board ...28 Installing or removing a memory card ...30 Installing or removing a flash memory or firmware card 32 Installing an option card ...34 Replacing the shield ...35 Chapter 5: Printing ......
...Windows ...11 Macintosh ...15 UNIX/Linux ...16 Chapter 3: Installing drivers for network printing 17 Printing a network setup page ...17 Assigning a printer IP address ...17 Verifying the IP settings ...18 Windows ...18 Macintosh ...22 UNIX/Linux ...24 NetWare ...24 Chapter 4: Installing and ... ...25 Installing a duplex unit ...27 Installing memory or option cards ...28 Accessing the printer system board ...28 Installing or removing a memory card ...30 Installing or removing a flash memory or firmware card 32 Installing an option card ...34 Replacing the shield ...35 Chapter 5: Printing ......

User's Guide
Page 28
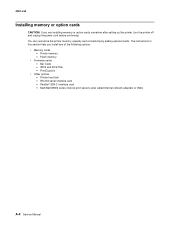
... - Bar Code - IPDS and SCS/TNe - Note: Use a Phillips screwdriver to install printer memory, flash memory, a firmware card, or an option card. Installing memory or option cards 28 Printer memory - Parallel 1284-C interface card - Installing and removing options Installing memory or option cards ... Other options - The instructions in this section help you are installing memory or option cards sometime after setting up the printer, turn the printer off and unplug the power cord before continuing. MarkNet N8000 series internal print servers (also called internal network adapters or...
... - Bar Code - IPDS and SCS/TNe - Note: Use a Phillips screwdriver to install printer memory, flash memory, a firmware card, or an option card. Installing memory or option cards 28 Printer memory - Parallel 1284-C interface card - Installing and removing options Installing memory or option cards ... Other options - The instructions in this section help you are installing memory or option cards sometime after setting up the printer, turn the printer off and unplug the power cord before continuing. MarkNet N8000 series internal print servers (also called internal network adapters or...

User's Guide
Page 30
Option card connector Flash and firmware card connectors Memory card connector Installing or removing a memory card Installation Note: Printer memory cards designed for the card you touch a memory card. 2 Push open the latches on either end of the connector snap into the ... the connector. 5 Push the memory card firmly into place. Use the illustration to locate the connector for other Lexmark printers may require some force to install. Touch something metal such as the printer frame before you want to fully seat the card. Save the packaging. 4 Align the notches on the bottom ...
Option card connector Flash and firmware card connectors Memory card connector Installing or removing a memory card Installation Note: Printer memory cards designed for the card you touch a memory card. 2 Push open the latches on either end of the connector snap into the ... the connector. 5 Push the memory card firmly into place. Use the illustration to locate the connector for other Lexmark printers may require some force to install. Touch something metal such as the printer frame before you want to fully seat the card. Save the packaging. 4 Align the notches on the bottom ...
User's Guide
Page 32
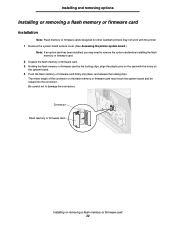
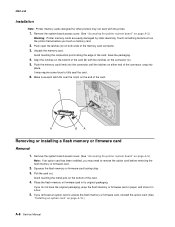
Installing and removing options Installing or removing a flash memory or firmware card Installation Note: Flash memory or firmware cards designed for other Lexmark printers may not work with the holes on the system board. 4 Push the flash memory or firmware card firmly into the connector. Be careful not to remove the option card before installing the...
Installing and removing options Installing or removing a flash memory or firmware card Installation Note: Flash memory or firmware cards designed for other Lexmark printers may not work with the holes on the system board. 4 Push the flash memory or firmware card firmly into the connector. Be careful not to remove the option card before installing the...
User's Guide
Page 33
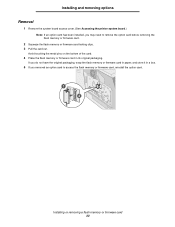
...out. Installing or removing a flash memory or firmware card 33 If you may need to access the flash memory or firmware card, reinstall the option card. Installing and removing options Removal 1 Remove the system board access cover. (See Accessing the printer system board.) Note: If an option card... has been installed, you do not have the original packaging, wrap the flash memory or firmware card in paper, and store it in its original packaging.
...out. Installing or removing a flash memory or firmware card 33 If you may need to access the flash memory or firmware card, reinstall the option card. Installing and removing options Removal 1 Remove the system board access cover. (See Accessing the printer system board.) Note: If an option card... has been installed, you do not have the original packaging, wrap the flash memory or firmware card in paper, and store it in its original packaging.
Service Manual
Page 9
... A-1 Installing a 250-sheet or 500-sheet drawer A-1 Installing a duplex unit A-3 Installing memory or option cards A-4 Accessing the printer system board A-5 Removing or installing a memory card A-7 Removal A-7 Installation A-8 Removing or installing a flash memory or firmware card A-8 Removal A-8 Installation A-9 Installing an option card A-10 Replacing the shield A-11 Printing and using features A-11 Canceling...
... A-1 Installing a 250-sheet or 500-sheet drawer A-1 Installing a duplex unit A-3 Installing memory or option cards A-4 Accessing the printer system board A-5 Removing or installing a memory card A-7 Removal A-7 Installation A-8 Removing or installing a flash memory or firmware card A-8 Removal A-8 Installation A-9 Installing an option card A-10 Replacing the shield A-11 Printing and using features A-11 Canceling...
Service Manual
Page 24
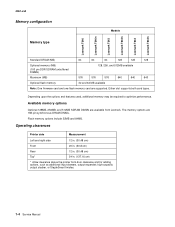
...Front 20 in. (50.8 cm) Rear Top* 12 in. (30.48 cm) 54 in. (137.16 cm) * Allow clearance above the printer front door clearance and for adding options, such as additional input drawers, output expander, high-capacity output stacker, or StapleSmart finisher. 1-4 Service Manual The ...Lexmark T640n Lexmark T642 Lexmark T642n Lexmark T644 Lexmark T644n Standard DRAM (MB) 64 64 64 128 128 128 Optional memory (MB) (100 pin DDR SDRAM unbuffered DIMMs) 128, 256, and 512MB available Maximum (MB) 576 576 576 640 640 640 Optional flash memory 32 and 64 MB available Note: One firmware...
...Front 20 in. (50.8 cm) Rear Top* 12 in. (30.48 cm) 54 in. (137.16 cm) * Allow clearance above the printer front door clearance and for adding options, such as additional input drawers, output expander, high-capacity output stacker, or StapleSmart finisher. 1-4 Service Manual The ...Lexmark T640n Lexmark T642 Lexmark T642n Lexmark T644 Lexmark T644n Standard DRAM (MB) 64 64 64 128 128 128 Optional memory (MB) (100 pin DDR SDRAM unbuffered DIMMs) 128, 256, and 512MB available Maximum (MB) 576 576 576 640 640 640 Optional flash memory 32 and 64 MB available Note: One firmware...
Service Manual
Page 388
...Bar Code - The instructions in this section help you are installing memory or option cards sometime after setting up the printer, turn the printer off and unplug the power cord before continuing. IPDS and SCS/TNe - Parallel 1284-C interface card - 4061-xx0...any of the following options: • Memory cards - Flash memory • Firmware cards - Printer hard disk - RS-232 serial interface card - You can customize the printer memory capacity and connectivity by adding optional cards. Printer memory - PrintCryption • Other options - MarkNet N8000 series internal print servers (...
...Bar Code - The instructions in this section help you are installing memory or option cards sometime after setting up the printer, turn the printer off and unplug the power cord before continuing. IPDS and SCS/TNe - Parallel 1284-C interface card - 4061-xx0...any of the following options: • Memory cards - Flash memory • Firmware cards - Printer hard disk - RS-232 serial interface card - You can customize the printer memory capacity and connectivity by adding optional cards. Printer memory - PrintCryption • Other options - MarkNet N8000 series internal print servers (...
Service Manual
Page 389
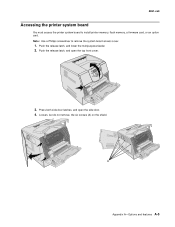
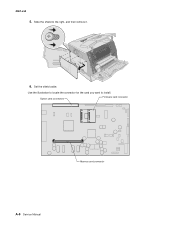
Press both side door latches, and open the top front cover. 3. 4061-xx0 Accessing the printer system board You must access the printer system board to remove the system board access cover. 1. Note: Use a Phillips screwdriver to install printer memory, flash memory, a firmware card, or an option card. Push the release latch, and open the side door. 4. A Appendix A-Options and features A-5 Push the release latch, and lower the multipurpose feeder. 2. Loosen, but do not remove, the six screws (A) on the shield.
Press both side door latches, and open the top front cover. 3. 4061-xx0 Accessing the printer system board You must access the printer system board to remove the system board access cover. 1. Note: Use a Phillips screwdriver to install printer memory, flash memory, a firmware card, or an option card. Push the release latch, and open the side door. 4. A Appendix A-Options and features A-5 Push the release latch, and lower the multipurpose feeder. 2. Loosen, but do not remove, the six screws (A) on the shield.
Service Manual
Page 390
Use the illustration to locate the connector for the card you want to the right, and then remove it. 6. Slide the shield to install. Option card connectors Firmware card connector Memory card connector A-6 Service Manual 4061-xx0 5. Set the shield aside.
Use the illustration to locate the connector for the card you want to the right, and then remove it. 6. Slide the shield to install. Option card connectors Firmware card connector Memory card connector A-6 Service Manual 4061-xx0 5. Set the shield aside.
Service Manual
Page 392
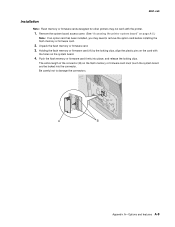
...card connector. 3. C A BA Removing or installing a flash memory or firmware card Removal 1. Push the memory card firmly into the connector until the latches on the end of the card (B) with the printer. 1. Align the notches on the bottom of the card. Squeeze the ...flash memory or firmware card locking clips. 3. Unpack the memory card. Touch something metal such as the printer frame before removing the flash memory or firmware card. 2. 4061-xx0 Installation Note: Printer memory cards designed for other printers may not work with the notches on...
...card connector. 3. C A BA Removing or installing a flash memory or firmware card Removal 1. Push the memory card firmly into the connector until the latches on the end of the card (B) with the printer. 1. Align the notches on the bottom of the card. Squeeze the ...flash memory or firmware card locking clips. 3. Unpack the memory card. Touch something metal such as the printer frame before removing the flash memory or firmware card. 2. 4061-xx0 Installation Note: Printer memory cards designed for other printers may not work with the notches on...
Service Manual
Page 393
...installing the flash memory or firmware card. 2. A B Appendix A-Options and features A-9 Push the flash memory or firmware card firmly into the connector. Unpack the flash memory or firmware card. 3. 4061-xx0 Installation Note: Flash memory or firmware cards designed for other printers may need to damage the...(B) on the system board. 4. Holding the flash memory or firmware card (A) by the locking clips, align the plastic pins on the card with the printer. 1. Remove the system board access cover. (See "Accessing the printer system board" on page A-5.) Note: If an option card has...
...installing the flash memory or firmware card. 2. A B Appendix A-Options and features A-9 Push the flash memory or firmware card firmly into the connector. Unpack the flash memory or firmware card. 3. 4061-xx0 Installation Note: Flash memory or firmware cards designed for other printers may need to damage the...(B) on the system board. 4. Holding the flash memory or firmware card (A) by the locking clips, align the plastic pins on the card with the printer. 1. Remove the system board access cover. (See "Accessing the printer system board" on page A-5.) Note: If an option card has...


