
User's Guide
Page 8
... Paper Menu Default Source Paper Size/Type Configure MP Envelope Enhance Substitute Size Paper Texture Paper Weight Paper Loading Custom Types Universal Setup Bin Setup Reports Menu Settings Page Device Statistics Network Setup Page Network Setup Page Profiles List NetWare Setup Page Print Fonts Print Directory Settings Setup Menu Finishing Menu Quality Menu Utilities Menu PDF Menu PostScript Menu PCL Emul Menu HTML Menu Image Menu Network/Ports IPv6 TCP/IP Standard Network Network Standard USB USB Parallel Parallel Serial NetWare AppleTalk LexLink Security Max Invalid PIN Job...
... Paper Menu Default Source Paper Size/Type Configure MP Envelope Enhance Substitute Size Paper Texture Paper Weight Paper Loading Custom Types Universal Setup Bin Setup Reports Menu Settings Page Device Statistics Network Setup Page Network Setup Page Profiles List NetWare Setup Page Print Fonts Print Directory Settings Setup Menu Finishing Menu Quality Menu Utilities Menu PDF Menu PostScript Menu PCL Emul Menu HTML Menu Image Menu Network/Ports IPv6 TCP/IP Standard Network Network Standard USB USB Parallel Parallel Serial NetWare AppleTalk LexLink Security Max Invalid PIN Job...

User's Guide
Page 10
... applicable, it will also display the current status and the Supplies (Warnings) status. This is used to move within a screen such as following a link, submitting a configuration item, or when you must resolve. Show me more screen Some held jobs were not restored. Learning about the printer Button Navigation buttons USB Direct interface Numeric pad 1 2 3 4 5 6 789 0 # Display panel Status / Supplies Ready Tray 1 low View Supplies Tell me screen Remove tray; The Left or...
... applicable, it will also display the current status and the Supplies (Warnings) status. This is used to move within a screen such as following a link, submitting a configuration item, or when you must resolve. Show me more screen Some held jobs were not restored. Learning about the printer Button Navigation buttons USB Direct interface Numeric pad 1 2 3 4 5 6 789 0 # Display panel Status / Supplies Ready Tray 1 low View Supplies Tell me screen Remove tray; The Left or...

User's Guide
Page 11
...: USB support is the letter of the CD-ROM drive). Use the following table to find driver installation instructions for local printing A local printer is intended to the computer using a USB or parallel cable. If the CD does not launch automatically, click Start Æ Run, and type D:\Setup.exe in downloadable software packages on the operating system used by the computer to page 11 11 12 12 15 16 Windows...
...: USB support is the letter of the CD-ROM drive). Use the following table to find driver installation instructions for local printing A local printer is intended to the computer using a USB or parallel cable. If the CD does not launch automatically, click Start Æ Run, and type D:\Setup.exe in downloadable software packages on the operating system used by the computer to page 11 11 12 12 15 16 Windows...

User's Guide
Page 13
... the printer. 3 Press until Menu Settings Page appears, and then press . Windows 13 Setting parameters in the COM port. The printer returns to Ready. 4 Press . 5 Press until Network/Ports appears, and then press . 6 Press until Serial Standard or Serial Option X appears, and then press . (x) is the setting required for a change ), and then 8 Press until appears (where is the number of the serial port. 7 Press until press . Installing drivers for local printing Before...
... the printer. 3 Press until Menu Settings Page appears, and then press . Windows 13 Setting parameters in the COM port. The printer returns to Ready. 4 Press . 5 Press until Network/Ports appears, and then press . 6 Press until Serial Standard or Serial Option X appears, and then press . (x) is the setting required for a change ), and then 8 Press until appears (where is the number of the serial port. 7 Press until press . Installing drivers for local printing Before...

User's Guide
Page 19
... the list of the computers on each network computer. Printer 2 Click Install Printer and Software. 3 Click Agree to page Windows 98 SE, 19 Windows NT 4.0, Windows Me, Windows 2000, Windows XP, or Windows Server 2003 Windows NT 4.0, 20 Windows 2000, Windows XP, or Windows Server 2003 Direct printing using Windows 98 SE, Me, Windows NT 4.0, Windows 2000, Windows XP, or Windows Server 2003 To install a custom printer driver and network port: 1 Launch the drivers CD. c Enter a port name. Installing drivers for network printing Follow the steps for your printing configuration...
... the list of the computers on each network computer. Printer 2 Click Install Printer and Software. 3 Click Agree to page Windows 98 SE, 19 Windows NT 4.0, Windows Me, Windows 2000, Windows XP, or Windows Server 2003 Windows NT 4.0, 20 Windows 2000, Windows XP, or Windows Server 2003 Direct printing using Windows 98 SE, Me, Windows NT 4.0, Windows 2000, Windows XP, or Windows Server 2003 To install a custom printer driver and network port: 1 Launch the drivers CD. c Enter a port name. Installing drivers for network printing Follow the steps for your printing configuration...
User's Guide
Page 36
... the driver override the default settings selected from a software application, a window representing the printer driver opens. Printing a document from a USB flash memory device A USB Direct interface is located on printing folio and statement size media. Note the following when using a USB flash memory device with the printer USB Direct Interface: • USB devices must be compatible with the printer. This chapter also provides information on the operator panel so you want to print, printing confidential jobs, canceling a print job, printing a menu settings page, a font list, and...
... the driver override the default settings selected from a software application, a window representing the printer driver opens. Printing a document from a USB flash memory device A USB Direct interface is located on printing folio and statement size media. Note the following when using a USB flash memory device with the printer USB Direct Interface: • USB devices must be compatible with the printer. This chapter also provides information on the operator panel so you want to print, printing confidential jobs, canceling a print job, printing a menu settings page, a font list, and...

User's Guide
Page 101
... support. In the address line, enter the IP address of an optional internal wireless print server to configure using the format: http://ip_address/. 2 Click Configuration. 3 Under Other Settings, click Network/Ports. Once enabled, only the ports set to Secure and Unsecure will allow network access to devices presenting a valid set of the printer you want to take place. To configure the Secure mode for any IP communication to configure using the Embedded Web Server (EWS) 101 In the address line...
... support. In the address line, enter the IP address of an optional internal wireless print server to configure using the format: http://ip_address/. 2 Click Configuration. 3 Under Other Settings, click Network/Ports. Once enabled, only the ports set to Secure and Unsecure will allow network access to devices presenting a valid set of the printer you want to take place. To configure the Secure mode for any IP communication to configure using the Embedded Web Server (EWS) 101 In the address line...
User's Guide
Page 103
... printer is turned on. • The printer cable is available on to power the printer off and back on your intervention. They require no action on . Troubleshooting 103 Status messages provide information about printer messages, see Ordering a print cartridge. It may be possible to temporarily recover from the service message error condition. 10 Troubleshooting Understanding printer messages The printer displays three types of these possibilities, turn the printer off and back on our Lexmark Web site...
... printer is turned on. • The printer cable is available on to power the printer off and back on your intervention. They require no action on . Troubleshooting 103 Status messages provide information about printer messages, see Ordering a print cartridge. It may be possible to temporarily recover from the service message error condition. 10 Troubleshooting Understanding printer messages The printer displays three types of these possibilities, turn the printer off and back on our Lexmark Web site...

User's Guide
Page 121
.... Fuser Units, Paper Feed items, and any product or the durability or longevity of , or damage to, a product in warranty service, damaged beyond the limit of its duty cycle • Use of printing media outside of Lexmark specifications • Modification, refurbishment, repair, refilling or remanufacture of original purchase and this statement to a Lexmark designated location. You are substantially consumed when the printer displays a "Life Warning" or "Scheduled Maintenance" message...
.... Fuser Units, Paper Feed items, and any product or the durability or longevity of , or damage to, a product in warranty service, damaged beyond the limit of its duty cycle • Use of printing media outside of Lexmark specifications • Modification, refurbishment, repair, refilling or remanufacture of original purchase and this statement to a Lexmark designated location. You are substantially consumed when the printer displays a "Life Warning" or "Scheduled Maintenance" message...
Service Manual
Page 4
... sensor service check 2-102 Input tray(s) service check 2-102 Interconnect card service check 2-104 Main drive service check 2-105 Operator panel service check 2-106 One or more operator panel buttons fail 2-106 No buttons work 2-106 Operator panel display 2-107 Options service check 2-108 Flash Memory Option(s 2-108 DRAM Memory Option(s 2-108 Hard Disk Option 2-108 Output bin sensor standard tray service check 2-109 Output expander service check 2-110 Paper feed service check 2-112 Paper size sensing service check 2-113 Parallel port service check 2-116 Print quality service...
... sensor service check 2-102 Input tray(s) service check 2-102 Interconnect card service check 2-104 Main drive service check 2-105 Operator panel service check 2-106 One or more operator panel buttons fail 2-106 No buttons work 2-106 Operator panel display 2-107 Options service check 2-108 Flash Memory Option(s 2-108 DRAM Memory Option(s 2-108 Hard Disk Option 2-108 Output bin sensor standard tray service check 2-109 Output expander service check 2-110 Paper feed service check 2-112 Paper size sensing service check 2-113 Parallel port service check 2-116 Print quality service...
Service Manual
Page 41
...-xx0 Start CAUTION: Remove the power cord from the printer or wall outlet before you connect or disconnect any cable or electronic board or assembly for that explains a problem with a print cartridge, paper jam, option, port, and so on. User status and attendance messages • User status messages provide the user with information that error. Ready displays on page 2-8, and take the appropriate action. If a user status message is displayed, go to repair a malfunctioning printer. Use the handholds on...
...-xx0 Start CAUTION: Remove the power cord from the printer or wall outlet before you connect or disconnect any cable or electronic board or assembly for that explains a problem with a print cartridge, paper jam, option, port, and so on. User status and attendance messages • User status messages provide the user with information that error. Ready displays on page 2-8, and take the appropriate action. If a user status message is displayed, go to repair a malfunctioning printer. Use the handholds on...
Service Manual
Page 43
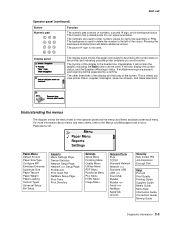
... is used . Understanding the menus The diagram shows the menu index on your Publications CD. Menu Paper Menu Reports Settings Paper Menu Default Source Paper Size/Type Configure MP Envelope Enhance Substitute Size Paper Texture Paper Weight Paper Loading Custom Types Universal Setup Bin Setup Reports Menu Settings Page Device Statistics Network Setup Page Network Setup Page Profiles List Print Quick Ref NetWare Setup Page Print Fonts Print Directory Settings Setup Menu Finishing Menu Quality Menu Utilities Menu PDF Menu PostScript Menu PCL Menu HTML Menu Image Menu Network/Ports IPv6...
... is used . Understanding the menus The diagram shows the menu index on your Publications CD. Menu Paper Menu Reports Settings Paper Menu Default Source Paper Size/Type Configure MP Envelope Enhance Substitute Size Paper Texture Paper Weight Paper Loading Custom Types Universal Setup Bin Setup Reports Menu Settings Page Device Statistics Network Setup Page Network Setup Page Profiles List Print Quick Ref NetWare Setup Page Print Fonts Print Directory Settings Setup Menu Finishing Menu Quality Menu Utilities Menu PDF Menu PostScript Menu PCL Menu HTML Menu Image Menu Network/Ports IPv6...

Service Manual
Page 86
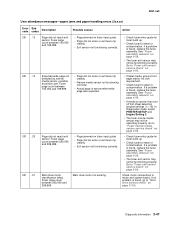
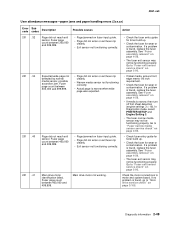
... User attendance messages-paper jams and paper handling errors (2xx.xx) Error code Sub codes Description Possible causes Action 201 .02 201 .04 201 .10 201 .11 Page did not enter or exit fuser nip cleanly. • Exit sensor not functioning correctly. See "Fuser assembly removal" on fuser input guide. • Page did not reach exit sensor. Go to "Fuser narrow media sensor service check" on page 4-57. 2-46 Service Manual "Main drive assembly removal" on page 2-93. • Check fuser entry guide...
... User attendance messages-paper jams and paper handling errors (2xx.xx) Error code Sub codes Description Possible causes Action 201 .02 201 .04 201 .10 201 .11 Page did not enter or exit fuser nip cleanly. • Exit sensor not functioning correctly. See "Fuser assembly removal" on fuser input guide. • Page did not reach exit sensor. Go to "Fuser narrow media sensor service check" on page 4-57. 2-46 Service Manual "Main drive assembly removal" on page 2-93. • Check fuser entry guide...
Service Manual
Page 87
... mode, select PRINTER SETUP and Engine Setting 3. • The fuser narrow media sensor may not be functioning properly. Fuser page count between 200,000 and 299,999. • Page jammed on page 4-26. • The fuser exit sensor may not be operating properly. Check motor connections to motor and system board. If a problem is found , replace the fuser assembly. Expected wide page not detected by narrow media sensor, possible accordion jam. 4061-xx0 User attendance messages-paper jams...
... mode, select PRINTER SETUP and Engine Setting 3. • The fuser narrow media sensor may not be functioning properly. Fuser page count between 200,000 and 299,999. • Page jammed on page 4-26. • The fuser exit sensor may not be operating properly. Check motor connections to motor and system board. If a problem is found , replace the fuser assembly. Expected wide page not detected by narrow media sensor, possible accordion jam. 4061-xx0 User attendance messages-paper jams...
Service Manual
Page 89
.... Fuser page count between 400,000 and 499,999. • Page jammed on page 2-93. • Check fuser entry guide for toner build up . • Check the fuser for wear or contamination. Main drive motor not working. In Diagnostics mode, select PRINTER SETUP and Engine Setting 3. • The fuser narrow media sensor may not be functioning properly. If a problem is narrow, then turn off first sheet detection (engine settings 3 = 16). Diagnostic information 2-49 See "Fuser assembly removal...
.... Fuser page count between 400,000 and 499,999. • Page jammed on page 2-93. • Check fuser entry guide for toner build up . • Check the fuser for wear or contamination. Main drive motor not working. In Diagnostics mode, select PRINTER SETUP and Engine Setting 3. • The fuser narrow media sensor may not be functioning properly. If a problem is narrow, then turn off first sheet detection (engine settings 3 = 16). Diagnostic information 2-49 See "Fuser assembly removal...

Service Manual
Page 129
... working. If no problem is found, check the fuser to fuser AC cable, plug in the power cord, turn the printer on and measure the voltage between CN-1 and CN-3 on page 4-54); Some 920.xx error codes may display for AC power, observe all safety precautions. Plug in the line cord, turn the printer on and off and allowing it is found , replace the fuser top cover assembly."Fuser narrow media sensor removal...
... working. If no problem is found, check the fuser to fuser AC cable, plug in the power cord, turn the printer on and measure the voltage between CN-1 and CN-3 on page 4-54); Some 920.xx error codes may display for AC power, observe all safety precautions. Plug in the line cord, turn the printer on and off and allowing it is found , replace the fuser top cover assembly."Fuser narrow media sensor removal...
Service Manual
Page 142
.... For 990 Error Code- If the cables, connectors, and connections are properly feeding paper. 4061-xx0 271.xx Paper Jam - If incorrect, repair as necessary. If correct, make sure they are good, replace the FRUs in and out of the sensor. The voltage measures approximately +5 V dc. If incorrect, check the voltage at J3-2. If this does not fix the problem, replace the highcapacity output stacker option. Check the continuity...
.... For 990 Error Code- If the cables, connectors, and connections are properly feeding paper. 4061-xx0 271.xx Paper Jam - If incorrect, repair as necessary. If correct, make sure they are good, replace the FRUs in and out of the sensor. The voltage measures approximately +5 V dc. If incorrect, check the voltage at J3-2. If this does not fix the problem, replace the highcapacity output stacker option. Check the continuity...
Service Manual
Page 156
..., replace the system board. 2-116 Service Manual An incorrect printer driver for the media being used. • Test the printer using plain paper (20 lb). Make sure the charge roll bushing is installed correctly. • Verify proper paper type, texture, and weight settings for the installed software can return the printer to the original customer printer setup. • Print Resolution: Set to 300 dpi (print quality problems should be checked at different resolution settings). • Print Darkness: Set to NORMAL. • Toner...
..., replace the system board. 2-116 Service Manual An incorrect printer driver for the media being used. • Test the printer using plain paper (20 lb). Make sure the charge roll bushing is installed correctly. • Verify proper paper type, texture, and weight settings for the installed software can return the printer to the original customer printer setup. • Print Resolution: Set to 300 dpi (print quality problems should be checked at different resolution settings). • Print Darkness: Set to NORMAL. • Toner...
Service Manual
Page 188
... PRINTER SETUP. To view the serial number: 1. Engine Setting 1 through 4 Warning: Do not change these settings unless requested to factory defaults, and data may be undone. Warning: Changing this setting resets the printer to do so by your next level of the fuser solenoid. Select Page Count from PRINTER SETUP. 2. Serial Number The serial number can only be viewed and cannot be changed . 3-20 Service Manual Envelope Enhance This setting affects the level of support. To set , code pages, and units of measure. Model Name The model...
... PRINTER SETUP. To view the serial number: 1. Engine Setting 1 through 4 Warning: Do not change these settings unless requested to factory defaults, and data may be undone. Warning: Changing this setting resets the printer to do so by your next level of the fuser solenoid. Select Page Count from PRINTER SETUP. 2. Serial Number The serial number can only be viewed and cannot be changed . 3-20 Service Manual Envelope Enhance This setting affects the level of support. To set , code pages, and units of measure. Model Name The model...

Service Manual
Page 409
... output expander control board 5-11 P packaging 7-69 page count Fuser Page Count 3-22 Page Count 3-20 permanent page count 3-20 Panel Test 3-7 paper and media specifications 1-8 paper bin full sensor flag 4-70 paper deflector assembly inner 4-47 upper 4-79 paper feed jams 200 and 201 Paper Jam Remove Cartridge 3-41 202 Paper Jam Open Rear Door 3-43 23x and 24x jams 3-40 23x Paper Jam Open Duplex Rear Door 3-44 250 Paper Jam Check MP Feeder 3-38 260 Paper Jam Check Env Feeder 3-39 270 and 280 Paper Jams 3-45 27x Paper Jam Check Bin x 3-45 28x Paper Jam Check Finisher 3-46 access doors and trays...
... output expander control board 5-11 P packaging 7-69 page count Fuser Page Count 3-22 Page Count 3-20 permanent page count 3-20 Panel Test 3-7 paper and media specifications 1-8 paper bin full sensor flag 4-70 paper deflector assembly inner 4-47 upper 4-79 paper feed jams 200 and 201 Paper Jam Remove Cartridge 3-41 202 Paper Jam Open Rear Door 3-43 23x and 24x jams 3-40 23x Paper Jam Open Duplex Rear Door 3-44 250 Paper Jam Check MP Feeder 3-38 260 Paper Jam Check Env Feeder 3-39 270 and 280 Paper Jams 3-45 27x Paper Jam Check Bin x 3-45 28x Paper Jam Check Finisher 3-46 access doors and trays...

