Quick Reference
Page 6
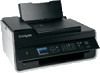
... • Lexmark S515 • Lexmark S519 Printer features Depending on the features of the printer that will help you manage and accomplish printing and imaging tasks: • Wireless or Ethernet networking-Print and scan from anywhere in two‑sided printing lets you save...installation software CD that display your home or office over a secure wireless network with one‑touch, computer‑free black or color copying. Using the SmartSolutions toolkit on a wireless network, then you purchased. xxxxxxxxxxxxxxxxxxxxxxxxxxxxxxxxx xxxxxxxxxxxxxx xxxxxxxxxxxxxxxxxxx Notes: &#...
... • Lexmark S515 • Lexmark S519 Printer features Depending on the features of the printer that will help you manage and accomplish printing and imaging tasks: • Wireless or Ethernet networking-Print and scan from anywhere in two‑sided printing lets you save...installation software CD that display your home or office over a secure wireless network with one‑touch, computer‑free black or color copying. Using the SmartSolutions toolkit on a wireless network, then you purchased. xxxxxxxxxxxxxxxxxxxxxxxxxxxxxxxxx xxxxxxxxxxxxxx xxxxxxxxxxxxxxxxxxx Notes: &#...
Quick Reference
Page 15
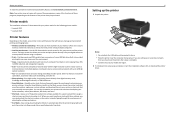
... enter or edit the date and time shown on the display. • Return to the previous screen. • Exit from a saved list of copies or prints you have already begun entering the number. 10 Dial tone Dial the telephone number manually using the keypad before sending the fax. 11 Address Book... level in a fax number to wait for three seconds to turn off the printer. 2 Display View: Note: The display is turned off . • Switch to black‑and‑white mode. 14 Start Start a job, depending on which mode is on, press to switch to view the last five numbers dialed...
... enter or edit the date and time shown on the display. • Return to the previous screen. • Exit from a saved list of copies or prints you have already begun entering the number. 10 Dial tone Dial the telephone number manually using the keypad before sending the fax. 11 Address Book... level in a fax number to wait for three seconds to turn off the printer. 2 Display View: Note: The display is turned off . • Switch to black‑and‑white mode. 14 Start Start a job, depending on which mode is on, press to switch to view the last five numbers dialed...
Quick Reference
Page 17
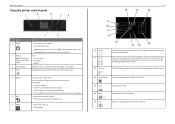
...Make sure you have a new ink cartridge or cartridges before you may dry out. Note: The printhead moves to Lexmark for printing photos. • For best results, use , return this cartridge to the cartridge installation position. After use, return this cartridge to..., order high‑yield ink cartridges. • Depending on the Lexmark Web site at www.lexmark.com. Lexmark S519 models Item Return Program Regular cartridge2 cartridge1 Black cartridge 160 Not available High‑yield black cartridge 160XL 160XLA Yellow color cartridge 160 Not available High‑yield...
...Make sure you have a new ink cartridge or cartridges before you may dry out. Note: The printhead moves to Lexmark for printing photos. • For best results, use , return this cartridge to the cartridge installation position. After use, return this cartridge to..., order high‑yield ink cartridges. • Depending on the Lexmark Web site at www.lexmark.com. Lexmark S519 models Item Return Program Regular cartridge2 cartridge1 Black cartridge 160 Not available High‑yield black cartridge 160XL 160XLA Yellow color cartridge 160 Not available High‑yield...
Quick Reference
Page 18
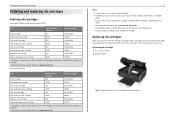
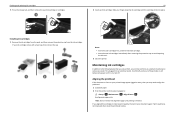
...you may need to align the printhead. 1 Load plain paper. 2 From the printer control panel, navigate to: > Setup > >Maintenance > An alignment page prints. > Align Printer > Note: Do not remove the alignment page until the cartridge clicks into an electrical outlet. Ordering and replacing ink cartridges 3 Press the release... the characters or lines on if it is plugged into place. 3 1 2 Notes: • Insert the color cartridges first, and then the black cartridge. • Insert the new ink cartridges immediately after removing the protective cap to avoid exposing the ink to improve...
...you may need to align the printhead. 1 Load plain paper. 2 From the printer control panel, navigate to: > Setup > >Maintenance > An alignment page prints. > Align Printer > Note: Do not remove the alignment page until the cartridge clicks into an electrical outlet. Ordering and replacing ink cartridges 3 Press the release... the characters or lines on if it is plugged into place. 3 1 2 Notes: • Insert the color cartridges first, and then the black cartridge. • Insert the new ink cartridges immediately after removing the protective cap to avoid exposing the ink to improve...
Quick Reference
Page 27
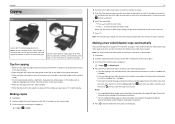
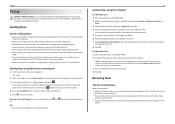
...When using the scanner glass, then press the arrow buttons to scroll to 2‑sided to 2‑sided. • If you select color or black‑only printing, the light that corresponds to the width of printer inactivity. Tips for copying • Make sure you purchased a printer without an ADF, then... instructions on the ADF to your choice comes on the scanner glass. Press every time you make a selection, and then press until you need to black‑and‑white mode. Note: You cannot make a selection. 6 Select the copy mode: • Press to switch to color mode. • ...
...When using the scanner glass, then press the arrow buttons to scroll to 2‑sided to 2‑sided. • If you select color or black‑only printing, the light that corresponds to the width of printer inactivity. Tips for copying • Make sure you purchased a printer without an ADF, then... instructions on the ADF to your choice comes on the scanner glass. Press every time you make a selection, and then press until you need to black‑and‑white mode. Note: You cannot make a selection. 6 Select the copy mode: • Press to switch to color mode. • ...
Quick Reference
Page 41
... is working if you hear a dial tone. • If you set up this step to add more numbers. 4 Press the Color/Black button to select a color or black‑and‑white fax. 5 Press to a working telephone, DSL, or VoIP line. Receiving faxes Tips for sending faxes • ... document after copying or scanning, lift the ADF input tray. • When using the computer For Windows users 1 With a document open , choose File > Print. 2 From the Printer pop‑up to receive faxes automatically (Auto Answer On), then load paper in the Dialing Prefix dialog. 6 Select the appropriate paper...
... is working if you hear a dial tone. • If you set up this step to add more numbers. 4 Press the Color/Black button to select a color or black‑and‑white fax. 5 Press to a working telephone, DSL, or VoIP line. Receiving faxes Tips for sending faxes • ... document after copying or scanning, lift the ADF input tray. • When using the computer For Windows users 1 With a document open , choose File > Print. 2 From the Printer pop‑up to receive faxes automatically (Auto Answer On), then load paper in the Dialing Prefix dialog. 6 Select the appropriate paper...

User's Guide
Page 13
...or in multiple packs. • You can also be used for printing photos. Lexmark S519 models Item Return Program cartridge1 Regular cartridge2 Black cartridge 160 Not available High‑yield black cartridge 160XL 160XLA Yellow color cartridge 160 Not available High‑yield ... use only. After use , return this cartridge to Lexmark for remanufacturing, refilling, or recycling. 2 Available only on your needs. • For page yield information, visit www.lexmark.com/yields. • The cartridges used for printing documents can order a mix of standard ink cartridges and...
...or in multiple packs. • You can also be used for printing photos. Lexmark S519 models Item Return Program cartridge1 Regular cartridge2 Black cartridge 160 Not available High‑yield black cartridge 160XL 160XLA Yellow color cartridge 160 Not available High‑yield ... use only. After use , return this cartridge to Lexmark for remanufacturing, refilling, or recycling. 2 Available only on your needs. • For page yield information, visit www.lexmark.com/yields. • The cartridges used for printing documents can order a mix of standard ink cartridges and...

User's Guide
Page 20
Using the printer control panel buttons and menus 20 13 Black 14 Start Switch to low. The Sleep feature optimizes energy efficiency by reducing the printer power consumption. To ... is the time it takes for the printer to switch to Sleep mode when the printer is selected. 15 Cancel • Cancel a print, copy, scan, or fax job in progress. • Clear current settings or error messages, and return to previous settings. 16 Ethernet... press . Start a job, depending on which mode is left idle for 10 minutes. • Set screen brightness to black‑and‑white mode.
Using the printer control panel buttons and menus 20 13 Black 14 Start Switch to low. The Sleep feature optimizes energy efficiency by reducing the printer power consumption. To ... is the time it takes for the printer to switch to Sleep mode when the printer is selected. 15 Cancel • Cancel a print, copy, scan, or fax job in progress. • Clear current settings or error messages, and return to previous settings. 16 Ethernet... press . Start a job, depending on which mode is left idle for 10 minutes. • Set screen brightness to black‑and‑white mode.

User's Guide
Page 52
... single page. 5 Press . Note: The selected copy settings are reset to your choice comes on the paper size that you select color or black‑only printing, the light that corresponds to the factory default after two minutes of the scanner glass, and then press . Press to save the setting. &#...8226; If you select Borderless, then the printer will reduce or enlarge the document or photo as necessary to print a borderless copy on . 7 Press . Copying 52 When you selected. Copying an ID card 1 Load plain A4‑ or letter‑size paper. 2 ...
... single page. 5 Press . Note: The selected copy settings are reset to your choice comes on the paper size that you select color or black‑only printing, the light that corresponds to the factory default after two minutes of the scanner glass, and then press . Press to save the setting. &#...8226; If you select Borderless, then the printer will reduce or enlarge the document or photo as necessary to print a borderless copy on . 7 Press . Copying 52 When you selected. Copying an ID card 1 Load plain A4‑ or letter‑size paper. 2 ...

User's Guide
Page 56
Scanning stops and the printer returns to black‑and‑white mode. Copying 56 6 Select the copy mode: • Press to switch to color mode. • ... Canceling copy jobs To cancel a copy job, press , and then press . When you select color or black‑only printing, the light that corresponds to your choice comes on. 7 Press to print on one side of the paper. 8 Load the next page of the document. • If you are.... 9 Remove the paper from the paper exit tray, and then reload the paper with the top edge first to print the other side of the paper is faceup. 10 Press .
Scanning stops and the printer returns to black‑and‑white mode. Copying 56 6 Select the copy mode: • Press to switch to color mode. • ... Canceling copy jobs To cancel a copy job, press , and then press . When you select color or black‑only printing, the light that corresponds to your choice comes on. 7 Press to print on one side of the paper. 8 Load the next page of the document. • If you are.... 9 Remove the paper from the paper exit tray, and then reload the paper with the top edge first to print the other side of the paper is faceup. 10 Press .

User's Guide
Page 182
...location 10 paper capacity 35 automatic fax conversion setting 78 B background, removing 54 backing material cleaning 124 bidirectional communication enabling 162 black and white scanning 62 blocking faxes 90 broadcast fax, sending immediately 82 buttons printer control panel 18 C cable installation 113 ... send faxes 152 cartridges, ink ordering 13 using genuine Lexmark 14 certificate request 108 Change to [Size] [Type] Paper 131 Change to [Size] Paper 131 changing default printing mode 48 changing page order 37 changing print order 37 changing Sleep timeout 20 changing wireless settings after...
...location 10 paper capacity 35 automatic fax conversion setting 78 B background, removing 54 backing material cleaning 124 bidirectional communication enabling 162 black and white scanning 62 blocking faxes 90 broadcast fax, sending immediately 82 buttons printer control panel 18 C cable installation 113 ... send faxes 152 cartridges, ink ordering 13 using genuine Lexmark 14 certificate request 108 Change to [Size] [Type] Paper 131 Change to [Size] Paper 131 changing default printing mode 48 changing page order 37 changing print order 37 changing Sleep timeout 20 changing wireless settings after...
User's Guide
Page 187
... unit location 12 scanner unit does not close 149 scanning creating a PDF from scan 61 documents for editing 60 documents for e‑mailing 61 in black and white 62 photos for editing 59 tips 57 to a flash drive 58 to a local computer 57 to a memory card 58 to a network 58 to... ID 77 fax header and footer 77 fax quality 88 maximum sending speed 78 sender information 77 Transmit Terminal Identification (TTI) 77 setting the duplex printing dry time 45 setting up fax country‑ or region‑specific 73 digital telephone service 72 DSL connection 70 standard telephone line connection 67...
... unit location 12 scanner unit does not close 149 scanning creating a PDF from scan 61 documents for editing 60 documents for e‑mailing 61 in black and white 62 photos for editing 59 tips 57 to a flash drive 58 to a local computer 57 to a memory card 58 to a network 58 to... ID 77 fax header and footer 77 fax quality 88 maximum sending speed 78 sender information 77 Transmit Terminal Identification (TTI) 77 setting the duplex printing dry time 45 setting up fax country‑ or region‑specific 73 digital telephone service 72 DSL connection 70 standard telephone line connection 67...


