
Embedded Web Server User's Guide
Page 2
Contents 2 Contents Overview...3 Using the Embedded Web Server 4 Accessing the Embedded Web Server...4 Understanding the home page...4 Customizing printer settings...5 Troubleshooting 7 Embedded Web Server does not open...7 Contacting customer support...7 Notices...8
Contents 2 Contents Overview...3 Using the Embedded Web Server 4 Accessing the Embedded Web Server...4 Understanding the home page...4 Customizing printer settings...5 Troubleshooting 7 Embedded Web Server does not open...7 Contacting customer support...7 Notices...8

Embedded Web Server User's Guide
Page 3
You can also view reports on connecting the printer to your network. Overview 3 Overview The Embedded Web Server lets you view and remotely customize printer settings even when you are not physically near the printer. For more information on printer activities, monitor and order printer supplies online, contact customer support, and download updates for your network, see the printer User's Guide. The Embedded Web Server requires that the printer is connected to your printer.
You can also view reports on connecting the printer to your network. Overview 3 Overview The Embedded Web Server lets you view and remotely customize printer settings even when you are not physically near the printer. For more information on printer activities, monitor and order printer supplies online, contact customer support, and download updates for your network, see the printer User's Guide. The Embedded Web Server requires that the printer is connected to your printer.

Embedded Web Server User's Guide
Page 4
... information on the menu selected from the navigation pane. The Embedded Web Server appears. For more information, see the printer User's Guide. 1 Obtain the printer IP address: • From the printer home screen • From the TCP/IP section in the Embedded Web Server, depending on your network. Note: The...appear in the Networks/Ports menu Note: An IP address appears as 123.123.123.123. 2 Open a Web browser, and then type the printer IP address in the address field. Using the Embedded Web Server 4 Using the Embedded Web Server Accessing the Embedded Web Server Note: Make sure ...
... information on the menu selected from the navigation pane. The Embedded Web Server appears. For more information, see the printer User's Guide. 1 Obtain the printer IP address: • From the printer home screen • From the TCP/IP section in the Embedded Web Server, depending on your network. Note: The...appear in the Networks/Ports menu Note: An IP address appears as 123.123.123.123. 2 Open a Web browser, and then type the printer IP address in the address field. Using the Embedded Web Server 4 Using the Embedded Web Server Accessing the Embedded Web Server Note: Make sure ...

Embedded Web Server User's Guide
Page 5
...a folder destination when the Scan to a File Transfer Protocol (FTP) address. E-mail/FTP Settings View and customize settings for the printer and Embedded Web Server. Additional Solutions Install, customize, or uninstall a solution. Import/Export Import or export a configuration file. Note:... This feature may not appear in the Embedded Web Server, depending on your printer model. Copy Settings View and customize settings for sending and receiving faxes. Note: This feature may not appear in the Embedded ...
...a folder destination when the Scan to a File Transfer Protocol (FTP) address. E-mail/FTP Settings View and customize settings for the printer and Embedded Web Server. Additional Solutions Install, customize, or uninstall a solution. Import/Export Import or export a configuration file. Note:... This feature may not appear in the Embedded Web Server, depending on your printer model. Copy Settings View and customize settings for sending and receiving faxes. Note: This feature may not appear in the Embedded ...

Embedded Web Server User's Guide
Page 6
Using the Embedded Web Server 6 Click To Device Management Allow the Embedded Web Server to collect data from the printer. 3 Click Submit to save, or click Reset Form to discard the new settings.
Using the Embedded Web Server 6 Click To Device Management Allow the Embedded Web Server to collect data from the printer. 3 Click Submit to save, or click Reset Form to discard the new settings.

Embedded Web Server User's Guide
Page 7
... to solve your printing problem. For other tasks to help you solve your problem. Lexmark has various ways to help you successfully use your system support person. • Make sure printer IP address is correct. Telephone support is also listed on the menu settings page.... call 1-800-539-6275. In the U.S. They can work with you to solve your printer problem or provide Assisted Service where the Lexmark Service Representative can send an e-mail to the Lexmark team, describing your computer through the Internet to troubleshoot problems, install updates, or complete other...
... to solve your printing problem. For other tasks to help you solve your problem. Lexmark has various ways to help you successfully use your system support person. • Make sure printer IP address is correct. Telephone support is also listed on the menu settings page.... call 1-800-539-6275. In the U.S. They can work with you to solve your printer problem or provide Assisted Service where the Lexmark Service Representative can send an e-mail to the Lexmark team, describing your computer through the Internet to troubleshoot problems, install updates, or complete other...
Quick Reference
Page 2
...bind, crush, or place heavy objects on the power cord. This patented printer is preaddressed. Place the empty Lexmark-branded inkjet cartridge or cartridges in our easy, no-cost method for returning empty Lexmark cartridges to maximize the environmental benefits. Do not pinch the power cord ...postage-paid return bag, and then seal the bag. Visit www.lexmark.com/recycle to Lexmark's recycling partner. Follow instructions to any subsequent user of the patented printer. Do not place or use only genuine Lexmark inkjet cartridges with all new parts, though components may be used...
...bind, crush, or place heavy objects on the power cord. This patented printer is preaddressed. Place the empty Lexmark-branded inkjet cartridge or cartridges in our easy, no-cost method for returning empty Lexmark cartridges to maximize the environmental benefits. Do not pinch the power cord ...postage-paid return bag, and then seal the bag. Visit www.lexmark.com/recycle to Lexmark's recycling partner. Follow instructions to any subsequent user of the patented printer. Do not place or use only genuine Lexmark inkjet cartridges with all new parts, though components may be used...

Quick Reference
Page 3
... 27 Tips for scanning...27 Scanning to a local computer 27 Scanning to a flash drive or memory card 27 Scanning directly to e‑mail using the printer software 27 Scanning to a PDF...28 Canceling scan jobs...28 E-mailing 29 Sending e-mail...29 Canceling an e‑mail...29 Setting up the... printer to fax 30 Step 1: Connect the printer to the telephone line 30 Step 2: Check the dial tone 37 Step 3: Set your fax name and fax number 37 Step 4: Set...
... 27 Tips for scanning...27 Scanning to a local computer 27 Scanning to a flash drive or memory card 27 Scanning directly to e‑mail using the printer software 27 Scanning to a PDF...28 Canceling scan jobs...28 E-mailing 29 Sending e-mail...29 Canceling an e‑mail...29 Setting up the... printer to fax 30 Step 1: Connect the printer to the telephone line 30 Step 2: Check the dial tone 37 Step 3: Set your fax name and fax number 37 Step 4: Set...
Quick Reference
Page 5
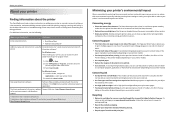
...Available on the installation software CD. 2 Available on the installation software CD and on the Lexmark Support Web site at http://support.lexmark.com. 5 Minimizing your printer's environmental impact We are committed to protecting the environment and are you adjust the darkness of...before printing. Two‑sided printing (duplexing) lets you to www.lexmark.com/recycle. About your printer About your printer Finding information about the printer The Quick Reference Guide contains instructions on adding your printer to a wireless network, setting up to 16 page images on one...
...Available on the installation software CD. 2 Available on the installation software CD and on the Lexmark Support Web site at http://support.lexmark.com. 5 Minimizing your printer's environmental impact We are committed to protecting the environment and are you adjust the darkness of...before printing. Two‑sided printing (duplexing) lets you to www.lexmark.com/recycle. About your printer About your printer Finding information about the printer The Quick Reference Guide contains instructions on adding your printer to a wireless network, setting up to 16 page images on one...
Quick Reference
Page 6
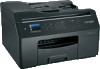
...8226; Do not attach the USB cable until prompted to do so. • Place the printer near the computer during setup. To read the Lexmark Environmental Sustainability Report, see www.lexmark.com/environment. Easily scan to a memory device or to multiple laptops or PCs over a ... some of the functions of these programs, depending on the model, your printer solutions. About your printer works for the following printer models: • Pro4000 • Pro4000c Printer features Depending on the features of the printer that you want to perform a task with up to 1200 dpi optical resolution...
...8226; Do not attach the USB cable until prompted to do so. • Place the printer near the computer during setup. To read the Lexmark Environmental Sustainability Report, see www.lexmark.com/environment. Easily scan to a memory device or to multiple laptops or PCs over a ... some of the functions of these programs, depending on the model, your printer solutions. About your printer works for the following printer models: • Pro4000 • Pro4000c Printer features Depending on the features of the printer that you want to perform a task with up to 1200 dpi optical resolution...

Quick Reference
Page 7
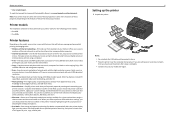
... Without a CD or DVD drive or for Linux 1 2 Download the printer driver from all areas of the printer. 5 Pull the paper tray completely out of the printer. About your printer 7 2 To initiate printer setup using a computer, insert the installation software CD, or download the printer driver. 4 If necessary, insert the correct language overlay until it clicks... does not appear after a minute, then see "Installation screen did not appear during installation" on page 45. 3 Remove tape and packing material from www.lexmark.com. Address Boko Dial Toen Pause Redial SD/MS/xD/MMC
... Without a CD or DVD drive or for Linux 1 2 Download the printer driver from all areas of the printer. 5 Pull the paper tray completely out of the printer. About your printer 7 2 To initiate printer setup using a computer, insert the installation software CD, or download the printer driver. 4 If necessary, insert the correct language overlay until it clicks... does not appear after a minute, then see "Installation screen did not appear during installation" on page 45. 3 Remove tape and packing material from www.lexmark.com. Address Boko Dial Toen Pause Redial SD/MS/xD/MMC

Quick Reference
Page 8
About your printer 6 Move the paper guides to the sides. 3 1 2 4 7 For legal‑size paper, extend the paper tray. 1 2 8 8 Load paper with the printable side facedown. 9 Adjust the paper guides to rest against the left, right, and bottom edges of the paper. 1 2 3 Note: Make sure the paper is below the maximum fill line located on the edge of the paper tray. Overloading the tray can cause paper jams.
About your printer 6 Move the paper guides to the sides. 3 1 2 4 7 For legal‑size paper, extend the paper tray. 1 2 8 8 Load paper with the printable side facedown. 9 Adjust the paper guides to rest against the left, right, and bottom edges of the paper. 1 2 3 Note: Make sure the paper is below the maximum fill line located on the edge of the paper tray. Overloading the tray can cause paper jams.

Quick Reference
Page 9
Address Boko Dial Toen Pause Redial SD/MS/xD/MMC 11 Connect the power cord only. Note: Do not attach the USB cable yet. 2 1 9 12 Make sure the printer is highlighted on . Address Boko Dial Toen Pause Redial SD/MS/xD/MMC 13 Using the printer control panel, press the up or down arrow button until the language you want is on the display, and then press OK . 14 Confirm the language, and then press OK . About your printer 10 Insert the paper tray.
Address Boko Dial Toen Pause Redial SD/MS/xD/MMC 11 Connect the power cord only. Note: Do not attach the USB cable yet. 2 1 9 12 Make sure the printer is highlighted on . Address Boko Dial Toen Pause Redial SD/MS/xD/MMC 13 Using the printer control panel, press the up or down arrow button until the language you want is on the display, and then press OK . 14 Confirm the language, and then press OK . About your printer 10 Insert the paper tray.

Quick Reference
Page 10
... Set the country or region, and then press OK . Fax Number Enter Fax Number and press OK Note: The date format varies, depending on the printer control panel, set up fax now? Please choose a time zone and press OK 10 19 To configure basic fax functions, press the left or right...
... Set the country or region, and then press OK . Fax Number Enter Fax Number and press OK Note: The date format varies, depending on the printer control panel, set up fax now? Please choose a time zone and press OK 10 19 To configure basic fax functions, press the left or right...

Quick Reference
Page 11
Your fax name identifies you will I be missing if I do this later? Lexmark Pro4000 Series Installation Configure Advanced Features You can I don't do this now? Note: Do not open the ink cartridge access door during the initial printhead preparation. .../MS/xD/MMC Continue SD/MS/xD/MMC 1 22 25 Close the ink cartridge access door. Get my printer ready to scan directly to my computer Configure Lexmark SmartSolutions and standalone email Get my printer ready to access all your sent faxes. 24 Insert each ink cartridge until it clicks into place. How...
Your fax name identifies you will I be missing if I do this later? Lexmark Pro4000 Series Installation Configure Advanced Features You can I don't do this now? Note: Do not open the ink cartridge access door during the initial printhead preparation. .../MS/xD/MMC Continue SD/MS/xD/MMC 1 22 25 Close the ink cartridge access door. Get my printer ready to scan directly to my computer Configure Lexmark SmartSolutions and standalone email Get my printer ready to access all your sent faxes. 24 Insert each ink cartridge until it clicks into place. How...
Quick Reference
Page 12
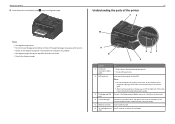
...indication of the input tray to retrieve the original documents easily. 3 PictBridge and USB Connect a PictBridge-enabled digital camera or a flash drive to the printer. Notes: • Do not load postcards, photos, small items, or thin media (such as magazine clippings) into the ADF. The alignment page... the ADF. port 4 Card reader light Check the card reader status. door About your printer 27 From the printer control panel, press OK to print an alignment page. 12 Understanding the parts of the printer 1 2 Address Boko Dial Toen Pause Redial SD/MS/xD/MMC Notes: • The...
...indication of the input tray to retrieve the original documents easily. 3 PictBridge and USB Connect a PictBridge-enabled digital camera or a flash drive to the printer. Notes: • Do not load postcards, photos, small items, or thin media (such as magazine clippings) into the ADF. The alignment page... the ADF. port 4 Card reader light Check the card reader status. door About your printer 27 From the printer control panel, press OK to print an alignment page. 12 Understanding the parts of the printer 1 2 Address Boko Dial Toen Pause Redial SD/MS/xD/MMC Notes: • The...

Quick Reference
Page 13
... Toen Pause Redial SD/MS/xD/MMC 15 13 12 11 14 Use the To 11 Customer support label Identify the model number of the printer, the customer support hot line, and the ink cartridge information. 12 Scanner glass Scan, copy, or fax photos and documents. 13 Power supply with port... Connect the printer to the power cord. 14 Duplex unit • Print on both sides of a sheet of paper. • Access paper jams. 15 USB port Connect the...
... Toen Pause Redial SD/MS/xD/MMC 15 13 12 11 14 Use the To 11 Customer support label Identify the model number of the printer, the customer support hot line, and the ink cartridge information. 12 Scanner glass Scan, copy, or fax photos and documents. 13 Power supply with port... Connect the printer to the power cord. 14 Duplex unit • Print on both sides of a sheet of paper. • Access paper jams. 15 USB port Connect the...

Quick Reference
Page 14
About your printer Use To 2 Display View: Note: The display is turned off in a fax number to wait for an outside line or get through menu items that ... options. • Save settings. 14 Use 8 Redial 9 Pause 10 Dial Tone To Display the last number dialed. Insert a three-second pause in Sleep mode. • Printer status • Messages • Menus 3 Arrow buttons Navigate through an automated answering system. Press the left or right arrow button to black‑and‑...
About your printer Use To 2 Display View: Note: The display is turned off in a fax number to wait for an outside line or get through menu items that ... options. • Save settings. 14 Use 8 Redial 9 Pause 10 Dial Tone To Display the last number dialed. Insert a three-second pause in Sleep mode. • Printer status • Messages • Menus 3 Arrow buttons Navigate through an automated answering system. Press the left or right arrow button to black‑and‑...

Quick Reference
Page 15
...a memory card or flash drive with the brand name label facing up. • Make sure any connector, the memory device, or the printer in select printer models. Notes: • The flash drive uses the same port that the memory card inserted is being accessed. For more information, see "...Check the wireless connection of data can occur. Inserting a memory card Inserting a flash drive FLASH DRIVE Notes: • Insert the card with the printer Insert a memory card into the card slot or a flash drive into the port. Warning-Potential Damage: Do not touch any cables, ports, ...
...a memory card or flash drive with the brand name label facing up. • Make sure any connector, the memory device, or the printer in select printer models. Notes: • The flash drive uses the same port that the memory card inserted is being accessed. For more information, see "...Check the wireless connection of data can occur. Inserting a memory card Inserting a flash drive FLASH DRIVE Notes: • Insert the card with the printer Insert a memory card into the card slot or a flash drive into the port. Warning-Potential Damage: Do not touch any cables, ports, ...

Quick Reference
Page 16
Notes: • If the printer does not recognize the memory device, then remove and reinsert it. • The printer reads only one memory device at a time. About your printer 16 Follow the instructions on the printer display or select from available options.
Notes: • If the printer does not recognize the memory device, then remove and reinsert it. • The printer reads only one memory device at a time. About your printer 16 Follow the instructions on the printer display or select from available options.


