
Network Guide
Page 2
... need to set up the printer on a wireless network 3 Installing the printer on a wireless network...4 What is Wi-Fi Protected Setup?...4 Configuring the printer wirelessly using WPS (Wi-Fi Protected Setup 5 Installing the printer on other computers...5 Interpreting the colors of the Wi-Fi indicator light...6 Special wireless installation instructions...6 Ethernet networking...
... need to set up the printer on a wireless network 3 Installing the printer on a wireless network...4 What is Wi-Fi Protected Setup?...4 Configuring the printer wirelessly using WPS (Wi-Fi Protected Setup 5 Installing the printer on other computers...5 Interpreting the colors of the Wi-Fi indicator light...6 Special wireless installation instructions...6 Ethernet networking...
Network Guide
Page 4
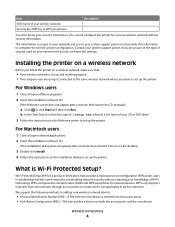
... Number (PIN)-A PIN from the new device is a product certification that communicate through access points or routers and is Wi-Fi Protected Setup? You cannot configure the printer for network devices. WPS configures the network name (SSID) and WPA passphrase for a secure wireless network without... network) Security key (WEP key or WPA passphrase) You must provide this information to complete the wireless printer configuration. Wi-Fi Protected Setup (WPS) is entered into the access point. • Push Button Configuration (PBC)-The user pushes a button on the Welcome screen ...
... Number (PIN)-A PIN from the new device is a product certification that communicate through access points or routers and is Wi-Fi Protected Setup? You cannot configure the printer for network devices. WPS configures the network name (SSID) and WPA passphrase for a secure wireless network without... network) Security key (WEP key or WPA passphrase) You must provide this information to complete the wireless printer configuration. Wi-Fi Protected Setup (WPS) is entered into the access point. • Push Button Configuration (PBC)-The user pushes a button on the Welcome screen ...
Network Guide
Page 5
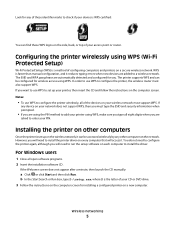
... set up your access point or router. However, you will need to add your printer using WPS. b In the Start Search or Run box, type D:\setup.exe, where D is the letter of the devices on your network does not support WPS, then you must type the SSID and security information when... prompted. • If you are using WPS (Wi-Fi Protected Setup) Wi-Fi Protected Setup (WPS) is set up on the wireless network, it . The SSID and WPA passphrase are automatically detected and configured for any device on...
... set up your access point or router. However, you will need to add your printer using WPS. b In the Start Search or Run box, type D:\setup.exe, where D is the letter of the devices on your network does not support WPS, then you must type the SSID and security information when... prompted. • If you are using WPS (Wi-Fi Protected Setup) Wi-Fi Protected Setup (WPS) is set up on the wireless network, it . The SSID and WPA passphrase are automatically detected and configured for any device on...
Network Guide
Page 7
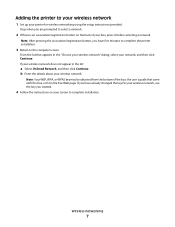
... the printer installation. 3 Return to complete installation. Note: After pressing the association/registration button, you have already changed the key for wireless networking using the setup instructions provided. If your wireless network does not appear in the "Choose your wireless network" dialog, select your wireless network. b Enter the details about your...
... the printer installation. 3 Return to complete installation. Note: After pressing the association/registration button, you have already changed the key for wireless networking using the setup instructions provided. If your wireless network does not appear in the "Choose your wireless network" dialog, select your wireless network. b Enter the details about your...
Network Guide
Page 8
.... For Windows users 1 Close all open software programs. 2 Insert the installation software CD. b In the Start Search or Run box, type D:\setup.exe, where D is easier for you to remember. Ethernet networking 8 If the installation dialog does not appear after a minute, do one of ... valid, unique IP address for the printer to use the default printer nickname, or assign a name that : • You have completed the initial setup of your network. Use a new network cable when possible to avoid potential problems caused by a damaged cable. For Macintosh users 1 Close all open ...
.... For Windows users 1 Close all open software programs. 2 Insert the installation software CD. b In the Start Search or Run box, type D:\setup.exe, where D is easier for you to remember. Ethernet networking 8 If the installation dialog does not appear after a minute, do one of ... valid, unique IP address for the printer to use the default printer nickname, or assign a name that : • You have completed the initial setup of your network. Use a new network cable when possible to avoid potential problems caused by a damaged cable. For Macintosh users 1 Close all open ...
Network Guide
Page 10
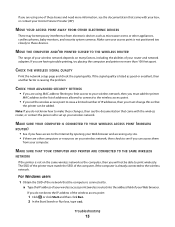
...network has Internet access, try connecting to the Internet over a wireless connection. • The printer driver is installed on printing a network setup page. • Your WEP key or WPA passphrase is solid green. • The computer and printer are correct for any obvious damage.... Ethernet cable is secure). Check the connectors at both connected to the same wireless network. If your security information is correct, run the wireless setup again. • The printer and the computer are turned on . • The wireless network is correct. Troubleshooting 10 If possible, use...
...network has Internet access, try connecting to the Internet over a wireless connection. • The printer driver is installed on printing a network setup page. • Your WEP key or WPA passphrase is solid green. • The computer and printer are correct for any obvious damage.... Ethernet cable is secure). Check the connectors at both connected to the same wireless network. If your security information is correct, run the wireless setup again. • The printer and the computer are turned on . • The wireless network is correct. Troubleshooting 10 If possible, use...
Network Guide
Page 11
... Network. 4 If you are updated to the most recent version and allow the printer software to a VPN. • Any non-Microsoft firewalls on printing a network setup page. The IP address appears as 192.168.0.100. Many devices can locate the printer IP address by viewing the printer network...
... Network. 4 If you are updated to the most recent version and allow the printer software to a VPN. • Any non-Microsoft firewalls on printing a network setup page. The IP address appears as 192.168.0.100. Many devices can locate the printer IP address by viewing the printer network...
Network Guide
Page 12
... network connections and resolve connectivity issues. Hexadecimal characters are connected to another network through a VPN connection, you will not be : • From 8 to Demo Mode: > Setup > Demo Mode. Hexadecimal characters are case-sensitive. Wireless troubleshooting Cannot print over your wireless network. ASCII characters in a WPA passphrase are case-sensitive. Select Off...
... network connections and resolve connectivity issues. Hexadecimal characters are connected to another network through a VPN connection, you will not be : • From 8 to Demo Mode: > Setup > Demo Mode. Hexadecimal characters are case-sensitive. Wireless troubleshooting Cannot print over your wireless network. ASCII characters in a WPA passphrase are case-sensitive. Select Off...
Network Guide
Page 13
... MAC address to the list of your Web browser. If the signal quality is causing the problem. CHECK THE WIRELESS SIGNAL QUALITY Print the network setup page and check the signal quality. If you are using MAC address filtering to limit access to your wireless network, then you must change this...
... MAC address to the list of your Web browser. If the signal quality is causing the problem. CHECK THE WIRELESS SIGNAL QUALITY Print the network setup page and check the signal quality. If you are using MAC address filtering to limit access to your wireless network, then you must change this...
Network Guide
Page 14
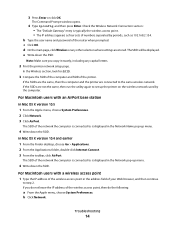
.... The Command Prompt window opens. 4 Type ipconfig, and then press Enter. d On the main page, click Wireless or any capital letters. 2 Print the printer network setup page. Note: Make sure you do the following: a From the Apple menu, choose System Preferences.
.... The Command Prompt window opens. 4 Type ipconfig, and then press Enter. d On the main page, click Wireless or any capital letters. 2 Print the printer network setup page. Note: Make sure you do the following: a From the Apple menu, choose System Preferences.
Network Guide
Page 19
... back of WPA. Other possible security settings are less likely to support this. Older routers are WPA and WPA2. To find the UAA, print a network setup page and look for the UAA listing. A newer version of the computer that describes the technology used to create an interoperable wireless local area network...
... back of WPA. Other possible security settings are less likely to support this. Older routers are WPA and WPA2. To find the UAA, print a network setup page and look for the UAA listing. A newer version of the computer that describes the technology used to create an interoperable wireless local area network...
Fax Guide
Page 5
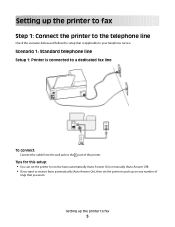
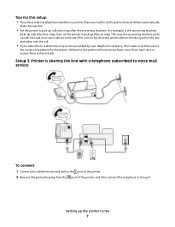
Tips for this setup: • You can set the printer to receive faxes automatically (Auto Answer On) or manually (Auto Answer Off). • If you want to receive faxes ... to pick up the printer to fax Step 1: Connect the printer to the telephone line Check the scenarios below and follow the setup that you want . Scenario 1: Standard telephone line Setup 1: Printer is applicable to the port of rings that is connected to a dedicated fax line To connect: Connect the cable from...
Tips for this setup: • You can set the printer to receive faxes automatically (Auto Answer On) or manually (Auto Answer Off). • If you want to receive faxes ... to pick up the printer to fax Step 1: Connect the printer to the telephone line Check the scenarios below and follow the setup that you want . Scenario 1: Standard telephone line Setup 1: Printer is applicable to the port of rings that is connected to a dedicated fax line To connect: Connect the cable from...

Fax Guide
Page 6
Connected to different wall jacks To connect: Connect the cable from the port of the printer. Setup 2: Printer is sharing the line with an answering machine Connected to the same telephone wall jack To connect: 1 Connect the cable from the wall jack to the port of the printer. 2 Remove the protective plug from the wall jack to the port of the printer, and then connect the answering machine to the port. Setting up the printer to fax 6
Connected to different wall jacks To connect: Connect the cable from the port of the printer. Setup 2: Printer is sharing the line with an answering machine Connected to the same telephone wall jack To connect: 1 Connect the cable from the wall jack to the port of the printer. 2 Remove the protective plug from the wall jack to the port of the printer, and then connect the answering machine to the port. Setting up the printer to fax 6
Fax Guide
Page 7
.... Setting up the printer to pick up calls first and your telephone company, then make sure that you set the correct ring pattern for this setup: • If you have set it to receive faxes automatically. This way, the answering machine picks up after four rings, then set the printer ... the protective plug from the port of the printer, and then connect the telephone to a distinctive ring service provided by your voice calls are received. Setup 3: Printer is a fax, then the printer detects the fax signal on your line, then you have only one telephone number on the line and takes...
.... Setting up the printer to pick up calls first and your telephone company, then make sure that you set the correct ring pattern for this setup: • If you have set it to receive faxes automatically. This way, the answering machine picks up after four rings, then set the printer ... the protective plug from the port of the printer, and then connect the telephone to a distinctive ring service provided by your voice calls are received. Setup 3: Printer is a fax, then the printer detects the fax signal on your line, then you have only one telephone number on the line and takes...
Fax Guide
Page 8
Tips for this setup: • This setup works best if you can also set the printer to turn off the voice mail service when you set the correct ring pattern for the ...
Tips for this setup: • This setup works best if you can also set the printer to turn off the voice mail service when you set the correct ring pattern for the ...
Fax Guide
Page 9
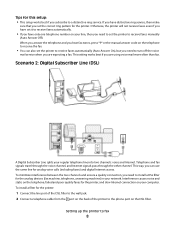
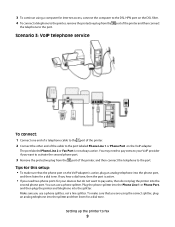
... hear a dial tone, then the port is active. • If you need to fax 9 You can use a phone splitter, not a line splitter. Tips for this setup: • To make sure that the phone port on the DSL filter. 4 To connect a telephone to the printer, remove the protective plug from the port...
... hear a dial tone, then the port is active. • If you need to fax 9 You can use a phone splitter, not a line splitter. Tips for this setup: • To make sure that the phone port on the DSL filter. 4 To connect a telephone to the printer, remove the protective plug from the port...
Fax Guide
Page 10
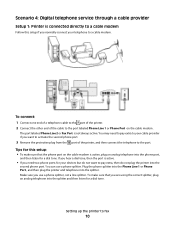
Scenario 4: Digital telephone service through a cable provider Setup 1: Printer is connected directly to a cable modem Follow this setup: • To make sure that the phone port on the cable modem. The port labeled Phone Line 2 or Fax Port is active. • If you ... do not want to activate the second phone port. 3 Remove the protective plug from the port of the cable to the port. Tips for this setup if you are using the correct splitter, plug an analog telephone into the splitter. If you hear a dial tone, then the port is not always...
Scenario 4: Digital telephone service through a cable provider Setup 1: Printer is connected directly to a cable modem Follow this setup: • To make sure that the phone port on the cable modem. The port labeled Phone Line 2 or Fax Port is active. • If you ... do not want to activate the second phone port. 3 Remove the protective plug from the port of the cable to the port. Tips for this setup if you are using the correct splitter, plug an analog telephone into the splitter. If you hear a dial tone, then the port is not always...
Fax Guide
Page 11
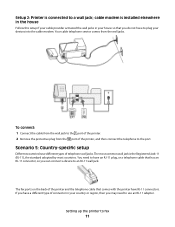
... to have an RJ-11 plug, or a telephone cable that has an RJ-11 connector, so you may need to a wall jack; Scenario 5: Country-specific setup Different countries have a different type of the printer. 2 Remove the protective plug from the wall jacks. The fax ports on the back of the printer... types of the printer, and then connect the telephone to an RJ-11 wall jack. cable modem is installed elsewhere in the house Follow this setup if your cable provider activated the wall jacks in your country or region, then you can connect a device to the port. Your cable telephone service...
... to have an RJ-11 plug, or a telephone cable that has an RJ-11 connector, so you may need to a wall jack; Scenario 5: Country-specific setup Different countries have a different type of the printer. 2 Remove the protective plug from the wall jacks. The fax ports on the back of the printer... types of the printer, and then connect the telephone to an RJ-11 wall jack. cable modem is installed elsewhere in the house Follow this setup if your cable provider activated the wall jacks in your country or region, then you can connect a device to the port. Your cable telephone service...

Fax Guide
Page 16
... fax number, and then set the printer to receive faxes automatically or manually: 1 From the printer control panel, navigate to Auto Answer: > Fax Setup > Ringing and Answering > Auto Answer 2 Select an Auto Answer setting, and then save it never receives the fax. 1 From the printer control panel..., navigate to Ring Pattern: > Fax Setup > Ringing and Answering > Ring Pattern 2 Select the ring pattern for the printer, and then save the setting. Step 4: Set the printer to receive ...
... fax number, and then set the printer to receive faxes automatically or manually: 1 From the printer control panel, navigate to Auto Answer: > Fax Setup > Ringing and Answering > Auto Answer 2 Select an Auto Answer setting, and then save it never receives the fax. 1 From the printer control panel..., navigate to Ring Pattern: > Fax Setup > Ringing and Answering > Ring Pattern 2 Select the ring pattern for the printer, and then save the setting. Step 4: Set the printer to receive ...
Fax Guide
Page 17
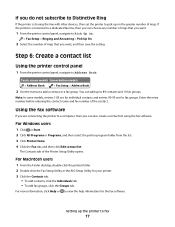
.... Setting up to 89 contacts and 10 fax groups. If you want . 1 From the printer control panel, navigate to Pick Up On: > Fax Setup > Ringing and Answering > Pick Up On 2 Select the number of rings that you want , and then save the setting. The Contacts tab of the...contact list Using the printer control panel 1 From the printer control panel, navigate to Address Book: Touch-screen models Arrow-button models > Address Book > Fax Setup > Address Book 2 Use the menus to view the help information for your printer. 3 Click the Contacts tab. • To add contacts, click the ...
.... Setting up to 89 contacts and 10 fax groups. If you want . 1 From the printer control panel, navigate to Pick Up On: > Fax Setup > Ringing and Answering > Pick Up On 2 Select the number of rings that you want , and then save the setting. The Contacts tab of the...contact list Using the printer control panel 1 From the printer control panel, navigate to Address Book: Touch-screen models Arrow-button models > Address Book > Fax Setup > Address Book 2 Use the menus to view the help information for your printer. 3 Click the Contacts tab. • To add contacts, click the ...


