OptraImage Quick Reference Cards
Page 1
... the scan unit, watch the control panel for messages. Use the numeric keypad to enter the fax number of the person receiving the fax. P/N 16A0341 Printed in U.S.A. 5/00 EC 1A2101 You must restart the fax sending process. All rights reserved. Tips • If you see your job name. OptraImage Quick Reference Make a simple copy 1 Make sure the OptraImage control panel is in copy mode and the Ready status message is displayed. (If necessary, press Stop/Clear to enter copy mode.) 2 Place your original document...
... the scan unit, watch the control panel for messages. Use the numeric keypad to enter the fax number of the person receiving the fax. P/N 16A0341 Printed in U.S.A. 5/00 EC 1A2101 You must restart the fax sending process. All rights reserved. Tips • If you see your job name. OptraImage Quick Reference Make a simple copy 1 Make sure the OptraImage control panel is in copy mode and the Ready status message is displayed. (If necessary, press Stop/Clear to enter copy mode.) 2 Place your original document...

OptraImage Quick Reference Cards
Page 2
... save paper. Copy Media specifies the type of the copies being made . Menu > or < Menu moves you move through copy, fax, and network scan modes. This does not cancel documents scanned to make copies, send faxes, or activate your fax or network scan. Pause inserts a two second pause when entering an outgoing fax number on your printed copies (plain paper, transparencies, and so on the control panel display. Adjusts the darkness of media for copies, faxes, and network scans. Adjusts the size of the original documents. Press this to memory. OptraImage Quick...
... save paper. Copy Media specifies the type of the copies being made . Menu > or < Menu moves you move through copy, fax, and network scan modes. This does not cancel documents scanned to make copies, send faxes, or activate your fax or network scan. Pause inserts a two second pause when entering an outgoing fax number on your printed copies (plain paper, transparencies, and so on the control panel display. Adjusts the darkness of media for copies, faxes, and network scans. Adjusts the size of the original documents. Press this to memory. OptraImage Quick...

OptraImage 443/433 Setup Guide (1.8 MB)
Page 2
... of a set forth in Technical Data and Computer Software clause at any time. This printer is a registered trademark of the Rights in subparagraph (c)(1)(ii) of Adobe Systems Incorporated. All rights reserved. In the United Kingdom and Eire, send to this product by calling 1-800-553-9727. Lexmark may be addressed to Lexmark International, Inc., Department F95/032-2, 740 West New Circle...
... of a set forth in Technical Data and Computer Software clause at any time. This printer is a registered trademark of the Rights in subparagraph (c)(1)(ii) of Adobe Systems Incorporated. All rights reserved. In the United Kingdom and Eire, send to this product by calling 1-800-553-9727. Lexmark may be addressed to Lexmark International, Inc., Department F95/032-2, 740 West New Circle...
OptraImage 443/433 Setup Guide (1.8 MB)
Page 3
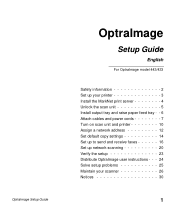
OptraImage Setup Guide OptraImage Setup Guide English For OptraImage model 443/433 Safety information 2 Set up your printer 3 Install the MarkNet print server 4 Unlock the scan unit 5 Install output tray and raise paper feed tray - - 6 Attach cables and power cords 7 Turn on scan unit and printer 10 Assign a network address 12 Set default copy settings 14 Set up to send and receive faxes 16 Set up network scanning 20 Verify the setup 23 Distribute OptraImage user instructions - - - 24 Solve setup problems 25 Maintain your scanner 26 Notices 30 1
OptraImage Setup Guide OptraImage Setup Guide English For OptraImage model 443/433 Safety information 2 Set up your printer 3 Install the MarkNet print server 4 Unlock the scan unit 5 Install output tray and raise paper feed tray - - 6 Attach cables and power cords 7 Turn on scan unit and printer 10 Assign a network address 12 Set default copy settings 14 Set up to send and receive faxes 16 Set up network scanning 20 Verify the setup 23 Distribute OptraImage user instructions - - - 24 Solve setup problems 25 Maintain your scanner 26 Notices 30 1

OptraImage 443/433 Setup Guide (1.8 MB)
Page 4
... port of the MarkNet print server. 2 OptraImage Setup Guide The safety features of some parts may not always be connected to an electrical outlet near the product and easily accessible. • Refer service or repairs, other replacement parts. Fax and telephone safety information • When installing the Lexmark MarkNet N2501e print server containing the fax modem port, follow all safety precautions of any equipment into which the card is being installed...
... port of the MarkNet print server. 2 OptraImage Setup Guide The safety features of some parts may not always be connected to an electrical outlet near the product and easily accessible. • Refer service or repairs, other replacement parts. Fax and telephone safety information • When installing the Lexmark MarkNet N2501e print server containing the fax modem port, follow all safety precautions of any equipment into which the card is being installed...

OptraImage 443/433 Setup Guide (1.8 MB)
Page 5
...: Turn All Power Off Before and during the OptraImage setup. 2 Verify the printer hardware setup by printing the menu settings page. This includes all power cords, fax/phone cables, and network cables from an outlet. Following setup, all bins and trays, duplex hardware, and any other options purchased. Read the following caution statement. When installing printer drivers, make sure you attach the printer to use the latest version. 1 Set up all equipment may have received more than one copy...
...: Turn All Power Off Before and during the OptraImage setup. 2 Verify the printer hardware setup by printing the menu settings page. This includes all power cords, fax/phone cables, and network cables from an outlet. Following setup, all bins and trays, duplex hardware, and any other options purchased. Read the following caution statement. When installing printer drivers, make sure you attach the printer to use the latest version. 1 Set up all equipment may have received more than one copy...

OptraImage 443/433 Setup Guide (1.8 MB)
Page 6
.../100 Fax Modem port (uses RJ-45 port (uses RJ- Step 2: Install the MarkNet print server CAUTION! Before installing the MarkNet N2501e print server in an available optional card slot inside your printer. (MarkNet internal print servers are sometimes called printer option cards.) For detailed instructions about installing your printer is not plugged into the card or the wall outlet. cable) 11 cable) MarkNet N2401e print server ports SCSI port (OptraImage scan unit attaches here) Ethernet 10/100 port (uses RJ-45 cable) 4 OptraImage Setup Guide Make sure your print server...
.../100 Fax Modem port (uses RJ-45 port (uses RJ- Step 2: Install the MarkNet print server CAUTION! Before installing the MarkNet N2501e print server in an available optional card slot inside your printer. (MarkNet internal print servers are sometimes called printer option cards.) For detailed instructions about installing your printer is not plugged into the card or the wall outlet. cable) 11 cable) MarkNet N2401e print server ports SCSI port (OptraImage scan unit attaches here) Ethernet 10/100 port (uses RJ-45 cable) 4 OptraImage Setup Guide Make sure your print server...

OptraImage 443/433 Setup Guide (1.8 MB)
Page 12
... restart OptraImage, a Please Wait message displays on scan unit and printer First time setup Power up sequence On/off the power to set required fax information. Step 6: Turn on the second line of the control panel. The Analog Fax option is disabled unless an upgrade of at least 24MB is completed the OptraImage control panel displays the current time and date, plus the Ready status message. When initialization is performed. You are using a MarkNet N2501e, plug the telephone fax line cable into...
... restart OptraImage, a Please Wait message displays on scan unit and printer First time setup Power up sequence On/off the power to set required fax information. Step 6: Turn on the second line of the control panel. The Analog Fax option is disabled unless an upgrade of at least 24MB is completed the OptraImage control panel displays the current time and date, plus the Ready status message. When initialization is performed. You are using a MarkNet N2501e, plug the telephone fax line cable into...

OptraImage 443/433 Setup Guide (1.8 MB)
Page 14
... address. Manually assign IP address information "X" designates which option card slot in option slot 2, the printer operator panel displays: Network Option 2. Pressing Method 1: Printer operator panel A simple way to use the buttons to communicate with other ways to set address information inside the MarkNet print server is generally performed by one. For instructions about other devices on the Drivers, MarkVision, and Utilities CD. Press Menu> repeatedly until you find the OptraImage, you must manually assign an IP address. Manually setting...
... address. Manually assign IP address information "X" designates which option card slot in option slot 2, the printer operator panel displays: Network Option 2. Pressing Method 1: Printer operator panel A simple way to use the buttons to communicate with other ways to set address information inside the MarkNet print server is generally performed by one. For instructions about other devices on the Drivers, MarkVision, and Utilities CD. Press Menu> repeatedly until you find the OptraImage, you must manually assign an IP address. Manually setting...
OptraImage 443/433 Setup Guide (1.8 MB)
Page 18
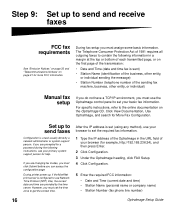
... the OptraImage heading, click FAX Setup. 4 Click Configuration. 5 Enter the required FCC information: • Date and Time (current date and time) • Station Name (personal name or company name) • Station Number (fax phone line number) 16 OptraImage Setup Guide Step 9: Set up to send faxes Configuration is a task usually done by the time server. During printer power up, if the MarkNet print server is configured to use Network Time Protocol (NTP) time, the current date and time are changing fax modes, you must set the required fax information. 1 Type...
... the OptraImage heading, click FAX Setup. 4 Click Configuration. 5 Enter the required FCC information: • Date and Time (current date and time) • Station Name (personal name or company name) • Station Number (fax phone line number) 16 OptraImage Setup Guide Step 9: Set up to send faxes Configuration is a task usually done by the time server. During printer power up, if the MarkNet print server is configured to use Network Time Protocol (NTP) time, the current date and time are changing fax modes, you must set the required fax information. 1 Type...

OptraImage 443/433 Setup Guide (1.8 MB)
Page 19
... set fax information Installation instructions for Solve Fax Problems. You can configure OptraImage to route faxes received through the fax modem port on the MarkNet N2501e to your printer. Follow the instructions on the Drivers, MarkVision, and Utilities CD. If you can do an IP search to find the OptraImage printer containing the MarkNet N2501e or N2401e print server and go to the Fax tab to the online documentation on your printer documentation. OptraImage Setup Guide 17...
... set fax information Installation instructions for Solve Fax Problems. You can configure OptraImage to route faxes received through the fax modem port on the MarkNet N2501e to your printer. Follow the instructions on the Drivers, MarkVision, and Utilities CD. If you can do an IP search to find the OptraImage printer containing the MarkNet N2501e or N2401e print server and go to the Fax tab to the online documentation on your printer documentation. OptraImage Setup Guide 17...

OptraImage 443/433 Setup Guide (1.8 MB)
Page 20
... a file. Assigning a shortcut lets you send or receive a fax, an entry of the activity is already selected, simply press the Configuration button. To set the fax transmission log options: 1 Type the IP address of the OptraImage in the control panel display. You can print this OptraImage. 2 Click Configuration. 3 Under the OptraImage heading, click Manage Destinations. 4 Click FAX Destinations Setup. 5 Enter a unique name for the fax recipient and specify their fax number (for supported paper sizes, paper types, and output bins. Press Fax/ Scan mode...
... a file. Assigning a shortcut lets you send or receive a fax, an entry of the activity is already selected, simply press the Configuration button. To set the fax transmission log options: 1 Type the IP address of the OptraImage in the control panel display. You can print this OptraImage. 2 Click Configuration. 3 Under the OptraImage heading, click Manage Destinations. 4 Click FAX Destinations Setup. 5 Enter a unique name for the fax recipient and specify their fax number (for supported paper sizes, paper types, and output bins. Press Fax/ Scan mode...
OptraImage 443/433 Setup Guide (1.8 MB)
Page 21
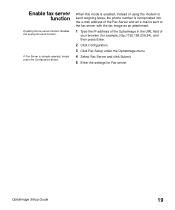
... field of the Fax Server and an e-mail is already selected, simply press the Configuration button. OptraImage Setup Guide 19 If Fax Server is sent to send outgoing faxes, the phone number is incorporated into the e-mail address of your browser (for example, http://192.168.236.24), and then press Enter. 2 Click Configuration. 3 Click Fax Setup under the OptraImage menu. 4 Select Fax Server and click Submit. 5 Enter the settings for Fax server. Enable fax server function Enabling the fax server function disables the analog fax send function.
... field of the Fax Server and an e-mail is already selected, simply press the Configuration button. OptraImage Setup Guide 19 If Fax Server is sent to send outgoing faxes, the phone number is incorporated into the e-mail address of your browser (for example, http://192.168.236.24), and then press Enter. 2 Click Configuration. 3 Click Fax Setup under the OptraImage menu. 4 Select Fax Server and click Submit. 5 Enter the settings for Fax server. Enable fax server function Enabling the fax server function disables the analog fax send function.
OptraImage 443/433 Setup Guide (1.8 MB)
Page 22
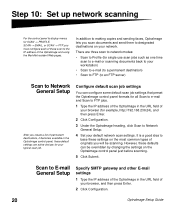
... defaults can configure some default scan job settings that preset the OptraImage control panel formats for all Scan to e-mail and Scan to FTP jobs. 1 Type the IP address of the OptraImage in the URL field of your browser (for example, http://192.168.236.24), and then press Enter. 2 Click Configuration. 3 Under the OptraImage heading, click Scan to Network General Setup. 4 Set your default network scan settings. However, these settings on your network. In addition to making copies and sending faxes, OptraImage...
... defaults can configure some default scan job settings that preset the OptraImage control panel formats for all Scan to e-mail and Scan to FTP jobs. 1 Type the IP address of the OptraImage in the URL field of your browser (for example, http://192.168.236.24), and then press Enter. 2 Click Configuration. 3 Under the OptraImage heading, click Scan to Network General Setup. 4 Set your default network scan settings. However, these settings on your network. In addition to making copies and sending faxes, OptraImage...
OptraImage 443/433 Setup Guide (1.8 MB)
Page 23
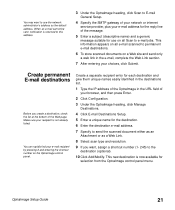
... # and entering the shortcut number on all Scan to e-mail jobs. This new destination is not already listed. You can rapidly find your choices, click Submit. Make sure your e-mail address for the reply line of the message. 5 Enter a subject (descriptive name) and a generic message suitable for selection from the OptraImage control panel menu. You may want , assign a shortcut number (1- 245) to the destination (optional). 10 Click Add/Modify...
... # and entering the shortcut number on all Scan to e-mail jobs. This new destination is not already listed. You can rapidly find your choices, click Submit. Make sure your e-mail address for the reply line of the message. 5 Enter a subject (descriptive name) and a generic message suitable for selection from the OptraImage control panel menu. You may want , assign a shortcut number (1- 245) to the destination (optional). 10 Click Add/Modify...
OptraImage 443/433 Setup Guide (1.8 MB)
Page 25
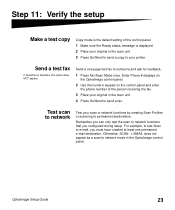
Enter Phone # displays on the OptraImage control panel. 2 Use the numeric keypad on the control panel and enter the phone number of the control panel. 1 Make sure the Ready status message is disabled, this option does NOT appear. OptraImage Setup Guide 23 Step 11: Verify the setup Make a test copy Copy mode is the default setting of the person receiving the fax. 3 Place your printer. Test scan to network Test your scan to network functions by creating Scan Profiles or scanning to network mode in the scan unit. 4 Press Go/Send to e-mail, you configured during setup. ...
Enter Phone # displays on the OptraImage control panel. 2 Use the numeric keypad on the control panel and enter the phone number of the control panel. 1 Make sure the Ready status message is disabled, this option does NOT appear. OptraImage Setup Guide 23 Step 11: Verify the setup Make a test copy Copy mode is the default setting of the person receiving the fax. 3 Place your printer. Test scan to network Test your scan to network functions by creating Scan Profiles or scanning to network mode in the scan unit. 4 Press Go/Send to e-mail, you configured during setup. ...
OptraImage 443/433 Setup Guide (1.8 MB)
Page 26
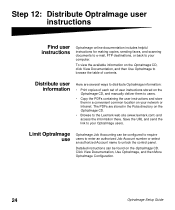
... on the OptraImage CD. • Browse to the Lexmark web site (www.lexmark.com) and access the information there. Step 12: Distribute OptraImage user instructions Find user instructions OptraImage online documentation includes helpful instructions for making copies, sending faxes, and scanning documents to e-mail, FTP destinations, or back to your OptraImage users. To view the available information on your network or Intranet. Limit OptraImage use OptraImage Job Accounting can be configured to require users to enter an authorized Job Account number or select...
... on the OptraImage CD. • Browse to the Lexmark web site (www.lexmark.com) and access the information there. Step 12: Distribute OptraImage user instructions Find user instructions OptraImage online documentation includes helpful instructions for making copies, sending faxes, and scanning documents to e-mail, FTP destinations, or back to your OptraImage users. To view the available information on your network or Intranet. Limit OptraImage use OptraImage Job Accounting can be configured to require users to enter an authorized Job Account number or select...

OptraImage 443/433 Setup Guide (1.8 MB)
Page 27
... detailed instructions. Click View Documentation, Use OptraImage, and then Solving fax problems. Scan to the fax phone outlet. 2 Repeat the fax setup. Make sure the printer is unlocked. See "Set up in order to show up network scanning" on the print server and to network modes must be turned off. 1 Turn printer off, and then back on. 2 Turn printer and scan unit off . Solve setup problems Problem Ready status message not displayed Control panel buttons not responding Scan unit isn't working Test document did not print Unable to the online documentation on page 10. For more help...
... detailed instructions. Click View Documentation, Use OptraImage, and then Solving fax problems. Scan to the fax phone outlet. 2 Repeat the fax setup. Make sure the printer is unlocked. See "Set up in order to show up network scanning" on the print server and to network modes must be turned off. 1 Turn printer off, and then back on. 2 Turn printer and scan unit off . Solve setup problems Problem Ready status message not displayed Control panel buttons not responding Scan unit isn't working Test document did not print Unable to the online documentation on page 10. For more help...

OptraImage 443/433 Setup Guide (1.8 MB)
Page 28
Maintain your scanner Clearing a paper jam in the ADF 1 Turn off and disconnect the power to the scan unit. 2 Open the Automatic Document Feeder (ADF). 3 Carefully pull out the jammed paper. 4 Close the ADF. 5 Reconnect the power and turn the scan unit back on. 26 OptraImage Setup Guide
Maintain your scanner Clearing a paper jam in the ADF 1 Turn off and disconnect the power to the scan unit. 2 Open the Automatic Document Feeder (ADF). 3 Carefully pull out the jammed paper. 4 Close the ADF. 5 Reconnect the power and turn the scan unit back on. 26 OptraImage Setup Guide

OptraImage 443/433 Setup Guide (1.8 MB)
Page 33
... 1991 makes it is located on the telephone line may result in the device not ringing in response to an incoming call. See "Attach cables and power cords" on telephone company-provided coin service. for instructions about contacting Lexmark is sent OptraImage Setup Guide 31 The Telephone Consumer Protection Act of devices which is used on page 7 for repair and warranty information. The REN is FCC Part...
... 1991 makes it is located on the telephone line may result in the device not ringing in response to an incoming call. See "Attach cables and power cords" on telephone company-provided coin service. for instructions about contacting Lexmark is sent OptraImage Setup Guide 31 The Telephone Consumer Protection Act of devices which is used on page 7 for repair and warranty information. The REN is FCC Part...


