
User's Guide (2 MB)
Page 12
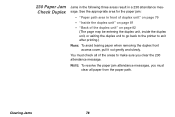
Using the Operator Panel and Menus 12 Service messages 917 Service Transfer Roll A service message indicates a printer failure that may require a service call. Attendance messages 201 Paper Jam Remove Cartridge Attendance messages help you solve printer problems. For example, if print material is jammed in the printer, the message 201 Paper Jam displays.
Using the Operator Panel and Menus 12 Service messages 917 Service Transfer Roll A service message indicates a printer failure that may require a service call. Attendance messages 201 Paper Jam Remove Cartridge Attendance messages help you solve printer problems. For example, if print material is jammed in the printer, the message 201 Paper Jam displays.
User's Guide (2 MB)
Page 26
... curl is too rough, the toner does not fuse to feed properly, causing paper jams. For best performance, use 75 g/m2 (20 lb bond) grain long paper. The degree of smoothness of paper to curve at its edges. The following paper characteristics affect print quality and reliability. Print material characteristics Weight Curl Smoothness For detailed...
... curl is too rough, the toner does not fuse to feed properly, causing paper jams. For best performance, use 75 g/m2 (20 lb bond) grain long paper. The degree of smoothness of paper to curve at its edges. The following paper characteristics affect print quality and reliability. Print material characteristics Weight Curl Smoothness For detailed...
User's Guide (2 MB)
Page 28
Choosing Print Materials 28 Paper guidelines To help avoid paper jams or poor print quality: • Always use new, undamaged paper. • Do not use paper that you have cut or trimmed yourself. • Do not mix paper sizes, weights, or types in the same paper source since mixing results in paper jams. • Do not use coated papers. • Do...
Choosing Print Materials 28 Paper guidelines To help avoid paper jams or poor print quality: • Always use new, undamaged paper. • Do not use paper that you have cut or trimmed yourself. • Do not mix paper sizes, weights, or types in the same paper source since mixing results in paper jams. • Do not use coated papers. • Do...

User's Guide (2 MB)
Page 35
Label guidelines The printer can print on many labels designed for use with paper or transparencies in the same paper tray; When printing on obtaining a label fuser cleaner. A special fuser cleaner should be used for label applications to the Administrator's Guide for information on ... (refer to peel off during printing, resulting in letter-size and A4-size sheets. NOTE: Labels are supplied in a paper jam and contamination of the most difficult print materials for detailed information about these settings). • Do not load labels together with laser printers. this...
Label guidelines The printer can print on many labels designed for use with paper or transparencies in the same paper tray; When printing on obtaining a label fuser cleaner. A special fuser cleaner should be used for label applications to the Administrator's Guide for information on ... (refer to peel off during printing, resulting in letter-size and A4-size sheets. NOTE: Labels are supplied in a paper jam and contamination of the most difficult print materials for detailed information about these settings). • Do not load labels together with laser printers. this...
User's Guide (2 MB)
Page 41
Do not remove paper trays while a job is printing or Busy is usually indicated on the operator panel. Doing so may cause a paper jam. This information is displayed on the paper package. Before loading paper, you need to know the recommended print side of the paper you want to load the: "Paper tray" go to page 44 "Multipurpose feeder" go to page 47 "Envelope feeder" go to page 61 "2000-sheet drawer" go to page 68 Choosing Print Materials 41 If you 're using. Paper loading Proper paper loading helps prevent paper jams and ensure troublefree printing.
Do not remove paper trays while a job is printing or Busy is usually indicated on the operator panel. Doing so may cause a paper jam. This information is displayed on the paper package. Before loading paper, you need to know the recommended print side of the paper you want to load the: "Paper tray" go to page 44 "Multipurpose feeder" go to page 47 "Envelope feeder" go to page 61 "2000-sheet drawer" go to page 68 Choosing Print Materials 41 If you 're using. Paper loading Proper paper loading helps prevent paper jams and ensure troublefree printing.
User's Guide (2 MB)
Page 42
... content" on page 20. • Make sure the recommended print side is under the paper capacity mark on page 69. Make sure the paper is face down for avoiding paper jams By carefully selecting print materials and loading them into trays or the multipurpose feeder. Make sure... Fan stacks of labels or transparencies before loading them properly, you are following these tips to avoid jams. • See "Loading Print Materials" on page 43 to avoid most paper jams. If jams do occur using the multipurpose feeder, try feeding one tray. • Use only recommended print materials...
... content" on page 20. • Make sure the recommended print side is under the paper capacity mark on page 69. Make sure the paper is face down for avoiding paper jams By carefully selecting print materials and loading them into trays or the multipurpose feeder. Make sure... Fan stacks of labels or transparencies before loading them properly, you are following these tips to avoid jams. • See "Loading Print Materials" on page 43 to avoid most paper jams. If jams do occur using the multipurpose feeder, try feeding one tray. • Use only recommended print materials...
User's Guide (2 MB)
Page 48
.... Loading Print Materials 48 This applies to other types of print materials, too. • Print material should be used with the top of paper or envelopes at a time in the multipurpose feeder. • To achieve the best possible print quality, use in the multipurpose feeder. For ...more guidelines on paper, see "Print materials" on it. Also, avoid pressing down or applying excessive force on page 20. • To prevent paper jams, do not add paper when there is designed for use only high-quality print media that ...
.... Loading Print Materials 48 This applies to other types of print materials, too. • Print material should be used with the top of paper or envelopes at a time in the multipurpose feeder. • To achieve the best possible print quality, use in the multipurpose feeder. For ...more guidelines on paper, see "Print materials" on it. Also, avoid pressing down or applying excessive force on page 20. • To prevent paper jams, do not add paper when there is designed for use only high-quality print media that ...
User's Guide (2 MB)
Page 50
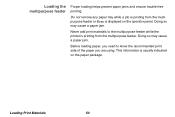
... Print Materials 50 This information is displayed on the paper package. Doing so may cause a paper jam. Before loading paper, you are using. Never add print materials to know the recommended print side of the paper you need to the multipurpose feeder while the printer is printing from... the multipurpose feeder or Busy is usually indicated on the operator panel. Loading the multipurpose feeder Proper loading helps prevent paper jams and ensure trouble-free printing....
... Print Materials 50 This information is displayed on the paper package. Doing so may cause a paper jam. Before loading paper, you are using. Never add print materials to know the recommended print side of the paper you need to the multipurpose feeder while the printer is printing from... the multipurpose feeder or Busy is usually indicated on the operator panel. Loading the multipurpose feeder Proper loading helps prevent paper jams and ensure trouble-free printing....
User's Guide (2 MB)
Page 67
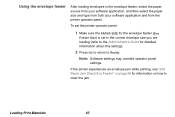
...setting). 2 Press Go to return to clear the jam. Loading Print Materials 67 Using the envelope feeder After loading envelopes in the envelope feeder, select the paper source from your software application, and then select the paper size and type from both your software application and... from the printer operator panel. NOTE: Software settings may override operator panel settings. If the printer experiences an envelope jam while printing, see "260 Paper Jam Check ...
...setting). 2 Press Go to return to clear the jam. Loading Print Materials 67 Using the envelope feeder After loading envelopes in the envelope feeder, select the paper source from your software application, and then select the paper size and type from both your software application and... from the printer operator panel. NOTE: Software settings may override operator panel settings. If the printer experiences an envelope jam while printing, see "260 Paper Jam Check ...
User's Guide (2 MB)
Page 69
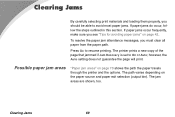
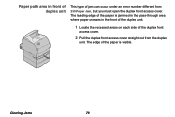
... through the printer and the options. The jam areas are shown, too. Possible paper jam areas "Paper jam areas" on the paper source and paper exit selection (output bin). If paper jams occur frequently, make sure you must clear all paper from the paper path. To resolve the paper jam attendance messages, you see "Tips for avoiding paper jams" on page 42. however, the Auto...
... through the printer and the options. The jam areas are shown, too. Possible paper jam areas "Paper jam areas" on the paper source and paper exit selection (output bin). If paper jams occur frequently, make sure you must clear all paper from the paper path. To resolve the paper jam attendance messages, you see "Tips for avoiding paper jams" on page 42. however, the Auto...
User's Guide (2 MB)
Page 70
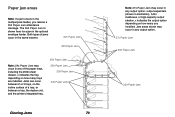
..., the duplex unit, and the printers integrated tray. 260 Paper Jam 250 Paper Jam 230 Paper Jam 24x Paper Jam Clearing Jams 70 Note: 27x Paper Jam may occur in any output option. 27x Paper Jam 202 Paper Jam 230 Paper Jam Jam areas shown may occur in any of jams occur in the same manner. 201 Paper Jam 200 Paper Jam Note: 24x Paper Jam may occur in any output option: output expanders (shown...
..., the duplex unit, and the printers integrated tray. 260 Paper Jam 250 Paper Jam 230 Paper Jam 24x Paper Jam Clearing Jams 70 Note: 27x Paper Jam may occur in any output option. 27x Paper Jam 202 Paper Jam 230 Paper Jam Jam areas shown may occur in any of jams occur in the same manner. 201 Paper Jam 200 Paper Jam Note: 24x Paper Jam may occur in any output option: output expanders (shown...
User's Guide (2 MB)
Page 71
..., high-capacity output stacker (not shown) Printer rear door Duplex rear door Lower front door (down when envelope feeder is opened. Rear door of paper sources and possible paper jam areas. If your printer has a multipurpose feeder, it is visible when the lower front door is installed) Integrated input tray Upper front door...
..., high-capacity output stacker (not shown) Printer rear door Duplex rear door Lower front door (down when envelope feeder is opened. Rear door of paper sources and possible paper jam areas. If your printer has a multipurpose feeder, it is visible when the lower front door is installed) Integrated input tray Upper front door...
User's Guide (2 MB)
Page 72
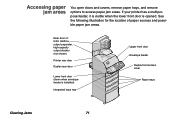
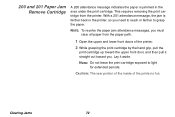
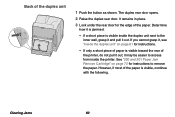
.... 1 Open the upper and lower front doors of the printer is hot. NOTE: To resolve the paper jam attendance messages, you must clear all paper from the printer. CAUTION: The rear portion of the inside of the printer. 2 While grasping the print cartridge by the hand grip, pull the ...up toward the upper front door, and then pull it aside. With a 201 attendance message, the jam is jammed in farther to light for extended periods. 200 and 201 Paper Jam Remove Cartridge A 200 attendance message indicates the paper is farther back in the printer, so you need to reach in the area under the...
.... 1 Open the upper and lower front doors of the printer is hot. NOTE: To resolve the paper jam attendance messages, you must clear all paper from the printer. CAUTION: The rear portion of the inside of the printer. 2 While grasping the print cartridge by the hand grip, pull the ...up toward the upper front door, and then pull it aside. With a 201 attendance message, the jam is jammed in farther to light for extended periods. 200 and 201 Paper Jam Remove Cartridge A 200 attendance message indicates the paper is farther back in the printer, so you need to reach in the area under the...
User's Guide (2 MB)
Page 73
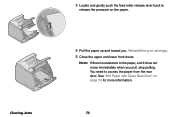
Clearing Jams 3 Locate and gently push the feed roller release lever back to release the pressure on page 74 for more information. 73 Reinstall the print cartridge. 5 Close the upper and lower front doors. See "202 Paper Jam Open Rear Door" on the paper. 4 Pull the paper up and toward you pull, stop pulling. NOTE: If there is resistance to access the paper from the rear door. You need to the paper, and it does not move immediately when you .
Clearing Jams 3 Locate and gently push the feed roller release lever back to release the pressure on page 74 for more information. 73 Reinstall the print cartridge. 5 Close the upper and lower front doors. See "202 Paper Jam Open Rear Door" on the paper. 4 Pull the paper up and toward you pull, stop pulling. NOTE: If there is resistance to access the paper from the rear door. You need to the paper, and it does not move immediately when you .
User's Guide (2 MB)
Page 74
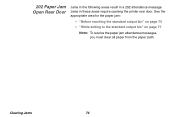
202 Paper Jam Open Rear Door Jams in the following areas result in these areas require opening the printer rear door. See the appropriate area for the paper jam: • "Before reaching the standard output bin" on page 75 • "While exiting to the standard output bin" on page 77 NOTE: To resolve the paper jam attendance messages, you must clear all paper from the paper path. Clearing Jams 74 Jams in a 202 attendance message.
202 Paper Jam Open Rear Door Jams in the following areas result in these areas require opening the printer rear door. See the appropriate area for the paper jam: • "Before reaching the standard output bin" on page 75 • "While exiting to the standard output bin" on page 77 NOTE: To resolve the paper jam attendance messages, you must clear all paper from the paper path. Clearing Jams 74 Jams in a 202 attendance message.
User's Guide (2 MB)
Page 75
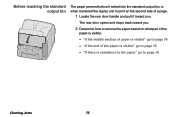
"If the middle section of paper is visible: - The rear door opens and drops back toward you . 2 Determine how to remove the paper based on the second side of a page. 1 Locate the rear door handle and pull it toward you . "If there is visible" go to page 76 - Before reaching the standard output bin The paper jammed before it exited into the standard output bin or when it entered the duplex unit to print on what part of the paper is visible" go to page 76 - "If the end of the paper is resistance to the paper" go to page 76 Clearing Jams 75
"If the middle section of paper is visible: - The rear door opens and drops back toward you . 2 Determine how to remove the paper based on the second side of a page. 1 Locate the rear door handle and pull it toward you . "If there is visible" go to page 76 - Before reaching the standard output bin The paper jammed before it exited into the standard output bin or when it entered the duplex unit to print on what part of the paper is visible" go to page 76 - "If the end of the paper is resistance to the paper" go to page 76 Clearing Jams 75
User's Guide (2 MB)
Page 77
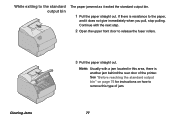
See "Before reaching the standard output bin" on page 75 for instructions on how to remove this area, there is resistance to the paper, and it exited the standard output bin. 1 Pull the paper straight out. While exiting to release the fuser rollers. Continue with a jam located in this type of the printer. If there is another jam behind the rear door of jam. 77 Clearing Jams 3 Pull the paper straight out. NOTE: Usually with the next step. 2 Open the upper front door to the standard output bin The paper jammed as it does not give immediately when you pull, stop pulling.
See "Before reaching the standard output bin" on page 75 for instructions on how to remove this area, there is resistance to the paper, and it exited the standard output bin. 1 Pull the paper straight out. While exiting to release the fuser rollers. Continue with a jam located in this type of the printer. If there is another jam behind the rear door of jam. 77 Clearing Jams 3 Pull the paper straight out. NOTE: Usually with the next step. 2 Open the upper front door to the standard output bin The paper jammed as it does not give immediately when you pull, stop pulling.
User's Guide (2 MB)
Page 78
See the appropriate area for the paper jam: • "Paper path area in a 230 attendance message. NOTE: To resolve the paper jam attendance messages, you must check all paper from the paper path. 230 Paper Jam Check Duplex Jams in the following three areas result in front of duplex unit" on page 79 • "Inside the duplex unit... the duplex unit, or exiting the duplex unit to go back to the printer to make sure you clear the 230 attendance message. Clearing Jams 78 You must clear all of the duplex unit" on page 81 • "Back of the areas to exit after printing.) NOTE: ...
See the appropriate area for the paper jam: • "Paper path area in a 230 attendance message. NOTE: To resolve the paper jam attendance messages, you must check all paper from the paper path. 230 Paper Jam Check Duplex Jams in the following three areas result in front of duplex unit" on page 79 • "Inside the duplex unit... the duplex unit, or exiting the duplex unit to go back to the printer to make sure you clear the 230 attendance message. Clearing Jams 78 You must clear all of the duplex unit" on page 81 • "Back of the areas to exit after printing.) NOTE: ...
User's Guide (2 MB)
Page 79
Paper path area in the front of the duplex unit. 1 Locate the recessed areas on each side of the duplex front access cover. 2 Pull the duplex front access cover straight out from 230 Paper Jam, but you must open the duplex front access cover. Clearing Jams 79 The leading edge of jam can occur under an error number different from the duplex unit. The edge of the paper is jammed in the pass-through area where paper crosses in front of duplex unit This type of the paper is visible.
Paper path area in the front of the duplex unit. 1 Locate the recessed areas on each side of the duplex front access cover. 2 Pull the duplex front access cover straight out from 230 Paper Jam, but you must open the duplex front access cover. Clearing Jams 79 The leading edge of jam can occur under an error number different from the duplex unit. The edge of the paper is jammed in the pass-through area where paper crosses in front of duplex unit This type of the paper is visible.
User's Guide (2 MB)
Page 82
If a short piece is visible inside the printer. See "200 and 201 Paper Jam Remove Cartridge" on page 81 for the edge of the printer, do not pull it out. Back of the paper is visible, continue with the following. However, if most of the duplex unit 1 Push the button as shown. It remains... the rear door for instructions. - Determine how it may be easier to access from inside the duplex unit next to remove the paper. If only a short piece of paper is jammed: - If you cannot grasp it, see "Inside the duplex unit" on page 72 for instructions to the inner wall, grasp it and...
If a short piece is visible inside the printer. See "200 and 201 Paper Jam Remove Cartridge" on page 81 for the edge of the printer, do not pull it out. Back of the paper is visible, continue with the following. However, if most of the duplex unit 1 Push the button as shown. It remains... the rear door for instructions. - Determine how it may be easier to access from inside the duplex unit next to remove the paper. If only a short piece of paper is jammed: - If you cannot grasp it, see "Inside the duplex unit" on page 72 for instructions to the inner wall, grasp it and...


