
User's Guide (7.1 MB)
Page 3
Table of Contents Table of Contents Introduction xi Trademarks xiii Getting Started Setting Up Your Printer 1 Identifying Your Printer, Features, and Options 1 Optra S 1255 and Optra S 1625 2 Optra S 1855 3 Optra S 2455 4 Unpacking the Printer 5 Determining What to Install Next 7 Installing the Dual 500-Sheet Drawer 7 Attaching the Decals 11 Removing the Print Cartridge Packaging 12 Removing the 250...
Table of Contents Table of Contents Introduction xi Trademarks xiii Getting Started Setting Up Your Printer 1 Identifying Your Printer, Features, and Options 1 Optra S 1255 and Optra S 1625 2 Optra S 1855 3 Optra S 2455 4 Unpacking the Printer 5 Determining What to Install Next 7 Installing the Dual 500-Sheet Drawer 7 Attaching the Decals 11 Removing the Print Cartridge Packaging 12 Removing the 250...
User's Guide (7.1 MB)
Page 4
...and Utilities 47 Online Services 47 Automated FAX System 48 Using Your Printer Using the Operator Panel and Menus 51 Power Indicator Light 52 Operator Panel Buttons 53 Printer Messages 54 Using the Operator Panel to Change Printer Settings 55 Example of Printing the Menu Settings 57 Operator Panel ...Menus 58 Overview of Printer Menus 60 Paper Menu 61 Finishing Menu 71 Tests Menu 78 ...
...and Utilities 47 Online Services 47 Automated FAX System 48 Using Your Printer Using the Operator Panel and Menus 51 Power Indicator Light 52 Operator Panel Buttons 53 Printer Messages 54 Using the Operator Panel to Change Printer Settings 55 Example of Printing the Menu Settings 57 Operator Panel ...Menus 58 Overview of Printer Menus 60 Paper Menu 61 Finishing Menu 71 Tests Menu 78 ...
User's Guide (7.1 MB)
Page 6
... Replacing the Print Cartridge 249 Ordering a Charge Roll Kit 250 vi Table of Contents Caring for Your Printer Understanding Printer Messages 177 Status Messages 177 Line 1 Messages 178 Line 2 Messages 182 Attendance Messages 184 Solving Printer Problems 199 Display Problems 200 Printing Problems 200 Print Quality Problems 201 Option Problems 204 Network Printing...
... Replacing the Print Cartridge 249 Ordering a Charge Roll Kit 250 vi Table of Contents Caring for Your Printer Understanding Printer Messages 177 Status Messages 177 Line 1 Messages 178 Line 2 Messages 182 Attendance Messages 184 Solving Printer Problems 199 Display Problems 200 Printing Problems 200 Print Quality Problems 201 Option Problems 204 Network Printing...
User's Guide (7.1 MB)
Page 7
Table of Contents Installing Options Adding Options to the Printer 253 Optional Drawers 255 Installing an Optional Drawer 256 Envelope Feeder Option 261 Installing the Envelope Feeder 262 Envelope Feeder Guidelines 265 Loading the Envelope... Expander Tray 289 Changing Output Bin Settings 291 Output Bin Linking 291 Memory and Option Cards 293 Accessing the Printer System Board 293 Closing the Printer System Board 297 Printer Memory Option 299 Installing a Printer Memory Option 300 Removing a Memory Option 303 Flash Memory Option 304 Installing a Flash Memory Option 304 Table of ...
Table of Contents Installing Options Adding Options to the Printer 253 Optional Drawers 255 Installing an Optional Drawer 256 Envelope Feeder Option 261 Installing the Envelope Feeder 262 Envelope Feeder Guidelines 265 Loading the Envelope... Expander Tray 289 Changing Output Bin Settings 291 Output Bin Linking 291 Memory and Option Cards 293 Accessing the Printer System Board 293 Closing the Printer System Board 297 Printer Memory Option 299 Installing a Printer Memory Option 300 Removing a Memory Option 303 Flash Memory Option 304 Installing a Flash Memory Option 304 Table of ...
User's Guide (7.1 MB)
Page 11
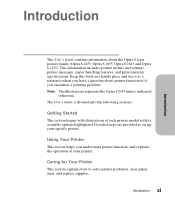
... about the Optra S laser printer family (Optra S 2455, Optra S 1855, Optra S 1625 and Optra S 1255). The User's Guide is divided into the following sections: Getting Started This section begins with illustrations of your specific printer. Detailed steps are provided to solve printer problems, clear...supplies. Note: The illustrations represent the Optra S 2455 unless indicated otherwise. Caring for Your Printer This section explains how to set up your printer. Introduction xi This information includes printer menus and settings, printer messages, paper handling features, and print...
... about the Optra S laser printer family (Optra S 2455, Optra S 1855, Optra S 1625 and Optra S 1255). The User's Guide is divided into the following sections: Getting Started This section begins with illustrations of your specific printer. Detailed steps are provided to solve printer problems, clear...supplies. Note: The illustrations represent the Optra S 2455 unless indicated otherwise. Caring for Your Printer This section explains how to set up your printer. Introduction xi This information includes printer menus and settings, printer messages, paper handling features, and print...
User's Guide (7.1 MB)
Page 12
... available in English. Appendixes This section provides information on fonts, print quality, printer specifications, features, and options. The Technical Reference is available from Lexmark. Simply complete the order form included with the printer registration card to install options available for your printer. Introduction Installing Options This section provides step-by-step instructions to request...
... available in English. Appendixes This section provides information on fonts, print quality, printer specifications, features, and options. The Technical Reference is available from Lexmark. Simply complete the order form included with the printer registration card to install options available for your printer. Introduction Installing Options This section provides step-by-step instructions to request...

User's Guide (7.1 MB)
Page 14
.... Details relating to the commands. xiv Trademarks PCL® is a registered trademark of the Hewlett-Packard Company. TrueType is designed and manufactured by Lexmark International, Inc., to be compatible with the PostScript Level 2 language. This printer is a trademark of their respective owners. Other trademarks are Hewlett-Packard Company's designations of a set of...
.... Details relating to the commands. xiv Trademarks PCL® is a registered trademark of the Hewlett-Packard Company. TrueType is designed and manufactured by Lexmark International, Inc., to be compatible with the PostScript Level 2 language. This printer is a trademark of their respective owners. Other trademarks are Hewlett-Packard Company's designations of a set of...
User's Guide (7.1 MB)
Page 17
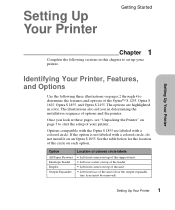
... output expander tray (tray must be removed) Setting Up Your Printer 1 Options compatible with the Optra S 1855 are highlighted in determining the installation sequence of the circle on page 5 to set up your printer. Identifying Your Printer, Features, and Options Use the following sections in this chapter...look at these pages, see "Unpacking the Printer" on each option. The options are labeled with a colored circle, do not install it on top of the unit • Left front face of the Optra™ S 1255, Optra S 1625, Optra S 1855, and Optra S 2455. Once you in color. If...
... output expander tray (tray must be removed) Setting Up Your Printer 1 Options compatible with the Optra S 1855 are highlighted in determining the installation sequence of the circle on page 5 to set up your printer. Identifying Your Printer, Features, and Options Use the following sections in this chapter...look at these pages, see "Unpacking the Printer" on each option. The options are labeled with a colored circle, do not install it on top of the unit • Left front face of the Optra™ S 1255, Optra S 1625, Optra S 1855, and Optra S 2455. Once you in color. If...
User's Guide (7.1 MB)
Page 18
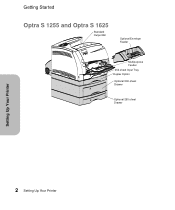
Getting Started Optra S 1255 and Optra S 1625 Standard Output Bin Optional Envelope Feeder Multipurpose Feeder 250-sheet Input Tray Duplex Option Optional 500-sheet Drawer Optional 250-sheet Drawer Setting Up Your Printer 2 Setting Up Your Printer
Getting Started Optra S 1255 and Optra S 1625 Standard Output Bin Optional Envelope Feeder Multipurpose Feeder 250-sheet Input Tray Duplex Option Optional 500-sheet Drawer Optional 250-sheet Drawer Setting Up Your Printer 2 Setting Up Your Printer

User's Guide (7.1 MB)
Page 19
Setting Up Your Printer 3 Optra S 1855 Optional Envelope Feeder Getting Started Optional Output Expanders Standard Output Bin Setting Up Your Printer Multipurpose Feeder Optional 500-sheet Drawer Optional 500-sheet Drawer Optional 500-sheet Drawer 250-sheet Input Tray Duplex Option Note: Options compatible with the Optra S 1855 are labeled with a colored circle, do not install it on page 1 for the location of the label. If the option is not labeled with a colored circle. See the table on an Optra S 1855.
Setting Up Your Printer 3 Optra S 1855 Optional Envelope Feeder Getting Started Optional Output Expanders Standard Output Bin Setting Up Your Printer Multipurpose Feeder Optional 500-sheet Drawer Optional 500-sheet Drawer Optional 500-sheet Drawer 250-sheet Input Tray Duplex Option Note: Options compatible with the Optra S 1855 are labeled with a colored circle, do not install it on page 1 for the location of the label. If the option is not labeled with a colored circle. See the table on an Optra S 1855.
User's Guide (7.1 MB)
Page 21
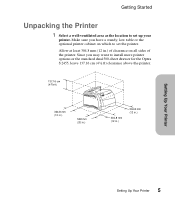
Since you have a sturdy, low table or the optional printer cabinet on all sides of clearance on which to install more printer options or the standard dual 500-sheet drawer for the Optra S 2455, leave 137.16 cm (4 ½ ft) clearance above the printer. 137.16 cm (4 ½ ft) 304.8 mm (12 in.) 508 mm... (20 in.) 304.8 mm (12 in.) 304.8 mm (12 in .) of the printer. Allow at least 304.8 mm (12 in .) Setting...
Since you have a sturdy, low table or the optional printer cabinet on all sides of clearance on which to install more printer options or the standard dual 500-sheet drawer for the Optra S 2455, leave 137.16 cm (4 ½ ft) clearance above the printer. 137.16 cm (4 ½ ft) 304.8 mm (12 in.) 508 mm... (20 in.) 304.8 mm (12 in.) 304.8 mm (12 in .) of the printer. Allow at least 304.8 mm (12 in .) Setting...

User's Guide (7.1 MB)
Page 22
... are missing, contact the place where you bought the printer. If any items are not under the printer when you are ready to install it . Then use the hand grips on the printer or ask someone to repack the printer for service or storage. Getting Started 2 Remove all ... box except the printer. Save the carton and packing material in the box until you set it down. CD Diskettes (May be included with certain models.) Power Cord Dual 500-sheet Drawer (Optra S 2455 only) Printer Setting Up Your Printer 6 Setting Up Your Printer CAUTION: Leave the printer in case you...
... are missing, contact the place where you bought the printer. If any items are not under the printer when you are ready to install it . Then use the hand grips on the printer or ask someone to repack the printer for service or storage. Getting Started 2 Remove all ... box except the printer. Save the carton and packing material in the box until you set it down. CD Diskettes (May be included with certain models.) Power Cord Dual 500-sheet Drawer (Optra S 2455 only) Printer Setting Up Your Printer 6 Setting Up Your Printer CAUTION: Leave the printer in case you...
User's Guide (7.1 MB)
Page 23
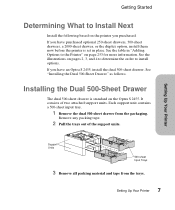
...-sheet Input Trays 3 Remove all packing material and tape from the packaging. Getting Started Determining What to the Printer" on page 253 for more information. If you have an Optra S 2455, install the dual 500-sheet drawer. See the table in place. If you purchased. Installing the... standard on pages 2, 3, and 4 to determine the order to install options. It consists of the support units. Setting Up Your Printer 7 See the illustrations on the Optra S 2455. Each support unit contains a 500-sheet input tray. 1 Remove the dual 500-sheet drawer from the trays. See "Installing...
...-sheet Input Trays 3 Remove all packing material and tape from the packaging. Getting Started Determining What to the Printer" on page 253 for more information. If you have an Optra S 2455, install the dual 500-sheet drawer. See the table in place. If you purchased. Installing the... standard on pages 2, 3, and 4 to determine the order to install options. It consists of the support units. Setting Up Your Printer 7 See the illustrations on the Optra S 2455. Each support unit contains a 500-sheet input tray. 1 Remove the dual 500-sheet drawer from the trays. See "Installing...
User's Guide (7.1 MB)
Page 24
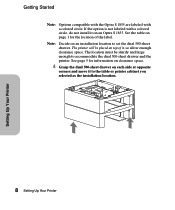
... Up Your Printer 8 Setting Up Your Printer Note: Decide on top of the label. See page 5 for the location of it to set the dual 500-sheet drawer. If the option is not labeled with a colored circle. Getting Started Note: Options compatible with the Optra S 1855 are labeled with a colored... circle, do not install it on each side at opposite corners and move it , so allow enough clearance space. The location must be placed on an installation location to the table or printer cabinet you selected as the...
... Up Your Printer 8 Setting Up Your Printer Note: Decide on top of the label. See page 5 for the location of it to set the dual 500-sheet drawer. If the option is not labeled with a colored circle. Getting Started Note: Options compatible with the Optra S 1855 are labeled with a colored... circle, do not install it on each side at opposite corners and move it , so allow enough clearance space. The location must be placed on an installation location to the table or printer cabinet you selected as the...
User's Guide (7.1 MB)
Page 25
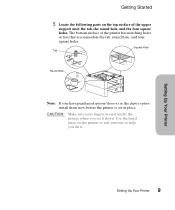
...the four square holes. Use the hand grips on the top surface of the printer has matching holes or feet that accommodate the tab, round hole, and four square holes. Setting Up Your Printer Setting Up Your Printer 9 Square Hole Tab Round Hole Note: If you lift it down. Getting Started... 5 Locate the following parts on the printer or ask someone to help you have purchased optional drawers or the duplex...
...the four square holes. Use the hand grips on the top surface of the printer has matching holes or feet that accommodate the tab, round hole, and four square holes. Setting Up Your Printer Setting Up Your Printer 9 Square Hole Tab Round Hole Note: If you lift it down. Getting Started... 5 Locate the following parts on the printer or ask someone to help you have purchased optional drawers or the duplex...

User's Guide (7.1 MB)
Page 26
Be sure the edges of the support unit. Hand Grip Support Unit 10 Setting Up Your Printer Setting Up Your Printer Getting Started 6 Lift and place the printer on top of the printer and the support unit are aligned so all the parts fit. The right side of the printer is aligned with the option.
Be sure the edges of the support unit. Hand Grip Support Unit 10 Setting Up Your Printer Setting Up Your Printer Getting Started 6 Lift and place the printer on top of the printer and the support unit are aligned so all the parts fit. The right side of the printer is aligned with the option.
User's Guide (7.1 MB)
Page 27
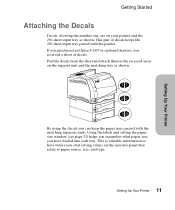
If you purchased an Optra S 2455 or optional drawers, you can keep the paper trays paired with the printer. By using the decals you received a sheet of decals keeps the 250-sheet input tray paired with the matching supports units. This is valuable information ...to paper source, size, and type. 11 Setting Up Your Printer Peel the decals from the sheet and attach them to the recessed areas on the operator panel that relate to have before you have loaded...
If you purchased an Optra S 2455 or optional drawers, you can keep the paper trays paired with the printer. By using the decals you received a sheet of decals keeps the 250-sheet input tray paired with the matching supports units. This is valuable information ...to paper source, size, and type. 11 Setting Up Your Printer Peel the decals from the sheet and attach them to the recessed areas on the operator panel that relate to have before you have loaded...
User's Guide (7.1 MB)
Page 28
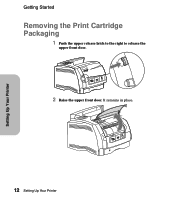
It remains in place. 12 Setting Up Your Printer Setting Up Your Printer Getting Started Removing the Print Cartridge Packaging 1 Push the upper release latch to the right to release the upper front door. 2 Raise the upper front door.
It remains in place. 12 Setting Up Your Printer Setting Up Your Printer Getting Started Removing the Print Cartridge Packaging 1 Push the upper release latch to the right to release the upper front door. 2 Raise the upper front door.
User's Guide (7.1 MB)
Page 29
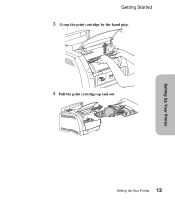
Setting Up Your Printer Getting Started 3 Grasp the print cartridge by the hand grip. 4 Pull the print cartridge up and out. 13 Setting Up Your Printer
Setting Up Your Printer Getting Started 3 Grasp the print cartridge by the hand grip. 4 Pull the print cartridge up and out. 13 Setting Up Your Printer
User's Guide (7.1 MB)
Page 30
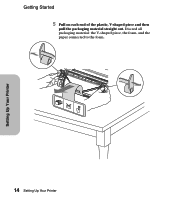
Discard all packaging material: the V-shaped piece, the foam, and the paper connected to the foam. 14 Setting Up Your Printer Setting Up Your Printer Getting Started 5 Pull on each end of the plastic, V-shaped piece and then pull the packaging material straight out.
Discard all packaging material: the V-shaped piece, the foam, and the paper connected to the foam. 14 Setting Up Your Printer Setting Up Your Printer Getting Started 5 Pull on each end of the plastic, V-shaped piece and then pull the packaging material straight out.

