
User's Guide
Page 7
Clearing duplex unit paper jams 175 Cleaning the print cartridge dust collector 181 Cleaning the waste toner sensor 184 Calling for customer support 188 Appendix A: MarkVision 189 Operating systems supported 189 Introducing MarkVision 190 Features 191 MarkVision online Help ...
Clearing duplex unit paper jams 175 Cleaning the print cartridge dust collector 181 Cleaning the waste toner sensor 184 Calling for customer support 188 Appendix A: MarkVision 189 Operating systems supported 189 Introducing MarkVision 190 Features 191 MarkVision online Help ...

User's Guide
Page 32
...condition has occurred, you can press GO to clear the error message, however the Supplies warning will be visible on the operator panel. See "Cleaning the waste toner sensor" on page 184 Note: The error 86 Transfer Belt Missing indicates the transfer belt is exhausted, the printer stops printing... be visible on page 138 Exhausted When the fuser reaches its life end, the printer identifies the transfer belt as being exhausted. You can clean the waste toner sensor. When the transfer belt is not installed in your Setup Guide or "Replacing the transfer kit" on the operator panel...
...condition has occurred, you can press GO to clear the error message, however the Supplies warning will be visible on the operator panel. See "Cleaning the waste toner sensor" on page 184 Note: The error 86 Transfer Belt Missing indicates the transfer belt is exhausted, the printer stops printing... be visible on page 138 Exhausted When the fuser reaches its life end, the printer identifies the transfer belt as being exhausted. You can clean the waste toner sensor. When the transfer belt is not installed in your Setup Guide or "Replacing the transfer kit" on the operator panel...
User's Guide
Page 129
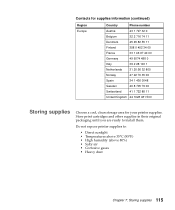
... 00 Spain 34 1 436 0048 Sweden 46 8 705 79 00 Switzerland 41 1 722 88 11 United Kingdom 44 1628 481 500 Storing supplies Choose a cool, clean storage area for your printer supplies. Do not expose printer supplies to install them.
... 00 Spain 34 1 436 0048 Sweden 46 8 705 79 00 Switzerland 41 1 722 88 11 United Kingdom 44 1628 481 500 Storing supplies Choose a cool, clean storage area for your printer supplies. Do not expose printer supplies to install them.
User's Guide
Page 170
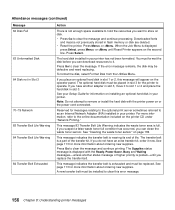
Downloaded fonts and macros not previously stored in Slot 3 70-79 Network 83 Transfer Belt Life Warning 84 Transfer Belt Life Warning 84 Transfer Belt Exhausted Action There is not enough space available to hold the resources you want to store on disk. • Press Go to clear the message and continue processing. Press Menu> or or Attendance messages (continued) Message 62 Disk Full 63 Unformatted Disk 64 Disk not in flash memory or disk are deleted. • Reset the printer.
Downloaded fonts and macros not previously stored in Slot 3 70-79 Network 83 Transfer Belt Life Warning 84 Transfer Belt Life Warning 84 Transfer Belt Exhausted Action There is not enough space available to hold the resources you want to store on disk. • Press Go to clear the message and continue processing. Press Menu> or or Attendance messages (continued) Message 62 Disk Full 63 Unformatted Disk 64 Disk not in flash memory or disk are deleted. • Reset the printer.
User's Guide
Page 176
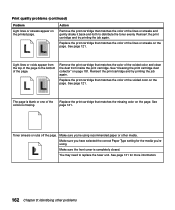
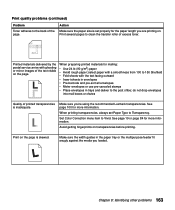
... paper or other problems See page 131 for the media you 're using . Light lines or voids appear from inside the print cartridge. See "Cleaning the print cartridge dust collector" on the printed page. Replace the print cartridge that matches the color of the lines or streaks and gently shake...Remove the print cartridge that matches the missing color on the page. Remove the print cartridge that matches the color of the voided color and clean the dust from the top of the page to replace the fuser unit. Reinsert the print cartridge and try printing the job again. You ...
... paper or other problems See page 131 for the media you 're using . Light lines or voids appear from inside the print cartridge. See "Cleaning the print cartridge dust collector" on the printed page. Replace the print cartridge that matches the color of the lines or streaks and gently shake...Remove the print cartridge that matches the missing color on the page. Remove the print cartridge that matches the color of the voided color and clean the dust from the top of the page to replace the fuser unit. Reinsert the print cartridge and try printing the job again. You ...
User's Guide
Page 177
... use pre-canceled stamps • Place envelopes in the paper tray or the multipurpose feeder fit snugly against the media you 're using the recommended Lexmark transparencies. Print on . do not drop envelopes into mail boxes or chutes Quality of the text visible on transparencies before printing. Chapter 8: Identifying other problems... length you are printing on the page is inadequate. Avoid getting fingerprints on the page. Make sure you loaded. Set Color Correction menu item to clean the transfer roller of the page.
... use pre-canceled stamps • Place envelopes in the paper tray or the multipurpose feeder fit snugly against the media you 're using the recommended Lexmark transparencies. Print on . do not drop envelopes into mail boxes or chutes Quality of the text visible on transparencies before printing. Chapter 8: Identifying other problems... length you are printing on the page is inadequate. Avoid getting fingerprints on the page. Make sure you loaded. Set Color Correction menu item to clean the transfer roller of the page.
User's Guide
Page 195
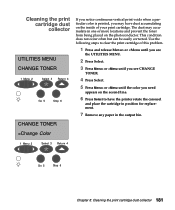
Cleaning the print cartridge dust collector UTILITIES MENU CHANGE TONER 1 Menu 2 Select 3 Return 4 Go 5 Stop 6 If you notice continuous vertical print voids when a particular color is printed, you may accumulate in one or more locations and prevent the toner from being placed on the inside of this problem. 1 Press and release Menu> or or or The dust may have dust accumulating on the photoconductor. This condition does not occur often but can be easily corrected. Use the following steps to clear the print cartridge of your print cartridge.
Cleaning the print cartridge dust collector UTILITIES MENU CHANGE TONER 1 Menu 2 Select 3 Return 4 Go 5 Stop 6 If you notice continuous vertical print voids when a particular color is printed, you may accumulate in one or more locations and prevent the toner from being placed on the inside of this problem. 1 Press and release Menu> or or or The dust may have dust accumulating on the photoconductor. This condition does not occur often but can be easily corrected. Use the following steps to clear the print cartridge of your print cartridge.
User's Guide
Page 196
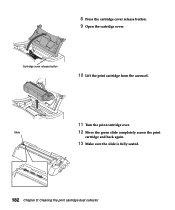
Cartridge cover release button 10 Lift the print cartridge from the carousel. 11 Turn the print cartridge over. Slide 12 Move the green slide completely across the print cartridge and back again. 13 Make sure the slide is fully seated. 182 Chapter 8: Cleaning the print cartridge dust collector 8 Press the cartridge cover release button. 9 Open the cartridge cover.
Cartridge cover release button 10 Lift the print cartridge from the carousel. 11 Turn the print cartridge over. Slide 12 Move the green slide completely across the print cartridge and back again. 13 Make sure the slide is fully seated. 182 Chapter 8: Cleaning the print cartridge dust collector 8 Press the cartridge cover release button. 9 Open the cartridge cover.
User's Guide
Page 197
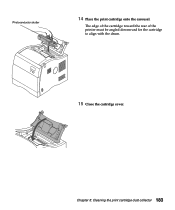
The edge of the cartridge toward the rear of the printer must be angled downward for the cartridge to align with the drum. 15 Close the cartridge cover. Photoconductor shutter 14 Place the print cartridge onto the carousel. Chapter 8: Cleaning the print cartridge dust collector 183
The edge of the cartridge toward the rear of the printer must be angled downward for the cartridge to align with the drum. 15 Close the cartridge cover. Photoconductor shutter 14 Place the print cartridge onto the carousel. Chapter 8: Cleaning the print cartridge dust collector 183
User's Guide
Page 198
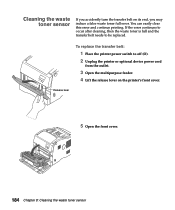
... belt: 1 Place the printer power switch to be replaced. You can easily clear this error and continue printing. If the error continues to occur after cleaning, then the waste toner is full and the transfer belt needs to off (O). 2 Unplug the printer or optional device power cord from the outlet. 3 Open... multipurpose feeder. 4 Lift the release lever on its end, you may induce a false waste toner full error. Release lever 5 Open the front cover. 184 Chapter 8: Cleaning the waste toner sensor
... belt: 1 Place the printer power switch to be replaced. You can easily clear this error and continue printing. If the error continues to occur after cleaning, then the waste toner is full and the transfer belt needs to off (O). 2 Unplug the printer or optional device power cord from the outlet. 3 Open... multipurpose feeder. 4 Lift the release lever on its end, you may induce a false waste toner full error. Release lever 5 Open the front cover. 184 Chapter 8: Cleaning the waste toner sensor

User's Guide
Page 199
Warning! Make sure you do not touch the image film inside of the printer may be hot. Caution! To remove the transfer belt, use the green tabs. Chapter 8: Cleaning the waste toner sensor 185 The inside the transfer belt housing. Allow the printer to cool before touching any internal components. 6 Pull the transfer belt from the printer.
Warning! Make sure you do not touch the image film inside of the printer may be hot. Caution! To remove the transfer belt, use the green tabs. Chapter 8: Cleaning the waste toner sensor 185 The inside the transfer belt housing. Allow the printer to cool before touching any internal components. 6 Pull the transfer belt from the printer.

User's Guide
Page 200
7 Place the transfer belt on its end as shown. 8 Move the wiper lever from side to side to clean the detection window. 9 Align the bottom of the transfer belt with rails inside the printer. 10 Push the transfer belt into the printer until it is firmly seated. 186 Chapter 8: Cleaning the waste toner sensor
7 Place the transfer belt on its end as shown. 8 Move the wiper lever from side to side to clean the detection window. 9 Align the bottom of the transfer belt with rails inside the printer. 10 Push the transfer belt into the printer until it is firmly seated. 186 Chapter 8: Cleaning the waste toner sensor
User's Guide
Page 201
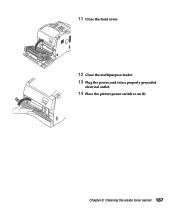
11 Close the front cover. 12 Close the multipurpose feeder. 13 Plug the power cord into a properly grounded electrical outlet. 14 Place the printer power switch to on (I). Chapter 8: Cleaning the waste toner sensor 187
11 Close the front cover. 12 Close the multipurpose feeder. 13 Plug the power cord into a properly grounded electrical outlet. 14 Place the printer power switch to on (I). Chapter 8: Cleaning the waste toner sensor 187

User's Guide
Page 270
... 189 online documentation xi Change Cartridges Install Cartridges 121 install cartridges 32 changing printer settings from MarkVision 7, 194 256 Index from operator panel 12 cleaning 181 cleaning the waste toner sensor 184 clearing the waste toner sensor 184 Clock Menu 58 CMYK 85 Coating Roll 17 coating roll replacing 126 when to...
... 189 online documentation xi Change Cartridges Install Cartridges 121 install cartridges 32 changing printer settings from MarkVision 7, 194 256 Index from operator panel 12 cleaning 181 cleaning the waste toner sensor 184 clearing the waste toner sensor 184 Clock Menu 58 CMYK 85 Coating Roll 17 coating roll replacing 126 when to...

Service Manual
Page 3
... 1-17 Contact Cam 1-18 Coupling Unit 1-19 Carriage Unit 1-21 Toner Cartridge Unit 1-22 Intermediate Transfer Unit 1-24 Fuser/Paper Exit Unit 1-27 Detecting New Cleaning Unit 1-28 Duplex Unit (Option 1-29 Diagnostic Information 2-1 Start 2-1 Service Error Codes 2-2 User Status Messages 2-7 User Attendance Messages 2-13 Symptom Tables 2-28 Base Printer Symptom...
... 1-17 Contact Cam 1-18 Coupling Unit 1-19 Carriage Unit 1-21 Toner Cartridge Unit 1-22 Intermediate Transfer Unit 1-24 Fuser/Paper Exit Unit 1-27 Detecting New Cleaning Unit 1-28 Duplex Unit (Option 1-29 Diagnostic Information 2-1 Start 2-1 Service Error Codes 2-2 User Status Messages 2-7 User Attendance Messages 2-13 Symptom Tables 2-28 Base Printer Symptom...
Service Manual
Page 5
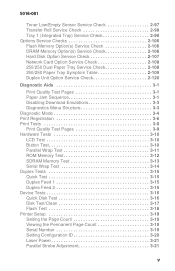
... Serial Wrap Test 3-14 Duplex Tests 3-15 Quick Test 3-15 Duplex Feed 1 3-15 Duplex Feed 2 3-15 Device Tests 3-16 Quick Disk Test 3-16 Disk Test/Clean 3-17 Flash Test 3-18 Printer Setup 3-19 Setting the Page Count 3-19 Viewing the Permanent Page Count 3-19 Serial Number 3-19 Setting Configuration ID 3-20...
... Serial Wrap Test 3-14 Duplex Tests 3-15 Quick Test 3-15 Duplex Feed 1 3-15 Duplex Feed 2 3-15 Device Tests 3-16 Quick Disk Test 3-16 Disk Test/Clean 3-17 Flash Test 3-18 Printer Setup 3-19 Setting the Page Count 3-19 Viewing the Permanent Page Count 3-19 Serial Number 3-19 Setting Configuration ID 3-20...

Service Manual
Page 7
... Locations 5-13 Solenoid/Clutch Locations 5-14 250/250 Paper Tray Option 5-15 Duplex Option 5-15 Cable Connections 5-16 Preventive Maintenance 6-1 Safety Inspection Guide 6-1 Service Precautions 6-1 Cleaning Procedures 6-1 Lubrication Specifications 6-1 Parts Catalog 7-1 vii
... Locations 5-13 Solenoid/Clutch Locations 5-14 250/250 Paper Tray Option 5-15 Duplex Option 5-15 Cable Connections 5-16 Preventive Maintenance 6-1 Safety Inspection Guide 6-1 Service Precautions 6-1 Cleaning Procedures 6-1 Lubrication Specifications 6-1 Parts Catalog 7-1 vii
Service Manual
Page 28
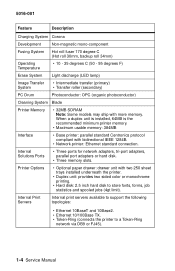
... - 95 degrees F) Erase System Light discharge (LED lamp) Image Transfer System • Intermediate transfer (primary) • Transfer roller (secondary) PC Drum Photoconductor: OPC (organic photoconductor) Cleaning System Blade Printer Memory • 32MB SDRAM Note: Some models may ship with bidirectional IEEE 1284B. • Network printer: Ethernet standard connection. Internal Solutions Ports...
... - 95 degrees F) Erase System Light discharge (LED lamp) Image Transfer System • Intermediate transfer (primary) • Transfer roller (secondary) PC Drum Photoconductor: OPC (organic photoconductor) Cleaning System Blade Printer Memory • 32MB SDRAM Note: Some models may ship with bidirectional IEEE 1284B. • Network printer: Ethernet standard connection. Internal Solutions Ports...
Service Manual
Page 48
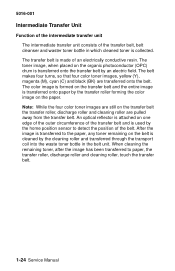
... an electric field. After the image is transferred onto paper by the home position sensor to detect the position of the belt. When cleaning the remaining toner, after the image has been transferred to the paper, any toner remaining on the transfer belt and the entire image is... transferred to paper, the transfer roller, discharge roller and cleaning roller, touch the transfer belt. 1-24 Service Manual An optical reflector is attached on one edge of the outer circumference of the transfer belt ...
... an electric field. After the image is transferred onto paper by the home position sensor to detect the position of the belt. When cleaning the remaining toner, after the image has been transferred to the paper, any toner remaining on the transfer belt and the entire image is... transferred to paper, the transfer roller, discharge roller and cleaning roller, touch the transfer belt. 1-24 Service Manual An optical reflector is attached on one edge of the outer circumference of the transfer belt ...
Service Manual
Page 49
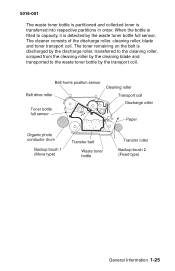
5016-001 The waste toner bottle is partitioned and collected toner is discharged by the discharge roller, transferred to the cleaning roller, scraped from the cleaning roller by the cleaning blade and transported to capacity, it is detected by the transport coil. General Information 1-25 The toner remaining on the belt is transferred into respective partitions in order. The cleaner consists of the discharge roller, cleaning roller, blade and toner transport coil. When the bottle is filled to the waste toner bottle by the waste toner bottle full sensor.
5016-001 The waste toner bottle is partitioned and collected toner is discharged by the discharge roller, transferred to the cleaning roller, scraped from the cleaning roller by the cleaning blade and transported to capacity, it is detected by the transport coil. General Information 1-25 The toner remaining on the belt is transferred into respective partitions in order. The cleaner consists of the discharge roller, cleaning roller, blade and toner transport coil. When the bottle is filled to the waste toner bottle by the waste toner bottle full sensor.


