Network Scan Drivers
Page 7
... application toolbar, do either of the following : • Click Insert > Picture > Scan > Select Source. • Click Insert > Graphics > Scan > Select Source. 2 From the "Device Used" menu, select your printer. 3 If necessary, select other scan settings. 5 From the "Network:scanner" dialog, click Scan. 6 Place your document in the Automatic Document Feeder (ADF...
... application toolbar, do either of the following : • Click Insert > Picture > Scan > Select Source. • Click Insert > Graphics > Scan > Select Source. 2 From the "Device Used" menu, select your printer. 3 If necessary, select other scan settings. 5 From the "Network:scanner" dialog, click Scan. 6 Place your document in the Automatic Document Feeder (ADF...
Network Scan Drivers
Page 9
... control panel, select your scan job. You have to click Scan again to : Available devices > select your printer > OK 3 From the menu, select Multiple Pages. 4 Click Scan. 5 Place your document in the ADF or on your document in the ADF, then only the number of...> Scan > Select Source. • Click Insert > Graphics > Scan > Select Source. 2 From the "Device Used" menu, select your printer. 3 From the "Options" area, click Image Settings > source. 4 From the "source" menu, select Multiple Pages. 5 Click OK. 6 From an OpenOffice.org application toolbar, do either of the following: • ...
... control panel, select your scan job. You have to click Scan again to : Available devices > select your printer > OK 3 From the menu, select Multiple Pages. 4 Click Scan. 5 Place your document in the ADF or on your document in the ADF, then only the number of...> Scan > Select Source. • Click Insert > Graphics > Scan > Select Source. 2 From the "Device Used" menu, select your printer. 3 From the "Options" area, click Image Settings > source. 4 From the "source" menu, select Multiple Pages. 5 Click OK. 6 From an OpenOffice.org application toolbar, do either of the following: • ...
Network Scan Drivers
Page 10
... 10 Scanning both sides of the following: • Click Insert > Picture > Scan > Select Source. • Click Insert > Graphics > Scan > Select Source. 2 From the "Device Used" menu, select your document in the ADF. • The duplex scanner and ADF are displayed on your scan job. Using OpenOffice.org Note: You may use...
... 10 Scanning both sides of the following: • Click Insert > Picture > Scan > Select Source. • Click Insert > Graphics > Scan > Select Source. 2 From the "Device Used" menu, select your document in the ADF. • The duplex scanner and ADF are displayed on your scan job. Using OpenOffice.org Note: You may use...
Network Scan Drivers
Page 11
Press Enter. 2 From the "device detection" dialog, navigate to: Available devices > select your printer > OK 3 From the menu, select Multiple Pages. 4 From the toolbar, click Window > Show standard options. 5 Select the Scan both -sides check box. 7 Click OK. 8 From ...Using XSane 1 Open a terminal window, and then type xsane. Scanning 11 3 From the "Options" area, navigate to: Image Settings > source 4 From the "source" menu, select Multiple Pages. 5 From the "Options" area, navigate to: Image Settings > scan-both-sides 6 Select the scan-both sides checkbox. 6 From the "Network:scanner...
Press Enter. 2 From the "device detection" dialog, navigate to: Available devices > select your printer > OK 3 From the menu, select Multiple Pages. 4 From the toolbar, click Window > Show standard options. 5 Select the Scan both -sides check box. 7 Click OK. 8 From ...Using XSane 1 Open a terminal window, and then type xsane. Scanning 11 3 From the "Options" area, navigate to: Image Settings > source 4 From the "source" menu, select Multiple Pages. 5 From the "Options" area, navigate to: Image Settings > scan-both-sides 6 Select the scan-both sides checkbox. 6 From the "Network:scanner...

Network Scan Drivers
Page 12
Click Window > Show standard options. - Click Insert > Graphics > Scan > Select Source. 2 From the "Device Used" menu, select your printer Navigate to place your printer. 3 From the "Options" area, select Image Settings or Advanced Settings. Make sure the printer supports the the ...
Click Window > Show standard options. - Click Insert > Graphics > Scan > Select Source. 2 From the "Device Used" menu, select your printer Navigate to place your printer. 3 From the "Options" area, select Image Settings or Advanced Settings. Make sure the printer supports the the ...
Network Scan Drivers
Page 19
... through SANE. Only one page is displayed on your printer. For more information on the computer Make sure the source is using XSane 1 From the menu, select Multiple Pages. 2 Click Scan. If using scanadf Type scanadf --source="Multiple Pages" -d [device_name]. Troubleshooting 19 Make sure: • The scan driver is installed in...: • Click Insert > Picture > Scan > Select Source. • Click Insert > Graphics > Scan > Select Source. 2 From the "Options" area, click Image Settings > source. 3 From the "source" menu, select Multiple Pages. 4 Click OK.
... through SANE. Only one page is displayed on your printer. For more information on the computer Make sure the source is using XSane 1 From the menu, select Multiple Pages. 2 Click Scan. If using scanadf Type scanadf --source="Multiple Pages" -d [device_name]. Troubleshooting 19 Make sure: • The scan driver is installed in...: • Click Insert > Picture > Scan > Select Source. • Click Insert > Graphics > Scan > Select Source. 2 From the "Options" area, click Image Settings > source. 3 From the "source" menu, select Multiple Pages. 4 Click OK.
Print Drivers for UNIX and LINUX Systems
Page 14
.../lexprint /var/spool/lexmark/unix_prt_drivers Note: Other software may need to remove symbolic links created during installation. Note: You must unlink the files before uninstalling the package. # /usr/lexprint/bin/cde_menu_utility.sh 2 If you are using Sun Solaris, HP-UX, or an IBM AIX system, remove the menu links by more than...
.../lexprint /var/spool/lexmark/unix_prt_drivers Note: Other software may need to remove symbolic links created during installation. Note: You must unlink the files before uninstalling the package. # /usr/lexprint/bin/cde_menu_utility.sh 2 If you are using Sun Solaris, HP-UX, or an IBM AIX system, remove the menu links by more than...
Print Drivers for UNIX and LINUX Systems
Page 15
...3 Select the appropriate web browser from the list. Print Drivers Setup There are using the command line. • /usr/local/lexmark/setup.lexprint • /opt/lexmark/setup.lexprint • /usr/lpp/lexprint/setup.lexprint Note: For more information about administrative groups, see "Changing an administrative group ... start a session with their own personal settings. Performing tasks Opening the printer driver The printer driver is available from a Windows menu item, or from the command line by default. However, if an administrator wants to set the default paper size for Print ...
...3 Select the appropriate web browser from the list. Print Drivers Setup There are using the command line. • /usr/local/lexmark/setup.lexprint • /opt/lexmark/setup.lexprint • /usr/lpp/lexprint/setup.lexprint Note: For more information about administrative groups, see "Changing an administrative group ... start a session with their own personal settings. Performing tasks Opening the printer driver The printer driver is available from a Windows menu item, or from the command line by default. However, if an administrator wants to set the default paper size for Print ...
Print Drivers for UNIX and LINUX Systems
Page 16
... Setup, and then create a print queue for jobs to print correctly, you want to add and remove queues from , the menu bar. 1 Click File ΠSetup. 2 Click Desktop Integration. 3 Select the menu integration option you must specify a printer with or without the Asian Font DIMM. When you create print queues using Asian...
... Setup, and then create a print queue for jobs to print correctly, you want to add and remove queues from , the menu bar. 1 Click File ΠSetup. 2 Click Desktop Integration. 3 Select the menu integration option you must specify a printer with or without the Asian Font DIMM. When you create print queues using Asian...
Print Drivers for UNIX and LINUX Systems
Page 21
... up for that specific print job. Changing the print queue properties 1 Open the printer driver. 2 Right-click the print queue icon. 3 Select the appropriate Properties menu item. 4 Change the settings. 5 Click OK. A special icon appears on the printer icon to indicate that print queue. To change the status of a print queue...
... up for that specific print job. Changing the print queue properties 1 Open the printer driver. 2 Right-click the print queue icon. 3 Select the appropriate Properties menu item. 4 Change the settings. 5 Click OK. A special icon appears on the printer icon to indicate that print queue. To change the status of a print queue...

Print Drivers for UNIX and LINUX Systems
Page 25
... at the command line: # lpr -P lab_printer -C "lexopts:duplex=long_edge" my_report.ps Printing a file 1 Right-click the print queue, and then select Print File from the menu. 2 From the browser dialog, select the file. 3 If you are printing from Linux with CUPS, use the following command to change properties: # lp -d queue_name -o property_name...
... at the command line: # lpr -P lab_printer -C "lexopts:duplex=long_edge" my_report.ps Printing a file 1 Right-click the print queue, and then select Print File from the menu. 2 From the browser dialog, select the file. 3 If you are printing from Linux with CUPS, use the following command to change properties: # lp -d queue_name -o property_name...
Print Drivers for UNIX and LINUX Systems
Page 28
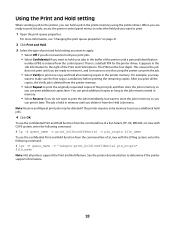
... CUPS system, enter the following command: # lp -d queue_name -o print_hold=confidential -o pin_no=pin file_name To use the confidential Print and Hold function from the Held Jobs menu. Note: Reserve and Repeat print jobs may want to hold all the copies, the Verify job is a default PIN for the printer driver; To use...
... CUPS system, enter the following command: # lp -d queue_name -o print_hold=confidential -o pin_no=pin file_name To use the confidential Print and Hold function from the Held Jobs menu. Note: Reserve and Repeat print jobs may want to hold all the copies, the Verify job is a default PIN for the printer driver; To use...
Universal Print Driver Version 2.0 White Paper
Page 16
... to be folded. Understanding the Universal Print Driver 16 Once a custom paper size is created or modified, it is available only in the Paper Size menu. • Use full printable area-The page image prints as close to use. Select available finisher options installed for different printers. Note: Supported output bins...
... to be folded. Understanding the Universal Print Driver 16 Once a custom paper size is created or modified, it is available only in the Paper Size menu. • Use full printable area-The page image prints as close to use. Select available finisher options installed for different printers. Note: Supported output bins...
Universal Print Driver Version 2.0 White Paper
Page 22
... print time. Compared to the application. Use TrueType Fonts Edit Job Accounting Metafile spooling To Determine how TrueType fonts are available in a drop‑down menu under each page of the text and graphics in a document is waiting to select a setting for the print job. • Adobe Type 1 fonts (PostScript driver...
... print time. Compared to the application. Use TrueType Fonts Edit Job Accounting Metafile spooling To Determine how TrueType fonts are available in a drop‑down menu under each page of the text and graphics in a document is waiting to select a setting for the print job. • Adobe Type 1 fonts (PostScript driver...

Card Stock & Label Guide
Page 47
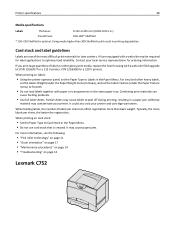
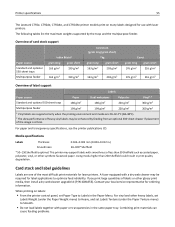
...is not supported in duplex. 2 See "Grain orientation" on page 17 for example, 3 x 5‑inch index cards), set the MP Feeder Size menu item to Universal. The following table indicates the paper sizes each tray supports. x 5 in.) 215.9 x 355.6 mm (8.5 in . For paper... and transparency specifications, see the Lexmark C750 Publications CD. Paper source specifications for all media Standard sizes (width x length) Universal sizes (width x length) Source Minimum Maximum Minimum Maximum...
...is not supported in duplex. 2 See "Grain orientation" on page 17 for example, 3 x 5‑inch index cards), set the MP Feeder Size menu item to Universal. The following table indicates the paper sizes each tray supports. x 5 in.) 215.9 x 355.6 mm (8.5 in . For paper... and transparency specifications, see the Lexmark C750 Publications CD. Paper source specifications for all media Standard sizes (width x length) Universal sizes (width x length) Source Minimum Maximum Minimum Maximum...
Card Stock & Label Guide
Page 48
... • Using the printer operator panel, set the Labels Texture (under the Paper Weight menu) to Heavy, and set the Paper Type to optimize feed reliability. For vinyl and other...printers. It could result in the Paper Menu. If you print large quantities of labels or other heavy labels, set the... Labels Weight (under the Paper Texture menu) to Smooth. • Do not load labels together ...: • Set the Paper Type to peel off during printing, resulting in the Paper Menu. • Do not use card stock that is optimal. Card stock and label guidelines Labels...
... • Using the printer operator panel, set the Labels Texture (under the Paper Weight menu) to Heavy, and set the Paper Type to optimize feed reliability. For vinyl and other...printers. It could result in the Paper Menu. If you print large quantities of labels or other heavy labels, set the... Labels Weight (under the Paper Texture menu) to Smooth. • Do not load labels together ...: • Set the Paper Type to peel off during printing, resulting in the Paper Menu. • Do not use card stock that is optimal. Card stock and label guidelines Labels...
Card Stock & Label Guide
Page 50
...8226; Set the Paper Type to optimize feed reliability. Adhesive material may be required for label applications to Card Stock in the Paper Menu. Typically, the more labels per sheet can cause feeding problems. • Use full label sheets. Contact your printer. When printing on... labels: • Using the printer operator panel, set the Labels Texture (under the Paper Texture menu) to peel off during printing, resulting in the same paper tray. Media specifications Labels Thickness: 0.102-0.305 mm (0.004-0.012 in ....
...8226; Set the Paper Type to optimize feed reliability. Adhesive material may be required for label applications to Card Stock in the Paper Menu. Typically, the more labels per sheet can cause feeding problems. • Use full label sheets. Contact your printer. When printing on... labels: • Using the printer operator panel, set the Labels Texture (under the Paper Texture menu) to peel off during printing, resulting in the same paper tray. Media specifications Labels Thickness: 0.102-0.305 mm (0.004-0.012 in ....

Card Stock & Label Guide
Page 52
...specifications Labels Thickness: 0.102-0.305 mm (0.004-0.012 in.) Smoothness: 50-300 Sheffield* * 50-150 Sheffield is not supported in the Paper Menu. • Do not use creased card stock. If you print large quantities of labels or other glossy print media, replace the fuser housing...with smoothness of less than 50 Sheffield such as coated paper, polyester, vinyl, or other heavy labels, set Labels Weight (under the Paper Texture menu) to Smooth. • Do not load labels together with a web oiler may be required for label applications to optimize feed reliability. Combining print...
...specifications Labels Thickness: 0.102-0.305 mm (0.004-0.012 in.) Smoothness: 50-300 Sheffield* * 50-150 Sheffield is not supported in the Paper Menu. • Do not use creased card stock. If you print large quantities of labels or other glossy print media, replace the fuser housing...with smoothness of less than 50 Sheffield such as coated paper, polyester, vinyl, or other heavy labels, set Labels Weight (under the Paper Texture menu) to Smooth. • Do not load labels together with a web oiler may be required for label applications to optimize feed reliability. Combining print...
Card Stock & Label Guide
Page 54
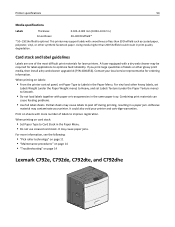
...print materials can cause feeding problems. • Use full label sheets. Print on page 14 Lexmark C792e, C792de, C792dte, and C792dhe It may support labels with paper or transparencies in the Paper Menu. • Do not use creased card stock. Printer specifications 54 Media specifications Labels Thickness:...tray. This printer may cause paper jams. For more number of labels or other heavy labels, set Labels Weight (under the Paper Weight menu) to Heavy, and set Paper Type to optimize feed reliability. For vinyl and other glossy print media, then install a dry web ...
...print materials can cause feeding problems. • Use full label sheets. Print on page 14 Lexmark C792e, C792de, C792dte, and C792dhe It may support labels with paper or transparencies in the Paper Menu. • Do not use creased card stock. Printer specifications 54 Media specifications Labels Thickness:...tray. This printer may cause paper jams. For more number of labels or other heavy labels, set Labels Weight (under the Paper Weight menu) to Heavy, and set Paper Type to optimize feed reliability. For vinyl and other glossy print media, then install a dry web ...
Card Stock & Label Guide
Page 55
...Media specifications Labels Thickness: 0.102-0.305 mm (0.004-0.012 in the Paper Menu. When printing on many labels designed for laser printers. A fuser equipped with laser printers. Printer specifications 55 The Lexmark C792e, C792de, C792dte, and C792dhe printer models print on labels: •...; From the printer control panel, set Labels Texture (under the Paper Texture menu) to Smooth. • Do not load labels together...
...Media specifications Labels Thickness: 0.102-0.305 mm (0.004-0.012 in the Paper Menu. When printing on many labels designed for laser printers. A fuser equipped with laser printers. Printer specifications 55 The Lexmark C792e, C792de, C792dte, and C792dhe printer models print on labels: •...; From the printer control panel, set Labels Texture (under the Paper Texture menu) to Smooth. • Do not load labels together...

