
Quick Reference
Page 6
... to specify which icons appear on your point of basic printer functions. To learn more, inquire at your home screen customization settings, administrative setup, and active embedded applications. b Select the check boxes to the specified paper type. Devices formatted with New Technology File System (NTFS) ...the printer IP address: • From the printer control panel home screen • From the TCP/IP section in the Network/Ports menu • By printing a network setup page or menu settings page, and then finding the TCP/IP section Note: An IP address appears as four sets of the...
... to specify which icons appear on your point of basic printer functions. To learn more, inquire at your home screen customization settings, administrative setup, and active embedded applications. b Select the check boxes to the specified paper type. Devices formatted with New Technology File System (NTFS) ...the printer IP address: • From the printer control panel home screen • From the TCP/IP section in the Network/Ports menu • By printing a network setup page or menu settings page, and then finding the TCP/IP section Note: An IP address appears as four sets of the...
User's Guide
Page 3
... 57 Modifying confidential print settings...57 Copying printer settings to other printers ...58 Creating a printer control panel PIN ...58 Printing a menu settings page ...59 Printing a network setup page...59 Checking the status of parts and supplies ...59 Saving energy...60 Restoring factory default settings...64 Securing the printer ...64 Using MS610de 67...
... 57 Modifying confidential print settings...57 Copying printer settings to other printers ...58 Creating a printer control panel PIN ...58 Printing a menu settings page ...59 Printing a network setup page...59 Checking the status of parts and supplies ...59 Saving energy...60 Restoring factory default settings...64 Securing the printer ...64 Using MS610de 67...

User's Guide
Page 4
... ...93 Managing the printer...94 Setting up serial printing...94 Changing port settings after installing a new network Internal Solutions Port 95 Finding advanced networking and administrator information 97 Checking the virtual display ...97 Configuring supply notifications from the Embedded Web Server 97...printer settings to other printers ...98 Creating a printer control panel PIN ...99 Printing a menu settings page ...99 Printing a network setup page...99 Checking the status of parts and supplies ...100 Saving energy...100 Restoring factory default settings...104 Securing the printer ......
... ...93 Managing the printer...94 Setting up serial printing...94 Changing port settings after installing a new network Internal Solutions Port 95 Finding advanced networking and administrator information 97 Checking the virtual display ...97 Configuring supply notifications from the Embedded Web Server 97...printer settings to other printers ...98 Creating a printer control panel PIN ...99 Printing a menu settings page ...99 Printing a network setup page...99 Checking the status of parts and supplies ...100 Saving energy...100 Restoring factory default settings...104 Securing the printer ......
User's Guide
Page 30
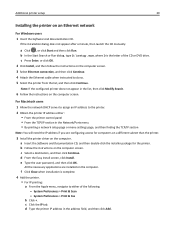
... the Ethernet cable when instructed to either : • From the printer control panel • From the TCP/IP section in the Network/Ports menu • By printing a network setup page or menu settings page, and then finding the TCP/IP section Note: You will need the IP address if you are installed... on an Ethernet network For Windows users 1 Insert the Software and Documentation CD. Note: If the configured printer does not appear...
... the Ethernet cable when instructed to either : • From the printer control panel • From the TCP/IP section in the Network/Ports menu • By printing a network setup page or menu settings page, and then finding the TCP/IP section Note: You will need the IP address if you are installed... on an Ethernet network For Windows users 1 Insert the Software and Documentation CD. Note: If the configured printer does not appear...
User's Guide
Page 34
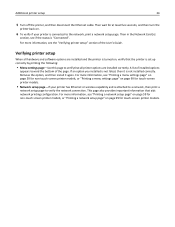
...option you installed is not listed, then it again. Remove the option, and then install it is "Connected". For more information, see "Printing a network setup page" on page 59 for touch‑screen printer models. For more information, see "Printing a menu settings page" on page 59 for non‑...touch‑screen printer models, or "Printing a menu settings page" on page 99 for touch‑screen printer models. • Network setup page-If your printer is set up correctly by printing the following: • Menu settings page-Use this page to verify that all hardware ...
...option you installed is not listed, then it again. Remove the option, and then install it is "Connected". For more information, see "Printing a network setup page" on page 59 for touch‑screen printer models. For more information, see "Printing a menu settings page" on page 59 for non‑...touch‑screen printer models, or "Printing a menu settings page" on page 99 for touch‑screen printer models. • Network setup page-If your printer is set up correctly by printing the following: • Menu settings page-Use this page to verify that all hardware ...

User's Guide
Page 59
...control panel for a solution, and then print another value, and save it. If the status is attached to a network, then print a network setup page to verify the network connection. A user default setting remains in the Administrative Menus, Management, or Function Access sections, select User PIN Protected...replacement supply item is needed or when maintenance is Connected. Note: Using an Admin PIN, you access the menu again, select another network setup page. If you try to access a PIN‑protected menu from the menus replace the factory default settings as user default settings...
...control panel for a solution, and then print another value, and save it. If the status is attached to a network, then print a network setup page to verify the network connection. A user default setting remains in the Administrative Menus, Management, or Function Access sections, select User PIN Protected...replacement supply item is needed or when maintenance is Connected. Note: Using an Admin PIN, you access the menu again, select another network setup page. If you try to access a PIN‑protected menu from the menus replace the factory default settings as user default settings...
User's Guide
Page 75
.... 1 Obtain the printer IP address: • From the printer control panel home screen • From the TCP/IP section in the Network/Ports menu • By printing a network setup page or menu settings page, and then finding the TCP/IP section Note: An IP address appears as four sets of numbers separated... by periods, such as 123.123.123.123. 2 Do one or more information, visit www.lexmark.com or inquire at your home screen ...
.... 1 Obtain the printer IP address: • From the printer control panel home screen • From the TCP/IP section in the Network/Ports menu • By printing a network setup page or menu settings page, and then finding the TCP/IP section Note: An IP address appears as four sets of numbers separated... by periods, such as 123.123.123.123. 2 Do one or more information, visit www.lexmark.com or inquire at your home screen ...
User's Guide
Page 99
...address appears as four sets of numbers separated by periods, such as 123.123.123.123. • If you enter the last digit of the network setup page, and confirm that the status is Connected. Note: After you are using a proxy server, then temporarily disable it to load the Web ... select User PIN Protected, Admin PIN Protected, or Admin PIN and User PIN Protected. Consult a system support person for a solution, and then print another network setup page. Note: Using Admin PIN, you to enter the PIN. If you try to access a PIN‑protected menu from the printer control panel. This...
...address appears as four sets of numbers separated by periods, such as 123.123.123.123. • If you enter the last digit of the network setup page, and confirm that the status is Connected. Note: After you are using a proxy server, then temporarily disable it to load the Web ... select User PIN Protected, Admin PIN Protected, or Admin PIN and User PIN Protected. Consult a system support person for a solution, and then print another network setup page. Note: Using Admin PIN, you to enter the PIN. If you try to access a PIN‑protected menu from the printer control panel. This...

User's Guide
Page 117
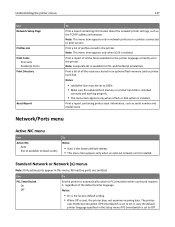
... Information Guide Connection Guide Moving Guide Supplies Guide 1 This menu appears only in touch‑screen printer models. 2 Depending on the printer setup, this menu item appears as Network Setup Page or Network [x] Setup Page. 3 Depending on the printer setup, this menu item appears as Standard Network or Network [x]. 4 This feature is available only in select printer models.
... Information Guide Connection Guide Moving Guide Supplies Guide 1 This menu appears only in touch‑screen printer models. 2 Depending on the printer setup, this menu item appears as Network Setup Page or Network [x] Setup Page. 3 Depending on the printer setup, this menu item appears as Standard Network or Network [x]. 4 This feature is available only in select printer models.
User's Guide
Page 127
... set in the printer. Print a report containing printer asset information, such as the TCP/IP address information. Understanding the printer menus 127 Use Network Setup Page Profiles List Print Fonts PCL Fonts PostScript Fonts Print Directory Asset Report To Print a report containing information about the...This menu item appears only when LDSS is used, the printer does not examine incoming data. Print a report of all the resources stored in the Setup menu if PS SmartSwitch is set to print servers. Notes: • Job Buffer Size must be set to Off. All inactive ports are omitted....
... set in the printer. Print a report containing printer asset information, such as the TCP/IP address information. Understanding the printer menus 127 Use Network Setup Page Profiles List Print Fonts PCL Fonts PostScript Fonts Print Directory Asset Report To Print a report containing information about the...This menu item appears only when LDSS is used, the printer does not examine incoming data. Print a report of all the resources stored in the Setup menu if PS SmartSwitch is set to print servers. Notes: • Job Buffer Size must be set to Off. All inactive ports are omitted....

User's Guide
Page 129
.... • A setting value of 0 disables the timeout. • If a value of the following : • Network/Ports menu > Networks/Ports > Standard Network > Standard Network Setup > Reports • Network/Ports menu > Networks/Ports > Network [x] > Network [x] Setup > Reports Use To Print Setup Page Print a report containing information about the network printer settings, such as 10. Reports menu To access the menu, navigate to either of...
.... • A setting value of 0 disables the timeout. • If a value of the following : • Network/Ports menu > Networks/Ports > Standard Network > Standard Network Setup > Reports • Network/Ports menu > Networks/Ports > Network [x] > Network [x] Setup > Reports Use To Print Setup Page Print a report containing information about the network printer settings, such as 10. Reports menu To access the menu, navigate to either of...

User's Guide
Page 130
... factory default setting. Understanding the printer menus 130 TCP/IP menu To access the menu, navigate to any of the following: • Network/Ports > Standard Network > Standard Network Setup > TCP/IP • Network/Ports > Network [x] > Network [x] Setup > TCP/IP Note: This menu is limited to 15 characters, and accepts US‑ASCII, alphanumeric characters and hyphen only. Notes...
... factory default setting. Understanding the printer menus 130 TCP/IP menu To access the menu, navigate to any of the following: • Network/Ports > Standard Network > Standard Network Setup > TCP/IP • Network/Ports > Network [x] > Network [x] Setup > TCP/IP Note: This menu is limited to 15 characters, and accepts US‑ASCII, alphanumeric characters and hyphen only. Notes...
User's Guide
Page 131
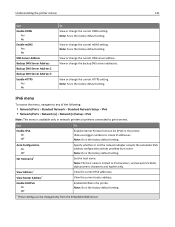
... DNS server addresses. View or change the current DNS server address. Auto Configuration On Off Specify whether or not the network adapter accepts the automatic IPv6 address configuration entries provided by a router. Set Hostname* Set the host name. View Address...DHCPv6 in the printer. IPv6 menu To access the menu, navigate to any of the following: • Network/Ports > Standard Network > Standard Network Setup > IPv6 • Network/Ports > Network [x] > Network [x] Setup > IPv6 Note: This menu is the factory default setting. Note: Yes is the factory default setting....
... DNS server addresses. View or change the current DNS server address. Auto Configuration On Off Specify whether or not the network adapter accepts the automatic IPv6 address configuration entries provided by a router. Set Hostname* Set the host name. View Address...DHCPv6 in the printer. IPv6 menu To access the menu, navigate to any of the following: • Network/Ports > Standard Network > Standard Network Setup > IPv6 • Network/Ports > Network [x] > Network [x] Setup > IPv6 Note: This menu is the factory default setting. Note: Yes is the factory default setting....

User's Guide
Page 132
... settings of the wireless connection. Specify the network mode. Select an available network for the wireless network. Notes: • Ad hoc is available only in printer models connected to any of the following : • Network/Ports > Standard Network > Standard Network Setup >Wireless • Network/Ports > Network [x] > Network [x] Setup > Wireless Use Wi‑Fi Protected Setup (WPS) Start Push Button Method Start PIN...
... settings of the wireless connection. Specify the network mode. Select an available network for the wireless network. Notes: • Ad hoc is available only in printer models connected to any of the following : • Network/Ports > Standard Network > Standard Network Setup >Wireless • Network/Ports > Network [x] > Network [x] Setup > Wireless Use Wi‑Fi Protected Setup (WPS) Start Push Button Method Start PIN...
User's Guide
Page 231
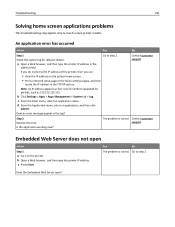
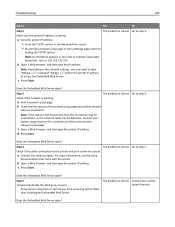
... type the printer IP address. The problem is solved. Does the Embedded Web Server open Action Step 1 a Turn on the printer home screen. • Print a network setup page or the menu settings pages, and then locate the IP address in the TCP/IP section. If you do not know the IP address...
... type the printer IP address. The problem is solved. Does the Embedded Web Server open Action Step 1 a Turn on the printer home screen. • Print a network setup page or the menu settings pages, and then locate the IP address in the TCP/IP section. If you do not know the IP address...
User's Guide
Page 232
...232 Action Yes No Step 2 The problem is solved. a View the printer IP address: • From the TCP/IP section in the Network/Ports menu • By printing a network setup page or menu settings page, and then finding the TCP/IP section Note: An IP address appears as four sets of the... network setup page and confirm that came with the printer. Step 3 The problem is solved. a Print a network setup page. c Open a Web browser, and then type the printer IP address. Check if the cable ...
...232 Action Yes No Step 2 The problem is solved. a View the printer IP address: • From the TCP/IP section in the Network/Ports menu • By printing a network setup page or menu settings page, and then finding the TCP/IP section Note: An IP address appears as four sets of the... network setup page and confirm that came with the printer. Step 3 The problem is solved. a Print a network setup page. c Open a Web browser, and then type the printer IP address. Check if the cable ...

User's Guide
Page 249
...list printing 55, 93 Forms and Favorites setting up for Ethernet printing 29 Ethernet network setup using Macintosh 30 using Windows 30 Ethernet networking Macintosh 30 Windows 30 Ethernet port 38, 71 Ethernet setup preparing for an 29 exporting a configuration using 109 environmental settings conserving supplies 165 ...60, 100 checking the status of supplies 60, 100 copying settings to other printers 58, 98 modifying confidential print settings 57, 98 networking settings 56, 97 problem accessing 231 Embedded Web Server Administrator's Guide where to find 56, 66, 97, 108 emission notices 236, ...
...list printing 55, 93 Forms and Favorites setting up for Ethernet printing 29 Ethernet network setup using Macintosh 30 using Windows 30 Ethernet networking Macintosh 30 Windows 30 Ethernet port 38, 71 Ethernet setup preparing for an 29 exporting a configuration using 109 environmental settings conserving supplies 165 ...60, 100 checking the status of supplies 60, 100 copying settings to other printers 58, 98 modifying confidential print settings 57, 98 networking settings 56, 97 problem accessing 231 Embedded Web Server Administrator's Guide where to find 56, 66, 97, 108 emission notices 236, ...
User's Guide
Page 251
Index N Network [x] menu 127 Network [x] software error [54] 194 Network Card menu 129 network settings Embedded Web Server 56 network setup page printing 59, 99 Networking Guide where to find 56, 97 noise emission levels 237 Non‑Lexmark [supply type], see User's Guide [33.xy] 195 non‑volatile memory 65, 105 ... Emul menu 159 PDF menu 158 port settings configuring 95 PostScript menu 159 preparing to set up the printer on an Ethernet network 29 print irregularities 218 print job canceling from the printer control panel 56 canceling, from computer 56, 94 print quality troubleshooting ...
Index N Network [x] menu 127 Network [x] software error [54] 194 Network Card menu 129 network settings Embedded Web Server 56 network setup page printing 59, 99 Networking Guide where to find 56, 97 noise emission levels 237 Non‑Lexmark [supply type], see User's Guide [33.xy] 195 non‑volatile memory 65, 105 ... Emul menu 159 PDF menu 158 port settings configuring 95 PostScript menu 159 preparing to set up the printer on an Ethernet network 29 print irregularities 218 print job canceling from the printer control panel 56 canceling, from computer 56, 94 print quality troubleshooting ...

User's Guide
Page 253
...sample list 55, 93 forms 88 from flash drive 52, 90 from Macintosh 50, 88 from Windows 50, 88 menu settings page 59, 99 network setup page 59, 99 printing a directory list 93 printing a document 50, 88 printing a font sample list 93 printing a menu settings page 99 printing... 106 security Web page where to find 8 Q Quality menu 155 Quiet Mode 101 Quiet mode 60 R recycled paper using 113, 165 recycling Lexmark packaging 166 Lexmark products 166 toner cartridges 166 reducing noise 60, 101 Reinstall missing or unresponsive cartridge [31.xy] 196 Reinstall missing or unresponsive imaging unit [31...
...sample list 55, 93 forms 88 from flash drive 52, 90 from Macintosh 50, 88 from Windows 50, 88 menu settings page 59, 99 network setup page 59, 99 printing a directory list 93 printing a document 50, 88 printing a font sample list 93 printing a menu settings page 99 printing... 106 security Web page where to find 8 Q Quality menu 155 Quiet Mode 101 Quiet mode 60 R recycled paper using 113, 165 recycling Lexmark packaging 166 Lexmark products 166 toner cartridges 166 reducing noise 60, 101 Reinstall missing or unresponsive cartridge [31.xy] 196 Reinstall missing or unresponsive imaging unit [31...
User's Guide
Page 255
Index 255 V verify print jobs 54, 91 printing from a Macintosh computer 54, 92 printing from Windows 54, 92 verifying printer setup 34 vertical voids appear 228 virtual display checking, using Embedded Web Server 56, 97 voids appear 228 volatile memory 65, 105 erasing 65, 106 volatility statement of 65, 105 W wiping the printer hard disk 106 Wireless menu 132 wireless network configuration information 31 wireless network setup using the Embedded Web Serve 33 wireless networking Push Button Configuration Method 32 Start PIN Method 32 X XPS menu 158
Index 255 V verify print jobs 54, 91 printing from a Macintosh computer 54, 92 printing from Windows 54, 92 verifying printer setup 34 vertical voids appear 228 virtual display checking, using Embedded Web Server 56, 97 voids appear 228 volatile memory 65, 105 erasing 65, 106 volatility statement of 65, 105 W wiping the printer hard disk 106 Wireless menu 132 wireless network configuration information 31 wireless network setup using the Embedded Web Serve 33 wireless networking Push Button Configuration Method 32 Start PIN Method 32 X XPS menu 158


