Printer Languages and Interfaces Technical Reference
Page 72
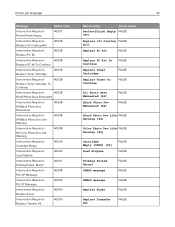
... Intervention Required Replace PC Kit 40038 Intervention Required - 40038 Replace PC Kit To Continue Intervention Required Replace Toner Cartridge 40038 Intervention Required - 40038 Replace Toner Cartridge To Continue Intervention Required - 40038 84 All Photo Devs Exhausted Intervention Required - 84 Black Photo Dev ...PerfectFinish Empty FALSE [87] Replace Oil Coating FALSE Roll Replace PC Kit FALSE Replace PC Kit To Continue Replace Toner Cartridge Replace Toner To Continue FALSE FALSE FALSE All Photo Devs Exhausted [84] Black Photo Dev Exhausted [84] FALSE FALSE Black ...
... Intervention Required Replace PC Kit 40038 Intervention Required - 40038 Replace PC Kit To Continue Intervention Required Replace Toner Cartridge 40038 Intervention Required - 40038 Replace Toner Cartridge To Continue Intervention Required - 40038 84 All Photo Devs Exhausted Intervention Required - 84 Black Photo Dev ...PerfectFinish Empty FALSE [87] Replace Oil Coating FALSE Roll Replace PC Kit FALSE Replace PC Kit To Continue Replace Toner Cartridge Replace Toner To Continue FALSE FALSE FALSE All Photo Devs Exhausted [84] Black Photo Dev Exhausted [84] FALSE FALSE Black ...
Printer Languages and Interfaces Technical Reference
Page 79
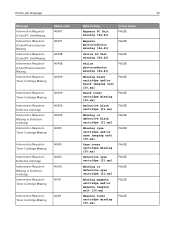
... 40407 40407 40408 40408 40409 Intervention Required Toner Cartridge Missing Intervention Required Defective Cartridge Intervention Required Missing or Defective Cartridge Intervention Required Toner Cartridge Missing 40409 40409 40409 40410 Intervention Required Toner Cartridge Missing Intervention Required Defective Cartridge Intervention Required Missing or Defective Cartridge Intervention Required Toner Cartridge Missing 40410 40410 40410 40411 Intervention Required Toner Cartridge Missing 40411 Return string Magenta PC Unit...
... 40407 40407 40408 40408 40409 Intervention Required Toner Cartridge Missing Intervention Required Defective Cartridge Intervention Required Missing or Defective Cartridge Intervention Required Toner Cartridge Missing 40409 40409 40409 40410 Intervention Required Toner Cartridge Missing Intervention Required Defective Cartridge Intervention Required Missing or Defective Cartridge Intervention Required Toner Cartridge Missing 40410 40410 40410 40411 Intervention Required Toner Cartridge Missing 40411 Return string Magenta PC Unit...

Printer Languages and Interfaces Technical Reference
Page 80
... Ready RDYMSG Power Saver Toner Low Toner Low Not Ready Not Ready Online status TRUE TRUE TRUE TRUE TRUE FALSE FALSE Printer job language 80 Message Intervention Required Defective Cartridge Intervention Required Missing or Defective Cartridge Intervention Required Toner Cartridge Missing Status code 40411 40411 40412 Intervention Required Toner Cartridge Missing 40412 Intervention Required Defective Cartridge 40412 Intervention Required -
... Ready RDYMSG Power Saver Toner Low Toner Low Not Ready Not Ready Online status TRUE TRUE TRUE TRUE TRUE FALSE FALSE Printer job language 80 Message Intervention Required Defective Cartridge Intervention Required Missing or Defective Cartridge Intervention Required Toner Cartridge Missing Status code 40411 40411 40412 Intervention Required Toner Cartridge Missing 40412 Intervention Required Defective Cartridge 40412 Intervention Required -

Paper and Specialty Media Guide PDF
Page 19
...ensure that affect printing. Label components Labels are preferred. Peeled off labels could cause jams. The label or adhesive could void the printer and toner cartridge warranties. • Flex, fan, and align the label edges before loading. • Use only label sheets that have no gaps between.... Liners constructed for your printer, see "Face sheet (printable stock)" on page 21. Partial sheets also contaminate the printer and the cartridge with a converter or a vendor who has extensive knowledge about label support for use labels that have coating or sizing applied to peel ...
...ensure that affect printing. Label components Labels are preferred. Peeled off labels could cause jams. The label or adhesive could void the printer and toner cartridge warranties. • Flex, fan, and align the label edges before loading. • Use only label sheets that have no gaps between.... Liners constructed for your printer, see "Face sheet (printable stock)" on page 21. Partial sheets also contaminate the printer and the cartridge with a converter or a vendor who has extensive knowledge about label support for use labels that have coating or sizing applied to peel ...
Paper and Specialty Media Guide PDF
Page 24
...on your printer may be slick, and the pick mechanism of your printer model and the number of integrated forms, you replace the toner cartridge. Depending on integrated forms with these forms, then contact your marketing representative. Polyester labels are less heat‑sensitive but requirements for ... adhesive marks on the roll, before purchasing large quantities. For integrated forms with these forms is on the printer and cartridge, which leads to toner buildup in the tray so the paper portion of the liner. Sheets with adhesive. Vinyls may contaminate the...
...on your printer may be slick, and the pick mechanism of your printer model and the number of integrated forms, you replace the toner cartridge. Depending on integrated forms with these forms, then contact your marketing representative. Polyester labels are less heat‑sensitive but requirements for ... adhesive marks on the roll, before purchasing large quantities. For integrated forms with these forms is on the printer and cartridge, which leads to toner buildup in the tray so the paper portion of the liner. Sheets with adhesive. Vinyls may contaminate the...
Lexmark MX32x 42x 52x 62x series Disassembly of Waste Electrical and Electronic Equipment
Page 2
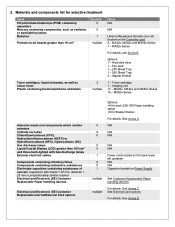
...CFC), Hydrochlorofluorocarbons (HCFC) or Hydrofluorocarbons (HFC), Hydrocarbons (HC) Gas discharge lamps Liquid Crystal Display (LCD) greater than 10 cm2 multiple Toner cartridges, liquid and pasty, as well as switches or backlighting lamps Batteries Quantity 0 0 1 Printed circuit boards greater than 100 cm2 and those... Replaceable Paper handling devices For details, See Annex C See External Card options For details, See Annex D Hard disk drive 1 - Toner cartridge 1 - MX62x Series For details, see Annex B Options: 1 - Fax card 1 - 250 Sheet Tray 1 - 550 Sheet Tray 2 - MX32x, ...
...CFC), Hydrochlorofluorocarbons (HCFC) or Hydrofluorocarbons (HFC), Hydrocarbons (HC) Gas discharge lamps Liquid Crystal Display (LCD) greater than 10 cm2 multiple Toner cartridges, liquid and pasty, as well as switches or backlighting lamps Batteries Quantity 0 0 1 Printed circuit boards greater than 100 cm2 and those... Replaceable Paper handling devices For details, See Annex C See External Card options For details, See Annex D Hard disk drive 1 - Toner cartridge 1 - MX62x Series For details, see Annex B Options: 1 - Fax card 1 - 250 Sheet Tray 1 - 550 Sheet Tray 2 - MX32x, ...

Lexmark MX32x 42x 52x 62x series Disassembly of Waste Electrical and Electronic Equipment
Page 4
MX32x, MX42x, MX52x, MX62x Series Location Supplies Toner Cartridge Imaging Unit Doc No.: Rev. 01 Page 4 of 26
MX32x, MX42x, MX52x, MX62x Series Location Supplies Toner Cartridge Imaging Unit Doc No.: Rev. 01 Page 4 of 26
Users Guide PDF
Page 61
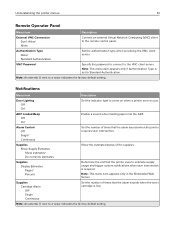
...Supplies Show Supply Estimates Show estimates* Do not show estimates Show the estimated status of times that the alarm sounds when the toner cartridge is set to a value indicates the factory default setting. Notifications Menu item Description Error Lighting Off On* Set the... Server. Note: An asterisk (*) next to Standard Authentication. Alarm Control Off Single* Continuous Set the number of the supplies. Supplies Cartridge Alarm Off* Single Continuous Set the number of times that the alarm sounds when the printer requires user intervention. Note: This menu...
...Supplies Show Supply Estimates Show estimates* Do not show estimates Show the estimated status of times that the alarm sounds when the toner cartridge is set to a value indicates the factory default setting. Notifications Menu item Description Error Lighting Off On* Set the... Server. Note: An asterisk (*) next to Standard Authentication. Alarm Control Off Single* Continuous Set the number of the supplies. Supplies Cartridge Alarm Off* Single Continuous Set the number of times that the alarm sounds when the printer requires user intervention. Note: This menu...
Users Guide PDF
Page 148
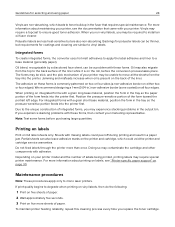
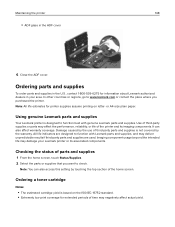
...All life estimates for printer supplies assume printing on the ISO/IEC 19752 standard. • Extremely low print coverage for information about Lexmark authorized dealers in the ADF cover 6 Close the ADF cover. Checking the status of third-party supplies or parts may damage your ... parts and supplies are designed to check. Maintaining the printer 148 • ADF glass in your Lexmark printer or its imaging components. All life indicators are used. Ordering a toner cartridge Notes: • The estimated cartridge yield is based on letter‑ or A4‑size plain paper.
...All life estimates for printer supplies assume printing on the ISO/IEC 19752 standard. • Extremely low print coverage for information about Lexmark authorized dealers in the ADF cover 6 Close the ADF cover. Checking the status of third-party supplies or parts may damage your ... parts and supplies are designed to check. Maintaining the printer 148 • ADF glass in your Lexmark printer or its imaging components. All life indicators are used. Ordering a toner cartridge Notes: • The estimated cartridge yield is based on letter‑ or A4‑size plain paper.
Users Guide PDF
Page 149
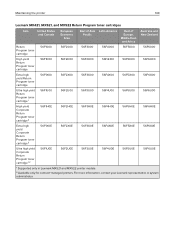
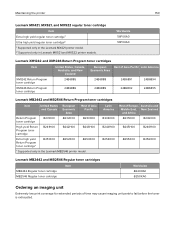
... the printer 149 Lexmark MX421, MX521, and MX522 Return Program toner cartridges Item United States and Canada European Economic Area Rest of Asia Pacific Latin America Rest of Europe, Middle East, and Africa Australia and New Zealand Return Program toner cartridge 56F1000 56F2000 56F3000 56F4000 56F5000 56F6000 High yield Return Program toner cartridge 56F1H00 56F2H00 56F3H00...
... the printer 149 Lexmark MX421, MX521, and MX522 Return Program toner cartridges Item United States and Canada European Economic Area Rest of Asia Pacific Latin America Rest of Europe, Middle East, and Africa Australia and New Zealand Return Program toner cartridge 56F1000 56F2000 56F3000 56F4000 56F5000 56F6000 High yield Return Program toner cartridge 56F1H00 56F2H00 56F3H00...
Users Guide PDF
Page 150
... B235000 B236000 B244H00 B245H00 B246H00 B254X00 B255X00 B256X00 Lexmark MB2442 and MB2546 Regular toner cartridges Item MB2442 Regular toner cartridge MB2546 Regular toner cartridge Worldwide B240HA0 B250XA0 Ordering an imaging unit Extremely low print coverage for extended periods of Asia Pacific Return Program toner cartridge B231000 B232000 B233000 High yield Return Program toner cartridge B241H00 B242H00 B243H00 Extra high yield Return Program...
... B235000 B236000 B244H00 B245H00 B246H00 B254X00 B255X00 B256X00 Lexmark MB2442 and MB2546 Regular toner cartridges Item MB2442 Regular toner cartridge MB2546 Regular toner cartridge Worldwide B240HA0 B250XA0 Ordering an imaging unit Extremely low print coverage for extended periods of Asia Pacific Return Program toner cartridge B231000 B232000 B233000 High yield Return Program toner cartridge B241H00 B242H00 B243H00 Extra high yield Return Program...
Users Guide PDF
Page 152
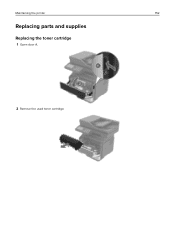
Maintaining the printer 152 Replacing parts and supplies Replacing the toner cartridge 1 Open door A. 2 Remove the used toner cartridge.
Maintaining the printer 152 Replacing parts and supplies Replacing the toner cartridge 1 Open door A. 2 Remove the used toner cartridge.
Users Guide PDF
Page 153
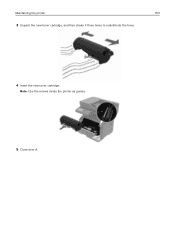
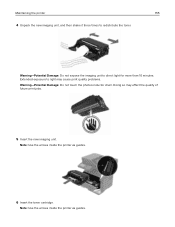
Note: Use the arrows inside the printer as guides. 5 Close door A. Maintaining the printer 153 3 Unpack the new toner cartridge, and then shake it three times to redistribute the toner. 4 Insert the new toner cartridge.
Note: Use the arrows inside the printer as guides. 5 Close door A. Maintaining the printer 153 3 Unpack the new toner cartridge, and then shake it three times to redistribute the toner. 4 Insert the new toner cartridge.
Users Guide PDF
Page 154
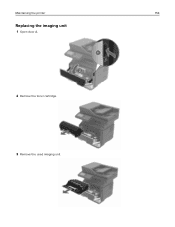
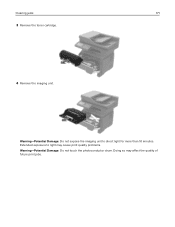
Maintaining the printer 154 Replacing the imaging unit 1 Open door A. 2 Remove the toner cartridge. 3 Remove the used imaging unit.
Maintaining the printer 154 Replacing the imaging unit 1 Open door A. 2 Remove the toner cartridge. 3 Remove the used imaging unit.
Users Guide PDF
Page 155
Doing so may cause print quality problems. Warning-Potential Damage: Do not touch the photoconductor drum. Extended exposure to light may affect the quality of future print jobs. 5 Insert the new imaging unit. Note: Use the arrows inside the printer as guides. Warning-Potential Damage: Do not expose the imaging unit to redistribute the toner. Maintaining the printer 155 4 Unpack the new imaging unit, and then shake it three times to direct light for more than 10 minutes. Note: Use the arrows inside the printer as guides. 6 Insert the toner cartridge.
Doing so may cause print quality problems. Warning-Potential Damage: Do not touch the photoconductor drum. Extended exposure to light may affect the quality of future print jobs. 5 Insert the new imaging unit. Note: Use the arrows inside the printer as guides. Warning-Potential Damage: Do not expose the imaging unit to redistribute the toner. Maintaining the printer 155 4 Unpack the new imaging unit, and then shake it three times to direct light for more than 10 minutes. Note: Use the arrows inside the printer as guides. 6 Insert the toner cartridge.
Users Guide PDF
Page 171
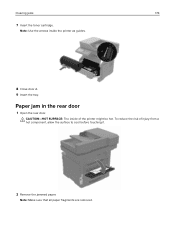
Doing so may cause print quality problems. Warning-Potential Damage: Do not touch the photoconductor drum. Extended exposure to direct light for more than 10 minutes. Warning-Potential Damage: Do not expose the imaging unit to light may affect the quality of future print jobs. Clearing jams 171 3 Remove the toner cartridge. 4 Remove the imaging unit.
Doing so may cause print quality problems. Warning-Potential Damage: Do not touch the photoconductor drum. Extended exposure to direct light for more than 10 minutes. Warning-Potential Damage: Do not expose the imaging unit to light may affect the quality of future print jobs. Clearing jams 171 3 Remove the toner cartridge. 4 Remove the imaging unit.
Users Guide PDF
Page 174
To reduce the risk of the printer might be hot. Clearing jams 174 7 Insert the toner cartridge. Paper jam in the rear door 1 Open the rear door. Note: Use the arrows inside of injury from a hot component, allow the surface to cool before touching it. 2 Remove the jammed paper. CAUTION-HOT SURFACE: The inside the printer as guides. 8 Close door A. 9 Insert the tray. Note: Make sure that all paper fragments are removed.
To reduce the risk of the printer might be hot. Clearing jams 174 7 Insert the toner cartridge. Paper jam in the rear door 1 Open the rear door. Note: Use the arrows inside of injury from a hot component, allow the surface to cool before touching it. 2 Remove the jammed paper. CAUTION-HOT SURFACE: The inside the printer as guides. 8 Close door A. 9 Insert the tray. Note: Make sure that all paper fragments are removed.
Users Guide PDF
Page 184
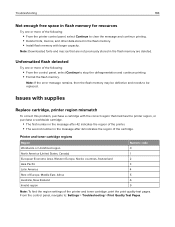
Note: If the error message remains, then the flash memory may be defective and needs to : Settings > Troubleshooting > Print Quality Test Pages. Printer and toner cartridge regions Region Worldwide or Undefined region North America (United States, Canada) European Economic Area, Western Europe, Nordic countries, Switzerland Asia Pacific Latin ...
Note: If the error message remains, then the flash memory may be defective and needs to : Settings > Troubleshooting > Print Quality Test Pages. Printer and toner cartridge regions Region Worldwide or Undefined region North America (United States, Canada) European Economic Area, Western Europe, Nordic countries, Switzerland Asia Pacific Latin ...
Users Guide PDF
Page 189
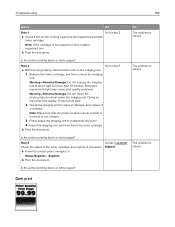
...a Check if the printer is not supported, then install a supported one. b Print the document. Note: If the cartridge is using a genuine and supported Lexmark toner cartridge. a Remove any packing material that the photoconductor drum contact is not bent or out of place. 3 Firmly shake the ...imaging unit to light may affect the quality of the toner cartridge, and replace if necessary. Doing so may cause ...
...a Check if the printer is not supported, then install a supported one. b Print the document. Note: If the cartridge is using a genuine and supported Lexmark toner cartridge. a Remove any packing material that the photoconductor drum contact is not bent or out of place. 3 Firmly shake the ...imaging unit to light may affect the quality of the toner cartridge, and replace if necessary. Doing so may cause ...
Users Guide PDF
Page 190
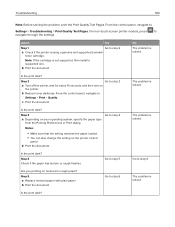
... supported, then install a supported one. From the control panel, navigate to step 5. b Print the document. Is the print dark? Note: If the cartridge is using a genuine and supported Lexmark toner cartridge. Is the print dark? The problem is solved. a Depending on textured or rough paper? The problem is solved. Notes: • Make sure that...
... supported, then install a supported one. From the control panel, navigate to step 5. b Print the document. Is the print dark? Note: If the cartridge is using a genuine and supported Lexmark toner cartridge. Is the print dark? The problem is solved. a Depending on textured or rough paper? The problem is solved. Notes: • Make sure that...


