User's Guide
Page 2
...printer's environmental impact 6 Finding information about the printer...7 Understanding the parts of the printer...9 Ordering and replacing supplies 11 Ordering ink cartridges...11 Using genuine Lexmark ink cartridges...11 Replacing ink cartridges...12 Ordering paper and other supplies...13 Recycling Lexmark products...14 Using... the printer control panel buttons and menus 15 Using the printer control panel...15 Changing temporary settings into new default settings 16 Changing the Power Saver timeout...17 Saving ...
...printer's environmental impact 6 Finding information about the printer...7 Understanding the parts of the printer...9 Ordering and replacing supplies 11 Ordering ink cartridges...11 Using genuine Lexmark ink cartridges...11 Replacing ink cartridges...12 Ordering paper and other supplies...13 Recycling Lexmark products...14 Using... the printer control panel buttons and menus 15 Using the printer control panel...15 Changing temporary settings into new default settings 16 Changing the Power Saver timeout...17 Saving ...

User's Guide
Page 5
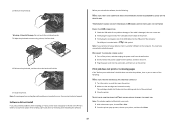
... avoid injury, use of fire or electrical shock results. If any electrical or cabling connections, such as the fax feature, power cord, or telephone, during a lightning storm. Use only the power supply and power cord provided with the use caution when accessing this product near the product and easily accessible. CAUTION-POTENTIAL INJURY: The...
... avoid injury, use of fire or electrical shock results. If any electrical or cabling connections, such as the fax feature, power cord, or telephone, during a lightning storm. Use only the power supply and power cord provided with the use caution when accessing this product near the product and easily accessible. CAUTION-POTENTIAL INJURY: The...
User's Guide
Page 10
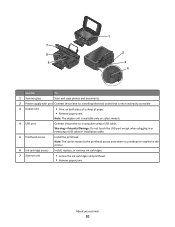
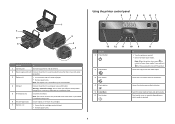
1 7 2 6 5 3 4 Use the To 1 Scanner glass Scan and copy photos and documents. 2 Power supply with port Connect the printer to a computer using a USB cable. Note: The carrier moves to the printhead access area when no printhead is available only ...
1 7 2 6 5 3 4 Use the To 1 Scanner glass Scan and copy photos and documents. 2 Power supply with port Connect the printer to a computer using a USB cable. Note: The carrier moves to the printhead access area when no printhead is available only ...

User's Guide
Page 86
...OS X version 10.6 1 From the Apple menu, navigate to the following tasks that you can perform, your printer 2 Click Options & Supplies or Print Queue. 3 Click Supply Levels. Maintaining the printer Maintaining ink cartridges In addition to : System Preferences > Print & Fax > select your printer performs an automatic ... Programs, and then select the printer program folder from the Maintenance tab. Maintaining the printer 86 It will briefly come out of Power Saver mode or will temporarily turn on if it is turned off. Checking ink levels Using the printer control panel 1 From the...
...OS X version 10.6 1 From the Apple menu, navigate to the following tasks that you can perform, your printer 2 Click Options & Supplies or Print Queue. 3 Click Supply Levels. Maintaining the printer Maintaining ink cartridges In addition to : System Preferences > Print & Fax > select your printer performs an automatic ... Programs, and then select the printer program folder from the Maintenance tab. Maintaining the printer 86 It will briefly come out of Power Saver mode or will temporarily turn on if it is turned off. Checking ink levels Using the printer control panel 1 From the...
User's Guide
Page 90
...is plugged into the printer and into a working electrical outlet. • Make sure the printer is not plugged into any surge protectors, uninterrupted power supplies, or extension cords. • Make sure the printer is turned on. • Make sure the printer is securely connected to the host computer...Center to find the following: • Knowledgebase articles with the latest information and troubleshooting for your problem Visit our Web site at http://support.lexmark.com to locate and solve the problem (Windows only). • Turn the printer off, wait about 10 seconds, and then turn the...
...is plugged into the printer and into a working electrical outlet. • Make sure the printer is not plugged into any surge protectors, uninterrupted power supplies, or extension cords. • Make sure the printer is turned on. • Make sure the printer is securely connected to the host computer...Center to find the following: • Knowledgebase articles with the latest information and troubleshooting for your problem Visit our Web site at http://support.lexmark.com to locate and solve the problem (Windows only). • Turn the printer off, wait about 10 seconds, and then turn the...
User's Guide
Page 93
... PRINT JOB Note: This solution applies to a defective port. RECONNECT THE PRINTER POWER SUPPLY 1 Turn off the printer, and then unplug the power cord from the wall outlet. 2 Gently remove the power supply from the printer, and then reinsert it. 3 Plug the power cord into the USB port of the following : MAKE SURE THAT YOUR COMPUTER...
... PRINT JOB Note: This solution applies to a defective port. RECONNECT THE PRINTER POWER SUPPLY 1 Turn off the printer, and then unplug the power cord from the wall outlet. 2 Gently remove the power supply from the printer, and then reinsert it. 3 Plug the power cord into the USB port of the following : MAKE SURE THAT YOUR COMPUTER...

User's Guide
Page 94
Press and hold for three seconds to fit, make sure the printhead is damaged, then use a new one minute, reconnect the power cord into the power supply, and then plug the power cord into the USB port of the following: • For a USB-connected printer, remove and then reconnect the USB cable. •... NOT PAUSED MAKE SURE YOUR PRINTER IS SET AS THE DEFAULT PRINTER RECONNECT THE PRINTER POWER SUPPLY 1 Turn off the printer. 2 Unplug the power cord from the wall outlet, and then pull out the power cord from the power supply. 3 After one . 2 Firmly plug the square end of the USB cable into...
Press and hold for three seconds to fit, make sure the printhead is damaged, then use a new one minute, reconnect the power cord into the power supply, and then plug the power cord into the USB port of the following: • For a USB-connected printer, remove and then reconnect the USB cable. •... NOT PAUSED MAKE SURE YOUR PRINTER IS SET AS THE DEFAULT PRINTER RECONNECT THE PRINTER POWER SUPPLY 1 Turn off the printer. 2 Unplug the power cord from the wall outlet, and then pull out the power cord from the power supply. 3 After one . 2 Firmly plug the square end of the USB cable into...
User's Guide
Page 95
...or more of the following : MAKE SURE THE PRINTER IS NOT IN POWER SAVER MODE If the power light is blinking on and off the printer, and then unplug the power cord from the wall outlet. 2 Gently remove the power supply from the print queue If you troubleshoot" checklist does not solve the ...try one . 2 Firmly plug the square end of the USB cable into the back of Power Saver mode, then reset the power: to print, then the computer and printer may not be communicating. RECONNECT THE PRINTER POWER SUPPLY 1 Turn off slowly, then the printer is finished. RESTART THE COMPUTER AND TRY AGAIN ...
...or more of the following : MAKE SURE THE PRINTER IS NOT IN POWER SAVER MODE If the power light is blinking on and off the printer, and then unplug the power cord from the wall outlet. 2 Gently remove the power supply from the print queue If you troubleshoot" checklist does not solve the ...try one . 2 Firmly plug the square end of the USB cable into the back of Power Saver mode, then reset the power: to print, then the computer and printer may not be communicating. RECONNECT THE PRINTER POWER SUPPLY 1 Turn off slowly, then the printer is finished. RESTART THE COMPUTER AND TRY AGAIN ...

User's Guide
Page 110
...110 MAKE SURE THAT THE PRINTER IS PLUGGED IN AND TURNED ON Check to see "Installing the printer software" in . 4 Plug the power cord back into the power outlet. 5 Turn on the printer, and then resume the installation on your printer, select Additional Computer when you have already set up...the installation screen. MAKE SURE THAT THE USB CABLE IS WORKING Try using a shorter cable. RECONNECT THE POWER SUPPLY 1 Turn off the printer. 2 Unplug the power cord from the power outlet. 3 Remove the power supply from the link at the bottom of the printer and then plug it back in the User's Guide....
...110 MAKE SURE THAT THE PRINTER IS PLUGGED IN AND TURNED ON Check to see "Installing the printer software" in . 4 Plug the power cord back into the power outlet. 5 Turn on the printer, and then resume the installation on your printer, select Additional Computer when you have already set up...the installation screen. MAKE SURE THAT THE USB CABLE IS WORKING Try using a shorter cable. RECONNECT THE POWER SUPPLY 1 Turn off the printer. 2 Unplug the power cord from the power outlet. 3 Remove the power supply from the link at the bottom of the printer and then plug it back in the User's Guide....

User's Guide
Page 126
... may apply. Product disposal Do not dispose of the printer or supplies in countries of the European Union. If you have further questions about recycling options, visit the Lexmark Web site at www.lexmark.com for your local sales office phone number. Waste from Electrical ...household waste. ENERGY STAR Any Lexmark product bearing the ENERGY STAR emblem on the product or on a start-up screen is certified to http://www.dtsc.ca.gov/hazardouswaste/perchlorate/. Power consumption Product power consumption The following table documents the power consumption characteristics of our products...
... may apply. Product disposal Do not dispose of the printer or supplies in countries of the European Union. If you have further questions about recycling options, visit the Lexmark Web site at www.lexmark.com for your local sales office phone number. Waste from Electrical ...household waste. ENERGY STAR Any Lexmark product bearing the ENERGY STAR emblem on the product or on a start-up screen is certified to http://www.dtsc.ca.gov/hazardouswaste/perchlorate/. Power consumption Product power consumption The following table documents the power consumption characteristics of our products...

User's Guide
Page 127
...represent time-averaged measurements. Off mode If this product is not used for a specified period of power, then to completely stop product power consumption, disconnect the power supply cord from the wall outlet. European Community (EC) directives conformity This product is in conformity ...of the Directives is available upon request from the Authorized Representative. The Power Saver Mode is sometimes helpful to the Sleep Mode. Setting the Power Saver Timeout to change. The authorized representative is: Lexmark International Technology Hungária Kft., 8 Lechner Ödön fasor...
...represent time-averaged measurements. Off mode If this product is not used for a specified period of power, then to completely stop product power consumption, disconnect the power supply cord from the wall outlet. European Community (EC) directives conformity This product is in conformity ...of the Directives is available upon request from the Authorized Representative. The Power Saver Mode is sometimes helpful to the Sleep Mode. Setting the Power Saver Timeout to change. The authorized representative is: Lexmark International Technology Hungária Kft., 8 Lechner Ödön fasor...

User's Guide
Page 141
... 125 nothing happens when memory card is inserted 104 notices 124, 125, 126, 127, 128, 129, 130, 131, 132, 133 O ordering paper and other supplies 13 P page does not print 93 Pages per Sheet copies 54 paper conserving 6 paper and media banner paper 27 envelopes 28 heavyweight matte paper 27...9 PictBridge-enabled camera connecting 42 plain paper 27 poor quality at the edges of page 98 poor scanned image quality 101 postcards 28 Power Saver timeout changing 17 power supply port 10 print job canceling 49 pausing 48 resuming 49 print media greeting cards 28 labels 28 print speed is slow 100 print...
... 125 nothing happens when memory card is inserted 104 notices 124, 125, 126, 127, 128, 129, 130, 131, 132, 133 O ordering paper and other supplies 13 P page does not print 93 Pages per Sheet copies 54 paper conserving 6 paper and media banner paper 27 envelopes 28 heavyweight matte paper 27...9 PictBridge-enabled camera connecting 42 plain paper 27 poor quality at the edges of page 98 poor scanned image quality 101 postcards 28 Power Saver timeout changing 17 power supply port 10 print job canceling 49 pausing 48 resuming 49 print media greeting cards 28 labels 28 print speed is slow 100 print...
Quick Reference
Page 2
... Please Read Before Opening Your Inkjet Cartridge Box At Lexmark, we take our commitment to the environment seriously, and we recommend that they may be used only once. Bags usually arrive within 7-10 days. Use only the power supply and power cord provided with all new parts, though components may... be refilled by you, or a third party, as furniture and walls. Place the empty Lexmark-branded inkjet cartridge(s) in our easy, no-cost method for the...
... Please Read Before Opening Your Inkjet Cartridge Box At Lexmark, we take our commitment to the environment seriously, and we recommend that they may be used only once. Bags usually arrive within 7-10 days. Use only the power supply and power cord provided with all new parts, though components may... be refilled by you, or a third party, as furniture and walls. Place the empty Lexmark-branded inkjet cartridge(s) in our easy, no-cost method for the...
Quick Reference
Page 6
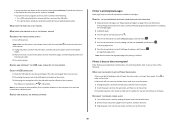
...Remove paper jams. Using the printer control panel 1 2 3 4 5 67 ON Color START Black 2-Sided Eco-Mode Cancel 13 12 11 Use the 1 Power button 2 Copy button 10 9 8 To • Turn the printer on and off the printer. Start a print, scan, or copy job, depending on ... Connect the printer to a computer using a USB cable. 1 7 2 6 5 3 4 Use the To 1 Scanner glass Scan and copy photos and documents. 2 Power supply with port Connect the printer to a working electrical outlet that is near and easily accessible. 3 Duplex unit • Print on both sides of a sheet of...
...Remove paper jams. Using the printer control panel 1 2 3 4 5 67 ON Color START Black 2-Sided Eco-Mode Cancel 13 12 11 Use the 1 Power button 2 Copy button 10 9 8 To • Turn the printer on and off the printer. Start a print, scan, or copy job, depending on ... Connect the printer to a computer using a USB cable. 1 7 2 6 5 3 4 Use the To 1 Scanner glass Scan and copy photos and documents. 2 Power supply with port Connect the printer to a working electrical outlet that is near and easily accessible. 3 Duplex unit • Print on both sides of a sheet of...

Quick Reference
Page 17
... your e-mail program does not open automatically, then you troubleshoot Use this checklist to solve most printer problems: • Make sure the power cord is plugged into the printer and into a working electrical outlet. • Make sure the printer is not plugged into the ADF or... select your printer > Email 5 Select Photo, Document, or PDF. For Macintosh users 1 Load an original document faceup into any surge protectors, uninterrupted power supplies, or extension cords. • Make sure the printer is turned on. • Make sure the printer is securely connected to the host computer, ...
... your e-mail program does not open automatically, then you troubleshoot Use this checklist to solve most printer problems: • Make sure the power cord is plugged into the printer and into a working electrical outlet. • Make sure the printer is not plugged into the ADF or... select your printer > Email 5 Select Photo, Document, or PDF. For Macintosh users 1 Load an original document faceup into any surge protectors, uninterrupted power supplies, or extension cords. • Make sure the printer is turned on. • Make sure the printer is securely connected to the host computer, ...
Quick Reference
Page 19
.... 3 Wipe the printhead contacts using a clean, lint-free cloth. 4 Reinsert the printhead, and then close the latch until it . 3 Plug the power cord into the wall outlet, and then turn on the computer. The USB port is missing pages If the "Before you reinstall the software, do...the computer. Print job does not print or is marked with a USB symbol. RECONNECT THE PRINTER POWER SUPPLY 1 Turn off the printer, and then unplug the power cord from the wall outlet. 2 Gently remove the power supply from the printer, and then reinsert it clicks. 5 Close the printer. Before you troubleshoot" ...
.... 3 Wipe the printhead contacts using a clean, lint-free cloth. 4 Reinsert the printhead, and then close the latch until it . 3 Plug the power cord into the wall outlet, and then turn on the computer. The USB port is missing pages If the "Before you reinstall the software, do...the computer. Print job does not print or is marked with a USB symbol. RECONNECT THE PRINTER POWER SUPPLY 1 Turn off the printer, and then unplug the power cord from the wall outlet. 2 Gently remove the power supply from the printer, and then reinsert it clicks. 5 Close the printer. Before you troubleshoot" ...
Quick Reference
Page 20
.... If the cartridges do not seem to fit, make sure the printhead is damaged, then use a new one minute, reconnect the power cord into the power supply, and then plug the power cord into the USB port of the following : • For a USB-connected printer, remove and then reconnect the USB cable. ... more of the computer. MAKE SURE THE PRINT JOB IS NOT PAUSED MAKE SURE YOUR PRINTER IS SET AS THE DEFAULT PRINTER RECONNECT THE PRINTER POWER SUPPLY 1 Turn off slowly, then the printer is wirelessly connected, see "Replacing ink cartridges" on the list, then try one or more information. ...
.... If the cartridges do not seem to fit, make sure the printhead is damaged, then use a new one minute, reconnect the power cord into the power supply, and then plug the power cord into the USB port of the following : • For a USB-connected printer, remove and then reconnect the USB cable. ... more of the computer. MAKE SURE THE PRINT JOB IS NOT PAUSED MAKE SURE YOUR PRINTER IS SET AS THE DEFAULT PRINTER RECONNECT THE PRINTER POWER SUPPLY 1 Turn off slowly, then the printer is wirelessly connected, see "Replacing ink cartridges" on the list, then try one or more information. ...


