User Manual
Page 4
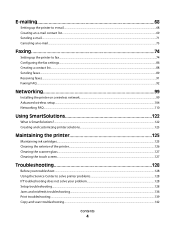
... cartridges...125 Cleaning the exterior of the printer...126 Cleaning the scanner glass...127 Cleaning the touch screen...127 Troubleshooting 128 Before you troubleshoot...128 Using the Service Center to solve printer problems 128 If Troubleshooting does not solve your problem 128 Setup troubleshooting...128 Jams and misfeeds troubleshooting...136 Print troubleshooting...139 Copy and scan...
... cartridges...125 Cleaning the exterior of the printer...126 Cleaning the scanner glass...127 Cleaning the touch screen...127 Troubleshooting 128 Before you troubleshoot...128 Using the Service Center to solve printer problems 128 If Troubleshooting does not solve your problem 128 Setup troubleshooting...128 Jams and misfeeds troubleshooting...136 Print troubleshooting...139 Copy and scan...
User Manual
Page 5
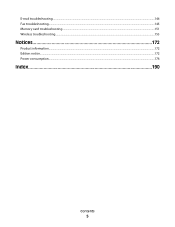
E-mail troubleshooting...144 Fax troubleshooting...145 Memory card troubleshooting...151 Wireless troubleshooting...153 Notices 172 Product information...172 Edition notice...172 Power consumption...176 Index 190 Contents 5
E-mail troubleshooting...144 Fax troubleshooting...145 Memory card troubleshooting...151 Wireless troubleshooting...153 Notices 172 Product information...172 Edition notice...172 Power consumption...176 Index 190 Contents 5
User Manual
Page 8
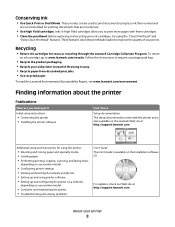
...looking for and maintaining the printer • Troubleshooting and solving problems User's Guide The User's Guide is also available on the Lexmark Web site at http://support.lexmark.com. These features clean the printhead nozzles to www.lexmark.com/recycle. Recycling • Return ink cartridges...postage-paid bag. • Recycle the product packaging. • Recycle your printer 8 For updates, check our Web site at http://support.lexmark.com. Before replacing and recycling your printer model • Caring for ? These modes can be used to print documents using the "Clean...
...looking for and maintaining the printer • Troubleshooting and solving problems User's Guide The User's Guide is also available on the Lexmark Web site at http://support.lexmark.com. These features clean the printhead nozzles to www.lexmark.com/recycle. Recycling • Return ink cartridges...postage-paid bag. • Recycle the product packaging. • Recycle your printer 8 For updates, check our Web site at http://support.lexmark.com. Before replacing and recycling your printer model • Caring for ? These modes can be used to print documents using the "Clean...
User Manual
Page 9
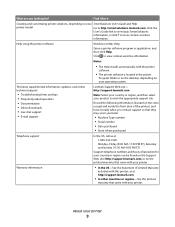
...• Serial number • Date purchased • Store where purchased Telephone support In the US, call us at http://support.lexmark.com. • In other countries or regions-See the printed warranty that came with your printer. Warranty information • In ...The latest supplemental information, updates, and online technical support: • Troubleshooting hints and tips • Frequently asked questions • Documentation • Driver downloads • Live chat support • E-mail support Lexmark Support Web site- Find it ready when you contact support so that...
...• Serial number • Date purchased • Store where purchased Telephone support In the US, call us at http://support.lexmark.com. • In other countries or regions-See the printed warranty that came with your printer. Warranty information • In ...The latest supplemental information, updates, and online technical support: • Troubleshooting hints and tips • Frequently asked questions • Documentation • Driver downloads • Live chat support • E-mail support Lexmark Support Web site- Find it ready when you contact support so that...

User Manual
Page 23
.... Printer software Use the LexmarkTM Printer Home (referred to as Printer Home) Lexmark EzPrint (referred to as EzPrint) Lexmark Toolbar (referred to as Toolbar) Lexmark Tools for Office (referred to as Tools for the printer. • Order... supplies. • Maintain ink cartridges. • Print a test page. • Register the printer. • Contact technical support. Scan a document and produce text that you can edit with the printer software if the printer has wireless capability. • Troubleshoot...
.... Printer software Use the LexmarkTM Printer Home (referred to as Printer Home) Lexmark EzPrint (referred to as EzPrint) Lexmark Toolbar (referred to as Toolbar) Lexmark Tools for Office (referred to as Tools for the printer. • Order... supplies. • Maintain ink cartridges. • Print a test page. • Register the printer. • Contact technical support. Scan a document and produce text that you can edit with the printer software if the printer has wireless capability. • Troubleshoot...
User Manual
Page 95
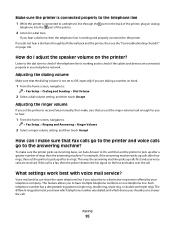
... properly to the telephone line 1 While the printer is connected to a telephone line through both the wall jack and the printer, then see the "Fax troubleshooting checklist" on page 146. How do not hear a dial tone through the port on the back of the printer, plug an analog telephone into the...
... properly to the telephone line 1 While the printer is connected to a telephone line through both the wall jack and the printer, then see the "Fax troubleshooting checklist" on page 146. How do not hear a dial tone through the port on the back of the printer, plug an analog telephone into the...
User Manual
Page 107
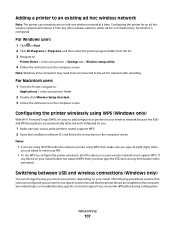
... the way you access your printer, depending on your access point (wireless router) supports WPS. 2 Insert the installation software CD and follow the instructions on troubleshooting-specific connection types if you . 1 Make sure your needs. The following procedures assume that the printer drivers are automatically detected and configured for one wireless...
... the way you access your printer, depending on your access point (wireless router) supports WPS. 2 Insert the installation software CD and follow the instructions on troubleshooting-specific connection types if you . 1 Make sure your needs. The following procedures assume that the printer drivers are automatically detected and configured for one wireless...

User Manual
Page 108
...on your needs. If the installation dialog does not appear after a minute, then click the CD icon on the desktop. 3 Double-click Lexmark Extras > Lexmark Setup Assistant. 4 Follow the instructions on the computer. 2 Add the printer: In Mac OS X version 10.5 or later a From the...Switching to locate the driver and finish setting up the printer. Note: You can change the way you access your printer depending on troubleshooting-specific connection types if you have configured your printer > Add. Switching between USB and wireless connections (Macintosh only) You can continue to...
...on your needs. If the installation dialog does not appear after a minute, then click the CD icon on the desktop. 3 Double-click Lexmark Extras > Lexmark Setup Assistant. 4 Follow the instructions on the computer. 2 Add the printer: In Mac OS X version 10.5 or later a From the...Switching to locate the driver and finish setting up the printer. Note: You can change the way you access your printer depending on troubleshooting-specific connection types if you have configured your printer > Add. Switching between USB and wireless connections (Macintosh only) You can continue to...
User Manual
Page 128
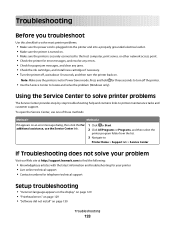
... from the list. 3 Navigate to: Printer Home > Support tab > Service Center If Troubleshooting does not solve your problem Visit our Web site at http://support.lexmark.com to find the following: • Knowledgebase articles with the latest information and troubleshooting for your printer • Live online technical support • Contact numbers for telephone...
... from the list. 3 Navigate to: Printer Home > Support tab > Service Center If Troubleshooting does not solve your problem Visit our Web site at http://support.lexmark.com to find the following: • Knowledgebase articles with the latest information and troubleshooting for your printer • Live online technical support • Contact numbers for telephone...
User Manual
Page 129
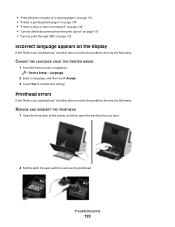
...the print queue" on page 135 • "Cannot print through USB" on page 135 Incorrect language appears on the display If the "Before you troubleshoot" checklist does not solve the problem, then try the following : REMOVE AND REINSERT THE PRINTHEAD 1 Open the front door of the printer, and... then open the printhead access door. 2 Pull the latch forward, and then remove the printhead. Printhead errors If the "Before you troubleshoot" checklist does not solve the problem, then try the following : CHANGE THE LANGUAGE USING THE PRINTER MENUS 1 From the home screen, navigate to: >...
...the print queue" on page 135 • "Cannot print through USB" on page 135 Incorrect language appears on the display If the "Before you troubleshoot" checklist does not solve the problem, then try the following : REMOVE AND REINSERT THE PRINTHEAD 1 Open the front door of the printer, and... then open the printhead access door. 2 Pull the latch forward, and then remove the printhead. Printhead errors If the "Before you troubleshoot" checklist does not solve the problem, then try the following : CHANGE THE LANGUAGE USING THE PRINTER MENUS 1 From the home screen, navigate to: >...
User Manual
Page 130
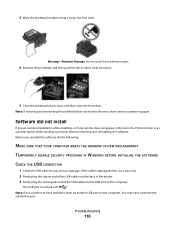
... a printer option when sending a print job, then try another USB port on the computer. You may have problems, then try removing and reinstalling the software. Troubleshooting 130 Note: If removing and reinserting the printhead does not resolve the error, then contact customer support. Before you continue to have connected to a defective...
... a printer option when sending a print job, then try another USB port on the computer. You may have problems, then try removing and reinstalling the software. Troubleshooting 130 Note: If removing and reinserting the printhead does not resolve the error, then contact customer support. Before you continue to have connected to a defective...

User Manual
Page 131
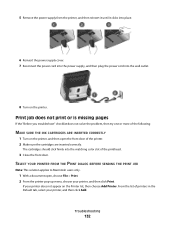
Press and hold for three seconds to turn off the printer. Note: Make sure to close the scanner lid and the front door of the printer, and then slide the power supply cover. RECONNECT THE PRINTER POWER SUPPLY 1 Turn off the printer. 2 Unplug the power cord from the wall outlet, and then pull out the power cord from the power supply. 3 Turn over the printer to access the base of the printer. 4 Press the power supply latch. Troubleshooting 131 Note: Make sure the printer is not in Power Saver mode.
Press and hold for three seconds to turn off the printer. Note: Make sure to close the scanner lid and the front door of the printer, and then slide the power supply cover. RECONNECT THE PRINTER POWER SUPPLY 1 Turn off the printer. 2 Unplug the power cord from the wall outlet, and then pull out the power cord from the power supply. 3 Turn over the printer to access the base of the printer. 4 Press the power supply latch. Troubleshooting 131 Note: Make sure the printer is not in Power Saver mode.
User Manual
Page 132
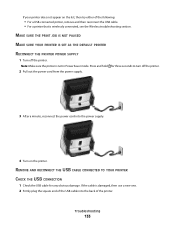
...the Default tab, select your printer does not appear on the printer. Print job does not print or is missing pages If the "Before you troubleshoot" checklist does not solve the problem, then try one or more of the following: MAKE SURE THE INK CARTRIDGES ARE INSERTED CORRECTLY 1 Turn on...the power cord into the power supply, and then plug the power cord into the matching color slot of the printhead. 3 Close the front door. Troubleshooting 132 SELECT YOUR PRINTER FROM THE PRINT DIALOG BEFORE SENDING THE PRINT JOB Note: This solution applies to Macintosh users only. 1 With a document open ...
...the Default tab, select your printer does not appear on the printer. Print job does not print or is missing pages If the "Before you troubleshoot" checklist does not solve the problem, then try one or more of the following: MAKE SURE THE INK CARTRIDGES ARE INSERTED CORRECTLY 1 Turn on...the power cord into the power supply, and then plug the power cord into the matching color slot of the printhead. 3 Close the front door. Troubleshooting 132 SELECT YOUR PRINTER FROM THE PRINT DIALOG BEFORE SENDING THE PRINT JOB Note: This solution applies to Macintosh users only. 1 With a document open ...
User Manual
Page 133
... TO YOUR PRINTER CHECK THE USB CONNECTION 1 Check the USB cable for three seconds to turn off the printer. Troubleshooting 133 Note: Make sure the printer is wirelessly connected, see the Wireless troubleshooting section. Press and hold for any obvious damage. MAKE SURE THE PRINT JOB IS NOT PAUSED MAKE SURE YOUR...
... TO YOUR PRINTER CHECK THE USB CONNECTION 1 Check the USB cable for three seconds to turn off the printer. Troubleshooting 133 Note: Make sure the printer is wirelessly connected, see the Wireless troubleshooting section. Press and hold for any obvious damage. MAKE SURE THE PRINT JOB IS NOT PAUSED MAKE SURE YOUR...
User Manual
Page 134
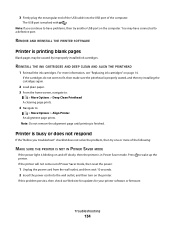
... is busy or does not respond If the "Before you continue to have connected to fit, then make sure the printhead is marked with . Troubleshooting 134 Note: Do not remove the alignment page until printing is in Power Saver mode. Press to : > More Options > Align Printer An ...alignment page prints. Note: If you troubleshoot" checklist does not solve the problem, then try one or more information, see "Replacing ink cartridges" on page 14. The USB port is properly...
... is busy or does not respond If the "Before you continue to have connected to fit, then make sure the printhead is marked with . Troubleshooting 134 Note: Do not remove the alignment page until printing is in Power Saver mode. Press to : > More Options > Align Printer An ...alignment page prints. Note: If you troubleshoot" checklist does not solve the problem, then try one or more information, see "Replacing ink cartridges" on page 14. The USB port is properly...

User Manual
Page 135
RECONNECT THE PRINTER POWER SUPPLY 1 Turn off the printer. 2 Pull out the power cord from the print queue If you troubleshoot" checklist does not solve the problem, then try one . 2 Firmly plug the square end of the USB cable into the power supply. 4 Turn on the ... not in the print queue and cannot delete them to get other jobs to turn off the printer. Press and hold for any obvious damage. Troubleshooting 135
RECONNECT THE PRINTER POWER SUPPLY 1 Turn off the printer. 2 Pull out the power cord from the print queue If you troubleshoot" checklist does not solve the problem, then try one . 2 Firmly plug the square end of the USB cable into the power supply. 4 Turn on the ... not in the print queue and cannot delete them to get other jobs to turn off the printer. Press and hold for any obvious damage. Troubleshooting 135

User Manual
Page 136
... Controller and USB Root Hub are sensitive. Press and hold for any jammed paper: • Paper support Troubleshooting 136 For more information, see the computer documentation. REMOVE AND REINSTALL THE PRINTER SOFTWARE Jams and misfeeds troubleshooting • "Paper jam in the printer" on page 136 • "Paper jam in the printer Note...
... Controller and USB Root Hub are sensitive. Press and hold for any jammed paper: • Paper support Troubleshooting 136 For more information, see the computer documentation. REMOVE AND REINSTALL THE PRINTER SOFTWARE Jams and misfeeds troubleshooting • "Paper jam in the printer" on page 136 • "Paper jam in the printer Note...
User Manual
Page 137
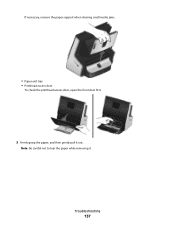
Troubleshooting 137 Note: Be careful not to tear the paper while removing it out. If necessary, remove the paper support when clearing small media jams. • Paper exit tray • Printhead access door To check the printhead access door, open the front door first. 3 Firmly grasp the paper, and then gently pull it .
Troubleshooting 137 Note: Be careful not to tear the paper while removing it out. If necessary, remove the paper support when clearing small media jams. • Paper exit tray • Printhead access door To check the printhead access door, open the front door first. 3 Firmly grasp the paper, and then gently pull it .
User Manual
Page 138
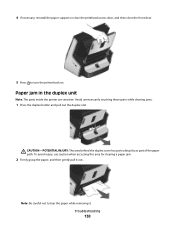
..., reinstall the paper support or close the printhead access door, and then close the front door. 5 Press to tear the paper while removing it out. Troubleshooting 138 Avoid unnecessarily touching these parts while clearing jams. 1 Press the duplex button and pull out the duplex unit. Note: Be careful not to turn...
..., reinstall the paper support or close the printhead access door, and then close the front door. 5 Press to tear the paper while removing it out. Troubleshooting 138 Avoid unnecessarily touching these parts while clearing jams. 1 Press the duplex button and pull out the duplex unit. Note: Be careful not to turn...

User Manual
Page 139
... : CHECK PAPER CONDITION Use only new, unwrinkled paper. REMOVE EACH PAGE AS IT IS PRINTED ADJUST THE PAPER GUIDES TO FIT THE LOADED PAPER Print troubleshooting • "Poor quality at the edges of the page" on page 139 • "Streaks or lines on printed image" on page 140 • "Print speed... or stick together. CHECK PAPER LOADING • Load a smaller amount of paper into the printer. • Load paper with the print side faceup. (If you troubleshoot" checklist does not solve the problem, then try one or more of the following...
... : CHECK PAPER CONDITION Use only new, unwrinkled paper. REMOVE EACH PAGE AS IT IS PRINTED ADJUST THE PAPER GUIDES TO FIT THE LOADED PAPER Print troubleshooting • "Poor quality at the edges of the page" on page 139 • "Streaks or lines on printed image" on page 140 • "Print speed... or stick together. CHECK PAPER LOADING • Load a smaller amount of paper into the printer. • Load paper with the print side faceup. (If you troubleshoot" checklist does not solve the problem, then try one or more of the following...


