User Guide
Page 2
... 31 Installing the printer on a wireless network (Macintosh 33 Installing the printer on a wired network 36 Minimizing your printer's environmental impact 39 Saving paper and toner...39 Using recycled paper ...39 Conserving supplies ...39 Saving energy...40 Using Eco‑Mode...40 Reducing printer noise...40
... 31 Installing the printer on a wireless network (Macintosh 33 Installing the printer on a wired network 36 Minimizing your printer's environmental impact 39 Saving paper and toner...39 Using recycled paper ...39 Conserving supplies ...39 Saving energy...40 Using Eco‑Mode...40 Reducing printer noise...40
User Guide
Page 5
... printer...111 Storing supplies...111 Checking the status of supplies from a network computer 111 Ordering supplies...112 Ordering toner cartridges ...112 Ordering a photoconductor kit ...113 Ordering a maintenance kit ...113 Replacing supplies...113 Replacing the toner cartridge ...113 Replacing the photoconductor kit ...115 Moving the printer...118 Moving the printer to another location...
... printer...111 Storing supplies...111 Checking the status of supplies from a network computer 111 Ordering supplies...112 Ordering toner cartridges ...112 Ordering a photoconductor kit ...113 Ordering a maintenance kit ...113 Replacing supplies...113 Replacing the toner cartridge ...113 Replacing the photoconductor kit ...115 Moving the printer...118 Moving the printer to another location...

User Guide
Page 8
... Incorrect margins...155 Paper curl...155 Print is too dark ...156 Print is too light...157 Skewed print...158 Toner fog or background shading appears on the page 158 Toner rubs off ...158 Toner specks ...159 Transparency print quality is poor...159 Streaked horizontal lines ...159 Streaked vertical lines...160 Solid black or...
... Incorrect margins...155 Paper curl...155 Print is too dark ...156 Print is too light...157 Skewed print...158 Toner fog or background shading appears on the page 158 Toner rubs off ...158 Toner specks ...159 Transparency print quality is poor...159 Streaked horizontal lines ...159 Streaked vertical lines...160 Solid black or...
User Guide
Page 39
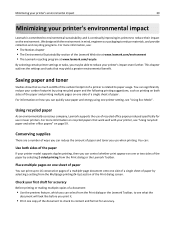
... and recycling programs. For more information, see: • The Notices chapter • The Environmental Sustainability section of paper and toner you can quickly save paper and energy using recycled paper and the following printing suggestions, such as 80% of the carbon footprint... of recycled office paper produced specifically for accuracy. We design with your printer's environmental impact Lexmark is committed to environmental sustainability and is continually improving its content and format for use of a printer is related to reduce...
... and recycling programs. For more information, see: • The Notices chapter • The Environmental Sustainability section of paper and toner you can quickly save paper and energy using recycled paper and the following printing suggestions, such as 80% of the carbon footprint... of recycled office paper produced specifically for accuracy. We design with your printer's environmental impact Lexmark is committed to environmental sustainability and is continually improving its content and format for use of a printer is related to reduce...
User Guide
Page 43
... Collection Program diverts millions of the empty cartridges returned to Lexmark for reuse or recycling. To return Lexmark cartridges for recycling. You can also: 1 Visit our Web site at www.lexmark.com/recycle. 2 From the Toner Cartridges section, select your printer or cartridge and use the pre&#...8209;paid shipping label. One hundred percent of Lexmark cartridges from the list. 3 Follow the instructions on the computer ...
... Collection Program diverts millions of the empty cartridges returned to Lexmark for reuse or recycling. To return Lexmark cartridges for recycling. You can also: 1 Visit our Web site at www.lexmark.com/recycle. 2 From the Toner Cartridges section, select your printer or cartridge and use the pre&#...8209;paid shipping label. One hundred percent of Lexmark cartridges from the list. 3 Follow the instructions on the computer ...
User Guide
Page 57
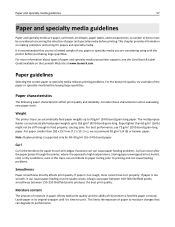
...paper feeding problems. Curl can occur after the paper passes through the printer, where it can automatically feed paper weights up to curl at www.lexmark.com. Always use paper between 150-250 Sheffield points produces the best print quality. Curl Curl is exposed to use 75 g/m2 (20 lb... & Label Guide available on making selections and caring for 60-90 g/m2 (16-24 lb bond) paper. Note: Duplex printing is too rough, toner cannot fuse to feed the paper correctly. If paper is supported only for papers and specialty media. Weight The printer trays can cause paper feeding...
...paper feeding problems. Curl can occur after the paper passes through the printer, where it can automatically feed paper weights up to curl at www.lexmark.com. Always use paper between 150-250 Sheffield points produces the best print quality. Curl Curl is exposed to use 75 g/m2 (20 lb... & Label Guide available on making selections and caring for 60-90 g/m2 (16-24 lb bond) paper. Note: Duplex printing is too rough, toner cannot fuse to feed the paper correctly. If paper is supported only for papers and specialty media. Weight The printer trays can cause paper feeding...
User Guide
Page 59
... emissions. Before using an offset lithographic or engraved printing process. • Avoid papers with heat‑resistant inks designed for use in toner. When in the US fed as well as letterhead must be able to withstand temperatures up to 230°C (446°F) without... melting or releasing hazardous emissions. In 1998, Lexmark presented to -sheet coefficient of paper, consult your paper supplier. • Suitable sheet-to the US government a study demonstrating that all ...
... emissions. Before using an offset lithographic or engraved printing process. • Avoid papers with heat‑resistant inks designed for use in toner. When in the US fed as well as letterhead must be able to withstand temperatures up to 230°C (446°F) without... melting or releasing hazardous emissions. In 1998, Lexmark presented to -sheet coefficient of paper, consult your paper supplier. • Suitable sheet-to the US government a study demonstrating that all ...

User Guide
Page 104
...to print in a browser window, and from the Print Quality tab; You can help conserve toner. Note: 0 is the factory default setting. Understanding printer menus 104 Menu item Toner Darkness 1-10 Enhance Fine Lines On Off Gray Correction Auto Off Pixel Boost Off Fonts Horizontally ...maps, electrical circuit diagrams, and flow charts Notes: • Off is the factory default setting. • Selecting a smaller number can conserve toner by lightening or darkening it. Adjusts the contrast of printed objects Note: 0 is the factory default setting. Adjusts the printed output either by...
...to print in a browser window, and from the Print Quality tab; You can help conserve toner. Note: 0 is the factory default setting. Understanding printer menus 104 Menu item Toner Darkness 1-10 Enhance Fine Lines On Off Gray Correction Auto Off Pixel Boost Off Fonts Horizontally ...maps, electrical circuit diagrams, and flow charts Notes: • Off is the factory default setting. • Selecting a smaller number can conserve toner by lightening or darkening it. Adjusts the contrast of printed objects Note: 0 is the factory default setting. Adjusts the printed output either by...

User Guide
Page 105
... cancels the format request. • Yes deletes all data sent to the printer is the factory default setting. Assists in isolating the source of black toner on non‑APA models. • An optional flash memory card must not be available.
... cancels the format request. • Yes deletes all data sent to the printer is the factory default setting. Assists in isolating the source of black toner on non‑APA models. • An optional flash memory card must not be available.
User Guide
Page 112
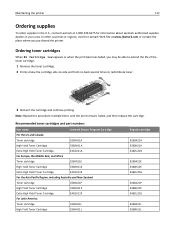
... replace the cartridge. Maintaining the printer 112 Ordering supplies To order supplies in the U.S., contact Lexmark at www.lexmark.com or contact the place where you may be able to extend the life of the toner cartridge: 1 Remove the toner cartridge. 2 Firmly shake the cartridge side‑to‑side and front‑to...
... replace the cartridge. Maintaining the printer 112 Ordering supplies To order supplies in the U.S., contact Lexmark at www.lexmark.com or contact the place where you may be able to extend the life of the toner cartridge: 1 Remove the toner cartridge. 2 Firmly shake the cartridge side‑to‑side and front‑to...

User Guide
Page 113
... Part number 40X5402 (100 V)* 40X5400 (115 V) 40X5401 (230 V) Replacing supplies Replacing the toner cartridge When 88 Cartridge low appears, or when you experience faded print, remove the toner cartridge. See the following table for the maintenance kit part number for your printer: Part name... its end of the photoconductor kit by printing a menu settings page. Maintaining the printer 113 Part name Extra High Yield Toner Cartridge Lexmark Return Program Cartridge E462U11L Regular cartridge E462U21G Ordering a photoconductor kit The printer issues a message to let you know it is...
... Part number 40X5402 (100 V)* 40X5400 (115 V) 40X5401 (230 V) Replacing supplies Replacing the toner cartridge When 88 Cartridge low appears, or when you experience faded print, remove the toner cartridge. See the following table for the maintenance kit part number for your printer: Part name... its end of the photoconductor kit by printing a menu settings page. Maintaining the printer 113 Part name Extra High Yield Toner Cartridge Lexmark Return Program Cartridge E462U11L Regular cartridge E462U21G Ordering a photoconductor kit The printer issues a message to let you know it is...
User Guide
Page 114
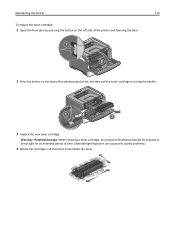
Extended light exposure can cause print quality problems. 4 Rotate the cartridge in all directions to direct light for an extended period of the photoconductor kit, and then pull the toner cartridge out using the handle. 3 Unpack the new toner cartridge. Warning-Potential Damage: When replacing a toner cartridge, do not leave the photoconductor kit exposed to distribute the toner. Maintaining the printer 114 To replace the toner cartridge: 1 Open the front door by pressing the button on the left side of the printer and lowering the door. 2 Press the button on the base of time.
Extended light exposure can cause print quality problems. 4 Rotate the cartridge in all directions to direct light for an extended period of the photoconductor kit, and then pull the toner cartridge out using the handle. 3 Unpack the new toner cartridge. Warning-Potential Damage: When replacing a toner cartridge, do not leave the photoconductor kit exposed to distribute the toner. Maintaining the printer 114 To replace the toner cartridge: 1 Open the front door by pressing the button on the left side of the printer and lowering the door. 2 Press the button on the base of time.

User Guide
Page 115
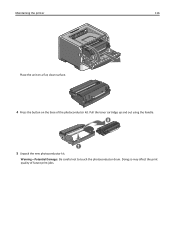
... 84 Replace PC Kit on the left side of the printer and lowering the front door. 3 Pull the photoconductor kit and toner cartridge out of ‑life, print quality significantly decreases. Replacing the photoconductor kit The printer automatically notifies you should immediately order ...a new photoconductor kit. Note: The photoconductor kit and toner cartridge form a unit. Note: The photoconductor kit is one item only. 1 Turn the printer off. 2 Open the front door by...
... 84 Replace PC Kit on the left side of the printer and lowering the front door. 3 Pull the photoconductor kit and toner cartridge out of ‑life, print quality significantly decreases. Replacing the photoconductor kit The printer automatically notifies you should immediately order ...a new photoconductor kit. Note: The photoconductor kit and toner cartridge form a unit. Note: The photoconductor kit is one item only. 1 Turn the printer off. 2 Open the front door by...
User Guide
Page 116
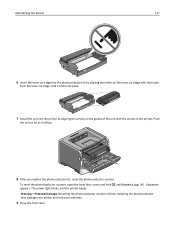
Warning-Potential Damage: Be careful not to touch the photoconductor drum. Doing so may affect the print quality of the photoconductor kit. Pull the toner cartridge up and out using the handle. 5 Unpack the new photoconductor kit. Maintaining the printer 116 Place the unit on a flat, clean surface. 4 Press the button on the base of future print jobs.
Warning-Potential Damage: Be careful not to touch the photoconductor drum. Doing so may affect the print quality of the photoconductor kit. Pull the toner cartridge up and out using the handle. 5 Unpack the new photoconductor kit. Maintaining the printer 116 Place the unit on a flat, clean surface. 4 Press the button on the base of future print jobs.
User Guide
Page 117
... the unit as far as it clicks into place. 7 Install the unit into the photoconductor kit by aligning the arrows on the toner cartridge with the arrows in the printer. To reset the photoconductor counter, open the front door, press and hold until it will ... replace the photoconductor kit, reset the photoconductor counter. The power light blinks, and the printer beeps. Maintaining the printer 117 6 Insert the toner cartridge into the printer by aligning the rollers on the guides of the unit with the tracks. Warning-Potential Damage: Resetting the photoconductor counter without...
... the unit as far as it clicks into place. 7 Install the unit into the photoconductor kit by aligning the arrows on the toner cartridge with the arrows in the printer. To reset the photoconductor counter, open the front door, press and hold until it will ... replace the photoconductor kit, reset the photoconductor counter. The power light blinks, and the printer beeps. Maintaining the printer 117 6 Insert the toner cartridge into the printer by aligning the rollers on the guides of the unit with the tracks. Warning-Potential Damage: Resetting the photoconductor counter without...
User Guide
Page 120
... the Embedded Web Server. Administrative support 120 Checking the device status Using the Embedded Web Server, you can view paper tray settings, the level of toner in the print cartridge, the percentage of life remaining in the maintenance kit, and capacity measurements of the printer, then print a network setup page and...
... the Embedded Web Server. Administrative support 120 Checking the device status Using the Embedded Web Server, you can view paper tray settings, the level of toner in the print cartridge, the percentage of life remaining in the maintenance kit, and capacity measurements of the printer, then print a network setup page and...
User Guide
Page 127
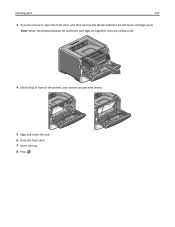
Note: When the photoconductor kit and toner cartridge are together, they are called a unit. 4 Lift the flap in front of the printer, and remove any jammed sheets. 5 Align and insert the unit. 6 Close the front door. 7 Insert the tray. 8 Press . Clearing jams 127 3 If you do not see it, open the front door, and then remove the photoconductor kit and toner cartridge (unit).
Note: When the photoconductor kit and toner cartridge are together, they are called a unit. 4 Lift the flap in front of the printer, and remove any jammed sheets. 5 Align and insert the unit. 6 Close the front door. 7 Insert the tray. 8 Press . Clearing jams 127 3 If you do not see it, open the front door, and then remove the photoconductor kit and toner cartridge (unit).
User Guide
Page 136
Troubleshooting 136 Troubleshooting Understanding printer messages Calibrating Wait for the message to clear the message. Cartridge Life Exceeded The toner cartridge is exhausted. 1 Remove the used toner cartridge, and then install a new one. 2 Press to clear. Try one or more appears, and then press . This may cause clipping of the following : • ...
Troubleshooting 136 Troubleshooting Understanding printer messages Calibrating Wait for the message to clear the message. Cartridge Life Exceeded The toner cartridge is exhausted. 1 Remove the used toner cartridge, and then install a new one. 2 Press to clear. Try one or more appears, and then press . This may cause clipping of the following : • ...

User Guide
Page 140
... affect print quality. Order a maintenance kit, which contains a fuser and a transfer roller. If the setting is exhausted. 1 Remove the used toner cartridge, and then install a new one. 2 Press to clear the message. Remove paper from standard bin The standard exit bin has reached its... default settings are restored: • All downloaded resources in the Serial , Network, Infrared, LocalTalk, and USB menus. Replace Cartridge The toner cartridge is On, then the printer stops printing. Then contact Customer Support, and report the message. Troubleshooting 140 Remove paper from the standard...
... affect print quality. Order a maintenance kit, which contains a fuser and a transfer roller. If the setting is exhausted. 1 Remove the used toner cartridge, and then install a new one. 2 Press to clear the message. Remove paper from standard bin The standard exit bin has reached its... default settings are restored: • All downloaded resources in the Serial , Network, Infrared, LocalTalk, and USB menus. Replace Cartridge The toner cartridge is On, then the printer stops printing. Then contact Customer Support, and report the message. Troubleshooting 140 Remove paper from the standard...
User Guide
Page 141
.... Tray disabled The specified tray is reached, this message appears and the printer enters a lockout mode. Remove the toner cartridge, and then install a new one. 31.yy Replace defective or missing cartridge The toner cartridge is installed. The time out duration is blocked from the standard exit bin to clear the message... remains on the number of login attempts. Tray Missing Insert the specified tray into the printer. 30.yy Invalid refill, change cartridge An unsupported, refilled toner cartridge is either missing or not functioning properly.
.... Tray disabled The specified tray is reached, this message appears and the printer enters a lockout mode. Remove the toner cartridge, and then install a new one. 31.yy Replace defective or missing cartridge The toner cartridge is installed. The time out duration is blocked from the standard exit bin to clear the message... remains on the number of login attempts. Tray Missing Insert the specified tray into the printer. 30.yy Invalid refill, change cartridge An unsupported, refilled toner cartridge is either missing or not functioning properly.


